Seasonal · The nail edit
25 Fall Thanksgiving Nails for a Cozy Holiday Look
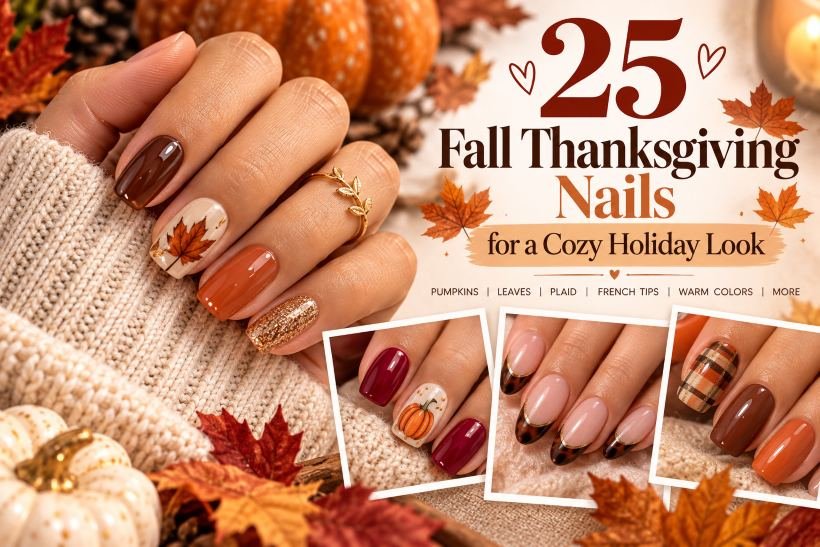
Take Aways A cranberry manicure and a tiny painted slice of pie can both belong at the Thanksgiving table. The best fall Thanksgiving nails for...
Take Aways
- Cranberry, cinnamon, olive, and chocolate create a Thanksgiving palette without detailed holiday artwork.
- Short nails can carry tiny pumpkins, a single leaf, or slim French tips when the details have room around them.
- Dots and simple color combinations are easier home projects than plaid, miniature food art, or raised texture.
- Choose glossy, matte, magnetic, or raised finishes deliberately; they need different application methods.
- Save a reference that shows the whole manicure, including which nails stay plain.
A cranberry manicure and a tiny painted slice of pie can both belong at the Thanksgiving table. The best fall Thanksgiving nails for your plans depend on whether you want rich color, a small seasonal detail, or artwork that starts a conversation while someone passes the dessert.
This collection includes short, practical shapes, warm French tips, playful accents, and a few textured salon looks. Each design explains the colors, placement, and finish, followed by a realistic way to recreate it. You can choose a complete set or keep one detail you love, with enough variety to find something that still feels like your style after the holiday.
1. Simple Fall Thanksgiving Nails in Five Warm Shades
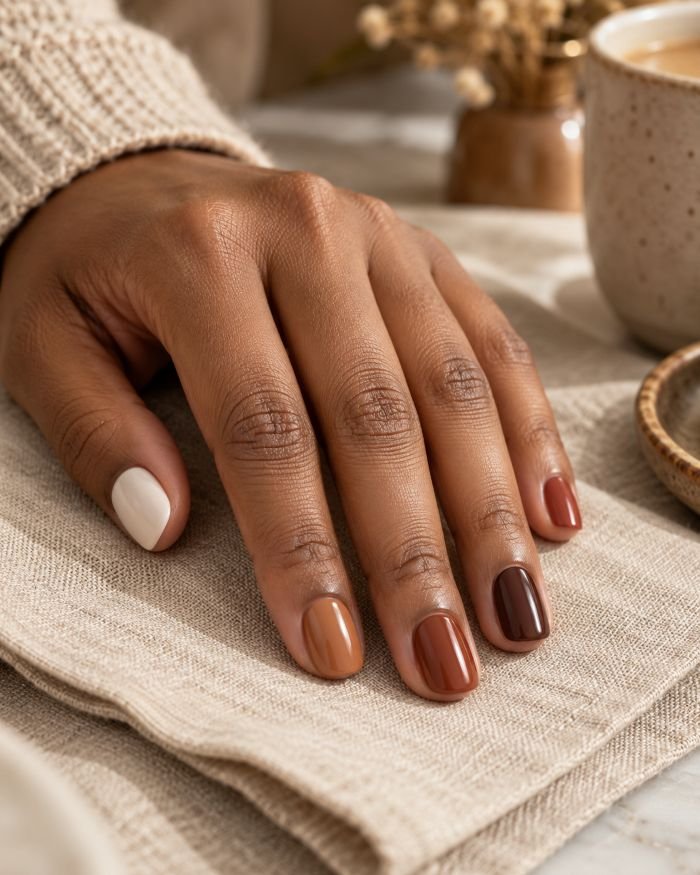
Cream, caramel, cinnamon, chocolate, and muted rust move across short squoval nails, one shade on each finger. The colors stay opaque and glossy, with no pattern interrupting the sequence. A soft cream thumb lightens the set, while the darker middle shades give it enough contrast to feel considered rather than randomly mixed.
These simple fall Thanksgiving nails are a good starting point when choosing one color feels harder than painting the manicure. Lay the bottles beside your hand before settling on an order. Similar warmth helps the shades sit together, but they do not need to match your skin undertone. Keep the finishes consistent so color remains the main feature.
How to Apply
- Shape clean, dry nails into short squovals, apply a regular-polish base coat, and apply two thin coats of cream polish on the thumb, caramel on the index, cinnamon on the middle, chocolate on the ring, and muted rust on the little finger, allowing each to dry as directed.
- Smooth any edges with a cleanup brush, keeping the finish clean and even.
- Finish with a compatible glossy top coat, including accessible free edges, and allow the design to dry fully.
2. Short Thanksgiving Nails in Glossy Cranberry
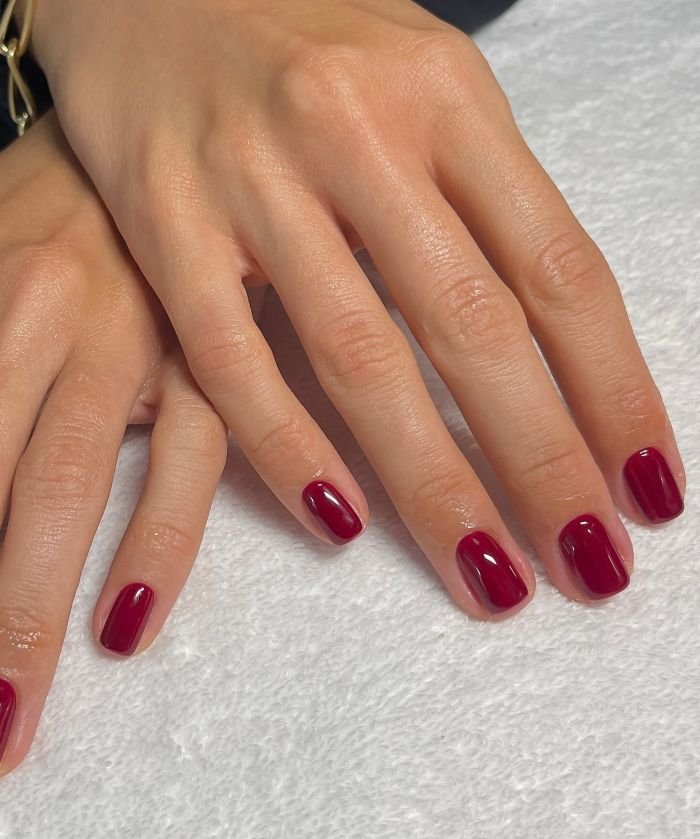
A single deep cranberry-red covers short square nails in one even, high-gloss colour, with no nail art to break the finish. The shade stays clearly red rather than turning dark or brown, and the shine does most of the work, giving the set a neat, considered look that suits a Thanksgiving table without extra detail.
This is the simplest choice in the collection when you want colour rather than a motif. Keep the coats thin and even, and leave a tidy margin around the skin so the edges stay clean. Check the colour in daylight and room light before you finish, since cranberry can look brighter or deeper depending on the light.
How to Apply
- File nails short and square and apply base coat to clean nails.
- Apply thin coats of cranberry-red regular polish, allowing drying time between coats.
- Clean any stray colour with a small cleanup brush, then apply a compatible glossy top coat without flooding the sidewalls.
3. Thanksgiving French Tip Nails With Chocolate and Gold Edges
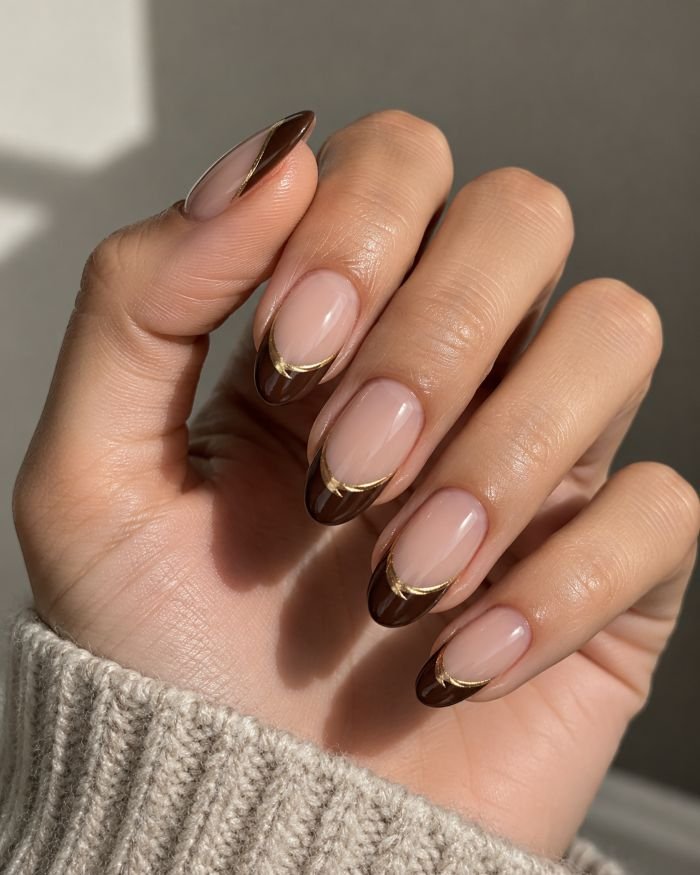
Long almond nails carry a soft nude-pink base with curved chocolate French tips, and a thin gold curved line sits near the tip to finish the edge. The chocolate gives the classic French shape an autumn warmth, while the gold line adds a small, neat detail without crowding the nail.
The look works best when the tip curve is smooth and even across the hand, so take time to shape the smile line before adding the gold. Keep the base sheer enough to look natural, and let each layer dry before the next so the chocolate and gold stay crisp.
How to Apply
- Shape nails into long almonds, apply base coat and a nude-pink polish, and let it dry.
- Paint curved chocolate French tips, keeping the curve even on each nail.
- Add a thin gold curved line near the tip, then finish with a glossy top coat once dry.
4. Tiny Pumpkin Accents on a Sheer Peach Base

Glossy peach nails keep the base simple, while a small orange pumpkin with black lines and a stem sits on each ring nail. The other nails stay plain, so the pumpkin reads as one clear seasonal accent rather than a pattern spread across the whole hand.
This is an easy way to add a Thanksgiving detail without painting a scene on every finger. Keep the pumpkin small and centred on the ring nail, and let the peach base dry fully first so the black lines stay neat.
How to Apply
- Apply base coat and glossy peach polish, and let it dry.
- Paint a small orange pumpkin with black lines and a stem on each ring nail.
- Let the detail dry, then float a glossy top coat over the design with a light touch.
5. Maple Leaf Thanksgiving Nail Art on Cream Nails
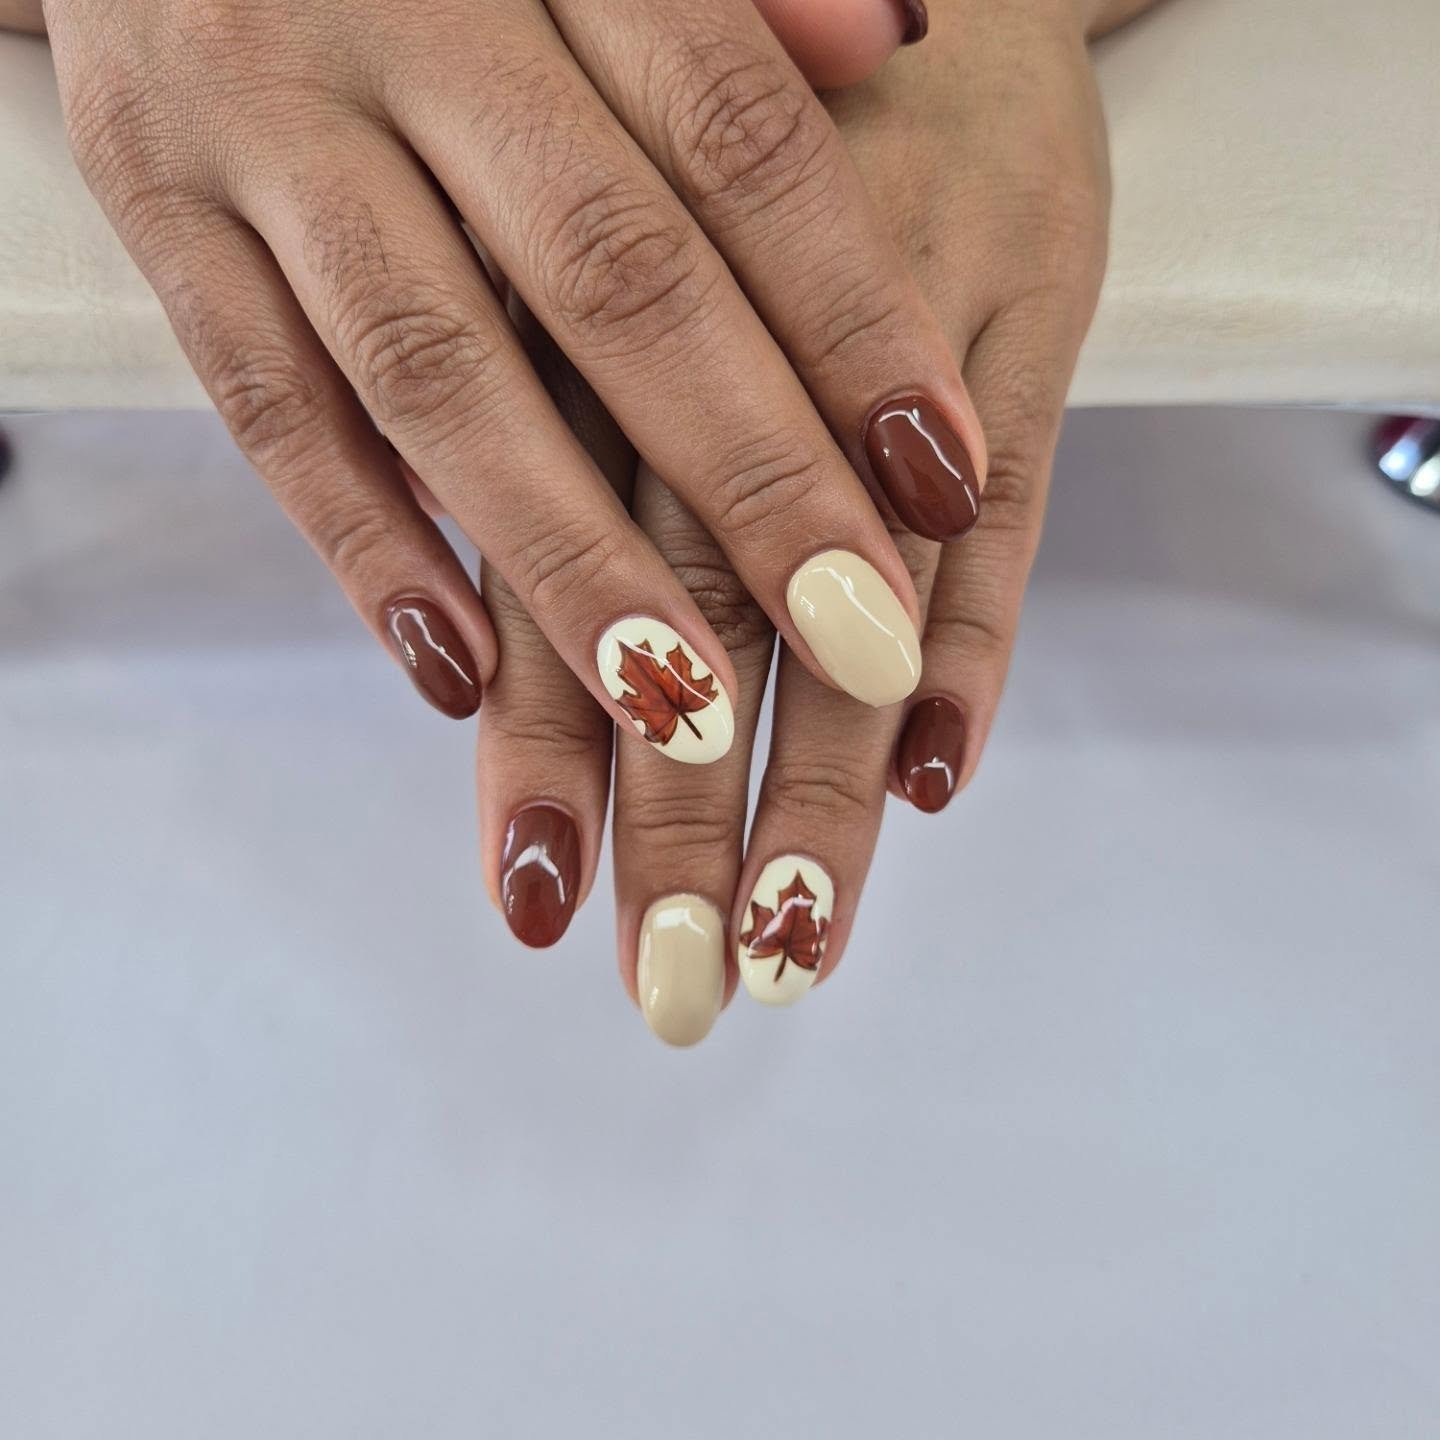
A warm cream-and-brown set pairs medium oval nails with detailed red-brown maple leaves painted on cream accent nails. The other nails are brown, not plain cream, so the leaves stand out against a rich, warm background while the set stays balanced.
The leaf detail is the clear focus here, so keep the accent nails clean and give the leaves room to show their shape. A steady hand and a fine brush help the veins stay neat, and a glossy finish keeps the colours warm and clear.
How to Apply
- Shape nails into medium ovals, apply base coat, and paint the accent nails cream and the other nails brown.
- Paint detailed red-brown maple leaves on the cream accent nails and let them dry.
- Finish with a glossy top coat over all nails.
6. Rust and Beige Plaid Accent Nails
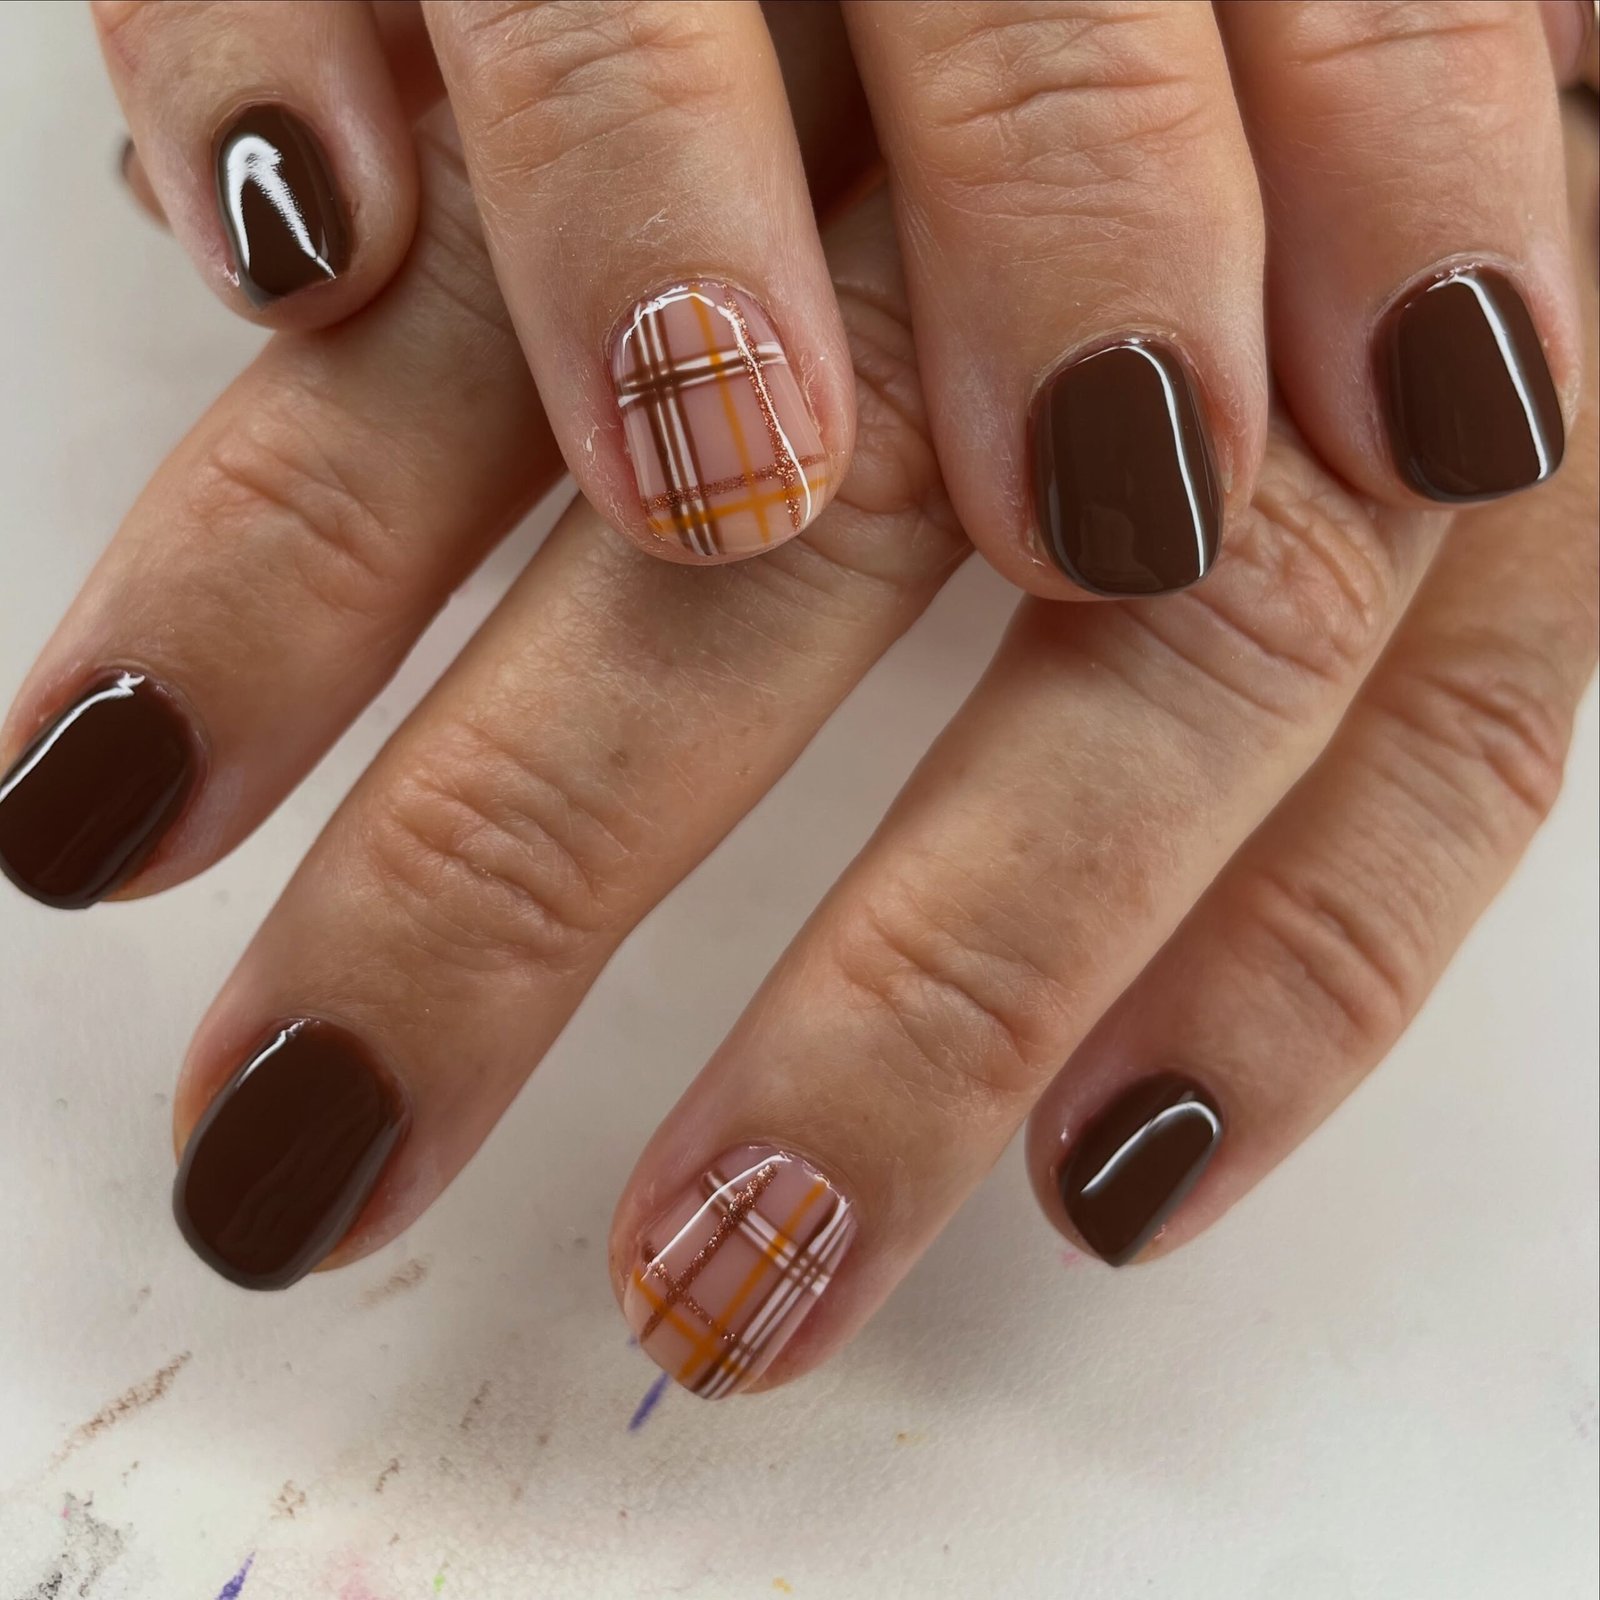
Glossy dark brown nails form the base of this set, while one nude-based accent carries a plaid pattern in brown, white, orange and copper glitter lines. The dark solids keep the look grounded, and the plaid adds a cosy, autumn feel without taking over the whole hand.
Plaid is easier when you build it in layers: lay down the nude base, add the wider stripes first, then the thinner crossing lines and the glitter last. Keep the solid nails simple so the accent stays the star.
How to Apply
- Apply base coat, paint most nails glossy dark brown, and leave the accent nails nude.
- Paint the plaid on the accent nails in brown, white and orange, adding copper glitter lines, and let it dry.
- Seal all nails with a glossy top coat.
7. Olive Green Nails With Bare Half-Moons
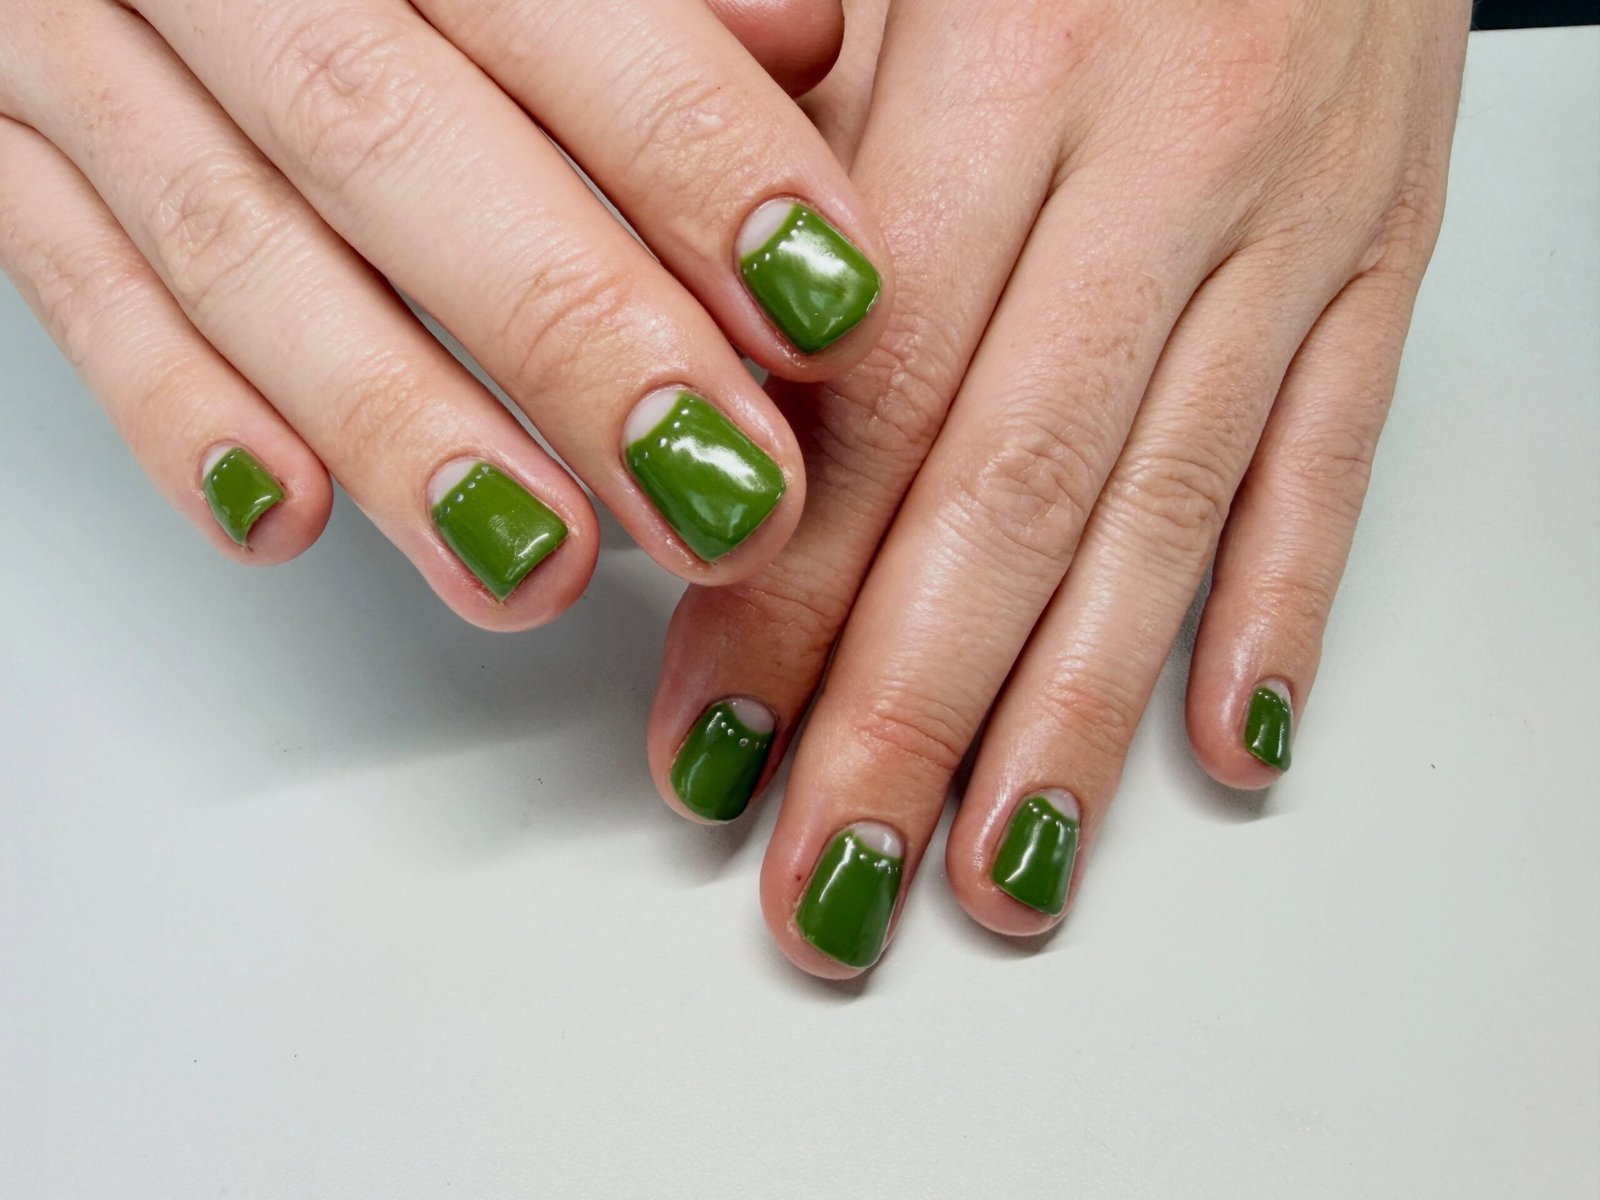
Short square nails in glossy olive-green leave a small bare crescent at the cuticle, and several nails carry three tiny white dots along the crescent curve. The bare half-moon keeps the deep green feeling light, while the dots add a delicate detail close to the base of the nail.
This is a neat option if you like a little detail but want most of the nail to stay a solid colour. Paint the green carefully around the crescent, and place the dots with a small dotting tool so they stay even and close to the curve.
How to Apply
- Shape nails short and square, apply base coat, and mark out a small bare crescent at each cuticle.
- Paint glossy olive-green polish around the crescent, keeping the bare area clean.
- Add three tiny white dots along the crescent curve on several nails, then finish with a glossy top coat once dry.
8. Fine Golden Wheat Stalks on Cocoa Nails
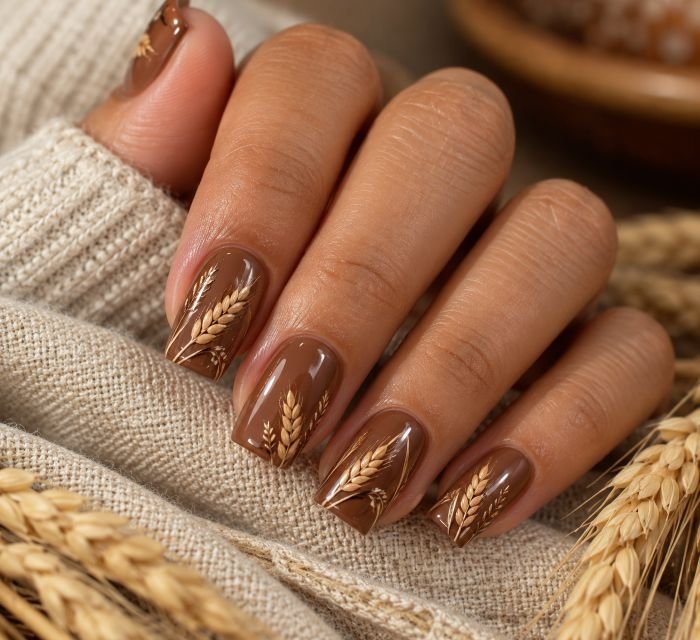
Square nails in a muted taupe-gray carry a fine metallic gold wheat ear on each nail. The soft grey keeps the set calm, while the gold wheat adds a slim harvest detail that catches the light without looking busy.
Because the wheat appears on every nail, keep each ear slim and similar in size so the set reads as one design. A fine brush and a light touch help the gold stay delicate against the muted base.
How to Apply
- Shape nails square, apply base coat and muted taupe-gray polish, and let it dry.
- Paint a fine metallic gold wheat ear on each nail.
- Let the detail dry, then apply a glossy top coat with a light touch.
9. Pumpkin Pie Accent Nails With Painted Cream Details
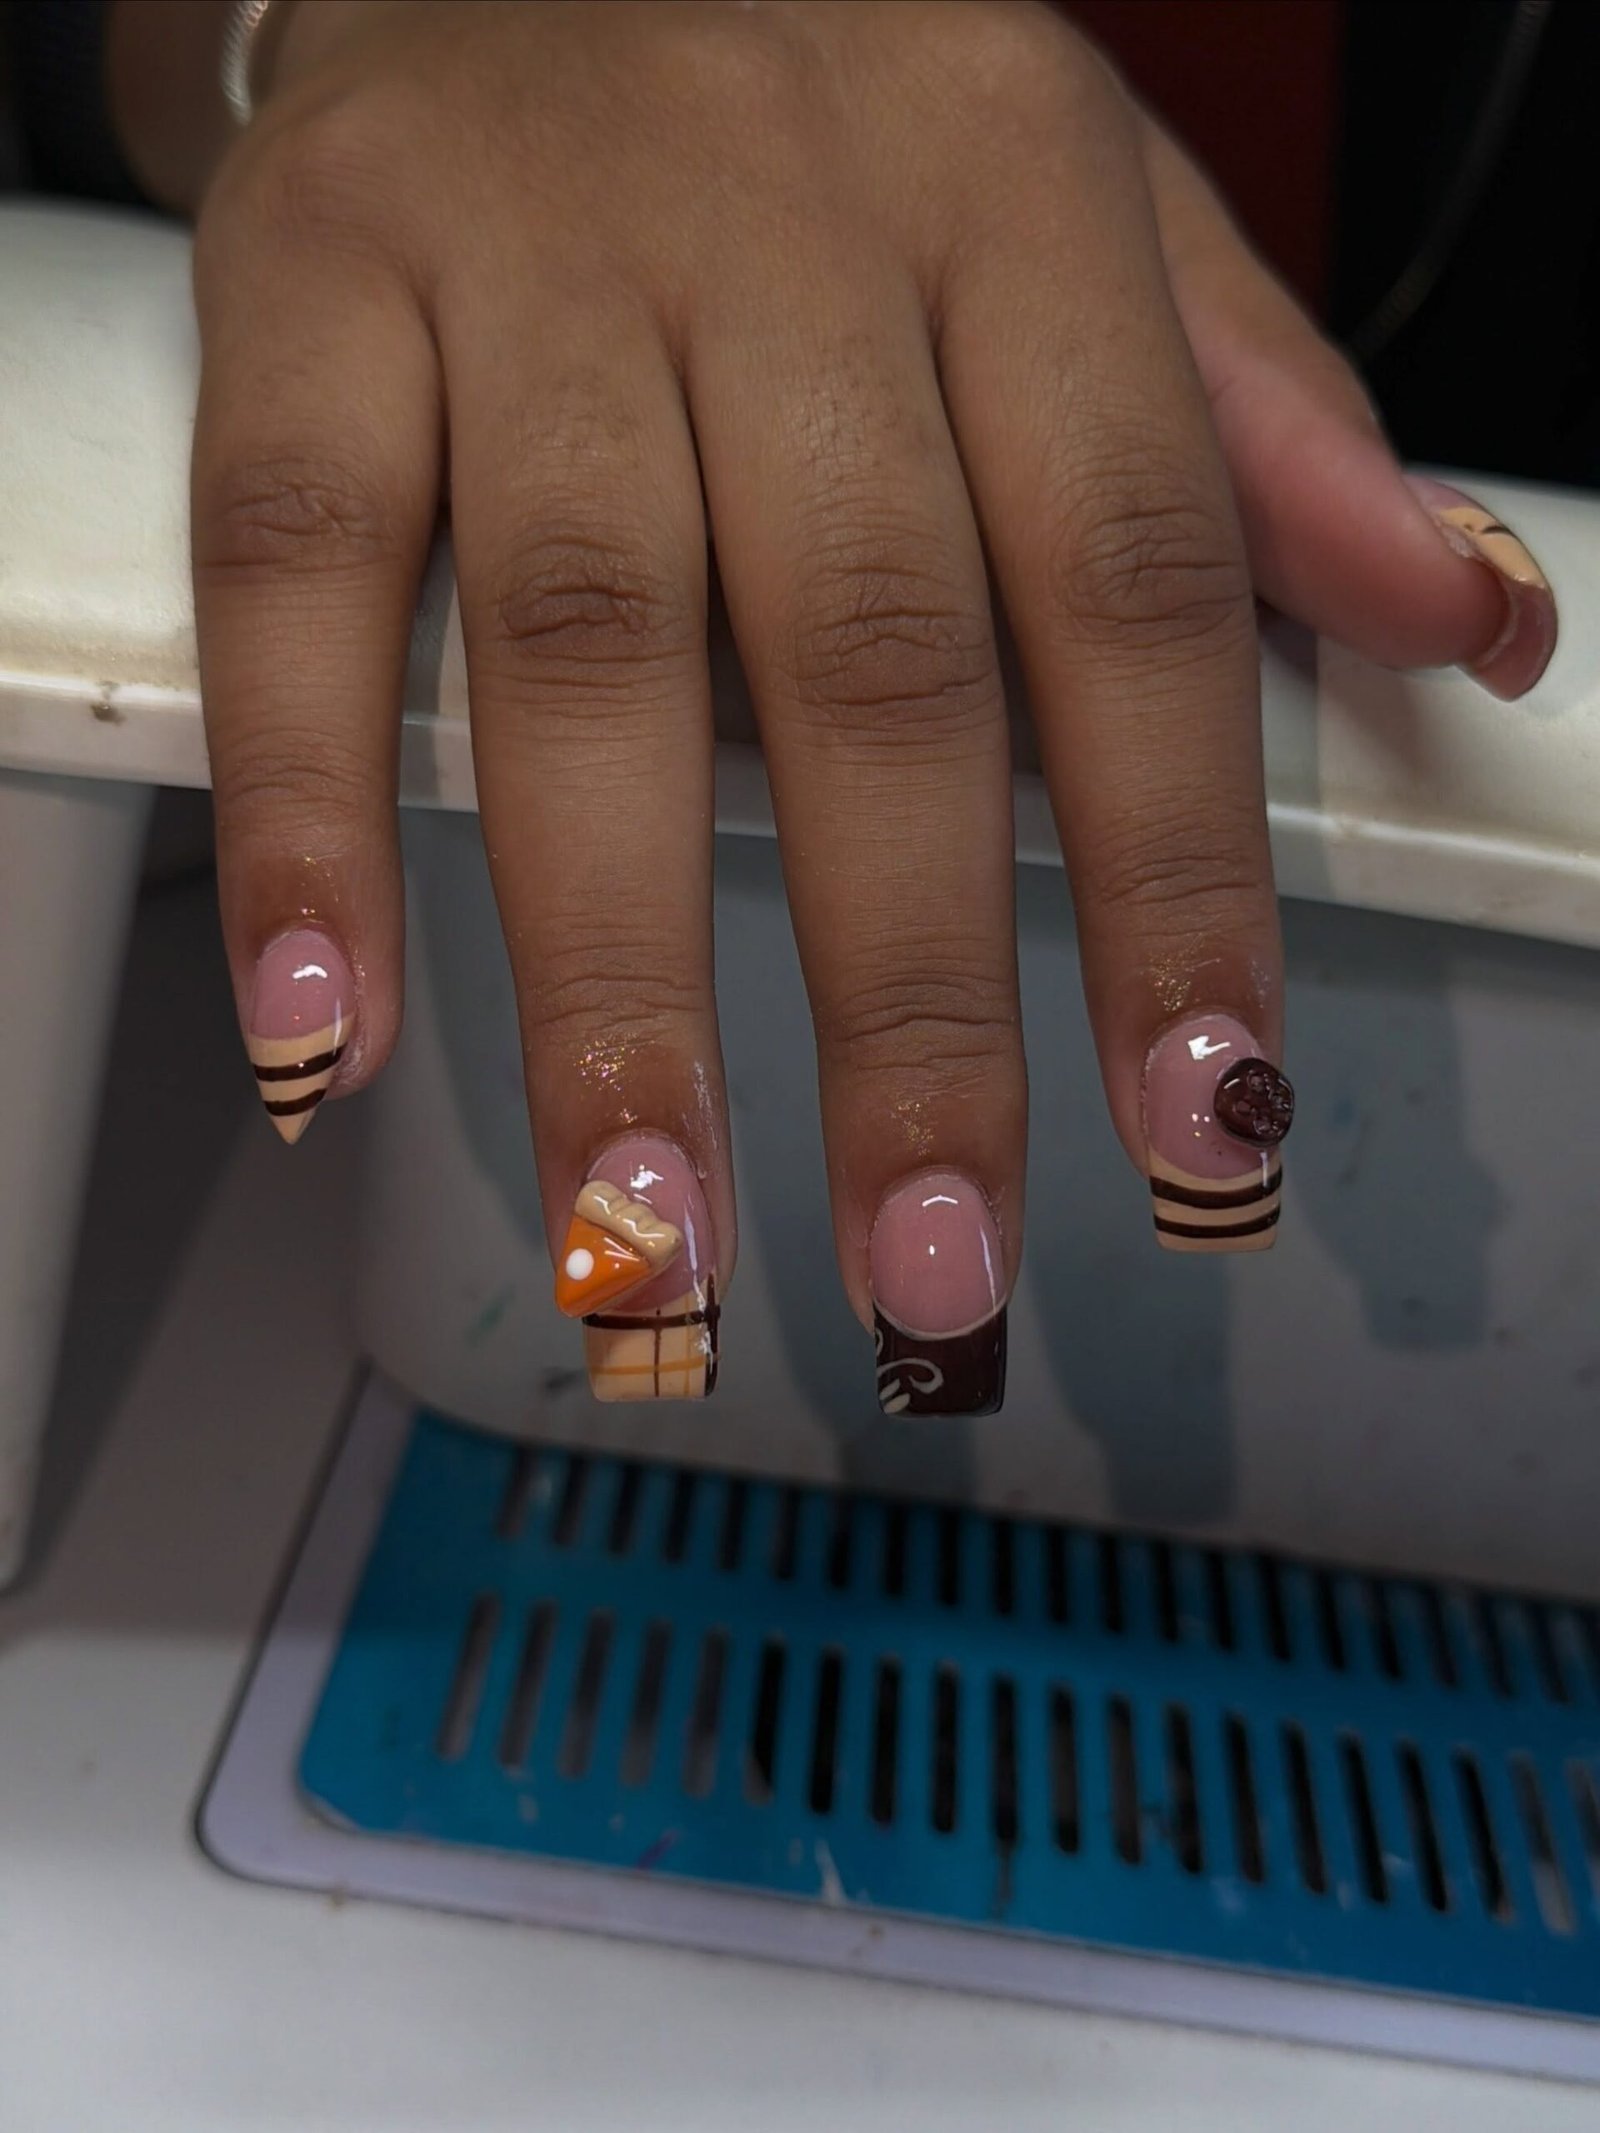
This long, pink-based mixed autumn set centres on one accent nail carrying a raised 3D pumpkin pie slice topped with a cream dollop. The neighbouring nails use pink sheer bases with dark brown striped and tipped details, and one nail carries a small dark round charm, so the pie stands out as the playful focus.
A raised 3D accent needs a secure finish, so let each layer set before adding the next and seal around the edges without flattening the shape. Keep the rest of the set simple enough that the pie slice stays the detail people notice first.
How to Apply
- Shape long nails, apply base coat and pink-based polish, and let it dry.
- Build the raised 3D pumpkin pie slice with its cream dollop on one accent nail, and add the dark brown striped and tipped details to the neighbouring nails.
- Add the small dark round charm, let everything set, and finish with a top coat that seals without flattening the raised detail.
10. A Tiny Turkey Accent on Short Caramel Nails
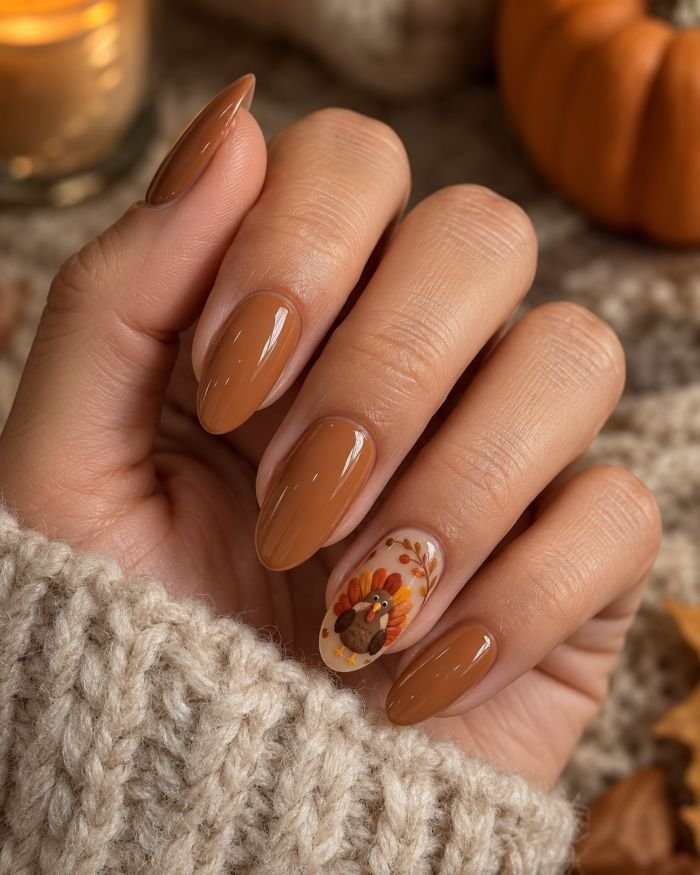
The photo shows a single white nail tip carrying a simple hand-painted turkey, with multicolour tail strokes in green, blue, magenta and orange. The turkey is drawn in a light, playful style, and the bright tail colours give the small design plenty of character without needing a full set.
Because the design sits on one tip, keep the turkey small and the tail strokes loose and separate so each colour stays visible. Let the white base dry fully first, then seal the artwork gently so the strokes do not smear.
How to Apply
- Apply base coat and a white polish to the nail tip, and let it dry.
- Paint a simple turkey with multicolour tail strokes in green, blue, magenta and orange.
- Let the artwork dry, then float a glossy top coat over it with a light touch.
11. Coffee and Cream Marble Nails
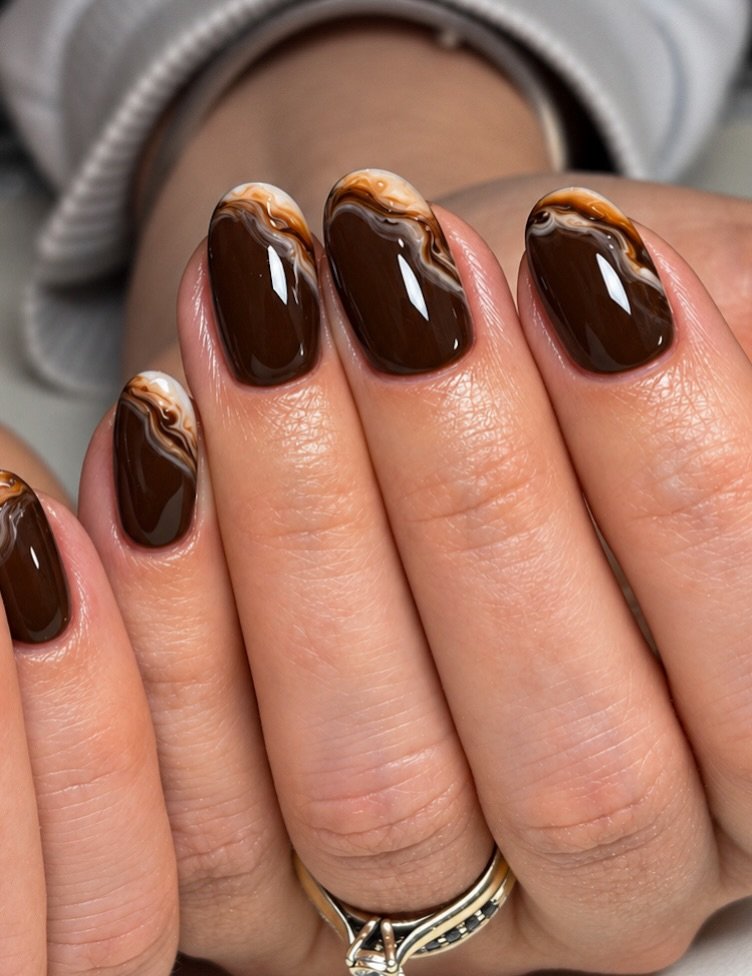
Medium almond nails carry a glossy dark-brown base, with soft cream-and-caramel marbled swirls gathered near the tips. The marble looks like cream stirred into coffee, and the dark base keeps the lighter swirls clear and easy to see.
Marble works best when the swirls stay soft rather than over-mixed, so drag the cream and caramel through the brown gently and stop while the pattern still has contrast. A glossy top coat smooths the finish and deepens the coffee colour.
How to Apply
- Shape nails into medium almonds, apply base coat and glossy dark-brown polish, and let it dry.
- Swirl soft cream and caramel polish near the tips to create a marbled effect.
- Let the marble set, then apply a glossy top coat.
12. Amber Jelly Nails With Scattered Gold Flakes
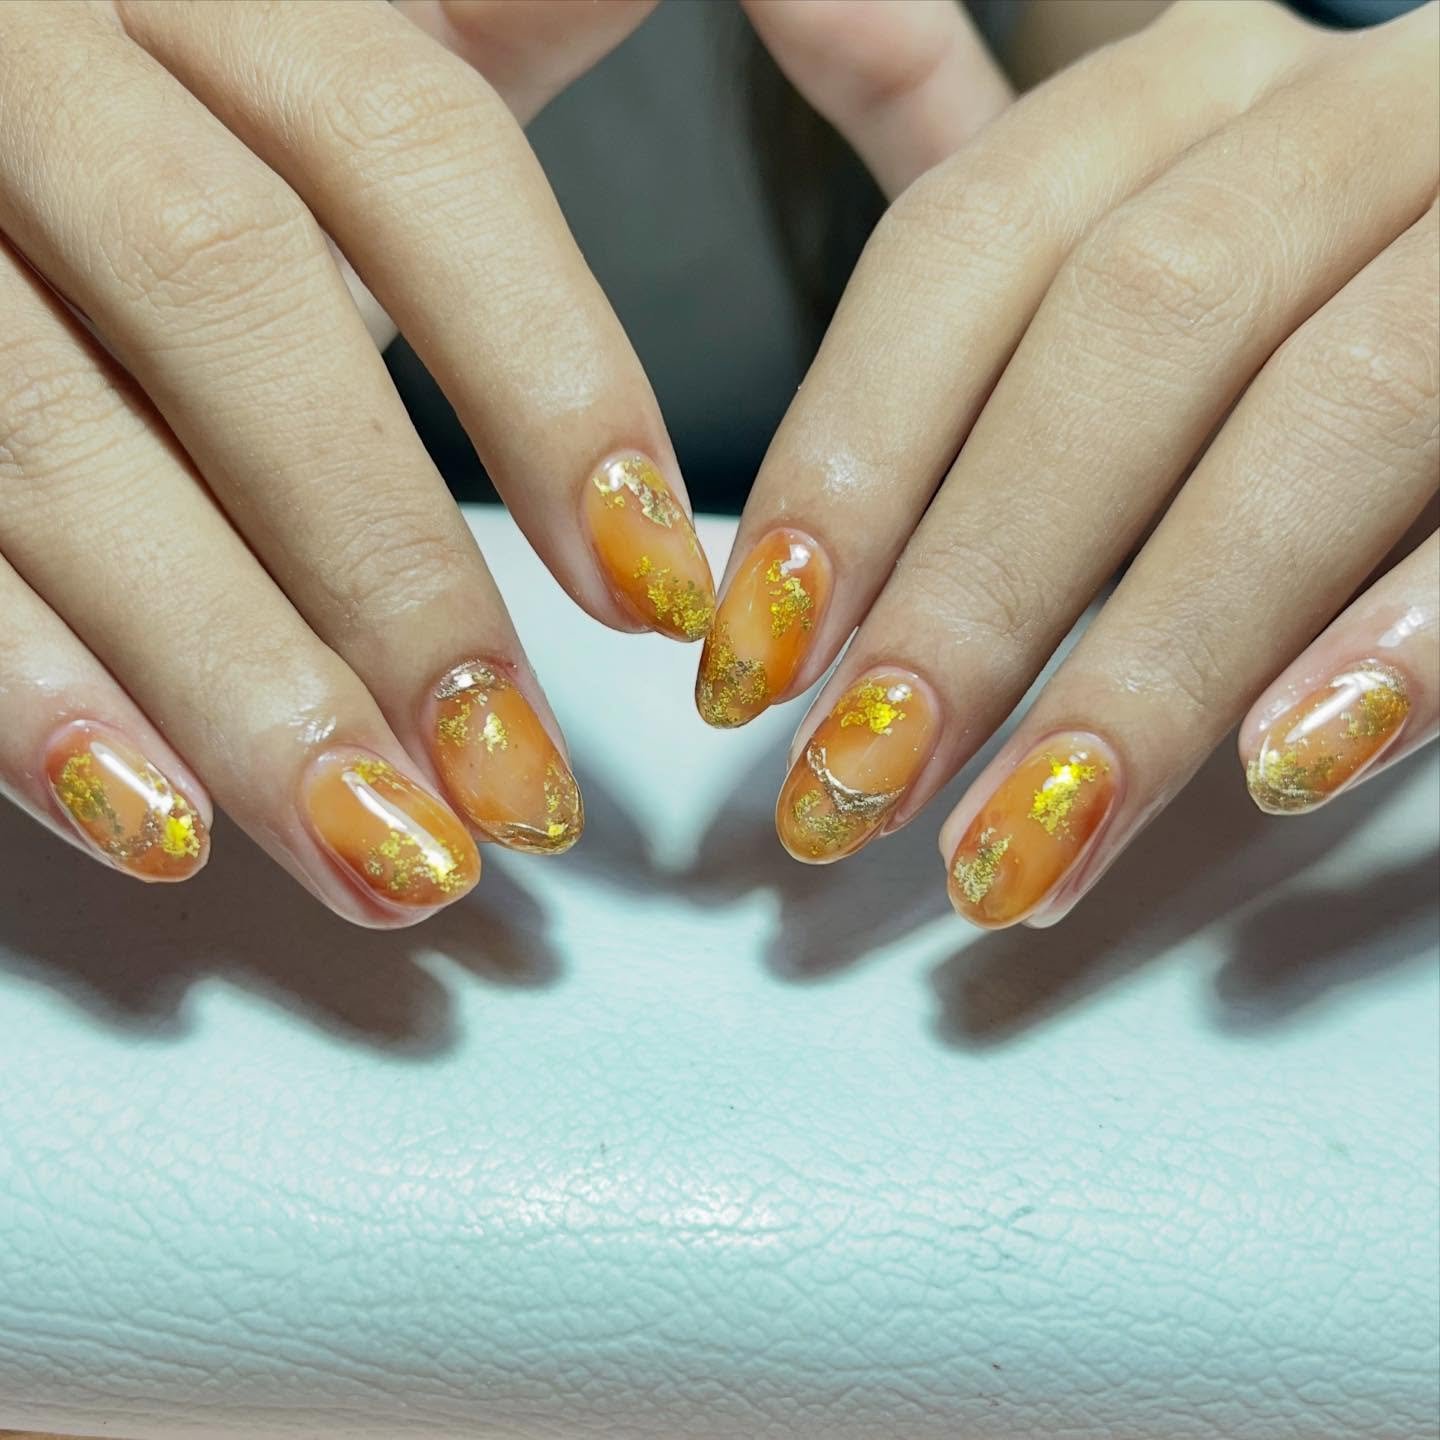
Almond-oval nails in translucent orange-amber jelly carry small gold flakes scattered through the colour, denser on some nails than others. The jelly finish lets light pass through the amber, and the gold flakes give the set a warm sparkle without a solid glitter coat.
To keep the flakes looking scattered rather than clumped, place them while the jelly coat is still workable and vary the amount from nail to nail. A glossy top coat seals the flakes and keeps the surface smooth.
How to Apply
- Shape nails almond-oval, apply base coat and translucent orange-amber jelly polish.
- Scatter small gold flakes through the jelly while it is still workable, denser on some nails.
- Let it set, then apply a glossy top coat to seal the flakes.
13. Mustard Nails With Delicate Brown Dot Borders
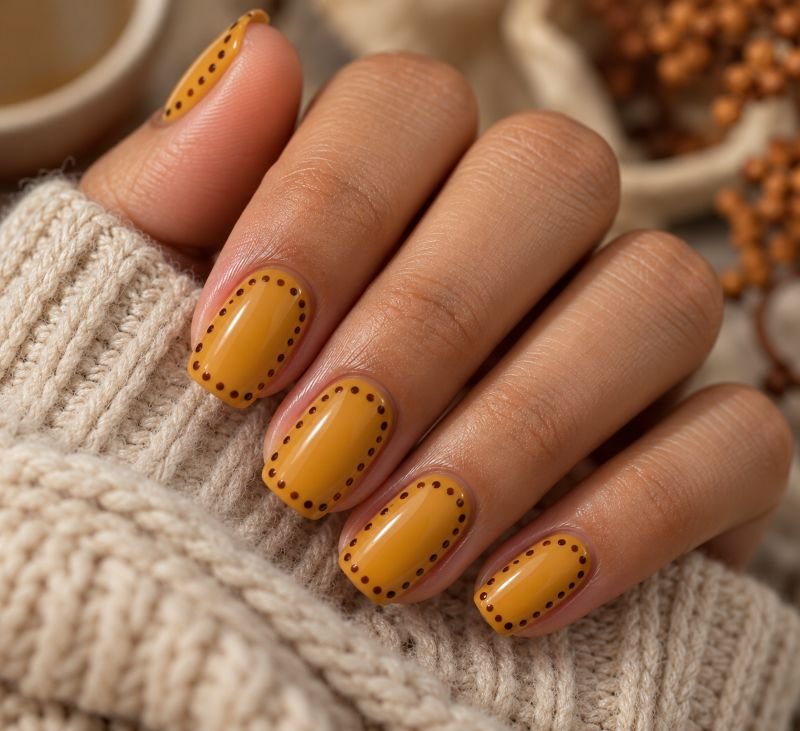
Muted mustard polish fills short squoval nails, with a row of tiny cocoa dots following one side of each nail. The border stops before reaching the tip and cuticle, leaving a small margin at both ends. Smooth gloss keeps the warm yellow clear, and the dotted line adds detail without filling the center with a pattern.
Use a small dotting tool and reload lightly so the border does not become a string of large circles. A little variation is fine, but similar spacing makes the design easier to read. This is a manageable home option if you like decorated nails but do not want to draw leaves, straight stripes, or a miniature holiday scene.
How to Apply
- Apply base coat and muted mustard regular polish to short squoval nails. Allow it to dry.
- Use a small dotting tool to place tiny cocoa dots along one side of each nail, keeping them inside the nail edge and away from the skin.
- Let the dots dry without smearing, then float a glossy top coat over the design with a light touch.
14. Burgundy Velvet Cat-Eye Nails
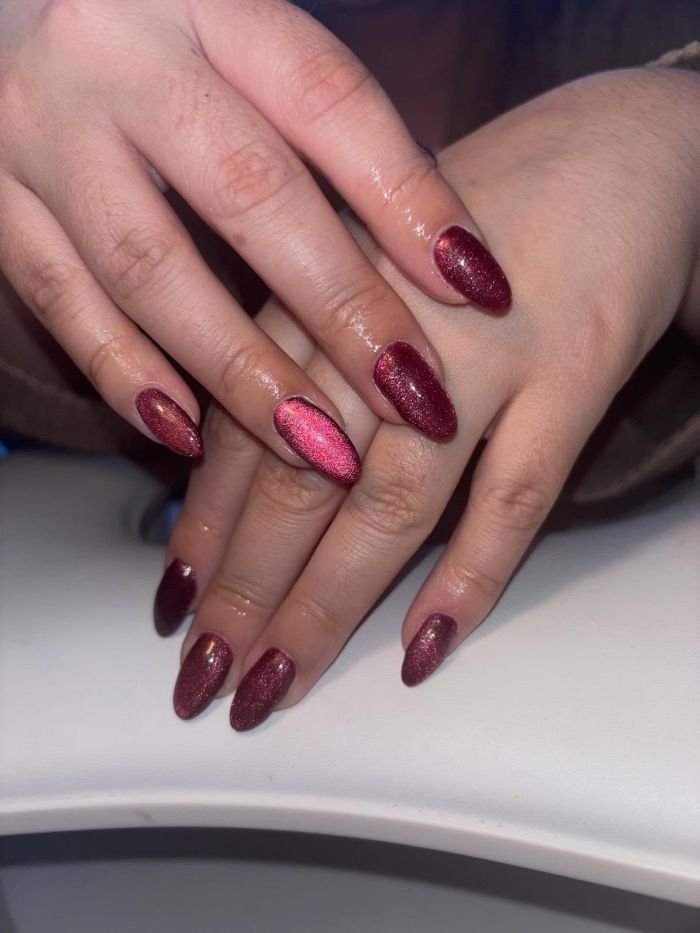
Long almond nails in deep burgundy magnetic cat-eye polish show a soft velvet glow that shifts as the light moves, finished with high shine. The wine-red depth keeps the set elegant, while the magnetic effect gives the colour dimension rather than a flat finish.
This is a salon-style look that suits a special occasion as well as a cosy autumn week. The cat-eye effect needs a magnet held over the wet polish, so work one nail at a time and keep the glow centred for a balanced result.
How to Apply
- Shape nails into long almonds and apply base coat.
- Apply deep burgundy magnetic cat-eye polish and hold a magnet over each wet nail to form the velvet glow.
- Cure or dry as directed for your polish, then finish with a high-shine top coat.
15. Oatmeal Corduroy Nails With Raised Vertical Lines
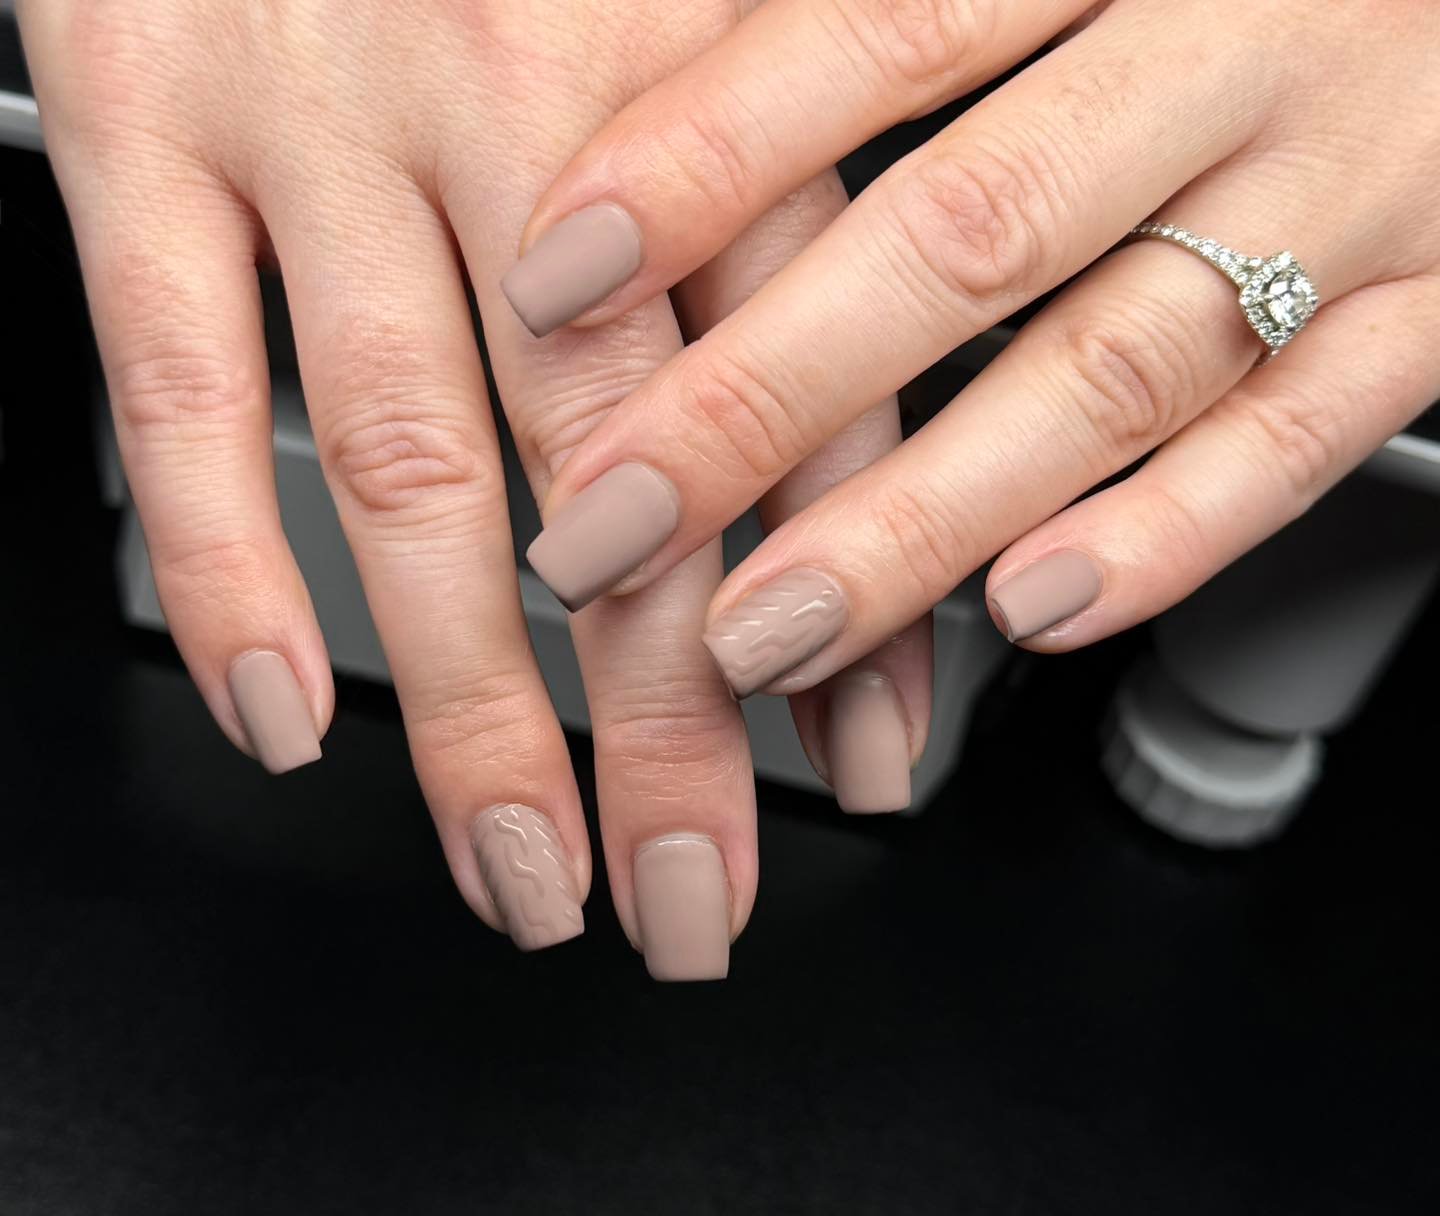
Short square nails in matte taupe-oatmeal pair smooth matte nails with accent nails carrying a raised sweater-knit texture. The soft oatmeal tone keeps the set calm, while the knitted pattern adds a cosy, tactile detail that suits autumn.
Raised texture is best kept to the accent nails so the set stays wearable day to day. Build the knit pattern in thin layers and let each one set before adding the next, then finish with a matte top coat so the texture stays soft rather than shiny.
How to Apply
- Shape nails short and square, apply base coat and matte taupe-oatmeal polish.
- Build a raised sweater-knit pattern on the accent nails in thin layers, letting each one set.
- Leave the other nails smooth, and finish with a matte top coat.
16. Rust-Colored Daisies on a Milky Beige Base
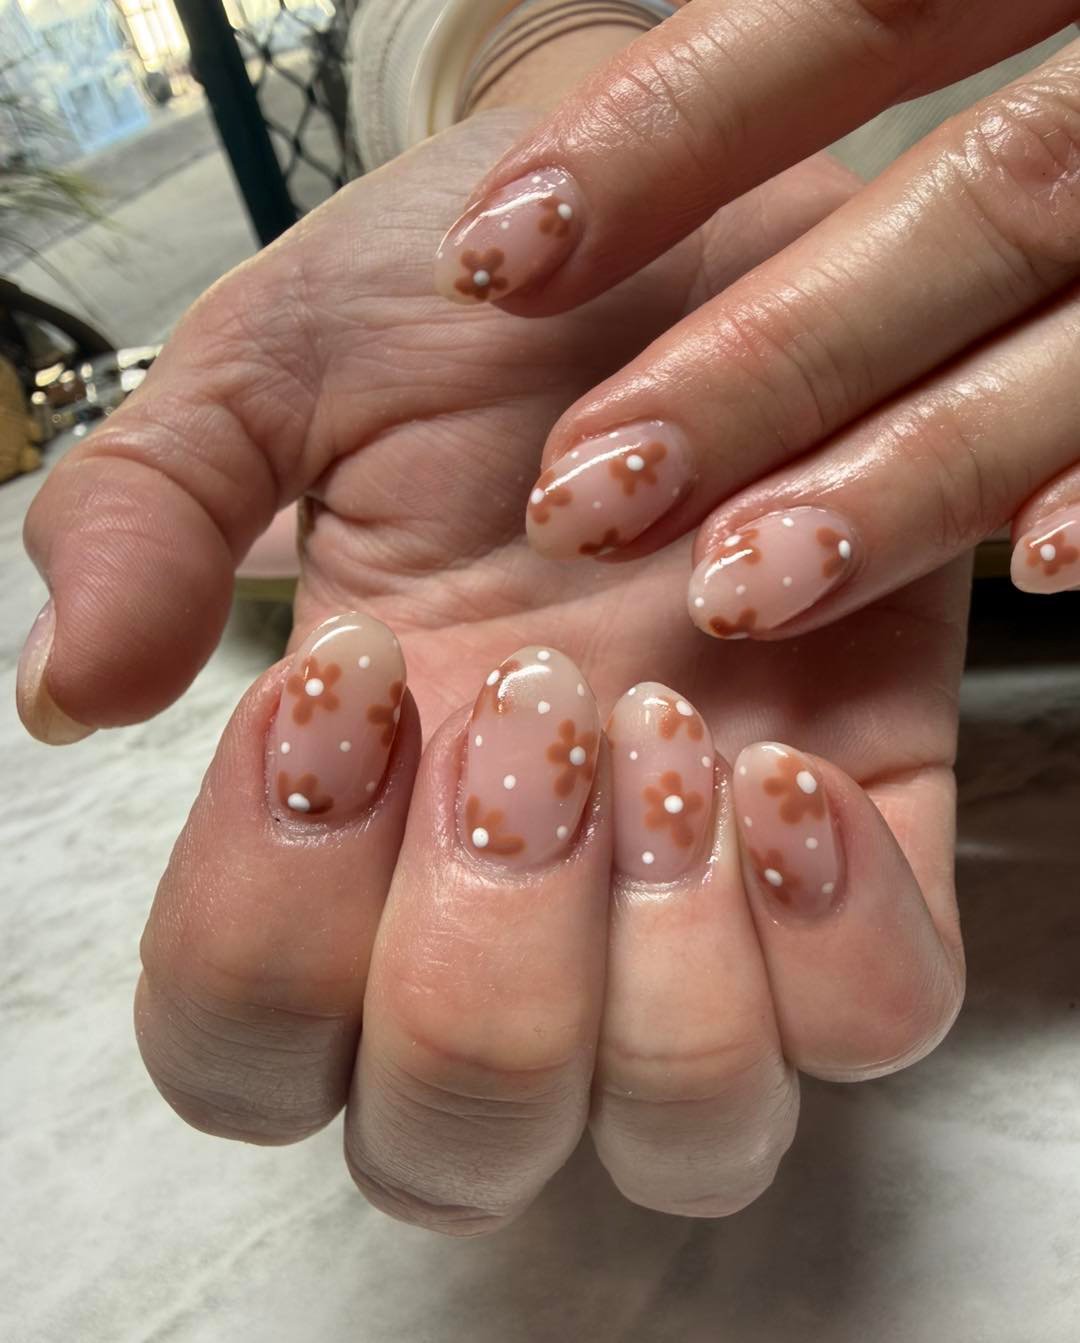
Soft almond-oval nails in a glossy sheer nude-pink base carry small brown five-petal daisies with white dot centres on every nail, with tiny white polka dots scattered between them. The sheer base keeps the flowers light, and the brown petals give the set a warm, autumn feel.
Daisies are easiest when you build them petal by petal with a small dotting tool, then add the white centre last. Keep the flowers small so they sit neatly on each nail, and finish with gloss to keep the sheer base shining.
How to Apply
- Shape nails soft almond-oval, apply base coat and glossy sheer nude-pink polish.
- Paint small brown five-petal daisies with white dot centres on every nail, adding tiny white polka dots.
- Let the detail dry, then apply a glossy top coat.
17. Tortoiseshell French Tips on Almond Nails
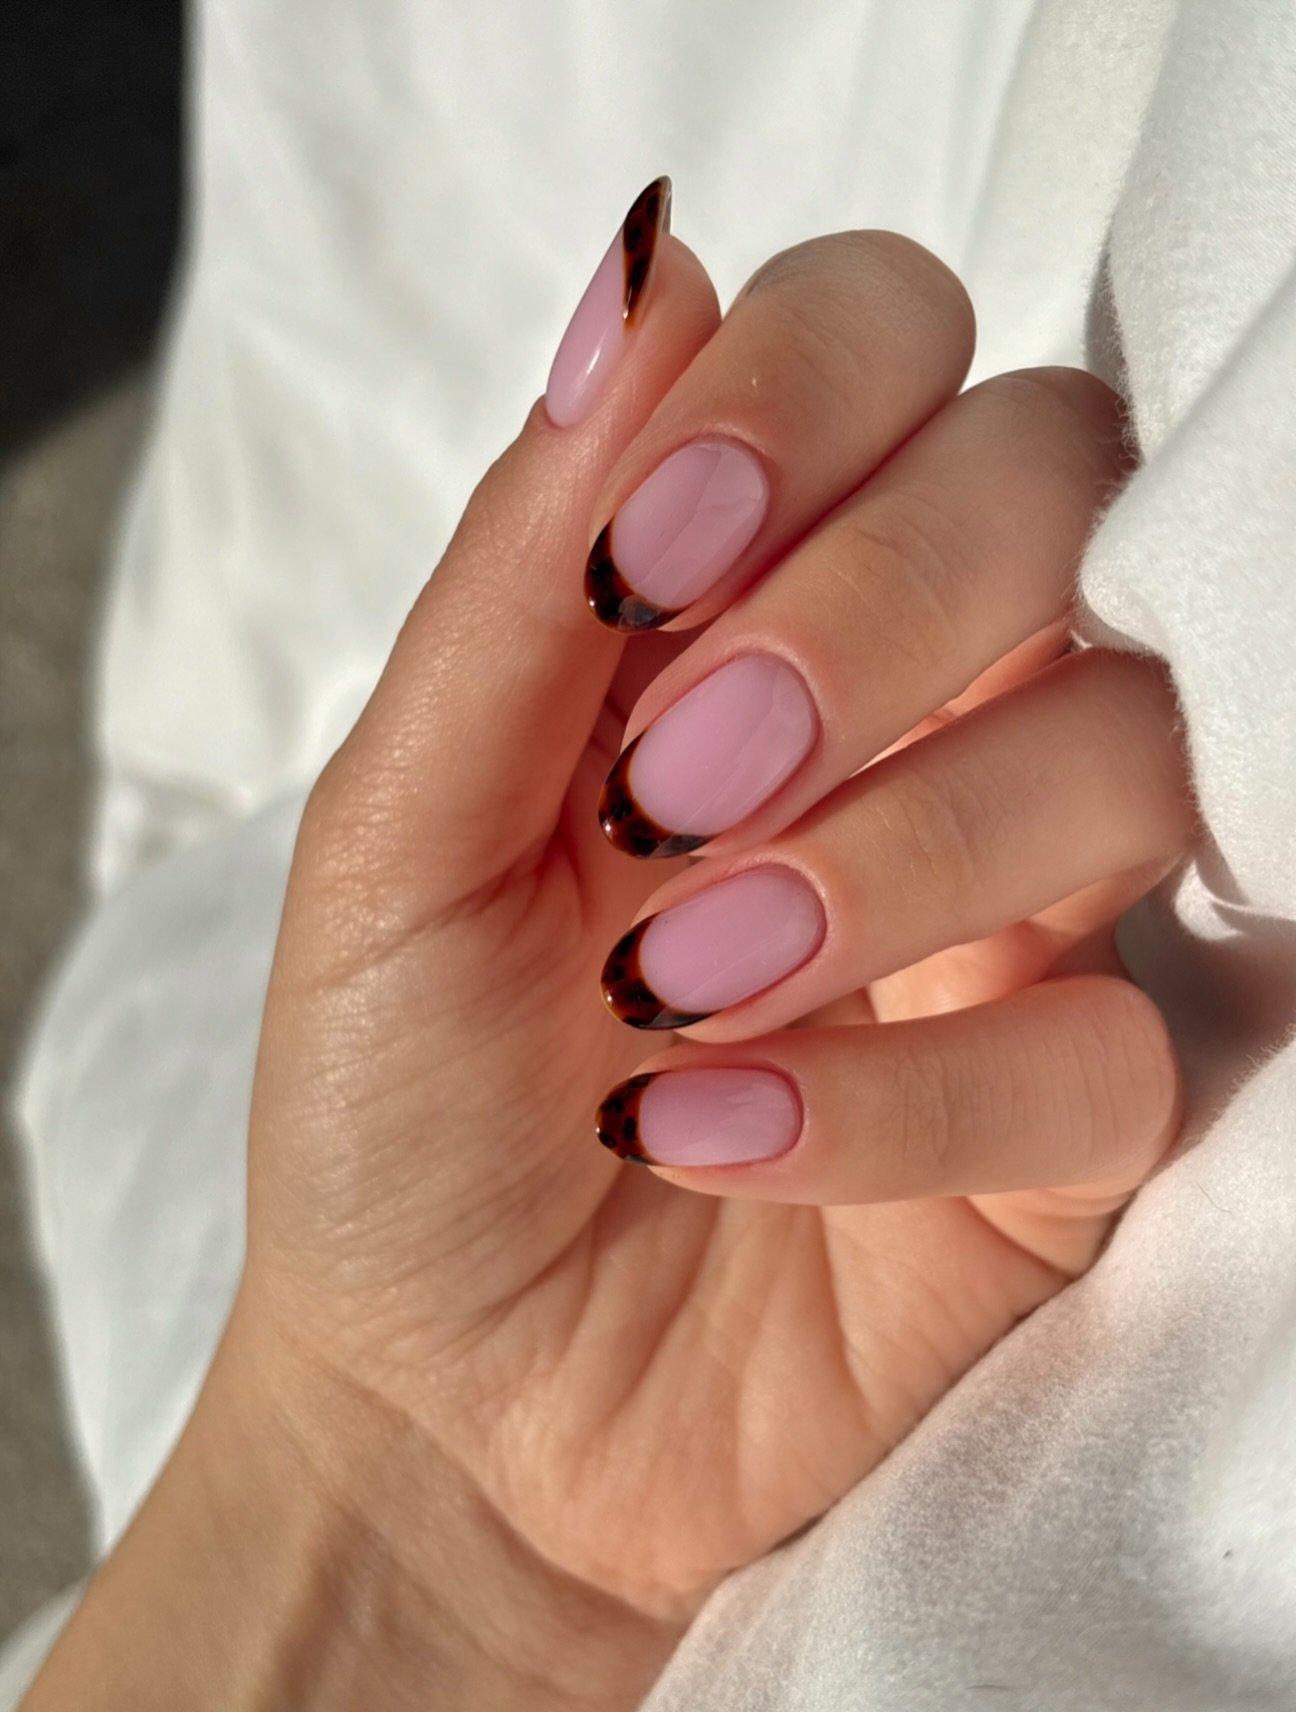
Almond nails with a light-pink base carry dark-brown tortoiseshell-patterned French tips, finished glossy. The tortoiseshell pattern gives the classic French tip an autumn twist, with its mottled browns standing out against the soft pink.
Tortoiseshell looks best when the patches stay soft and blended rather than sharply outlined, so layer the browns while the tip colour is still workable. Keep the tip shape even across the hand, and seal with gloss for a smooth finish.
How to Apply
- Shape nails almond, apply base coat and light-pink polish, and let it dry.
- Paint dark-brown tortoiseshell-patterned French tips, blending the mottled browns.
- Let the tips dry, then apply a glossy top coat.
18. Terracotta Nails With Open Curved Panels
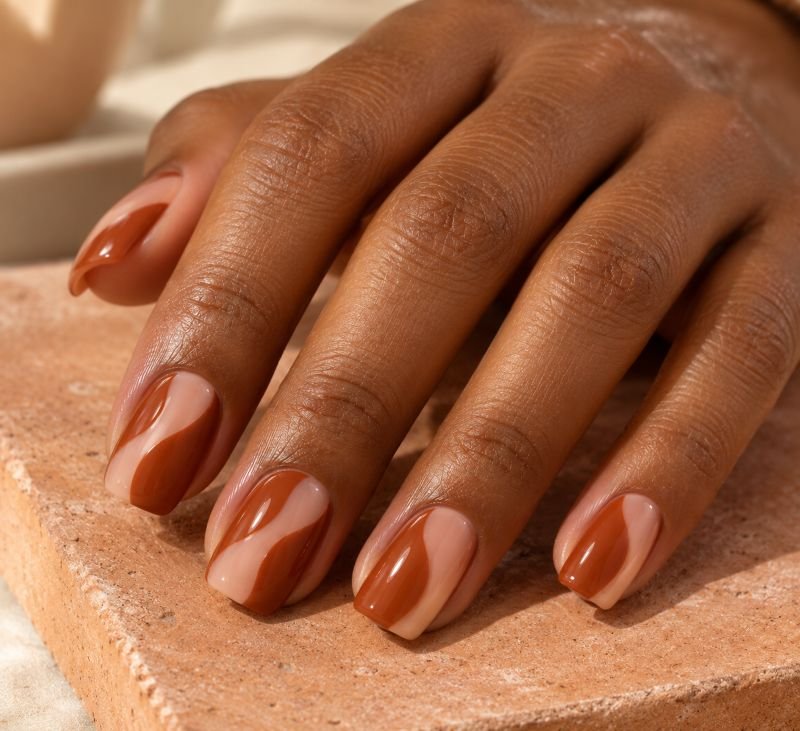
Terracotta color sweeps around an open, curved strip on each medium squoval nail. The strip reveals a sheer peach base and travels from one side near the cuticle toward the opposite side at the tip. A glossy finish keeps the rounded boundaries clear, with no outline or added motif competing with the shape.
Make the open strip wide enough to notice, especially on your smaller nails. A very thin gap can disappear once the surrounding color is filled in. This is an abstract option for someone who wants autumn warmth without recognizable holiday art. The curves can vary across the hand, but keeping their width similar helps the set feel connected.
How to Apply
- Apply base coat and sheer peach regular polish to medium squoval nails. Let the base dry.
- Use a liner brush to outline both sides of a broad flowing strip that will remain unpainted on each nail.
- Fill the surrounding areas with terracotta polish, keeping the open strip and the skin margins clear.
- Let the color dry before applying glossy top coat across both the terracotta and sheer areas..
19. Copper Glitter Fading Over a Sheer Nude Base
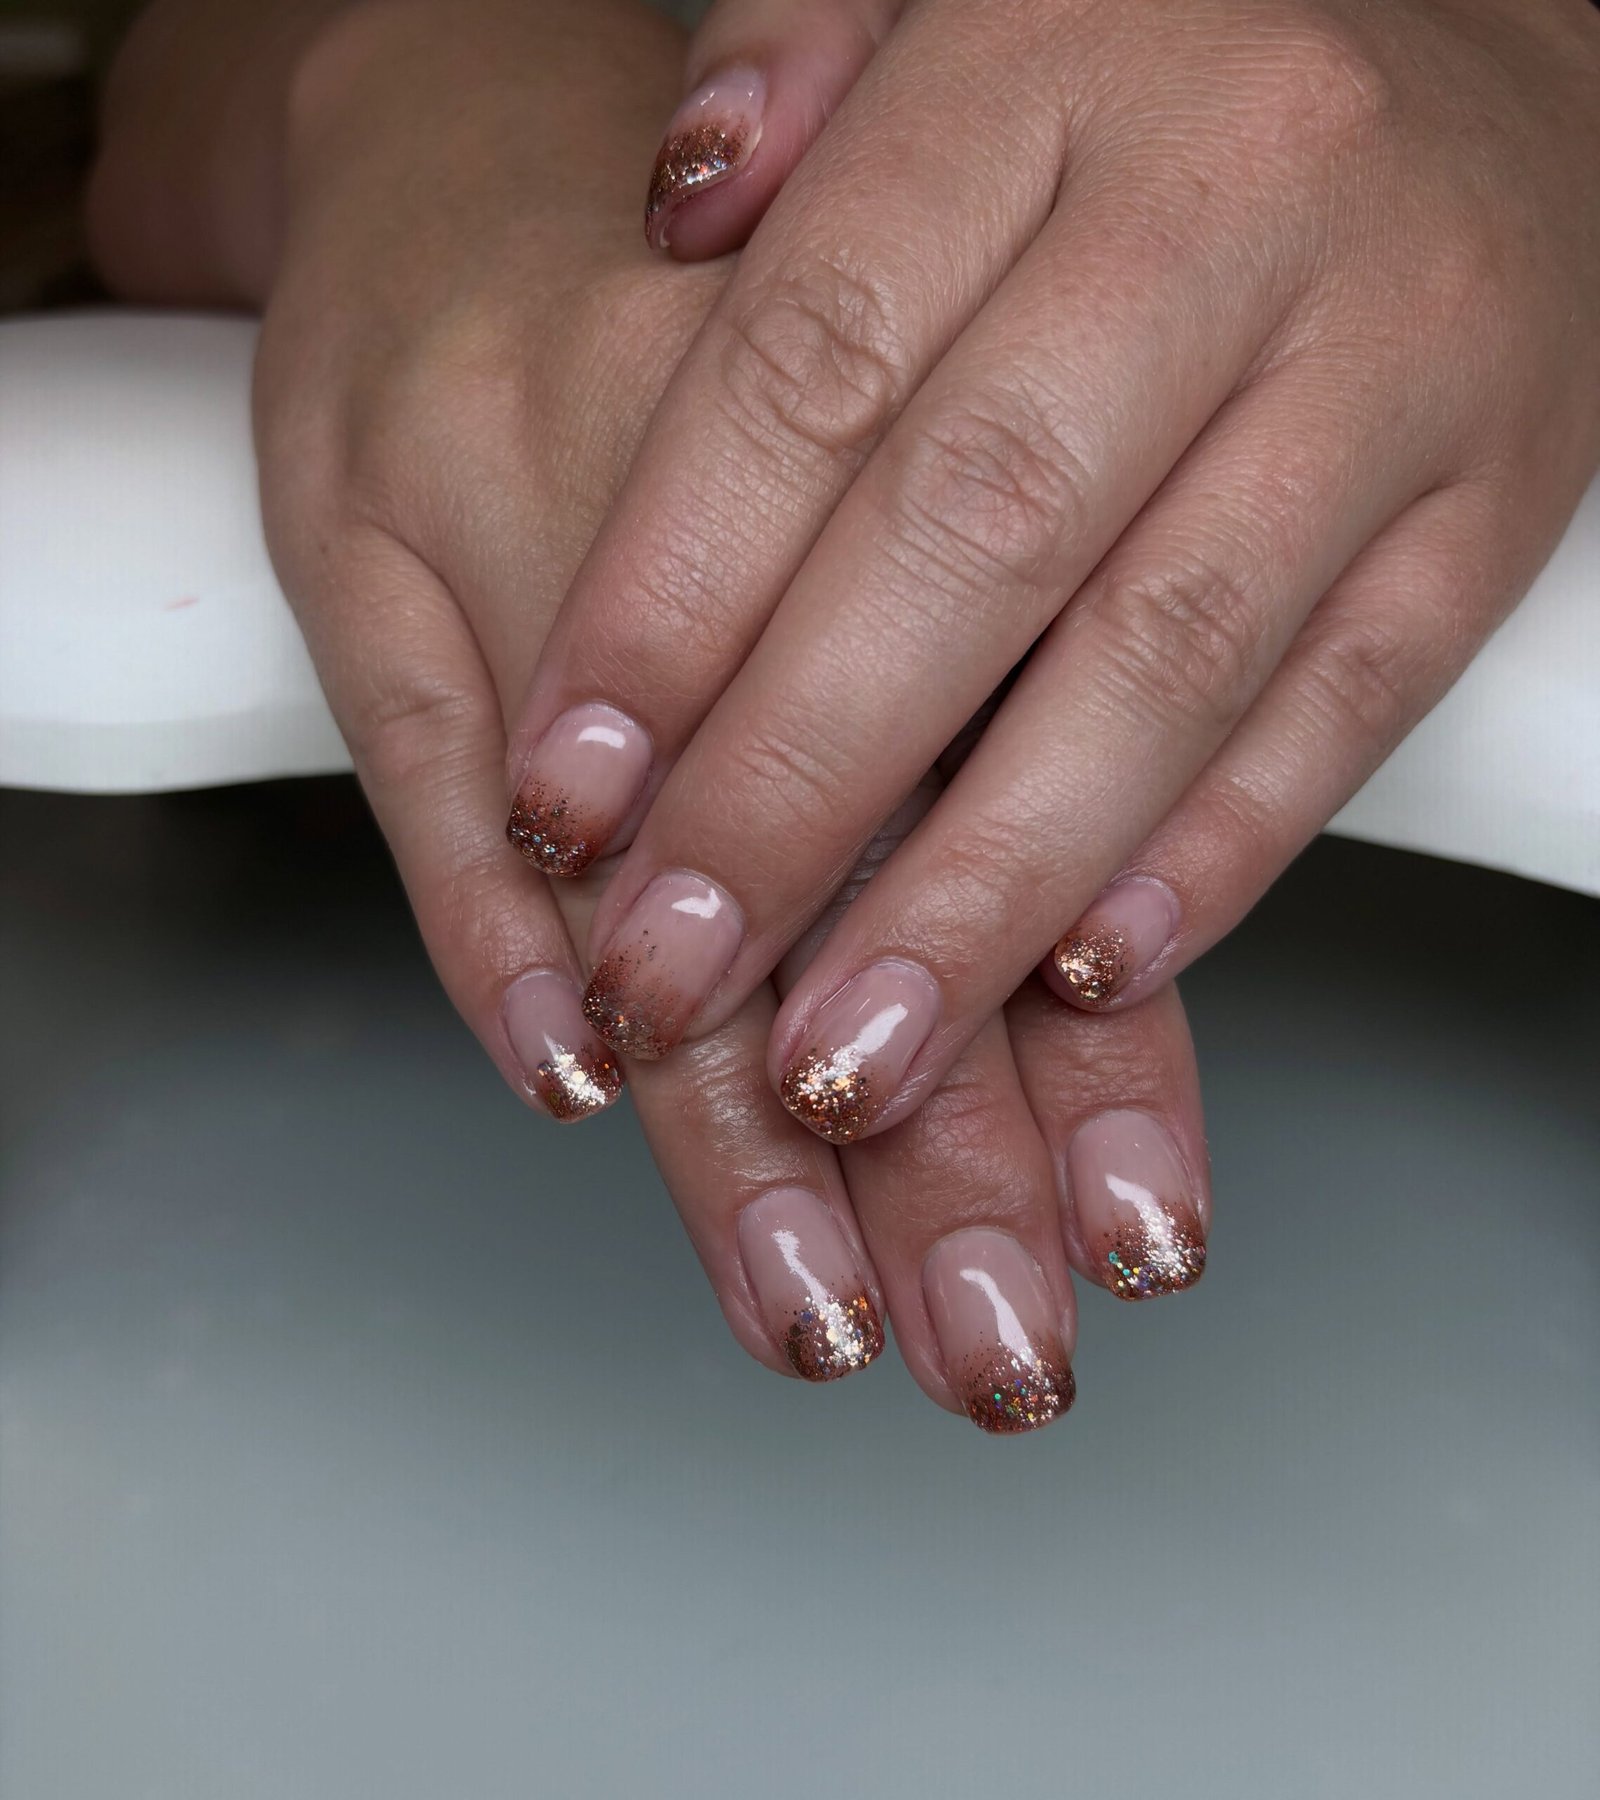
A sheer nude base fades into a copper-and-gold glitter ombre concentrated at the tips, finished glossy. The glitter is densest at the very tip and softens toward the middle of the nail, giving a warm glow that feels festive without covering the whole nail.
An ombre works best when the glitter fades gradually, so sponge or dab the glitter on in light layers and build it up at the tip. Keep the base sheer and even, and seal with gloss so the glitter sits smooth.
How to Apply
- Apply base coat and sheer nude polish, and let it dry.
- Dab copper-and-gold glitter onto the tips, building it denser at the tip and fading toward the middle.
- Let it set, then apply a glossy top coat to smooth the glitter.
20. Mocha and Ivory Checkerboard Accent Nails
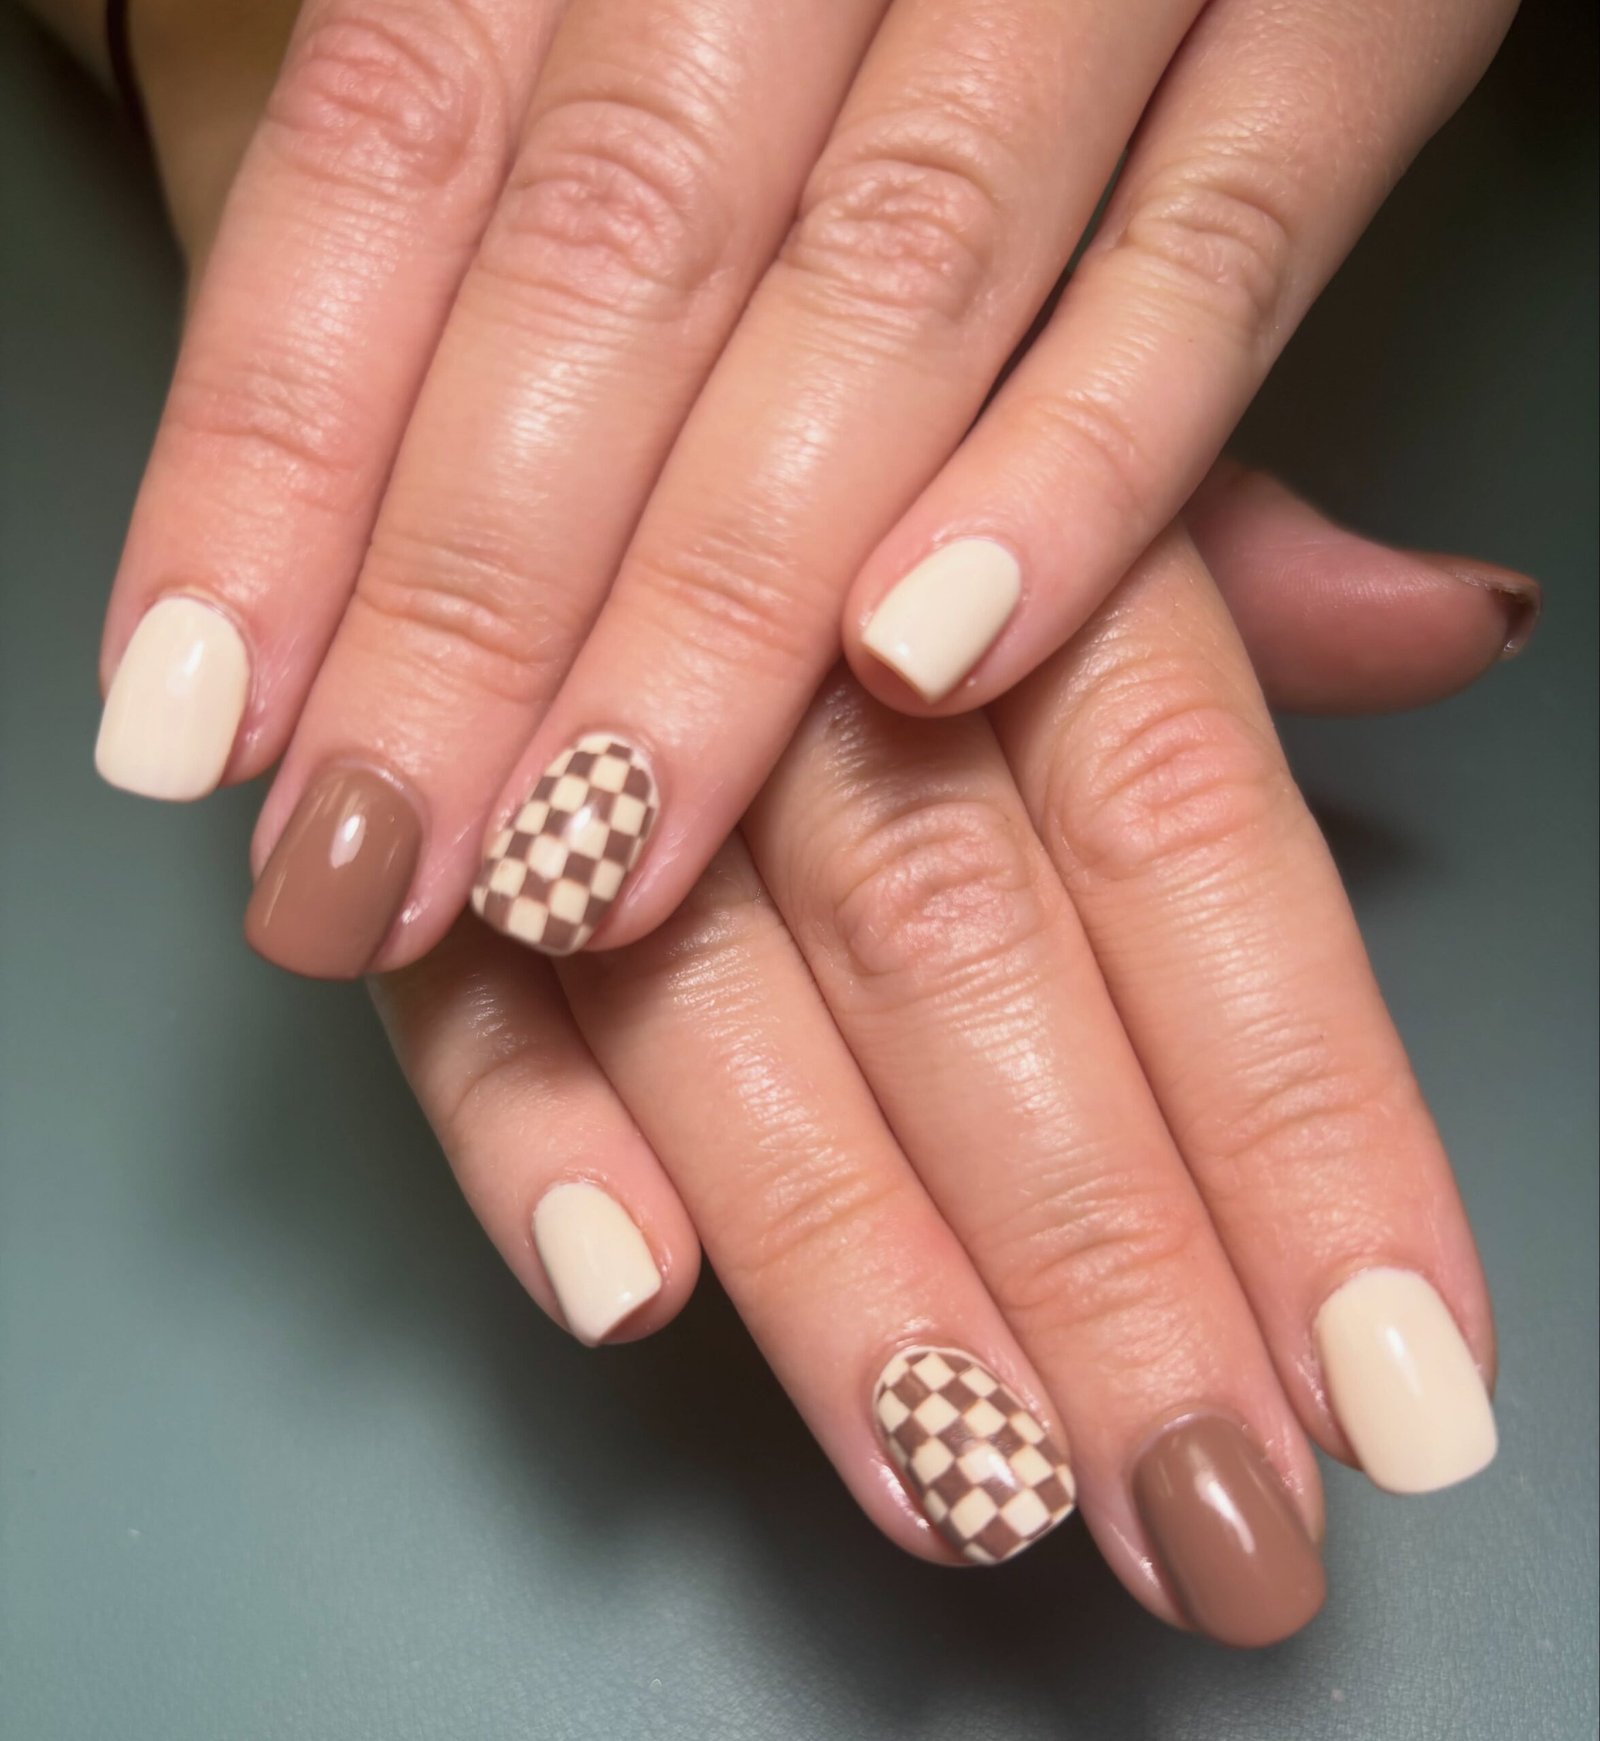
Short squared nails mix medium brown and creamy off-white solids with a brown-and-cream checkerboard accent on each ring finger. The checkerboard adds a retro twist, while the solid colours keep the set calm and easy to wear.
Checkerboard is easiest with a steady grid: paint the base colour first, then add the contrasting squares in neat rows. Keep the squares small and even, and finish with gloss so the pattern looks clean.
How to Apply
- Shape nails short and squared, apply base coat, and paint the nails medium brown or creamy off-white.
- Paint a brown-and-cream checkerboard pattern on each ring finger.
- Let the pattern dry, then apply a glossy top coat.
21. Matte Plum Nails With Glossy Leaf Silhouettes
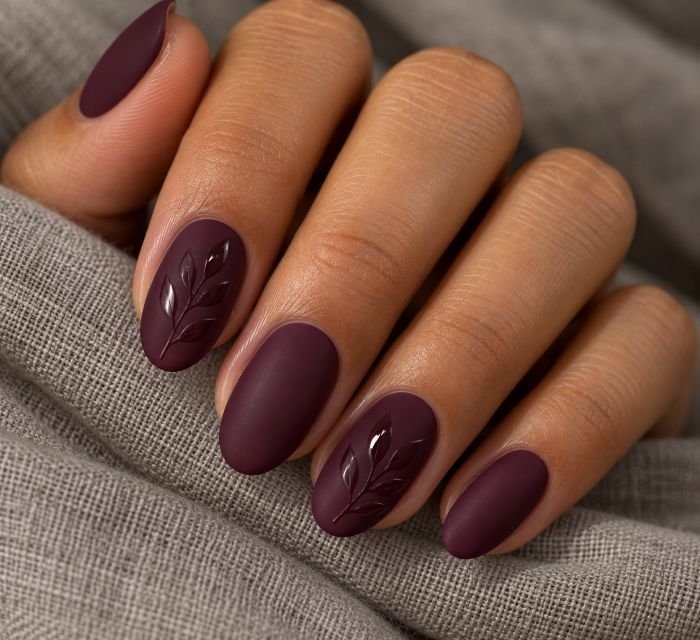
Deep plum covers medium oval nails with a matte finish, while clear glossy leaves catch the light on the index and ring fingers. Each accent has one slim stem with three small leaves, painted in clear gloss over the same plum color. The pattern becomes more noticeable as the hand turns rather than standing out through a contrasting shade.
This is a subtle choice if you enjoy seasonal artwork but want it to stay quiet in photographs. Keep the leaves broad enough to catch a reflection, since extremely fine clear lines can disappear. The final finish matters: coating the whole nail in gloss would remove the contrast. Leave the surrounding plum matte so the leaf shapes remain the reflective part.
How to Apply
- Apply base coat and deep-plum regular polish to medium oval nails, allowing color to dry.
- Cover all nails with compatible matte top coat and let finish dry fully.
- With detail brush and compatible clear glossy top coat, paint one small three-leaf sprig on each index and ring nail.
- Let glossy artwork dry. Do not add another full-nail top coat over mixed finishes.
22. Forest Green Nails With Fine Gold Side Curves

Long square nails in glossy deep emerald green carry a fine metallic gold wavy line on each nail. The rich green gives the set depth, while the slim gold wave adds a neat, elegant detail that runs along the nail without crowding it.
A fine gold line works best when it stays slim and smooth, so use a liner brush and keep the wave gentle and even. Let the green dry fully first so the gold stays crisp, and finish with gloss for shine.
How to Apply
- Shape nails long and square, apply base coat and glossy deep emerald green polish, and let it dry.
- Paint a fine metallic gold wavy line on each nail.
- Let the gold dry, then apply a glossy top coat.
23. Tiny Acorn and Oak Leaf Accents
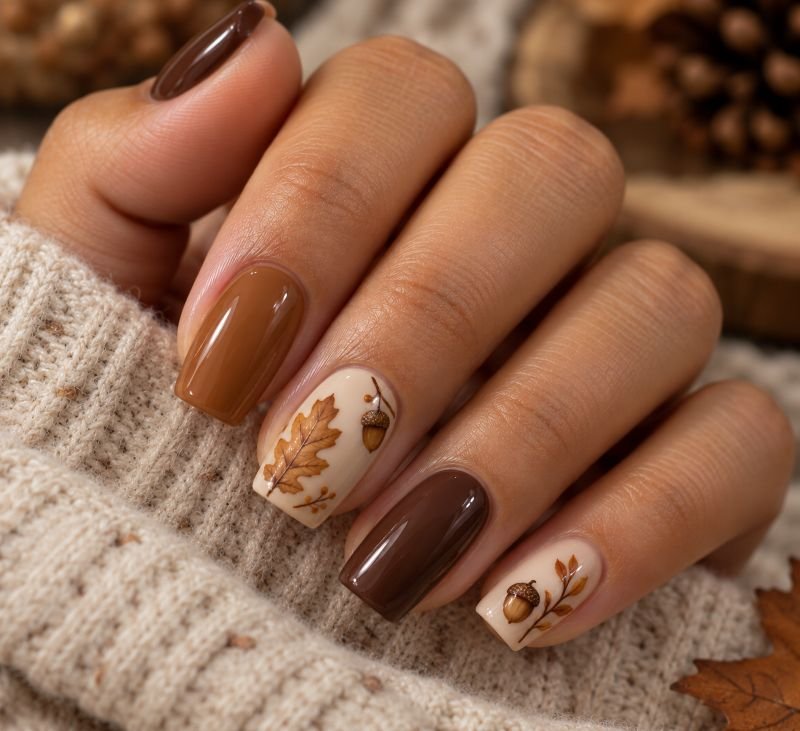
The main nails are solid glossy olive green, while cream ring-nail accents carry a tiny acorn with a dotted cap paired with a small green oak leaf. The cream accent gives the small autumn details room to show, and the olive green keeps the set grounded.
Small details like this are best kept tiny and neat, so paint the acorn and leaf with a fine brush and let each part dry before adding the next. A glossy top coat ties the solid nails and the accent together.
How to Apply
- Apply base coat, paint the main nails glossy olive green and the ring nails cream, and let them dry.
- Paint a tiny acorn with a dotted cap and a small green oak leaf on each cream ring-nail accent.
- Let the detail dry, then apply a glossy top coat.
24. Cream, Cinnamon, and Mustard Patchwork Nails
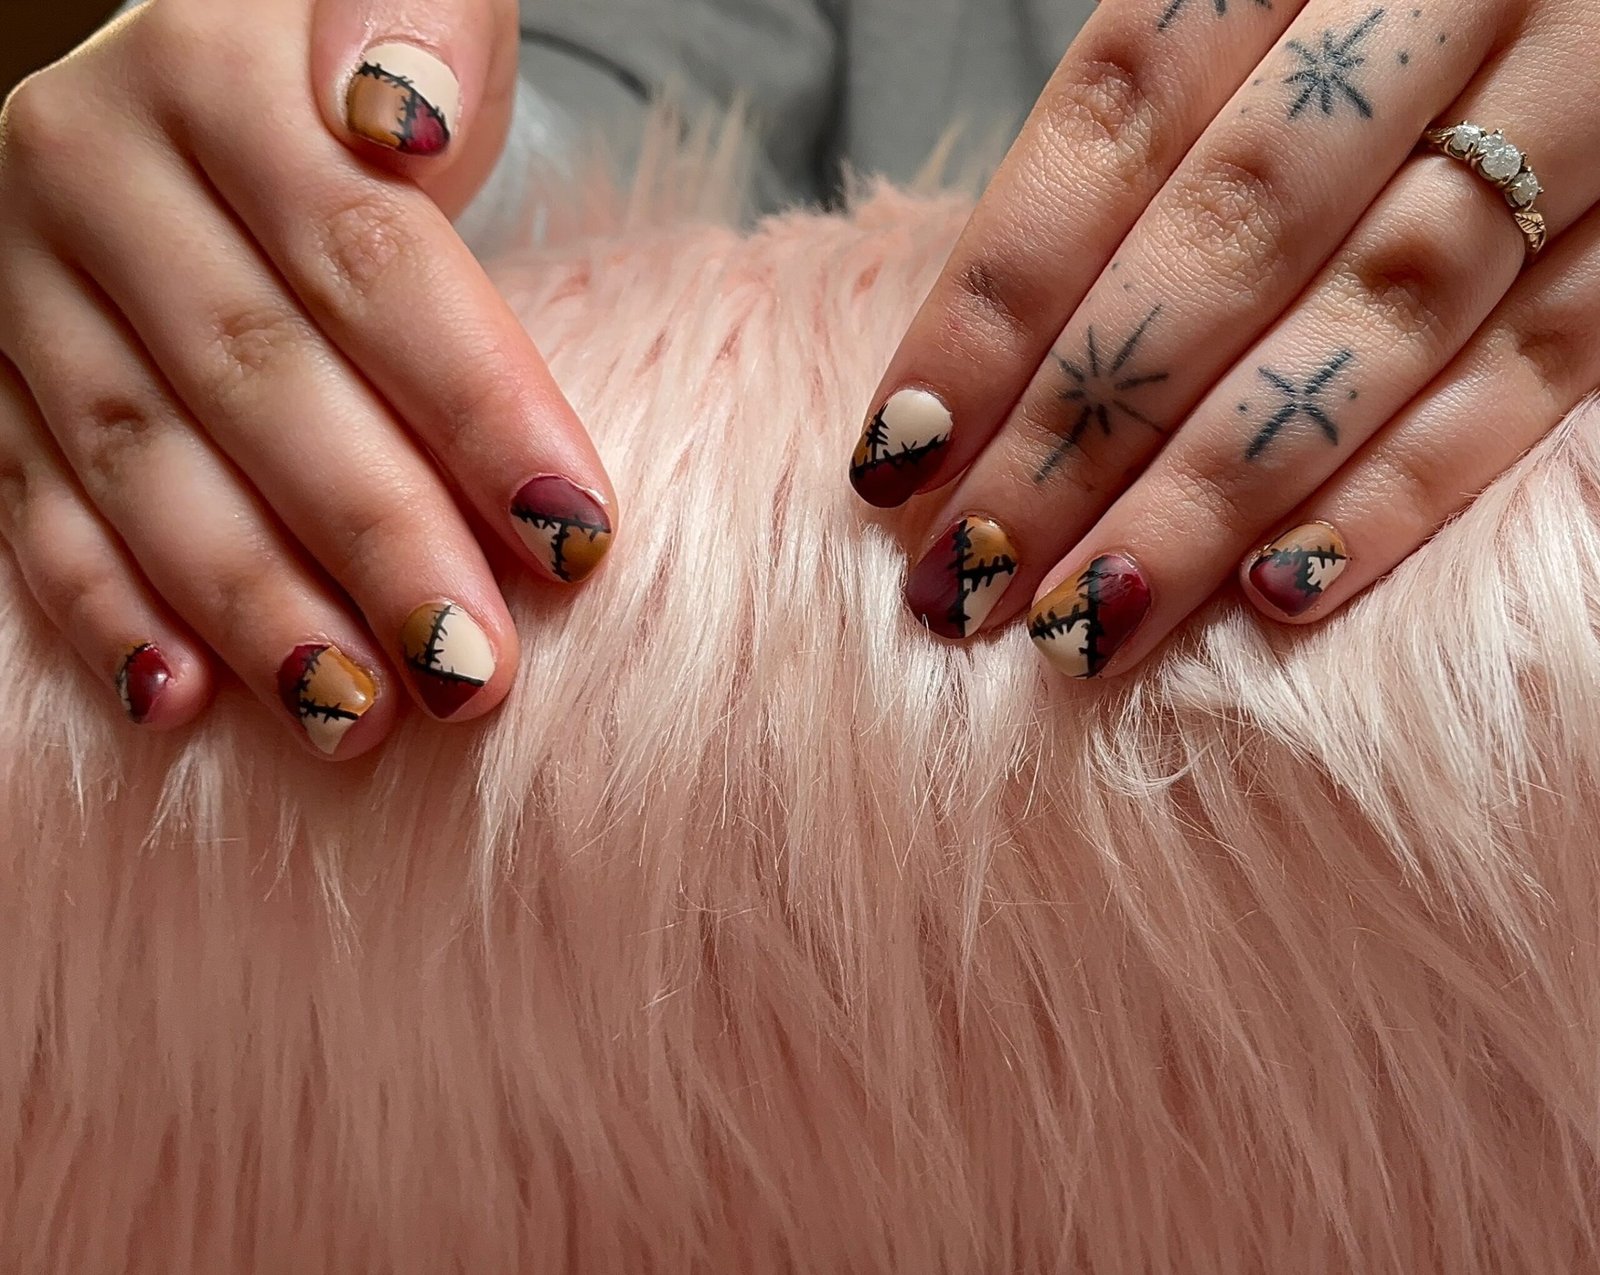
Patchwork nails in cream, mustard and deep burgundy are divided into sewn-looking sections, with black stitch-like lines mimicking sewn patches. The mix of warm colours feels like autumn fabric, and the stitching gives the set a handmade, quilted character.
Patchwork is easier when you plan the colour blocks first and keep the sections simple, then add the stitch lines last with a fine brush. Let each colour dry before stitching over it so the black lines stay clean.
How to Apply
- Apply base coat and divide the nails into patchwork sections in cream, mustard and deep burgundy.
- Add black stitch-like lines along the section edges to mimic sewn patches, and let them dry.
- Apply a top coat to seal the design.
25. Cranberry Branches on Soft Pink Nails
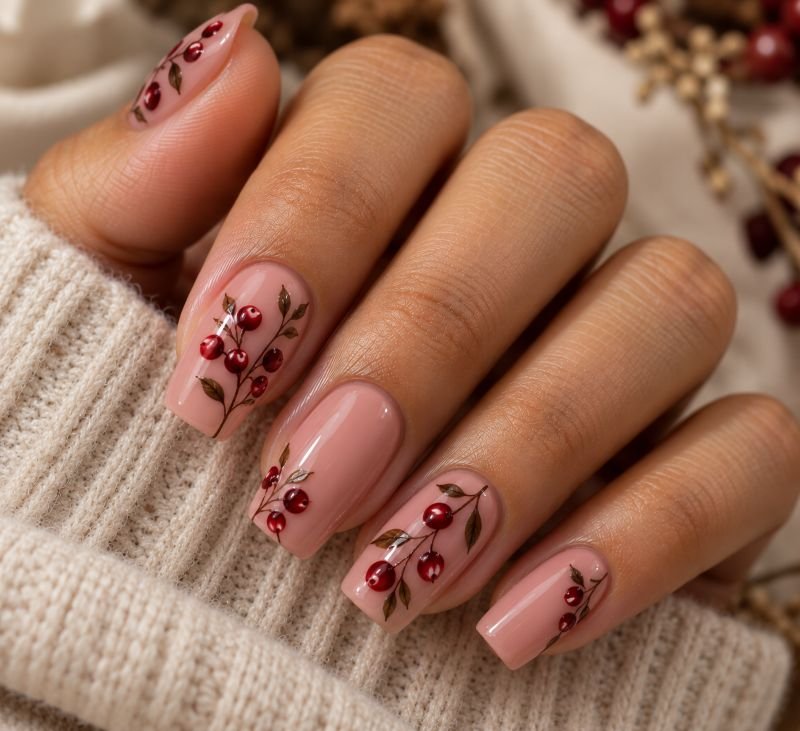
Bright pink nails pair with white accent nails carrying black branches and small magenta berries, with small silver glitter details along the branches. The bold pink keeps the set lively, while the white accents give the branch design a clean background.
Branch designs work best when the lines stay thin and the berries stay small, so the pattern looks delicate rather than heavy. Paint the branches first, add the berries and glitter last, and seal with gloss once everything is dry.
How to Apply
- Apply base coat, paint most nails bright pink and the accent nails white, and let them dry.
- Paint black branches with small magenta berries and small silver glitter details on the white accent nails.
- Let the design dry, then apply a glossy top coat.
How to Keep Your Autumn Thanksgiving Nails Simple
Simple autumn Thanksgiving nails start with one clear choice: a color, a finish, or a small motif. A cranberry manicure already carries strong color, so it does not need a pumpkin, glitter, and plaid added to every finger. If you want artwork, give one or two nails the detail and keep the others quieter.
Use a limited palette that you can repeat across the hand. Cream, cinnamon, and cocoa work for dots, leaves, or a single patterned accent without requiring more shades. Smooth, flat designs are also worth considering if raised details would get in the way of your usual routine.
How to Create Easy Thanksgiving Nails at Home
For easy Thanksgiving nails at home, choose the warm five-color set, mustard dot borders, or a solid cranberry manicure. Prepare your colors and tools before applying base coat, and practice unfamiliar details on a spare nail tip. Regular polish needs drying time; an LED lamp is not a substitute for that drying process.
Let the base dry before adding stickers or fine artwork, and follow the directions for your polish and top coat. Decals can handle small pumpkins, leaves, and turkey faces without demanding miniature brushwork. If you want magnetic gel or raised corduroy, book a technician or choose a professionally made press-on set instead.
How to Choose Thanksgiving Nail Inspiration for Your Nail Length
Choose Thanksgiving nail inspiration by looking at the space around the artwork, not just the color. On short nails, one leaf, a small dot border, or a slim French tip leaves enough room for the design to stay clear. A reference with long extensions may need fewer details when adapted to your own nails.
Medium lengths offer more space for plaid, patchwork, and layered tortoiseshell tips, but added length does not require extra decoration. Show your technician the full hand and identify the details that matter most. If the thumb is hidden in a reference, decide its design explicitly rather than assuming it matches another finger.
Final Thoughts
Your Thanksgiving manicure can be as quiet as glossy cranberry or as playful as a tiny pie slice. Start with the look you would enjoy seeing throughout the week, then decide whether one holiday accent adds something you want. Short nails, simple polish, and flat decals all have a place alongside the more detailed salon options.
Before choosing your fall Thanksgiving nails, compare the shape, tip width, and amount of artwork as well as the colors. Use Nail Blooms’ virtual nail try-on to preview your favorite on your own hand and see which autumn look you prefer.
Ready to bring a little autumn warmth to your next manicure? From rich cranberry and chocolate shades to delicate maple leaves, pumpkin accents, and shimmering copper details, find a Thanksgiving nail design that suits your style. Save your favorite and preview how it looks on your hands before recreating it at home or visiting your nail salon.
Use Virtual Nails Try-On

Bloomie
Bloomie (I) is the founder and author of Nail Blooms, a nail inspiration website dedicated to manicure ideas, nail art, colors, shapes, and emerging beauty trends. My interest in nails began with a simple habit of collecting beautiful manicure ideas and exploring different styles, from timeless nude shades and French tips to creative nail art and seasonal looks. What started as a personal interest gradually grew into Nail Blooms, a space created to make discovering nail inspiration easier and more enjoyable. At Nail Blooms, My goal is to help readers give new ideas, find different possibilities, and feel inspired when choosing their next manicure.
About the editor ↗