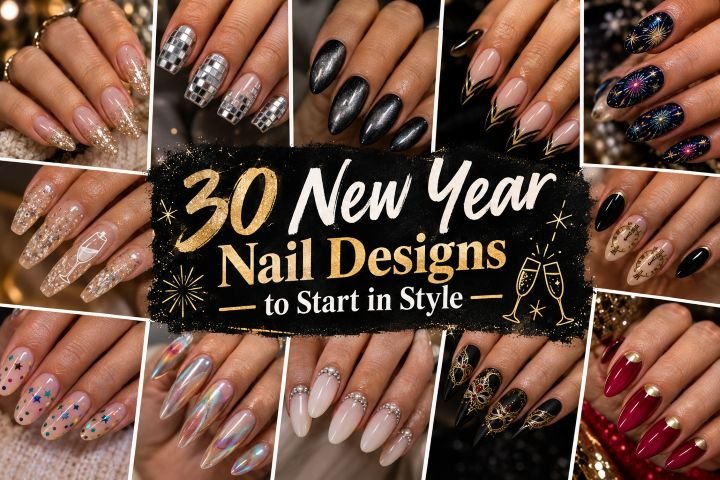
30 New Year Nail Designs to Start in Style
New Year’s Eve nails have to glow at midnight but look good the next morning. The new year nail designs have a variety from champagne glitter to the mirrored ball mosaic, countdown clocks, fireworks motifs, metallic French tips, glass jelly color, and milky manicure for the January babies. Recently, the beauty section has exploded in metallic polish, cat-eye effect, champagne color, clocks, confetti patterns, pearls, holographic finishes, and jewelry-inspired nail art. InStyle and Vogue magazines spot different ways to interpret the New Year’s nail art theme.
The most crucial question is not only how sparkly your nails should be but also what occasion you are going to, if you plan to wear any glittery jewelry, how long your nails are, and if the nails have to survive the following workday. The following ideas offer short New Year’s nails that look beautiful with the short coffin shape, graphic design at the salon, warm and cool metallic tones, and graphic art, and nail polish that goes beyond one night.
1. Champagne Glitter Fade Nails
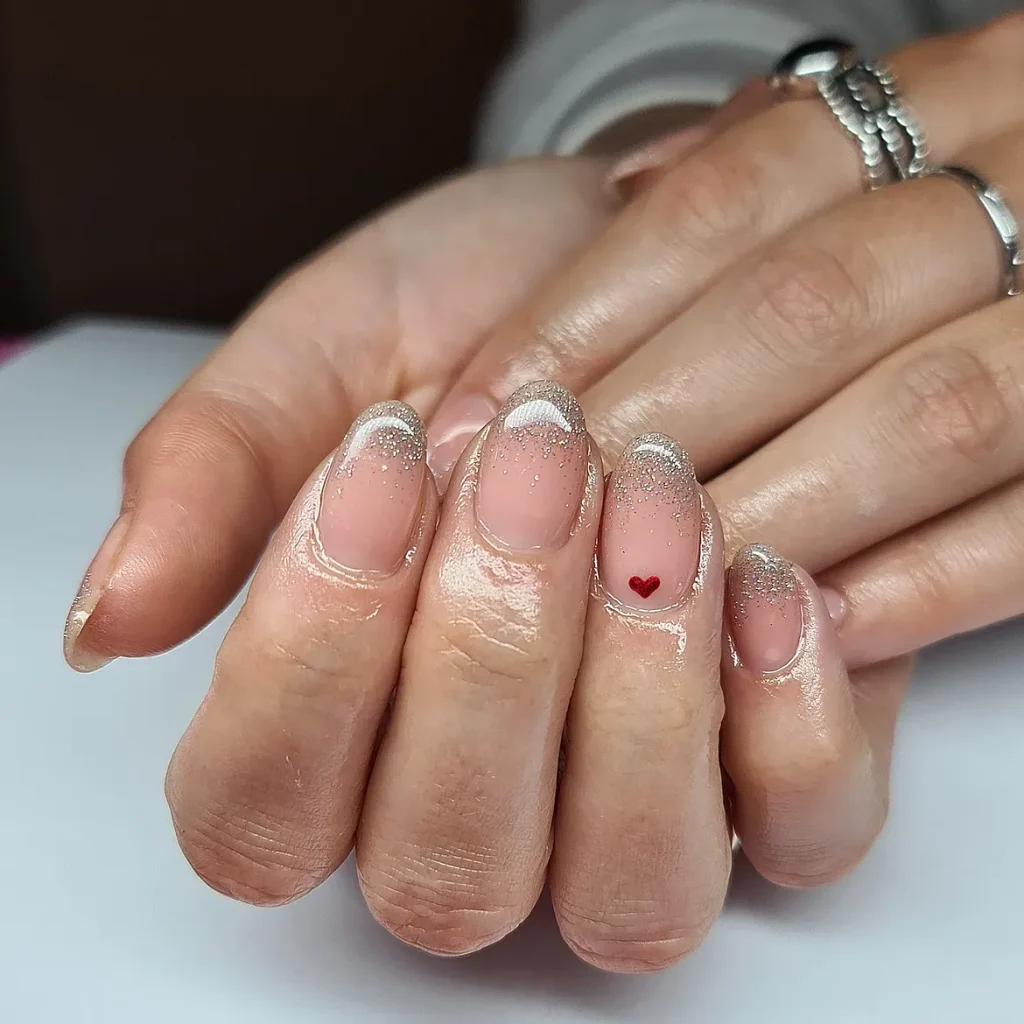
Short almond nails begin with a translucent beige-pink base and build into a dense champagne glitter fade at the tips. The particles mix fine gold, pale silver, and a few larger reflective flecks, creating dimension without forming a harsh line. One accent nail reverses the placement with a light glitter veil near the cuticle.
This is an adaptable New Year’s Eve manicure because it photographs well in party lighting but still feels appropriate for dinner, travel, or work after the celebration. The short almond shape keeps the sparkle refined and practical. A makeup sponge concentrates the glitter more effectively than repeated full brush coats, making this one of the easier designs to recreate at home.
How to Apply
- Apply two thin coats of translucent beige-pink polish to short almond nails.
- Dab champagne glitter onto a sponge and press it most densely along the free edges.
- Blend a lighter scattering toward the center and reverse the fade near one accent cuticle.
- Smooth the particles with one or two layers of glossy top coat.
2. Silver Mirrorball Mosaic Nails
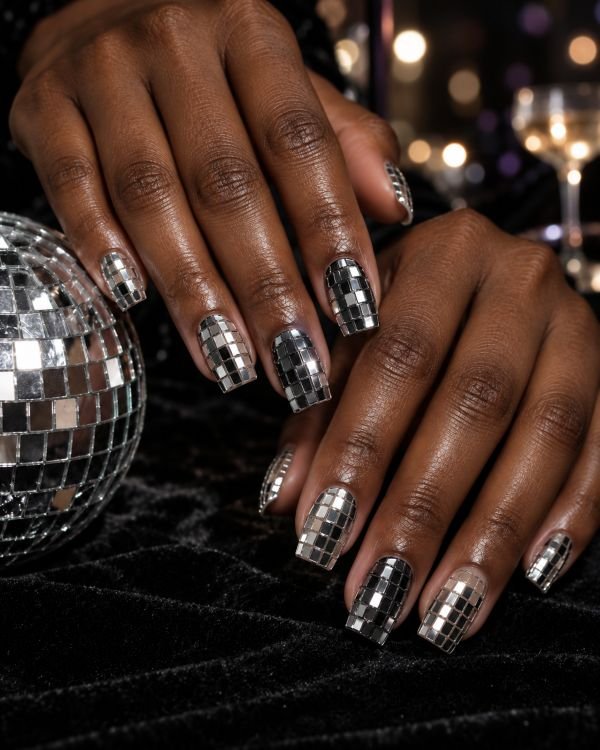
Medium square nails are covered with tiny silver and gunmetal squares arranged in curved rows that mimic the tiled surface of a disco ball. Narrow black gaps separate the pieces, preventing the design from becoming one flat sheet of silver. Two nails carry partial mosaics over a sheer base, while the others are fully tiled for stronger reflection.
The square shape gives the miniature tiles clean edges, but the curved placement keeps the manicure from resembling a standard checkerboard. This set suits dance parties, concerts, and metallic outfits, especially when you want the nails to move with the light. Applying each tile is slow, so book a salon or use predesigned press-ons unless you enjoy precision work.
How to Apply
- Apply a black base to the fully tiled nails and a sheer nude base to the partial accents.
- Place tiny flat silver and gunmetal squares in curved rows with narrow gaps between them.
- Trim or reposition any pieces that cross the sidewalls or free edges.
- Encapsulate the flat tiles beneath clear builder gel and finish with glossy top coat.
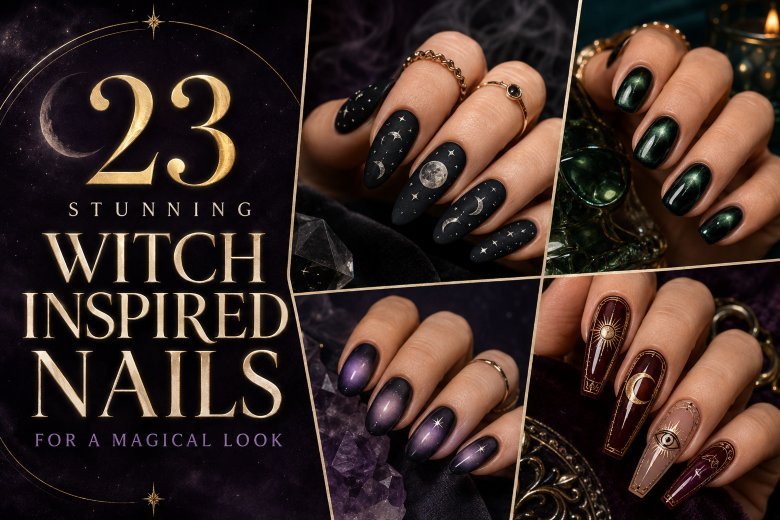
3. Black Velvet Cat-Eye Nails
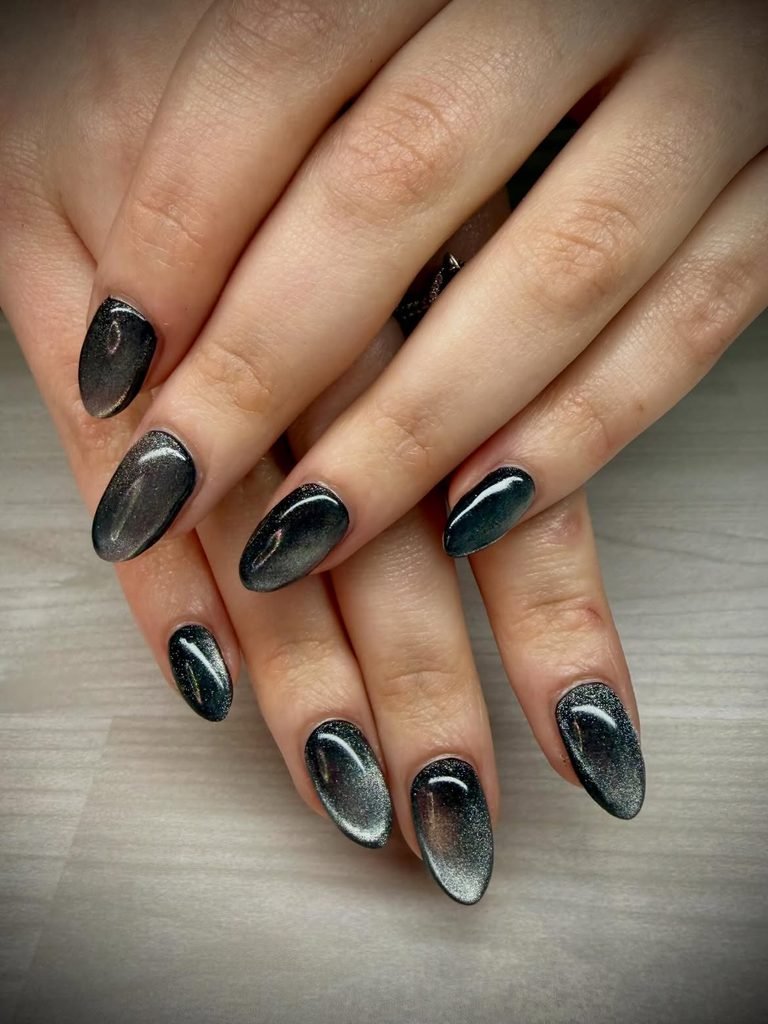
Oval nails appear almost black until a soft silver magnetic glow moves across their centers. Instead of one sharp cat-eye stripe, the pigment is spread into a wide velvet nail effect, then framed with a narrow glossy black border around each nail. The contrast makes the center look plush and dimensional beneath a clear glass finish.
This is the pared-back choice for a black outfit or silver jewelry, and the short oval length remains comfortable through a long evening. The manicure does not depend on literal clocks or confetti, yet the shifting surface feels celebratory in low light. Magnetic gel must be shaped before curing, so work one nail at a time rather than magnetizing the whole hand at once.
How to Apply
- Apply black base gel to oval nails and cure according to the system.
- Cover one nail with silver-black magnetic gel and move the magnet around the sides to spread the pigment into a broad velvet glow.
- Cure immediately, repeat on the remaining nails, and trace a slim black frame around each perimeter.
- Seal the set with a clear high-gloss gel top coat.
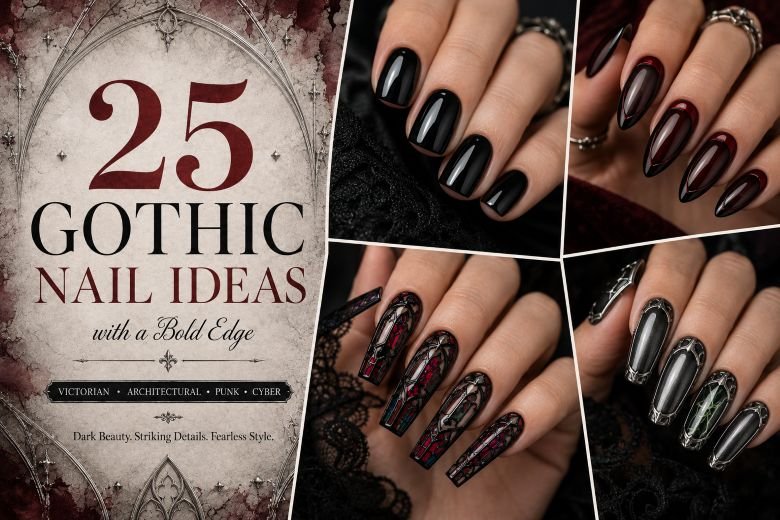
4. Black and Gold Art Deco French Nails
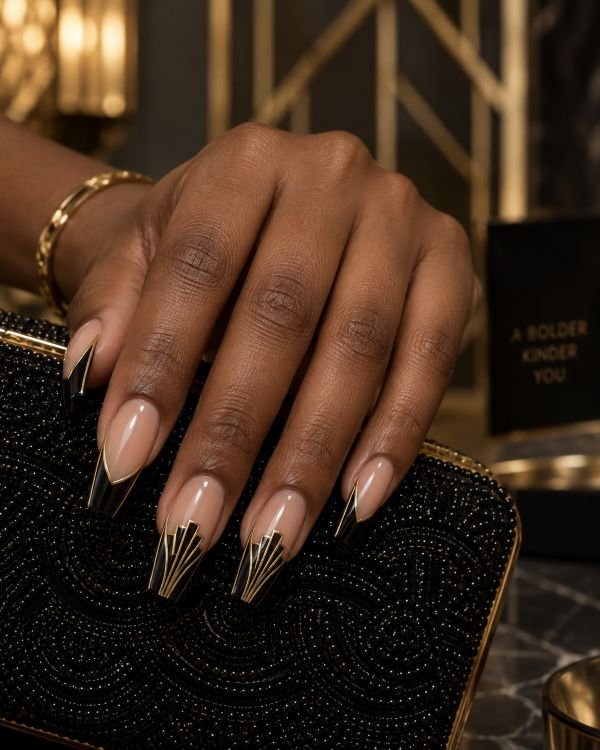
Medium coffin nails use a sheer nude base with angular black French tips divided by slim gold chrome lines. Two accent nails extend the geometry toward the cuticle with stepped fans and narrow arches inspired by Art Deco nail art. The design relies on symmetry, negative space, and clean metallic borders rather than glitter coverage.
This manicure works beautifully for a black-tie party, structured jumpsuit, or vintage-inspired dress. Coffin nails support the straight architectural lines, while the translucent base keeps the overall set lighter than solid black. Striping tape can simplify the gold borders, but a nail technician will produce more consistent angles across both hands.
How to Apply
- Apply a sheer nude base to medium coffin nails.
- Sketch angular black French tips and fill them evenly without rounding the corners.
- Add thin gold lines along the tip borders, then build stepped fan motifs on two accents.
- Seal the geometry with a smooth glossy top coat.
5. Midnight Firework Nails
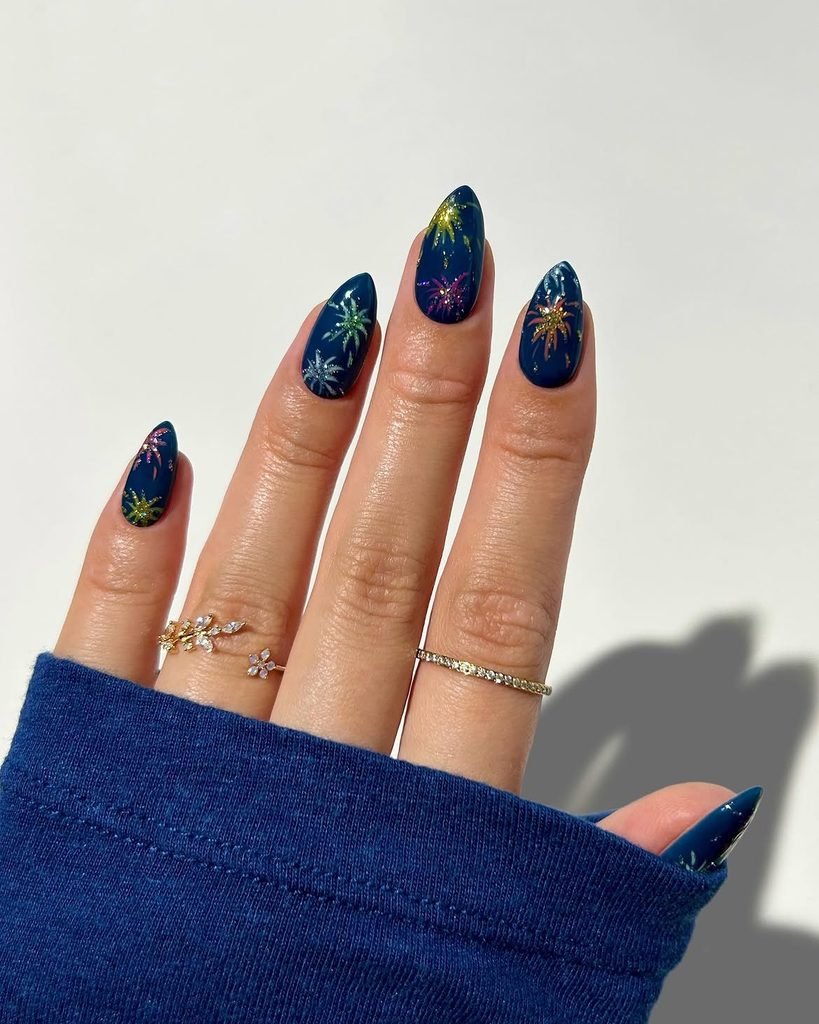
Deep navy fades into black across medium almond nails, forming a night-sky base for hand-painted fireworks in silver, champagne gold, cobalt, and magenta. Each burst begins with a bright central point and expands into fine curved trails, with tiny glitter dots scattered below like falling sparks. Only three nails carry large fireworks so the scene retains visible darkness.
These firework nails make the New Year’s reference immediately clear without adding numbers or lettering. Almond nails give the radiating lines enough vertical space, and the mix of cool and warm metallics coordinates with either jewelry tone. Stamping plates can handle the basic burst shape, but hand-painted curved trails look more natural and less repetitive.
How to Apply
- Blend deep navy into black across medium almond nails and let the base set.
- Mark bright centers on three nails, then pull fine silver, gold, cobalt, and magenta trails outward.
- Add smaller partial bursts and scattered glitter dots without filling the entire dark background.
- Finish with glossy top coat to deepen the sky and protect the linework.
6. Champagne Bubble Glass Nails
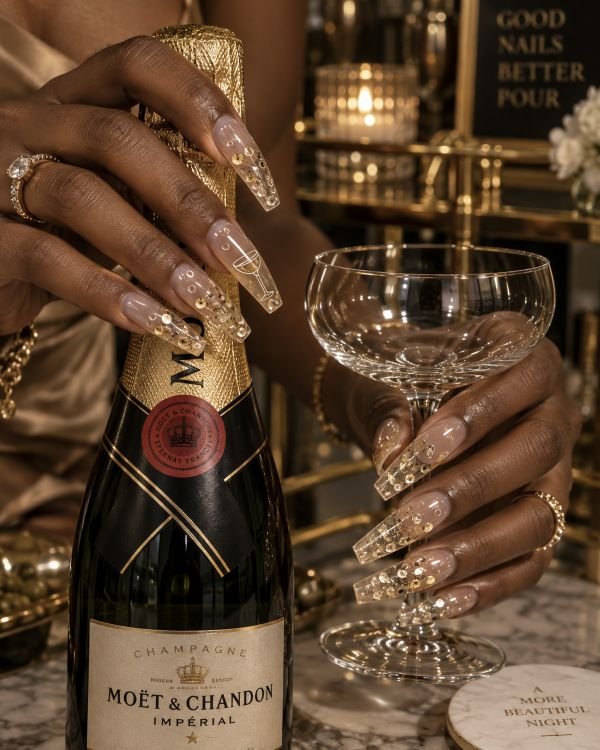
Long coffin nails are built from transparent champagne-tinted gel, with tiny clear spheres, pale gold circles, and microscopic iridescent flecks suspended at different depths. The bubbles rise more densely toward the tips, while the cuticle area stays almost clear. One accent includes a fine white outline of a coupe glass beneath the encapsulated details.
The transparent layering gives these champagne nails more depth than a flat bottle-and-glass illustration. They suit an elaborate salon appointment, themed party, or New Year’s photoshoot where longer nails are practical. Ask for thin encapsulation and a balanced apex because the design loses its airy quality if the structure becomes bulky.
How to Apply
- Build clear coffin extensions with a subtle champagne tint and balanced structure.
- Place small clear domes, pale gold circles, and iridescent flecks between thin transparent layers.
- Concentrate the bubbles near the tips and paint one fine coupe outline on an accent nail.
- Encapsulate, refine the surface, and finish with a glassy top coat.
7. Countdown Clock Accent Nails
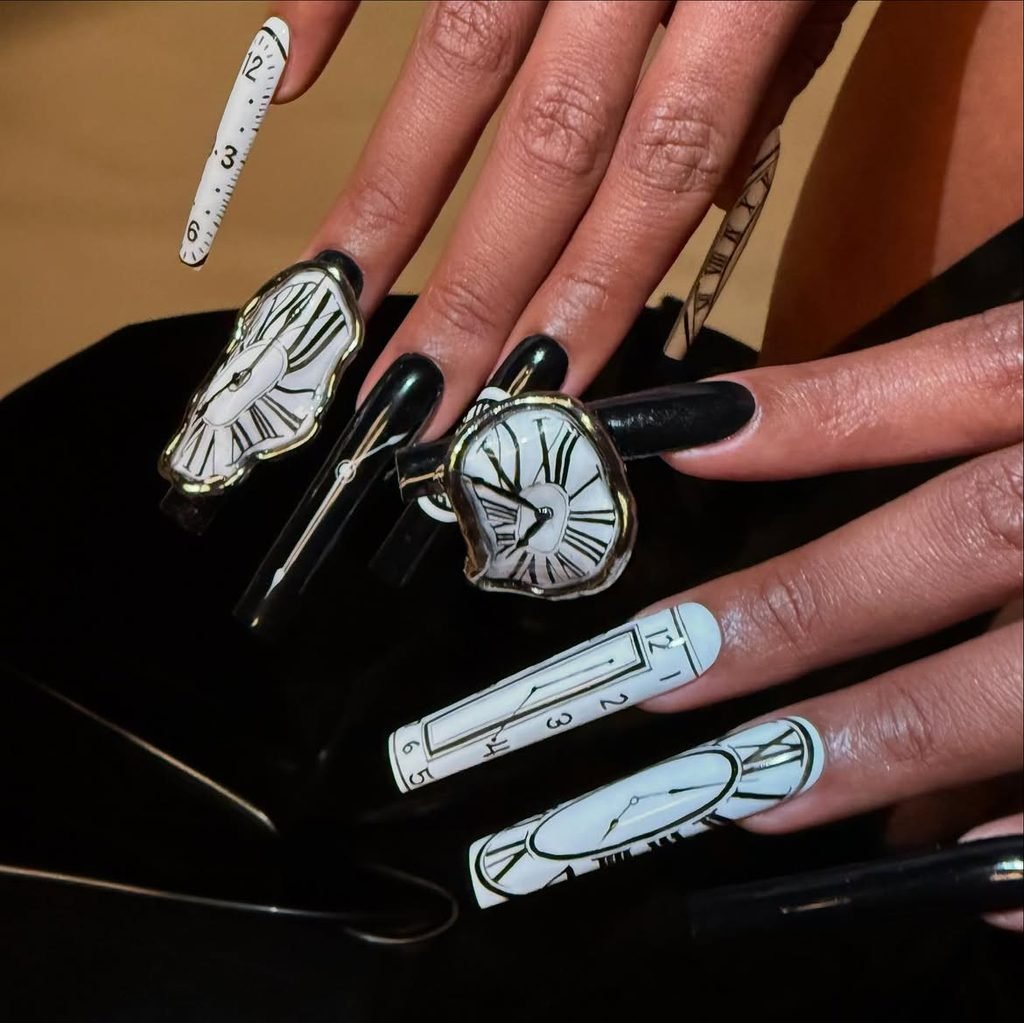
Glossy black long almond nails are interrupted by two sheer accents featuring slim gold clock faces set at five minutes to midnight. Fine Roman numerals mark only the quarter hours, while a tiny crystal sits at the center of each pair of hands. The remaining nails carry narrow gold arcs near the cuticles to connect the set without repeating the clock.
This is a literal New Year’s countdown manicure, but the restrained illustration keeps it formal enough for an evening dress or tailored suit. Almond nails provide the length for elegant clock hands without requiring wide, crowded faces. Because warped circles and uneven numerals are easy to notice, this is best hand-painted by a technician or applied as a detailed transfer.
How to Apply
- Paint most long almond nails glossy black and cover two accents with a sheer beige base.
- Draw thin gold circles and add Roman numerals at the quarter-hour positions.
- Set the clock hands close to midnight, secure one tiny center crystal, and add gold cuticle arcs to the solid nails.
- Seal the complete set with a high-shine top coat.
8. Rainbow Confetti Negative-Space Nails
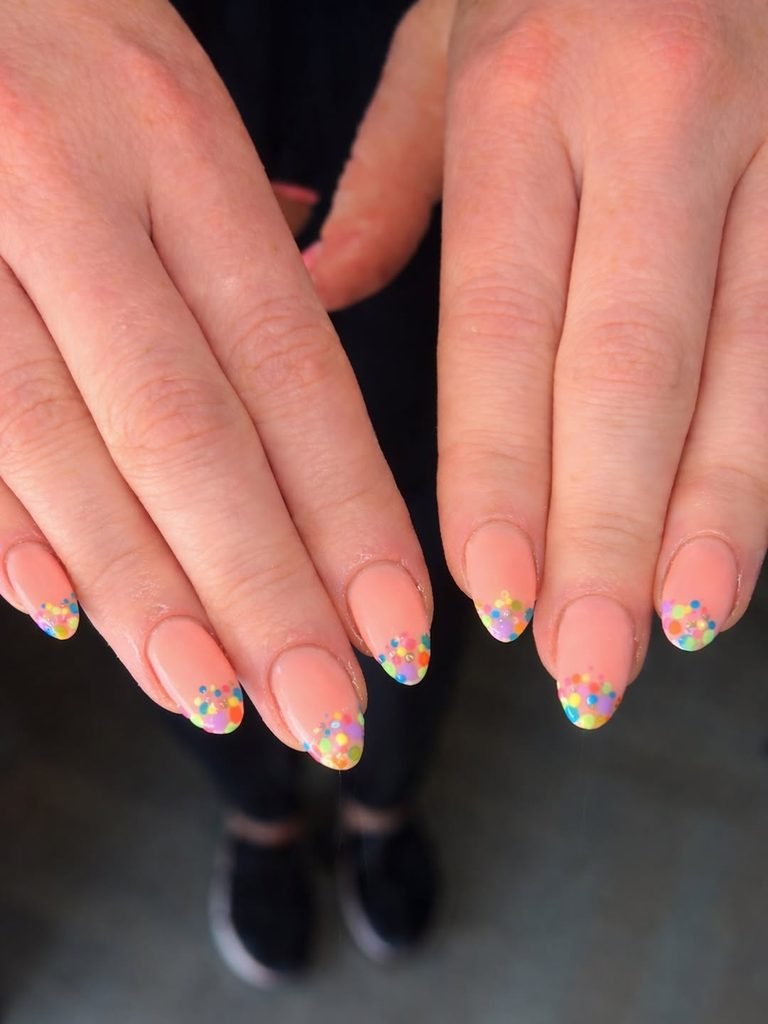
Short round nails are mostly nude beneath a transparent pink coat, with metal circles, tiny squares, and curved streamers scattered from one side. The confetti nail art uses fuchsia, cobalt blue, emerald green, orange, silver, and gold, in various densities, as each nail showcases a unique combination. The lack of clutter around the decorations keeps the colors vibrant and makes the overall design lively.
The manicure is perfect for a girls’ house party or someone who loves color but does not want a dramatic multicolored nail art. Short round nails make the scattered confetti pieces cute and convenient. Flat nail confetti is applied instead of thick craft glitter, and all edges are reinforced with a top coat to prevent chipping.
How to Apply
- Apply a translucent pink base to short round nails.
- Place flat metallic circles and rectangles diagonally across each nail, varying the colors and density.
- Paint a few curved streamer lines between the shapes while preserving open negative space.
- Encapsulate the confetti beneath a smoothing glossy top coat.
9. Sculpted Liquid Silver Nails
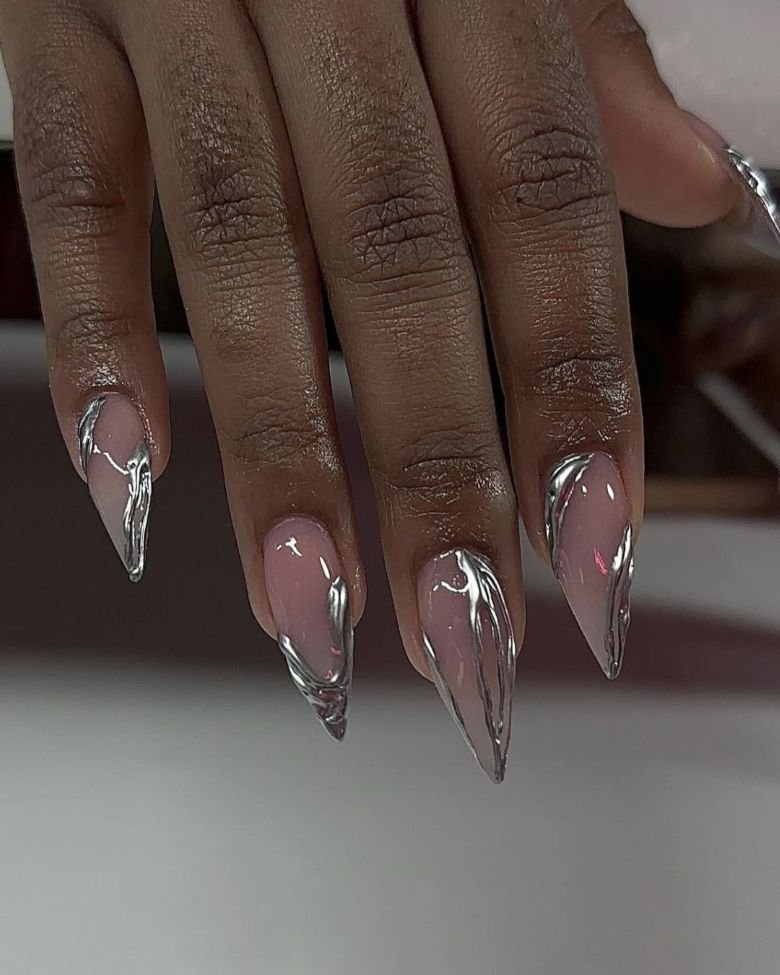
Long stiletto nails wear a smoked nude base beneath raised silver lines that flow like molten metal from cuticle to tip. The liquid chrome nail art forms irregular pools, narrow ridges, and open windows of negative space, with no two nails following the same path. A few sections are mirror smooth, while others have a gently rippled texture.
This is a high-impact salon design for a fashion-led party or monochrome outfit, and the stiletto shape amplifies its fluid movement. The metal should remain low enough to avoid snagging despite its sculptural appearance. Chrome powder needs a compatible gel surface and careful edge sealing, so press-ons are a better home alternative than improvised thick gel.
How to Apply
- Build balanced long stiletto extensions and apply a smoked translucent nude base.
- Sculpt low irregular streams and pools with thick art gel, leaving clear windows between them.
- Cure the relief, apply compatible chrome gel over the raised areas, and rub in mirror-silver powder.
- Seal the chrome edges and smooth any sharp ridges without flattening the design.
10. Icy Blue Aura Nails
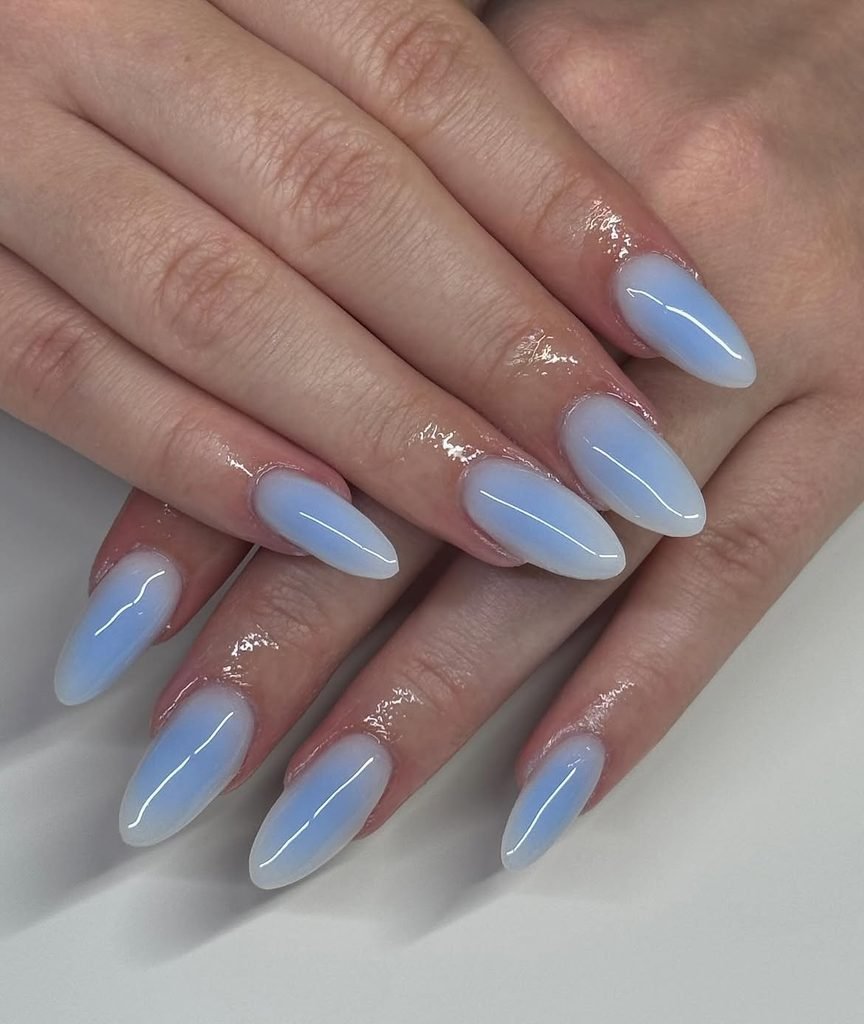
Medium almond nails fade from translucent milky edges into concentrated icy blue centers, with a trace of lavender softening the transition. Fine silver star points sit off-center on three nails, and a sheer pearl top layer gives the aura manicure a frosted glow. The blue should appear diffused beneath the surface rather than painted as a hard circle.
This cooler design suits silver dresses, pale tailoring, and celebrations that continue into winter travel. It also transitions cleanly into January because the art does not depend on a dated number or party motif. A salon airbrush creates the softest center, although a small sponge can build the gradient at home through several almost-dry layers.
How to Apply
- Apply a translucent milky base to medium almond nails.
- Sponge pale blue into the center, then deepen a smaller inner area with icy cobalt and a trace of lavender.
- Add three fine silver star points and a sheer pearl glaze over the gradient.
- Finish with a clear glossy top coat to create depth.
11. Black-Tie Tuxedo Nails
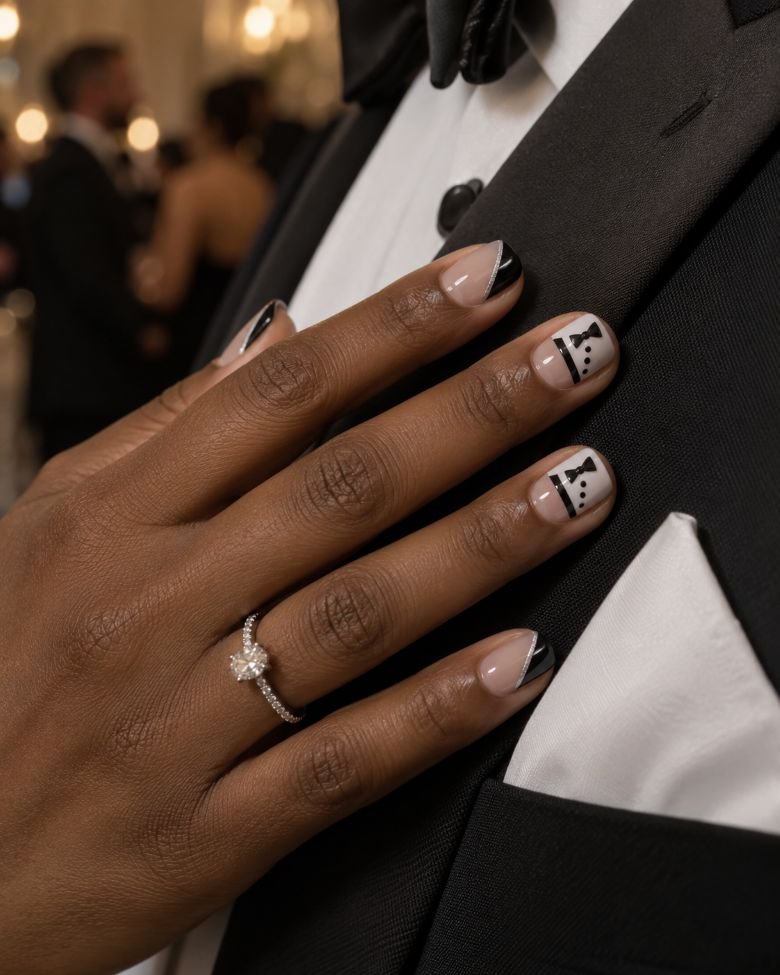
Short square nails use a sheer beige base with crisp black V-shaped tips that resemble tailored lapels. Two white accent nails carry tiny black buttons and a miniature satin bow-tie motif close to the cuticle. A narrow silver line traces selected V tips, adding evening shine without covering the graphic black-and-white contrast.
These black-tie nails are playful enough for New Year’s Eve but structured enough to work with formal clothing. The short square silhouette reinforces the tailoring and remains practical through dinner and dancing. Nail decals can handle the bow tie and buttons, while French-tip guides help keep both sides of each V symmetrical.
How to Apply
- Apply sheer beige to most short square nails and opaque white to two accents.
- Paint sharp black V tips on the nude nails, checking that both sides meet at the center.
- Add tiny black buttons and bow ties to the white accents, then trace several V tips with silver.
- Seal the graphic design with a glossy top coat.
12. Emerald Jewel Cat-Eye Nails
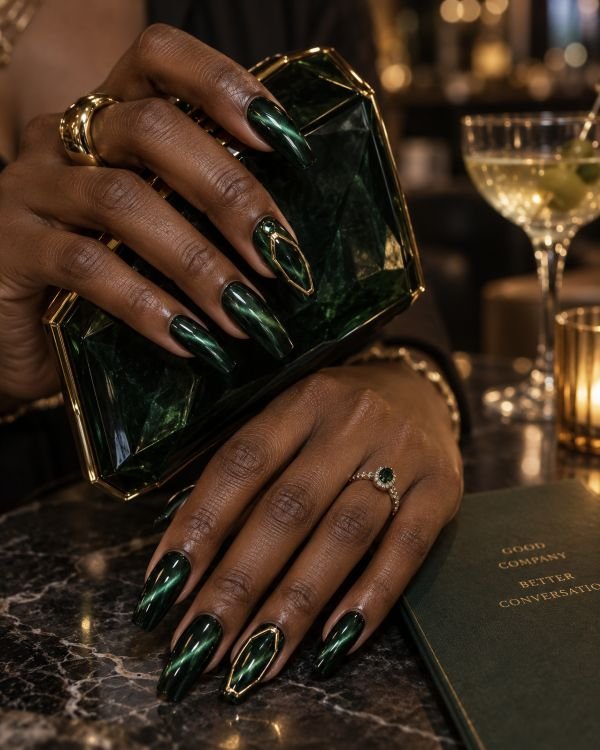
Medium coffin nails in blackened emerald use magnetic pigment to form sharp diagonal beams rather than a soft velvet haze. Thin raised gold frames surround the green light on two accents, creating the appearance of long faceted gemstones, while one tiny emerald crystal sits near a cuticle. The remaining nails keep the unframed diagonal cat-eye effect.
This design combines a jewel-tone color with architectural detail, making it distinct from a uniform velvet manicure. It suits gold jewelry, black dresses, and intimate cocktail events where the moving green light can be seen up close. The gold frames and magnetic beams require one-nail-at-a-time gel work, so this is better suited to a salon than regular shimmer polish.
How to Apply
- Apply a black base to medium coffin nails and cure.
- Cover one nail with emerald magnetic gel, pull the pigment into a sharp diagonal beam, and cure immediately.
- Add low raised gold gemstone frames to two accents and secure one small emerald crystal near a cuticle.
- Seal the color and frame edges with glossy top coat.
13. Ruby Glass French Nails
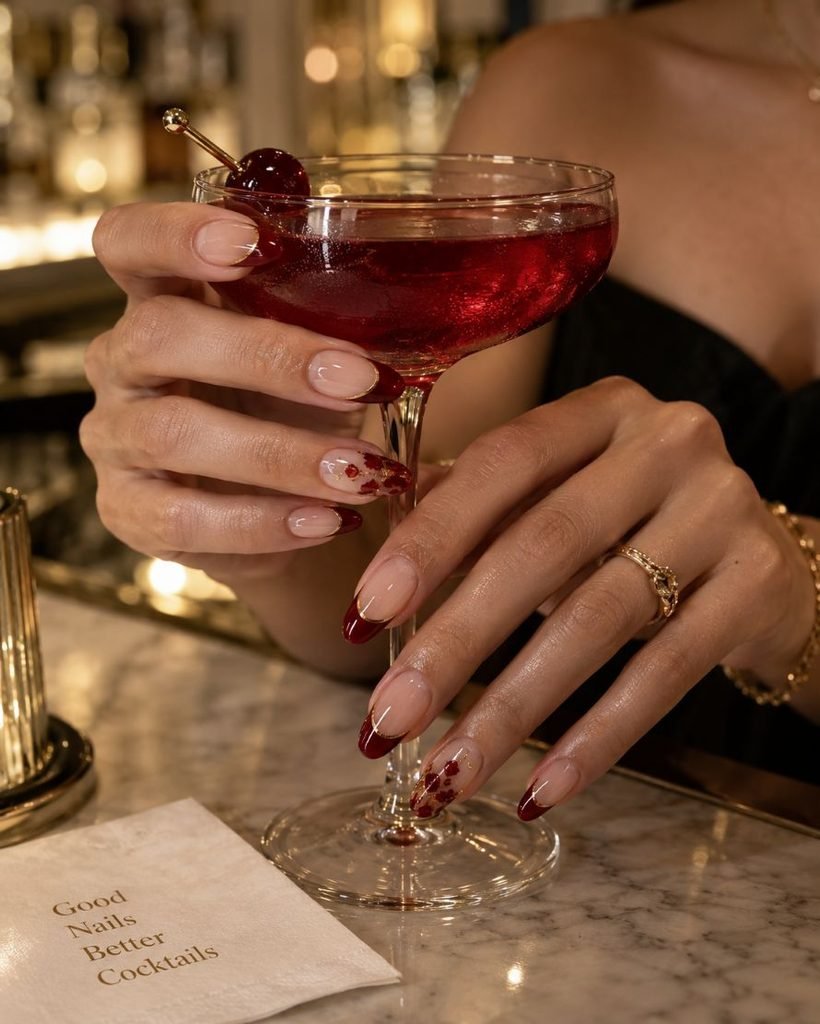
Medium almond nails remain translucent nude from the cuticle through the center, then transition into deep ruby-red jelly tips. A hairline gold border traces the French smile line, and two accent tips contain tiny suspended red foil fragments beneath the transparent color. The result resembles stained glass rather than opaque red polish.
This manicure is a strong option for someone wearing red lipstick, gold jewelry, or a neutral party dress. The translucent tips feel celebratory while remaining sleek enough for early January. Jelly gel creates the clearest depth, although a sheer red lacquer layered over a nude French base can suggest the effect on natural nails.
How to Apply
- Apply a translucent nude base to medium almond nails.
- Build ruby-red jelly color over the tips in thin layers, preserving a clean curved border.
- Add tiny red foil fragments beneath two accent tips and trace each smile line with fine gold.
- Encapsulate the tips with a glassy top coat.
14. Nude Gold Starburst Nails
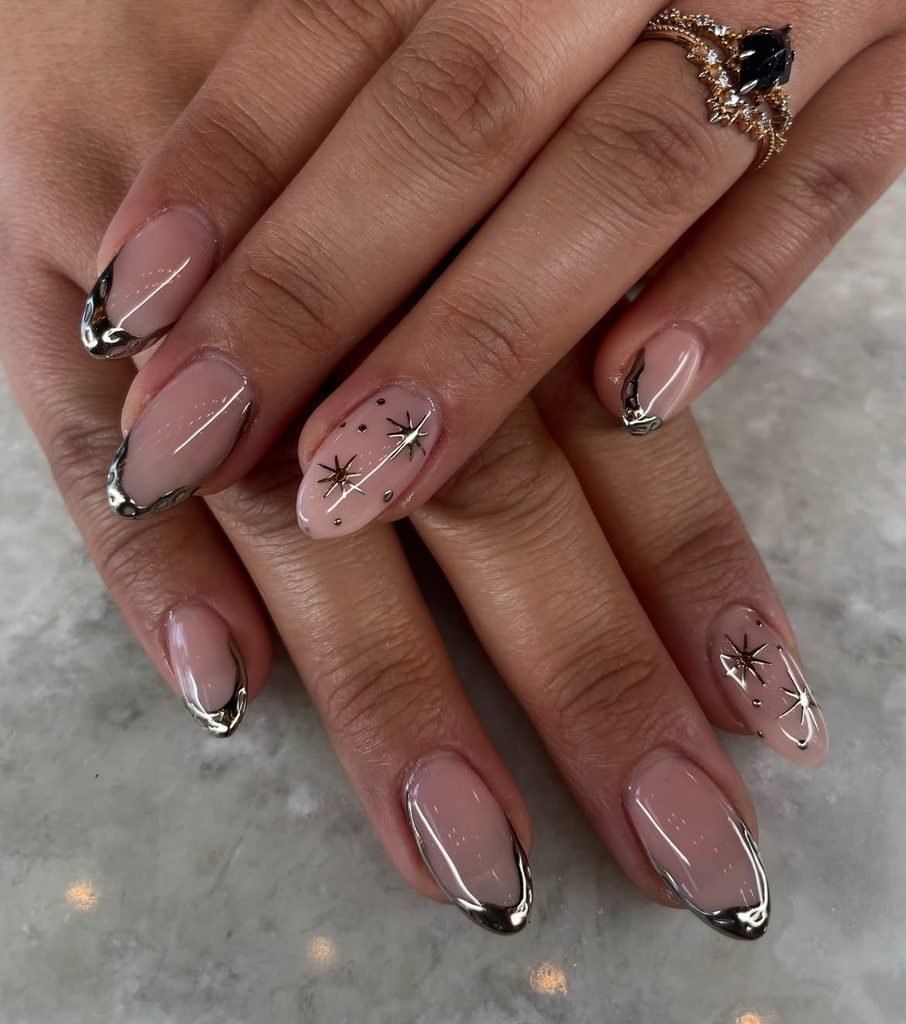
Short oval nails are covered in translucent pink-beige polish, then decorated with fine champagne-gold starbursts placed asymmetrically near the tips and sidewalls. The bursts vary between four, six, and eight points, accompanied by tiny metallic dots but no loose glitter. One nail stays almost bare with a single miniature star close to the cuticle.
This is the quietest New Year nail art option for a work event, dinner at home, or anyone who prefers jewelry-like detail. Short oval nails make the fine lines feel delicate, and the neutral base will not compete with patterned clothing. Metallic decals provide sharp points for beginners, while a long liner brush gives a more organic hand-painted result.
How to Apply
- Apply two thin coats of translucent pink-beige polish to short oval nails.
- Paint or place asymmetrical gold starbursts in several sizes.
- Add sparse champagne-gold microdots while leaving one nail nearly bare.
- Press all details flat and finish with glossy top coat.
15. Holographic Prism Nails
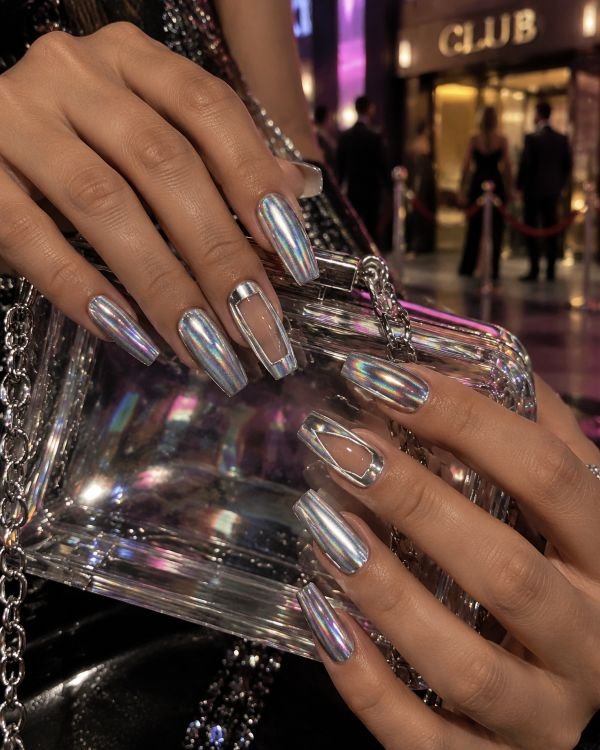
Medium coffin nails are covered in a smooth silver holographic design that shifts to pink, blue, violet, and green when viewed from different angles. Two of the nails have transparent negative-space windows decorated with the same multicolored pattern as the others, so the manicure as a whole is not a single continuous ribbon of color. The design is linear and glassy rather than having large chunks of glitter.
Considering their size and the amount of color they display, such holographic nails could be worn at a dance club or a concert, as well as with black clothing because the effect would complement dark monochrome outfits.
Coffin-shaped nails provide a wide surface for the design to extend on, but shorter square nails could also work as the holographic effect is not overwhelming. Using a gel polish is easier than using the loose powder as it results in an even reflection rather than having to seal the individual bits of glitter.
How to Apply
- Apply a smooth black or silver base to medium coffin nails, leaving two planned negative-space windows clear.
- Cover the colored areas with linear holographic gel or compatible prism powder.
- Refine the transparent windows with thin silver borders.
- Seal the full set with a high-gloss top coat that preserves the color shift.
16. Pearl Chrome Bow Nails
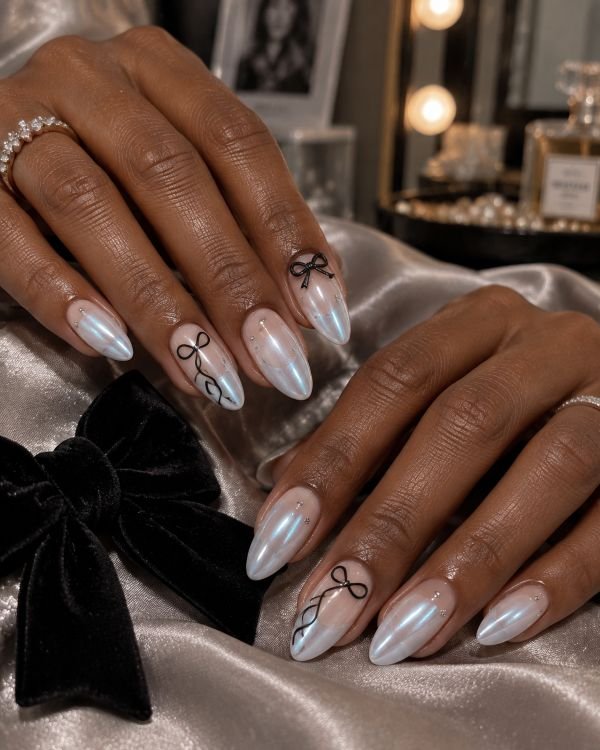
Medium almond nails glow beneath translucent milky polish and a fine pearl chrome veil that shifts from white to pale blue. Two accents feature narrow black ribbon loops painted diagonally across the surface, while a single low sculpted bow sits close to one cuticle. Tiny silver dots follow the ribbon edges without turning the set into a heavily embellished manicure.
The black ribbon keeps the pearly base from reading as bridal and creates a polished coquette option for New Year’s dinner or a winter party. Almond nails give the bow loops space to curve gracefully, but the raised accent should stay low enough not to catch on clothing. Flat bow decals offer the most practical home version.
How to Apply
- Apply translucent milky gel to medium almond nails and cure.
- Rub fine pearl chrome over a compatible surface and remove the excess powder.
- Paint slim black ribbon loops on two nails and sculpt or attach one low black bow near a cuticle.
- Seal the chrome and ribbon edges with glossy top coat.
17. Dirty Martini Olive Nails
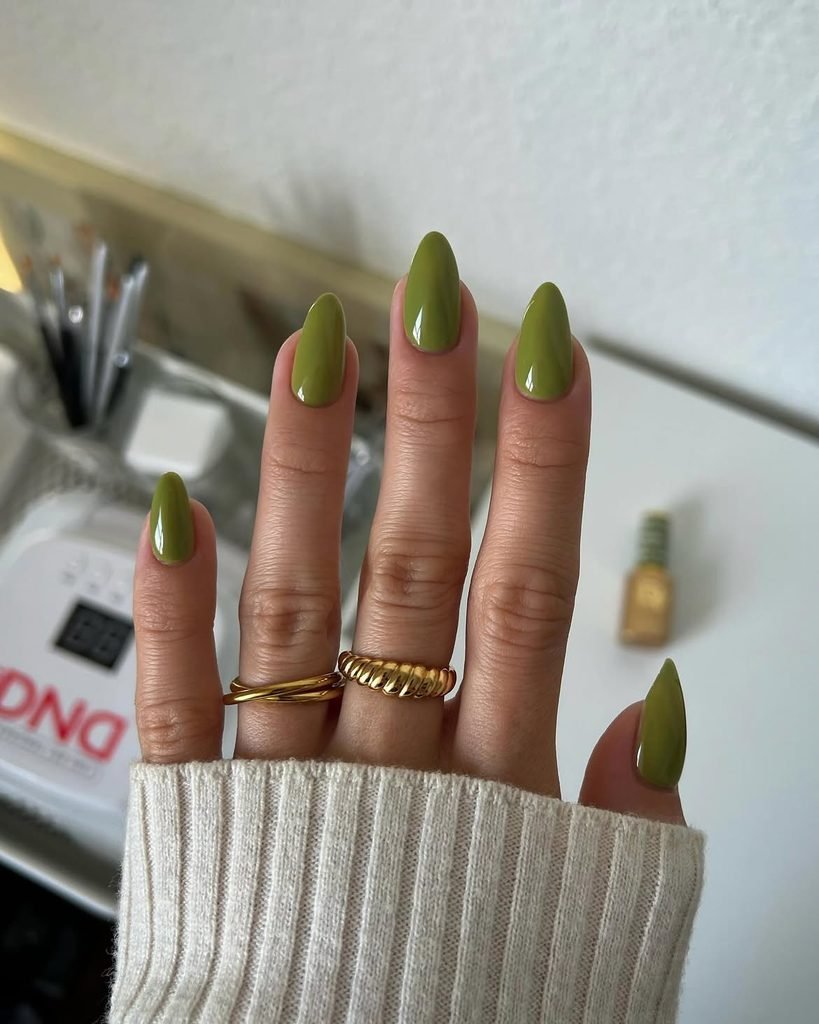
Short oval nails are coated in translucent olive-green jelly, with two sheer nude accents carrying minimalist martini details. Fine silver cocktail picks cross the accents diagonally, each holding one green olive with a tiny red pimento center. A few clear droplets near the tips create the cold, glassy appearance of a freshly poured drink.
These martini-inspired nails offer a witty alternative to champagne art and pair especially well with black, cream, chocolate, and silver outfits. The short oval shape keeps the cocktail details chic rather than novelty-driven. Dotting tools make the olives easy to paint, while the straight picks only require a fine liner brush and a steady hand.
How to Apply
- Paint most short oval nails with two thin coats of translucent olive jelly polish.
- Apply a sheer nude base to two accents and draw slim diagonal silver cocktail picks.
- Add green olive circles, tiny red pimento centers, and several small clear droplets near the tips.
- Finish the set with a glassy top coat.
18. Midnight City Skyline Nails
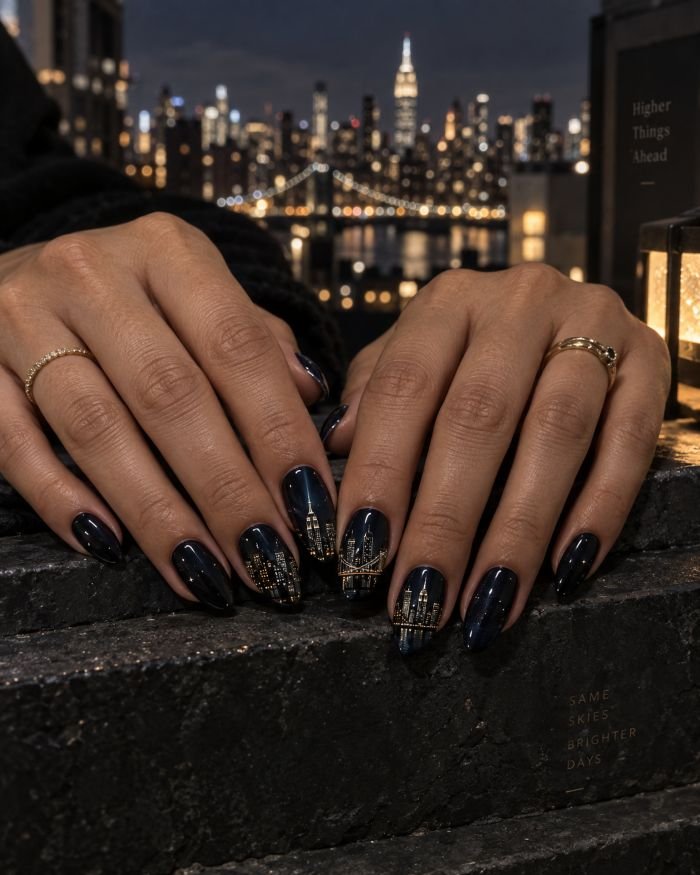
Medium almond nails fade from black at the tips into deep midnight navy near the cuticles. A fine silver city skyline runs across three nails, with tiny warm-gold windows and one narrow beam of light rising into the sky. The remaining nails carry scattered silver pinpoints that resemble distant building lights rather than a full star field.
This midnight blue manicure captures the feeling of watching the countdown from a rooftop without using a literal clock. The connected skyline works best on nails long enough to keep the buildings recognizable, although one simplified accent can fit shorter lengths. Pair it with navy velvet, black tailoring, or mixed-metal jewelry for an evening city celebration.
How to Apply
- Blend midnight navy into black across medium almond nails.
- Draw a thin silver horizon and varied building silhouettes over three nails.
- Dot a few warm-gold windows and paint one narrow upward light beam.
- Add sparse silver pinpoints to the remaining nails and seal with glossy top coat.
19. Sparkler French Tips
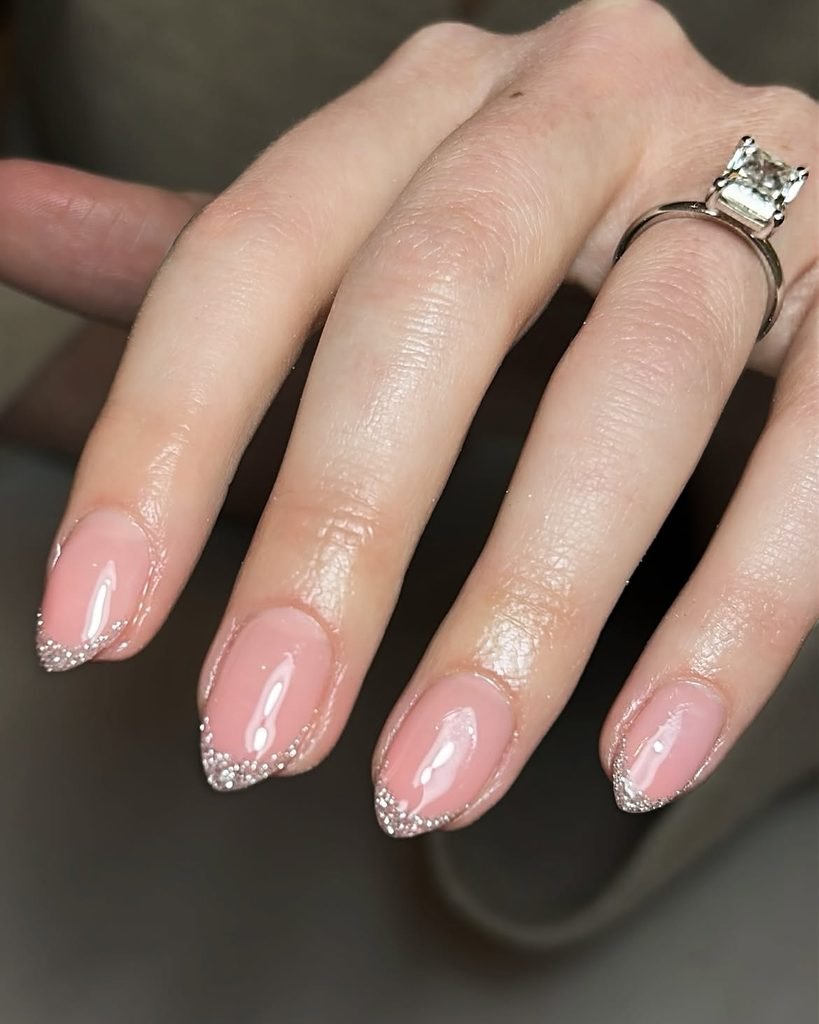
Short oval nails use a sheer blush base with fine champagne-silver glitter French tips. At one corner of each smile line, a tiny gold sparkler burst extends into delicate radiating lines and pinprick dots. The bursts alternate sides across the hand, giving the sparkly French manicure a natural rhythm.
This design delivers clear New Year’s energy without sacrificing a practical nail length. It suits office parties, dinner reservations, or a quieter celebration where a full glitter set would feel excessive. A small detail brush and dotting tool are enough for the bursts, while a sponge helps create dense glitter tips without thick polish.
How to Apply
- Apply a sheer blush base to short oval nails.
- Sponge fine champagne-silver glitter across each free edge to form a narrow French tip.
- Paint a small gold sparkler center at alternating corners and pull fine lines outward.
- Add a few pinprick dots and finish with a glossy top coat.
20. Pink Champagne Chrome Aura Nails
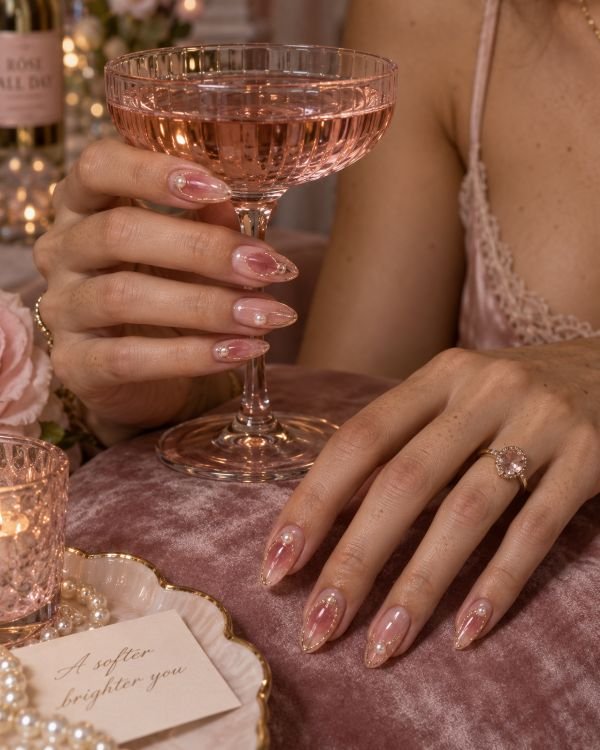
Translucent blush almond nails deepen into soft rose centers, then receive an isolated ring of rose-gold chrome around each aura. The metallic halo is intentionally irregular, appearing brighter on one side as though lit by a glass of pink champagne. Two accents include a few tiny pearl bubbles floating above the chrome ring.
This design combines diffused color with reflective detail, making it more dimensional than a standard pink gradient. It works for romantic dinners, feminine party outfits, and anyone who prefers warm metallics to silver. A salon airbrush and isolated chrome gel produce the cleanest result, while a sponge and rose-gold metallic liner can create a simpler DIY interpretation.
How to Apply
- Apply a translucent blush base to medium almond nails.
- Sponge a soft rose aura into each center, keeping the edges diffused.
- Paint an irregular halo with compatible non-wipe gel, cure as directed, and rub in rose-gold chrome.
- Add tiny pearl bubble dots to two accents and seal the chrome edges.
21. Mixed-Metal Ripple Nails
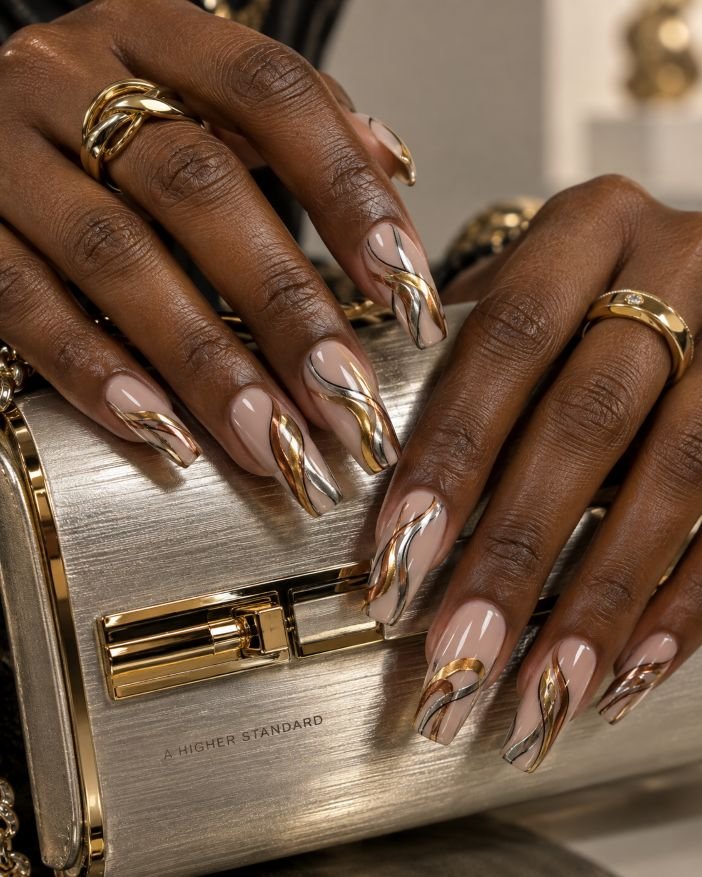
Sheer nude medium coffin nails are crossed by fluid ribbons of silver, yellow gold, and warm copper chrome. The ripples vary in width and direction, sometimes overlapping while leaving generous transparent space between them. A few narrow black lines separate selected metals, giving the mixed-metal nail art clearer definition.
This manicure solves the problem of choosing one jewelry tone and works particularly well with layered rings or a metallic bag. Coffin nails provide a long, flat canvas for the ribbons, but the design can be shortened by using only one ripple per nail. Chrome powders need isolated application and careful sealing, so metallic art gel is the easier home substitute.
How to Apply
- Apply a sheer nude base to medium coffin nails.
- Paint separate flowing ribbons with compatible chrome gel and cure them without allowing the colors to touch prematurely.
- Rub silver, gold, and copper chrome onto the designated ripples, then add a few thin black separators.
- Brush away excess powder and seal every metallic edge with a glossy top coat.
22. Black and Gold Marble Nails
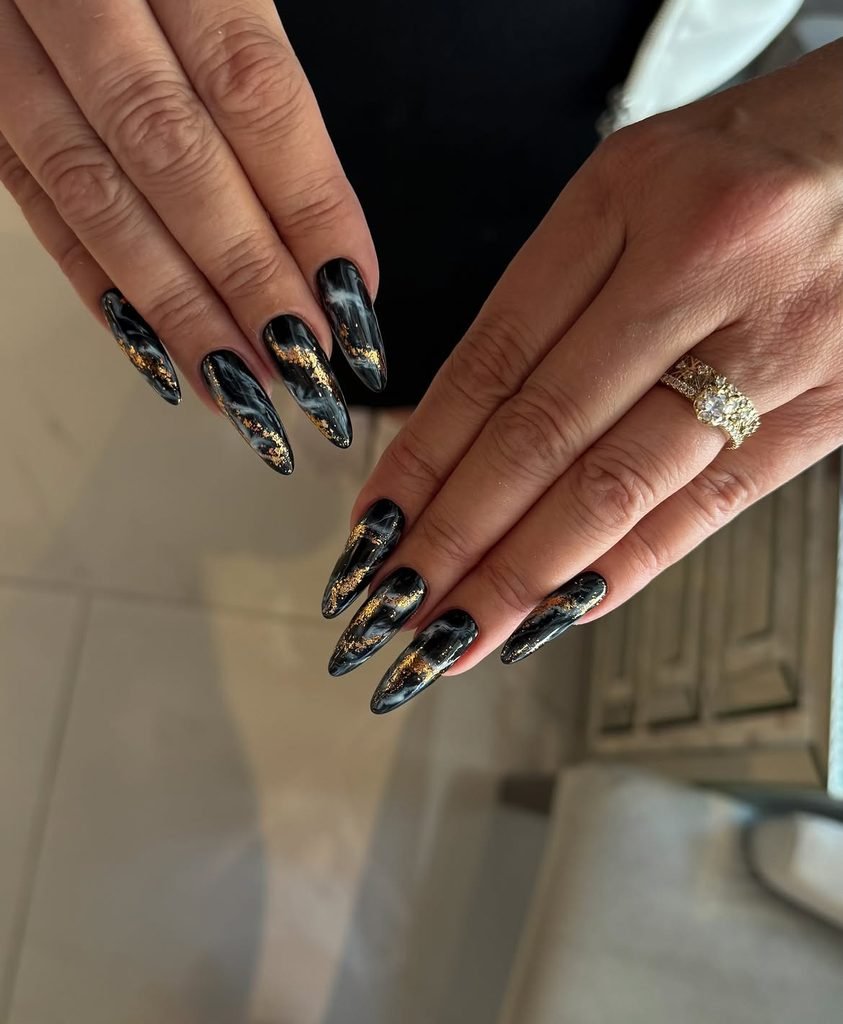
Long stiletto nails combine pools of glossy black, smoky cream, and translucent grey in an irregular marble nail design. Fine gold foil veins travel through the color boundaries, widening into small fractured patches on two accents. The pattern changes across every nail, with enough cream remaining to prevent the set from looking solid black.
This is a luxe but grounded choice for dinner parties and formal gatherings, particularly with black, camel, ivory, or gold outfits. Short almond nails keep the marble wearable, and the organic pattern hides small differences between hands. Blooming gel can diffuse the colors at a salon, while a fine brush and diluted polish work for a slower at-home version.
How to Apply
- Apply a smoky cream base to Long stiletto nails.
- Swirl irregular black and translucent grey pools through the uncured or wet layer without overmixing them.
- Press fine gold foil along selected color boundaries and widen it in a few fractured areas.
- Encapsulate the marble beneath a leveling glossy top coat.
23. Multichrome Disco Swirl Nails
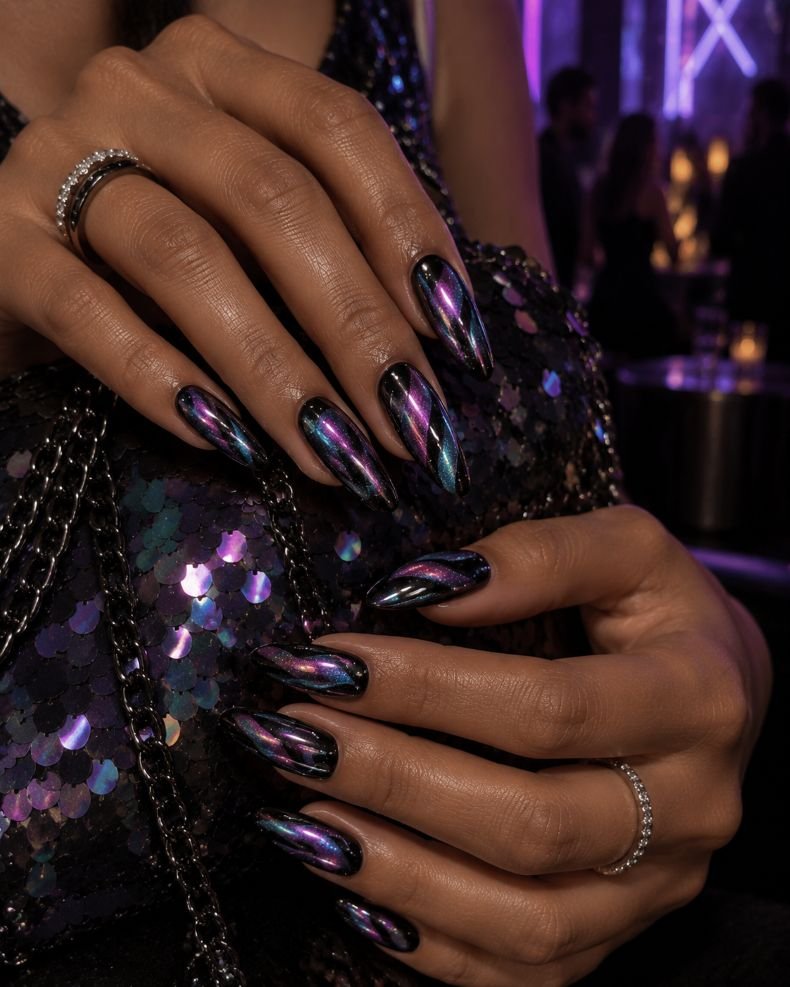
Long almond nails use a black base beneath broad ribbons of multichrome pigment shifting between fuchsia, violet, teal, and electric blue. The swirls curve from sidewall to tip, leaving narrow black channels that sharpen the movement. Fine holographic dust is restricted to the bends, where the color change is strongest.
These multichrome nails suit dancing, concerts, and colorful party clothing without relying on a literal disco-ball pattern. The long almond shape lets each ribbon travel in a full curve, although medium nails can carry one simplified wave. A premixed multichrome gel is easier to control than layering several loose powders over the same area.
How to Apply
- Paint long almond nails opaque black and cure or dry fully.
- Draw broad curved ribbons using multichrome gel, preserving narrow black channels between them.
- Add fine holographic dust only at selected bends to emphasize movement.
- Finish with a deep glossy top coat and cap the free edges.
24. Crystal Cuticle Cuff Nails
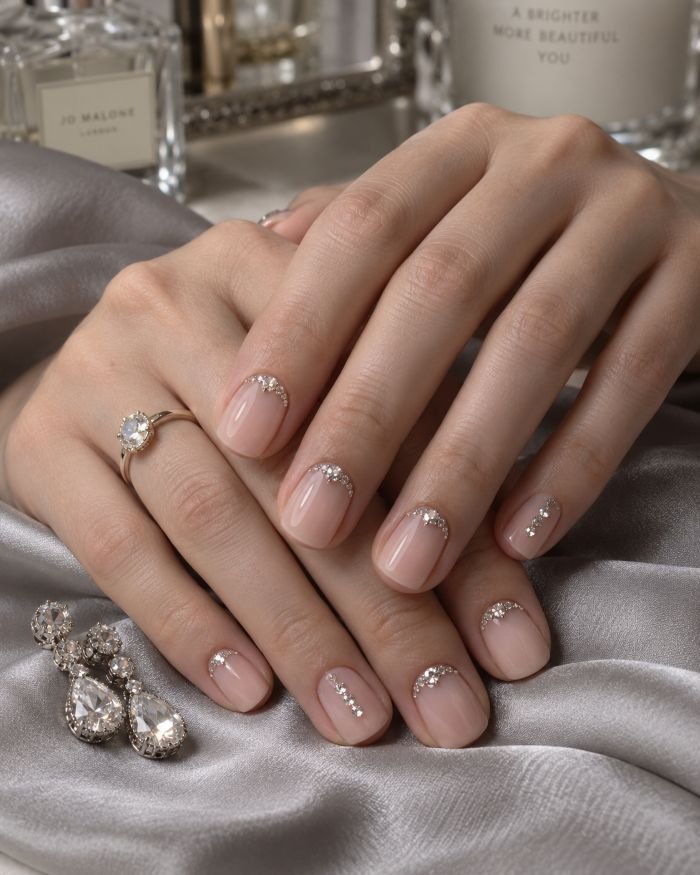
Short squoval nails remain almost bare beneath a translucent blush base. Tiny clear crystals graduate from larger stones at the center of each cuticle to smaller points along the sides, creating curved rhinestone cuticle cuffs. Two nails use only three stones, breaking the repetition and keeping the manicure from appearing overly formal.
This is a jewelry-focused option for someone who wants sparkle without metallic polish or glitter removal. The short shape makes the embellishment feel balanced, but every stone must be placed away from the surrounding skin and sealed securely. Flat-back crystals and gem gel support a secure salon placement; adhesive crystal decals are the lower-commitment DIY version.
How to Apply
- Apply a translucent blush base to short squoval nails and finish the surface as required by the system.
- Place one larger clear crystal above each cuticle center, keeping a safe gap from the skin.
- Graduate smaller stones along the curve and use only three stones on two nails.
- Secure the crystal edges with strong gem gel without coating the reflective facets.
25. Metallic Checkerboard Nails
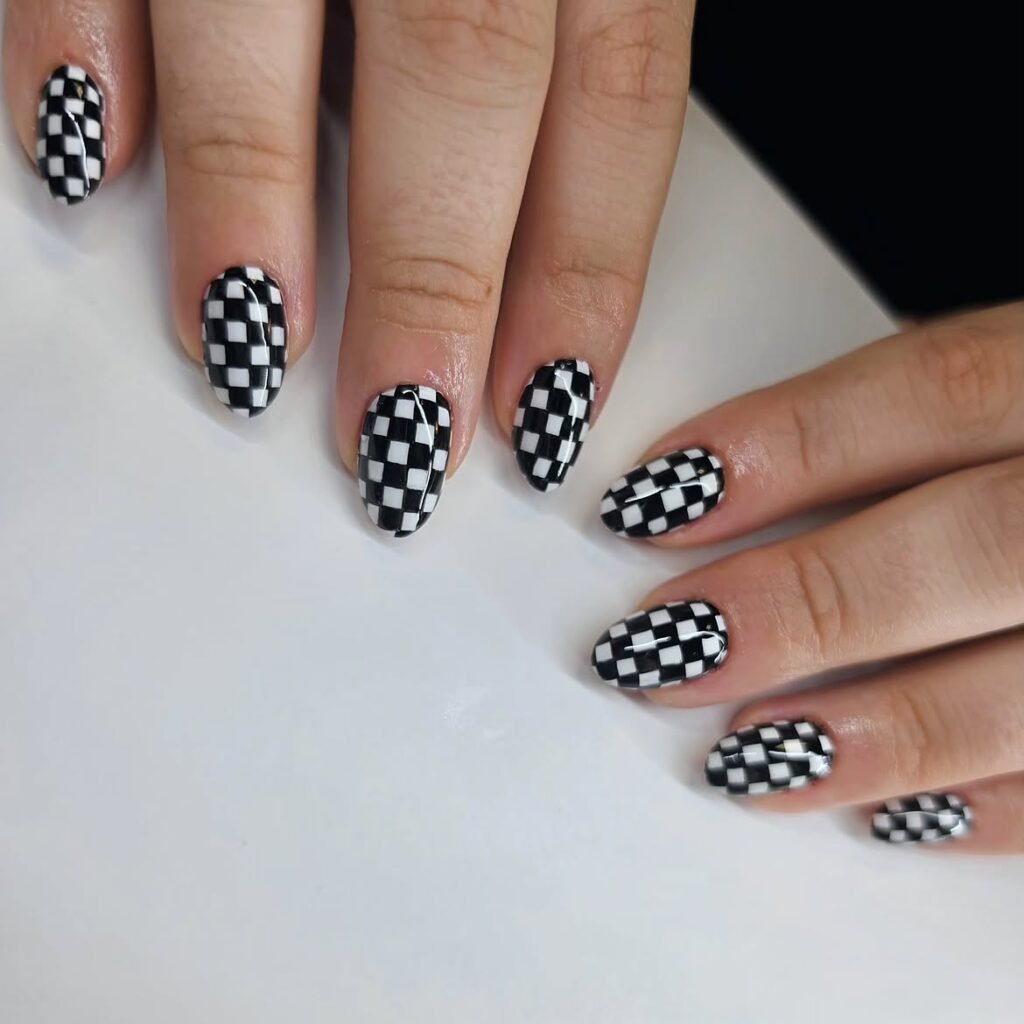
Medium almond nails carry a large-scale checkerboard of mirror silver, satin black, and transparent nude almond. The finishes alternate irregularly so that some nails show more negative space while others lean metallic. Fine silver borders keep each block crisp, and a glossy top coat contrasts with selected matte-black squares.
Unlike a mirrorball mosaic, this checkerboard manicure is flat, graphic, and visible from a distance. It works with minimalist black clothing, silver accessories, or a modern house party setting. Almond nails support the grid naturally, and striping tape can help map the pattern before the individual blocks are filled.
How to Apply
- Apply a clear nude base to medium almond nails and map a large checkerboard with fine guide lines.
- Fill alternating blocks with black gel and mirror-silver gel or chrome, leaving selected squares transparent.
- Trace the grid with thin silver and apply matte top coat only to several black blocks.
- Seal the remaining surface with gloss while preserving the finish contrast.
26. Ruby Red Half-Moon Nails
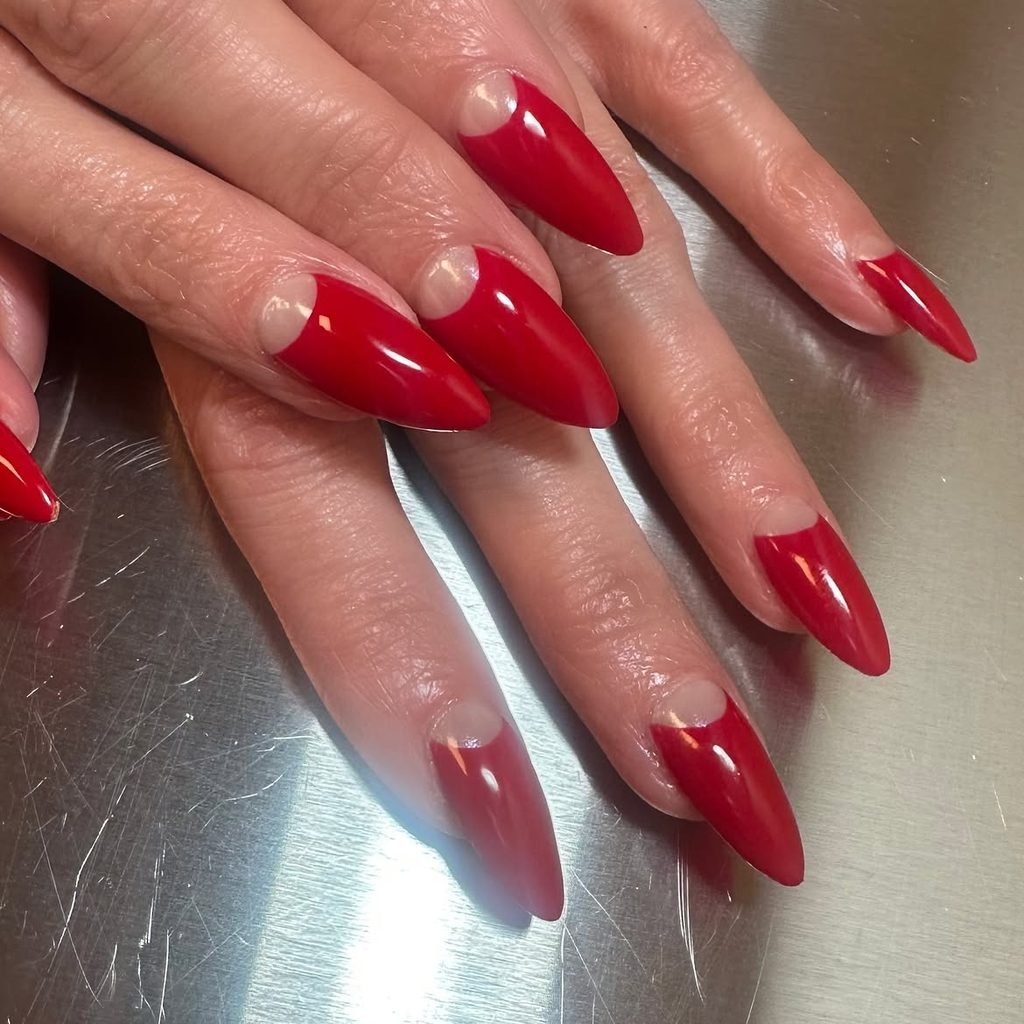
Almond nails are painted a saturated ruby red, leaving clean champagne-gold half-moons visible at the cuticles. A slim black line divides the red and gold on two accents, while the remaining nails keep the border simple. The red is finished in high gloss and the metallic crescents remain softly reflective.
This is the polished red manicure for someone who wants New Year’s glamour without illustrative nail art. It works for dinner, a formal event, or a celebration followed by an ordinary workweek. Reinforcement stickers can guide the half-moons at home, but they need to be removed before the color fully dries to keep the curves sharp.
How to Apply
- Paint champagne-gold polish near the cuticles of almond nails and allow it to set.
- Position curved guides over the gold and apply saturated ruby red across the remaining nail.
- Remove the guides carefully and add a fine black divider to two accents.
- Finish with a glossy top coat, keeping the half-moon edges crisp.
27. Frosted Confetti Jelly Nails
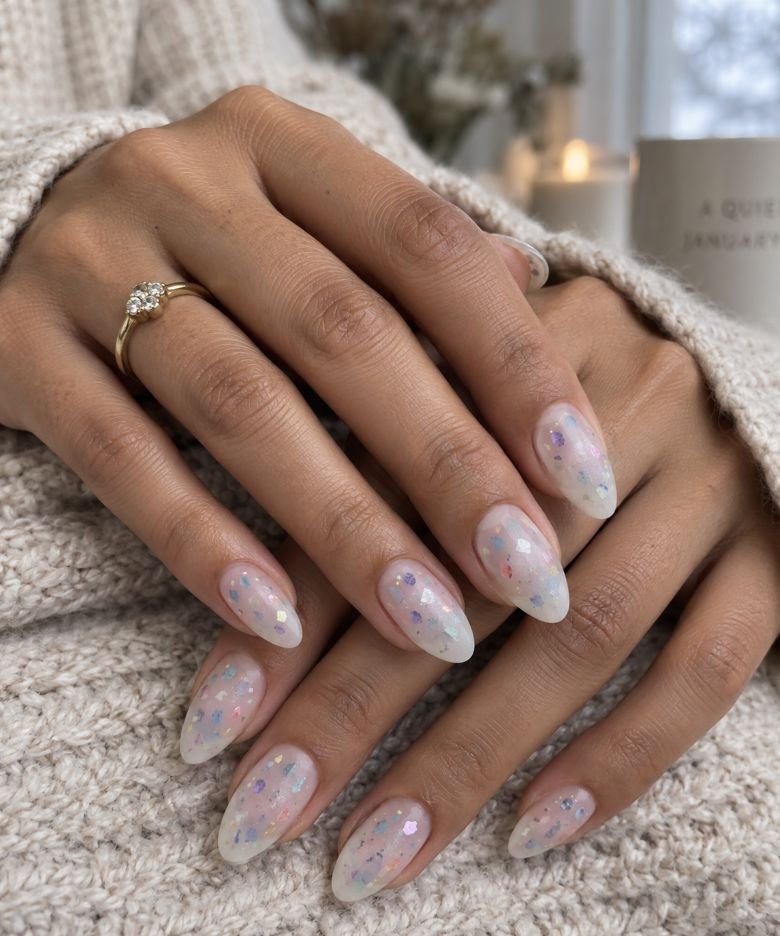
Medium almond nails are built from translucent milky jelly with irregular pieces of pastel and metallic film suspended inside. Lavender, blue, pink, mint, silver, and gold fragments appear softened by the cloudy layers, like confetti seen through frosted glass. A satin top coat diffuses the surface while preserving hints of reflection underneath.
This is a quieter interpretation of confetti for someone who wants color without sharp, high-contrast shapes. The milky finish transitions smoothly into January and complements knitwear as easily as a party dress. Encapsulation produces the best depth, but a sheer milky polish layered over thin foil pieces can imitate the effect on natural nails.
How to Apply
- Apply one translucent milky layer to medium almond nails.
- Place irregular pastel and metallic film fragments with visible space between them.
- Cover the pieces with another milky layer, adding a second group at a different depth if desired.
- Smooth the surface and finish with a satin top coat.
28. Champagne Toast Line-Art Nails
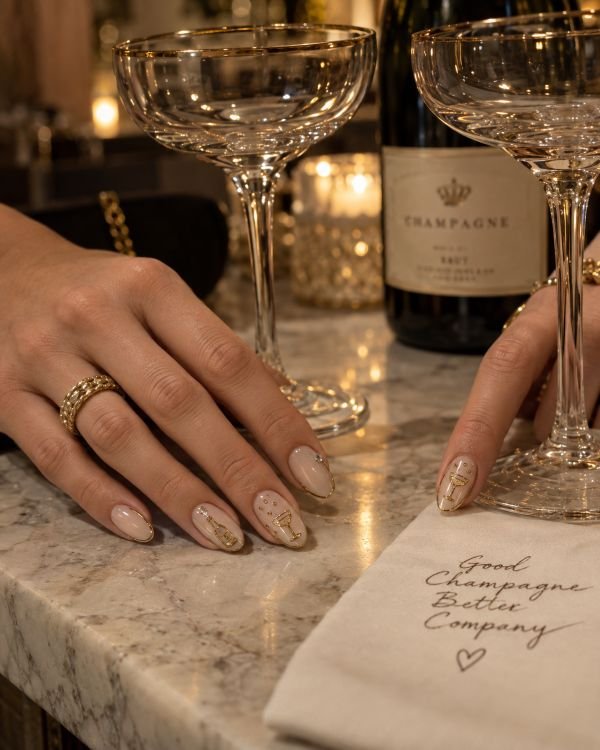
Medium oval nails use a sheer beige base as a canvas for fine metallic-gold illustrations of a champagne bottle, two coupe glasses, and rising bubbles. The imagery continues across three nails, while the remaining nails carry slim gold side outlines and one tiny clear crystal. The artwork stays linear and open instead of filling the nails with opaque color.
This design offers a recognizable toast motif without the bulk of encapsulated bubbles or 3D charms. Oval nails make the bottle and glass curves feel elegant, and the sheer base pairs with almost any party outfit. Gold decals can replace the detailed drawings, but custom linework will fit the proportions of each nail more naturally.
How to Apply
- Apply a sheer beige base to medium oval nails.
- Draw a fine gold bottle across one nail and two coupe outlines across the adjacent accents.
- Add rising gold bubbles, slim side outlines on the remaining nails, and one tiny clear crystal.
- Seal the line art with a smooth glossy top coat.
29. Clean Slate Milky White Nails
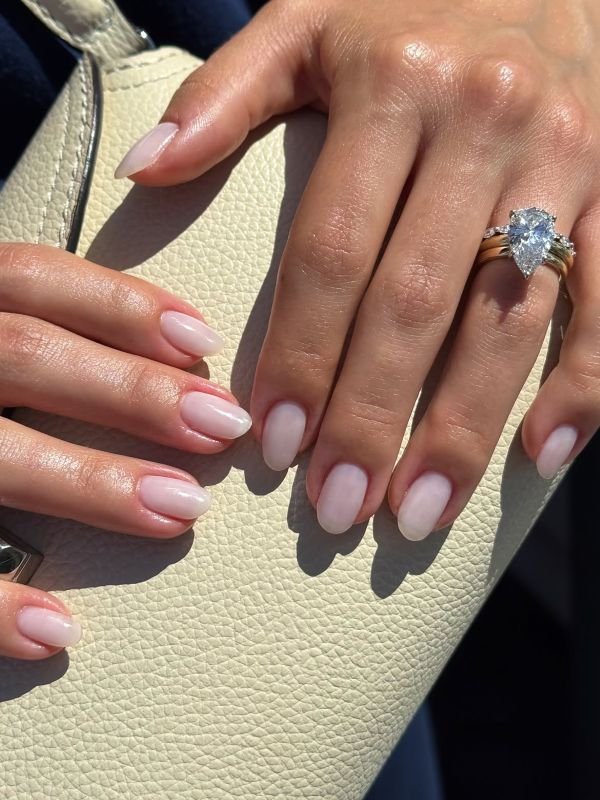
Short oval nails fade from translucent pink at the cuticles into soft milky white through the tips, finished with a barely visible pearl glaze. A single hairline silver edge runs down one side of each nail, alternating direction across the hand. There is no glitter, lettering, or central motif, giving the set a calm New Year’s Day manicure feel.
This design is for someone who wants the manicure to suggest a fresh start rather than one night of celebration. It works with office clothing, winter neutrals, and any jewelry tone, and the short length requires little adjustment after the holiday. The soft gradient can be created with a sponge, airbrush, or carefully layered sheer polish.
How to Apply
- Apply a translucent pink base to short oval nails.
- Sponge milky white from the tips toward the center, keeping the cuticle area sheer.
- Add a fine pearl glaze and one alternating hairline silver edge along each sidewall.
- Finish with a clear glossy top coat for a smooth, clean surface.
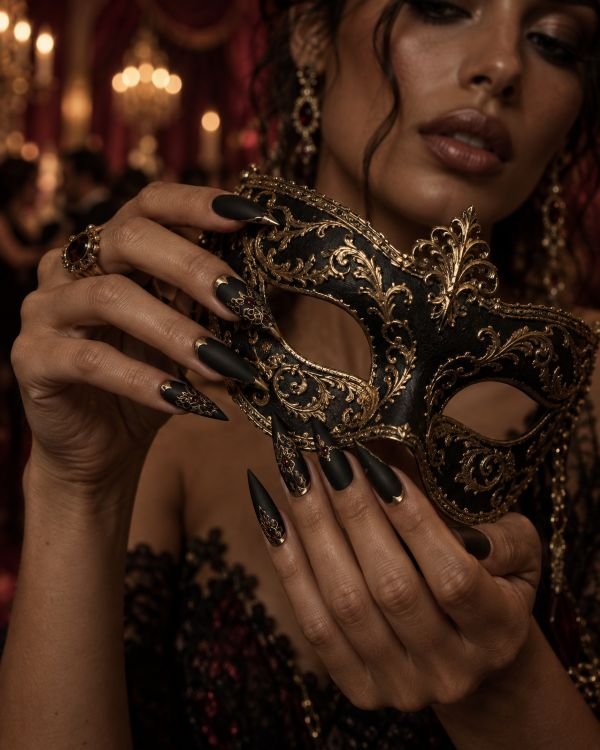
30. Black and Gold Masquerade Nails
Long stiletto nails in velvet-matte black are covered with fine metallic-gold lace that forms the suggestion of masquerade masks across four accents. Small burgundy crystals mark the outer corners like jewels, while the remaining nails carry sharp gold cuticle points. Select lace sections receive a glossy finish, creating texture against the matte base.
This final design is intentionally dramatic and best suited to a formal ball, themed party, or custom press-on set. Stiletto nails support the mask’s upward sweep and give the lace enough room to remain readable. The combination of long extensions, fine patterning, and securely placed crystals makes it a specialist salon request rather than a quick DIY project.
How to Apply
- Build balanced long stiletto extensions, paint them black, and apply a velvet-matte top coat.
- Draw fine symmetrical gold lace patterns across four accents to suggest masquerade masks.
- Secure small burgundy crystals at the outer corners and paint sharp gold cuticle points on the remaining nails.
- Add gloss selectively over parts of the lace and seal all crystal edges securely.
Choosing a New Year’s Manicure for Your Plans
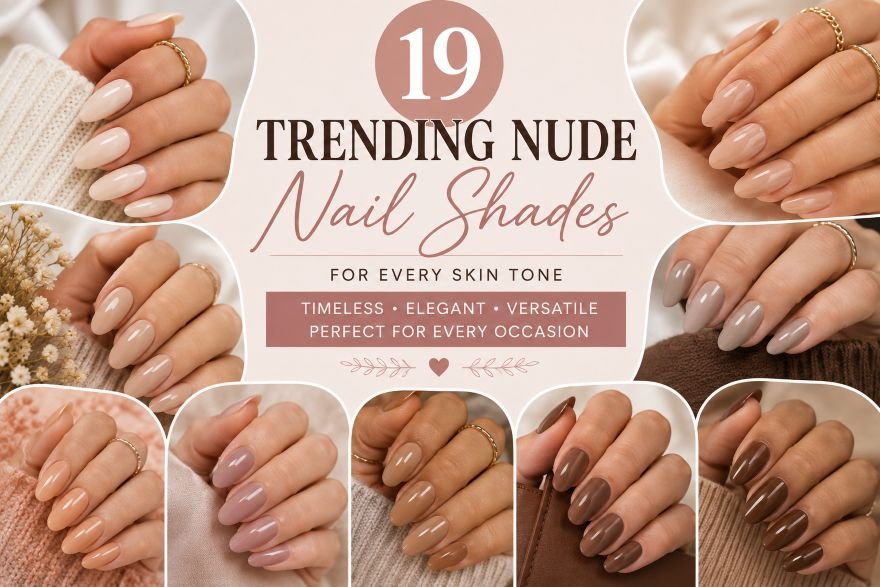
A busy dance floor offers a rewarding opportunity to let your reflection do the work, so consider mirrorball tiles, holographic polish, cat-eye gel, liquid chrome, and multichrome swirls. For a seated dinner, your look needs to keep going strong up close, so go for Art Deco tips, ruby half-moons, martini accents, gold starbursts, or crystal cuffs. Meanwhile, if you need to keep your polish going through the week (and maybe into the weekend), reach for champagne fades, metallic French tips, pearl chrome, and the clean-slate milky design instead of clocks or illustrated champagne bottles.
Cleaner metallic outlines, subtle sparkle gradients, and dimension without excessive density have featured strongly in recent New Year’s manicure coverage, which is useful guidance if you want to shine without visual clutter. Who What Wear highlights metallic edges and controlled gradients, while Byrdie shows how short square metallic nails and restrained bow details can work beyond the party itself.
Best Nail Shapes for New Year Nail Art
Short round and oval nails suit glitter fades, half-moons, starbursts, and small cocktail motifs. Square and squoval nails give French tips, checkerboards, mirror tiles, and tuxedo details the cleanest geometry. Almond nails work with fireworks, aura gradients, glass tips, and flowing swirls, while coffin and stiletto nails provide the space needed for clocks, encapsulated bubbles, sculpted metal, and elaborate lace. More space is only useful when the length remains compatible with your routine.
Can New Year Nail Designs Work on Short Nails?
Short fingernails should be decorated in such a way that the accent is on one particular detail. It is possible to highlight one special feature with magnetic velvet, ruby lacquer, champagne glitter, chrome tips, and holographic polish, and draw attention to it without overloading a small surface with various elements and killing self-expression. On short nails, it is necessary to choose an icon that is clearly visible but at the same time not too complicated: a starburst, half-moons, mini sparklers, olives, or crystal cuffs. The whole point is not to burden the nail plate with clocks, fireworks, champagne glasses, confetti, and lettering.
Final Thoughts
The most successful New Year’s manicure concept is united by a single idea. The mirrorball tiles require only a minimum of extra glitter, the countdown clock looks best of all on a restrained black-gold background, and the crystal cuff makes the most sense when the other nails are bare. Determine the statement you want to make in color, contrast, texture, design, or detailing, and build your look around it.
Choose for January 1 as well as midnight. If you want a one-night fantasy, sculpted silver, champagne bubbles, or masquerade lace earns the appointment time. If you need versatility, a metallic edge, ruby half-moon, pearl glaze, or champagne fade will still look intentional after the confetti has been swept away.