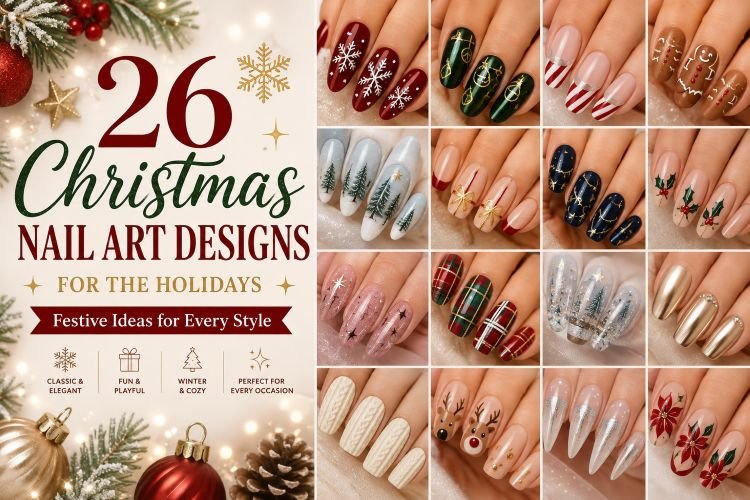
26 Christmas Nail Art Designs for the Holidays
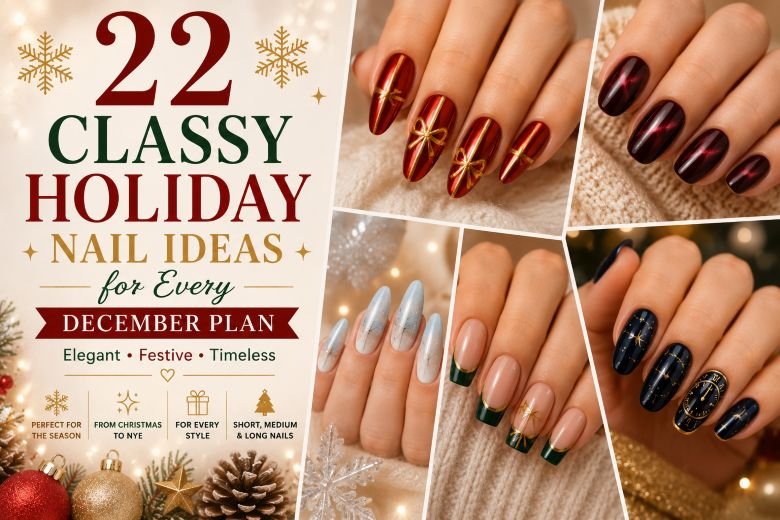
Christmas manicures can be frivolous, refined, or restrained in their holiday cheer, depending on how many shades and illustrations you are willing to invest in your nails. The christmas nail art designs below offer a variety of options to create the ultimate festive look for your nails, from the subtlest white accents to the most extravagant holiday-themed designs.
The collection includes ideas for short Christmas nails, practical New Year’s nail designs for natural nails, and more ambitious almond-, coffin-shaped, or long-accent nails. Additionally, you will find various ideas using shiny, frosted, metallic, jelly-effect, matte, and textured nail polish and nail art techniques to ensure that you can create a holiday manicure that will accompany you to your New Year’s party, not just serve as a picture in a Christmas card.
1. Classic Red Snowflake Nails
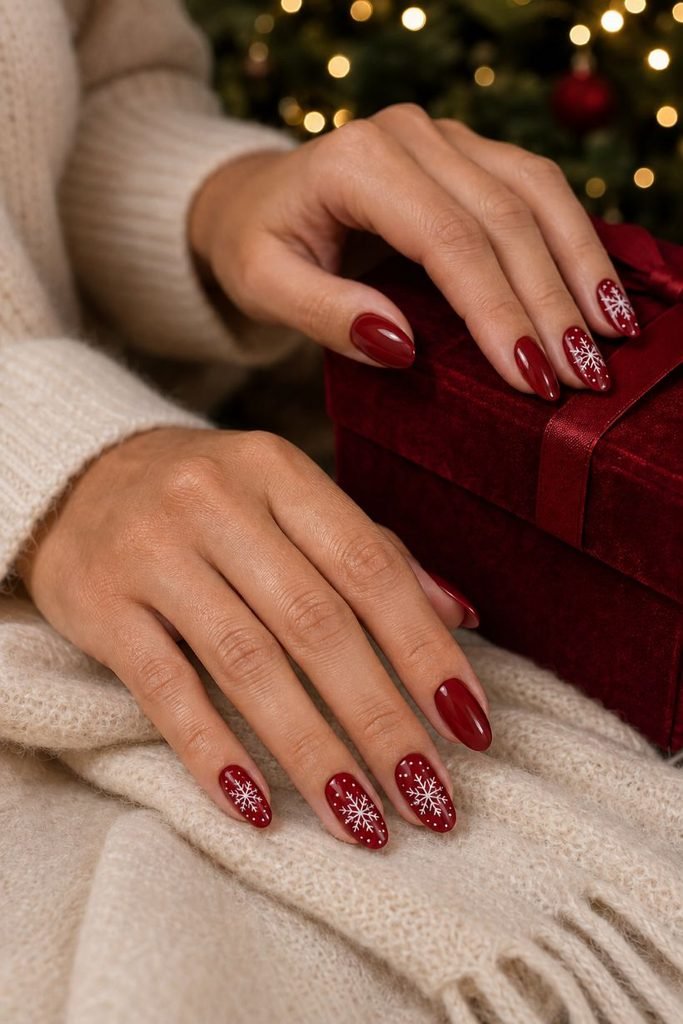
A rich cranberry-red base gives medium almond nails a warm, glossy finish, while hand-painted white snowflakes decorate three accent nails. The flakes vary slightly in size and structure, with tiny white dots scattered between them to suggest light snowfall. Leaving two nails solid red prevents the detailed pattern from overwhelming the tapered shape.
This is a dependable red Christmas manicure because the contrast is instantly seasonal without relying on glitter or raised decorations. It works for office parties, Christmas dinner, and winter events, and the medium length remains practical beneath gloves. A nail technician can create finer branches, but snowflake decals and a dotting tool make the design approachable at home.
How to Apply:
- Shape the nails into a medium almond and apply base coat followed by two thin coats of cranberry-red polish.
- Draw a small cross and diagonal lines on three nails, then add short branches to form individual snowflakes.
- Place uneven white dots around the flakes, keeping the remaining two nails solid red.
- Seal the design with a smooth high-gloss top coat.
2. Emerald Velvet Ornament Nails
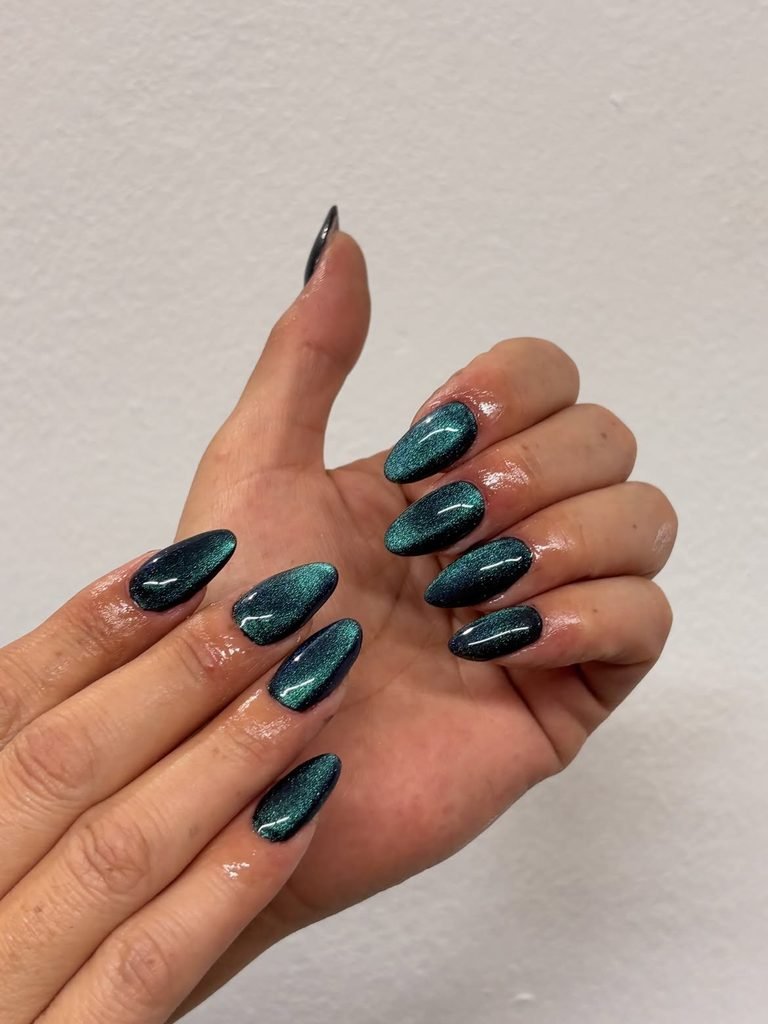
Short oval nails glow with deep emerald magnetic cat-eye gel, shaped into rounded highlights that resemble light moving across glass ornaments. Fine gold caps and hanging threads appear near the cuticles on two accent nails, turning the luminous circles into understated baubles. The magnetic pigment creates a velvety center while the surface remains completely glossy.
The dark green shade feels formal enough for eveningwear but still looks festive with cream knitwear and gold jewelry. Short oval nails keep the ornament details refined and comfortable for wrapping presents, cooking, or traveling. This effect needs magnetic polish and a nail magnet; standard shimmer cannot create the same concentrated band of reflected light.
How to Apply:
- Apply base gel and one thin coat of black or very dark green gel, curing according to the system.
- Cover one nail with emerald magnetic gel and guide the pigment into a rounded central glow before curing.
- Repeat one nail at a time, then paint small gold ornament caps and threads on two accents.
- Finish with a glossy gel top coat and seal the free edges.
3. Candy Cane French Tips
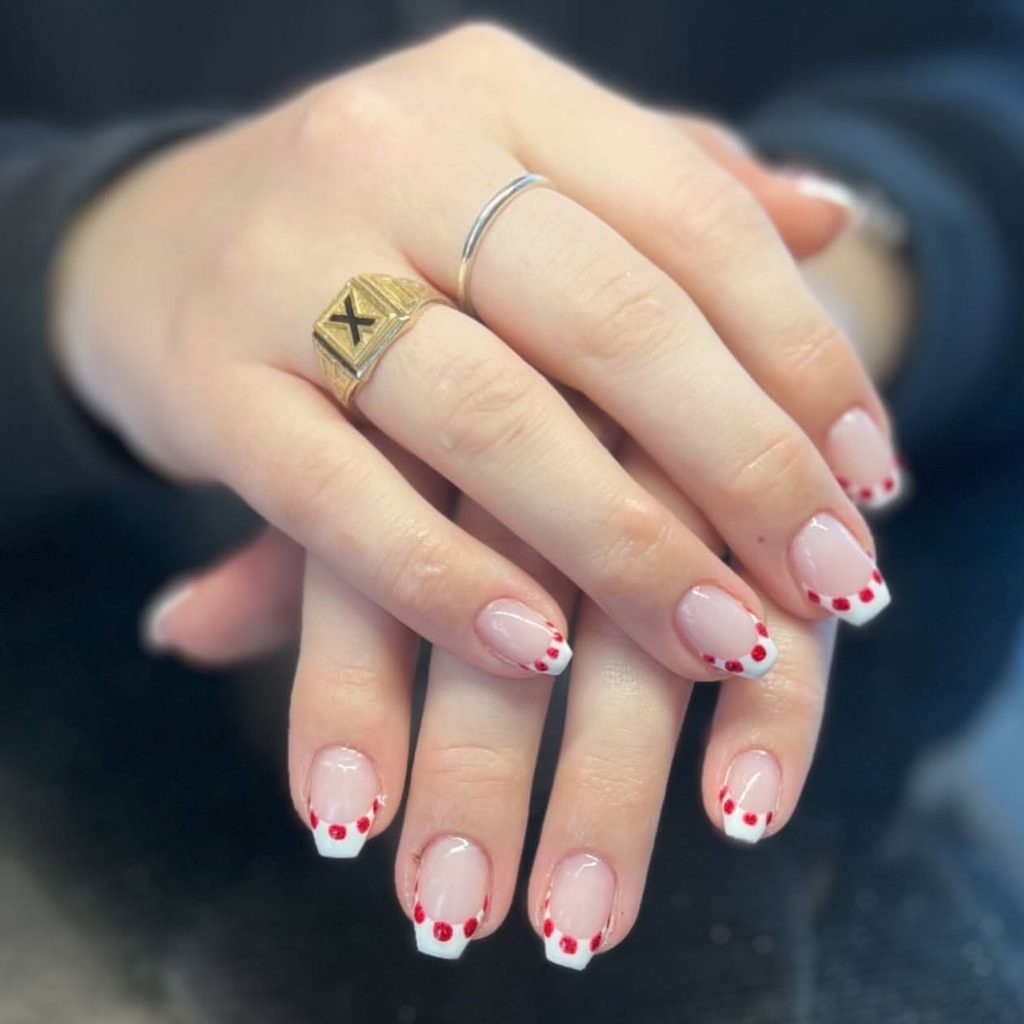
A sheer blush base keeps short square nails fresh, while crisp white French tips are crossed with slim diagonal red stripes. The alternating stripe widths give the tips a recognizable candy cane nail art pattern without covering the entire nail. One tiny silver line beneath each tip adds a festive glint and sharpens the border.
This design is cheerful but controlled, making it useful for anyone who wants recognizable Christmas art on a short, practical length. It pairs easily with red lipstick, white shirts, and silver accessories. The straight free edge of square nails makes the striping easier to balance, although striping tape or nail wraps will produce cleaner lines for a beginner.
How to Apply:
- Apply one or two coats of sheer blush polish to neatly shaped short square nails.
- Paint an opaque white French tip across each free edge.
- Add spaced diagonal red lines across the white tips, then trace a very thin silver line beneath each tip.
- Let the striping dry fully and seal it with glossy top coat.
4. Gingerbread Cookie Nails
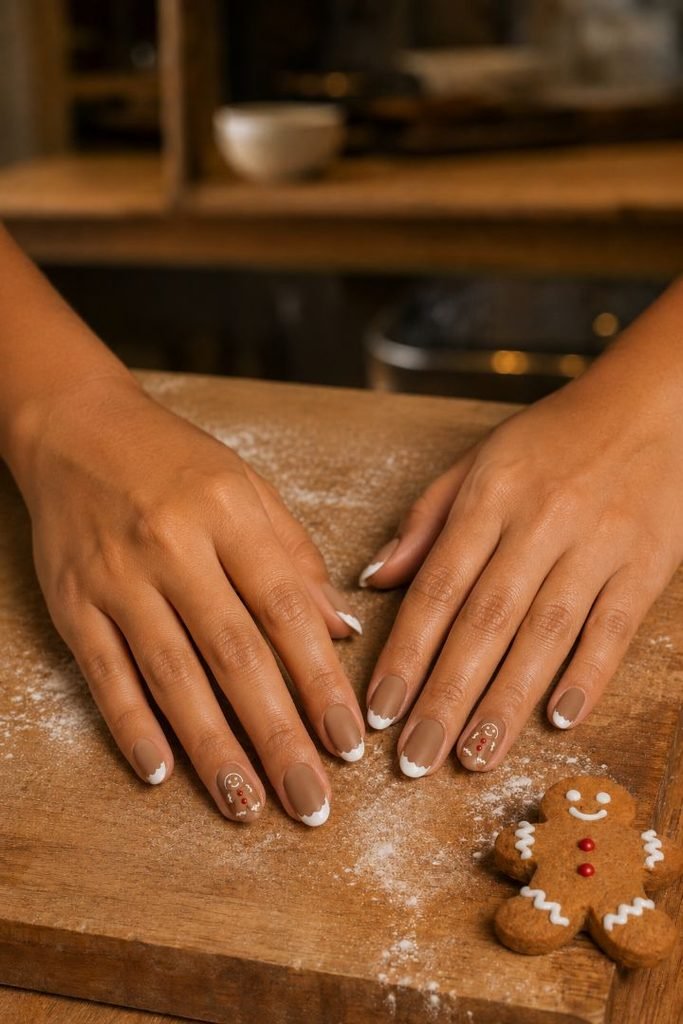
Warm biscuit-brown lacquer neatly covers medium oval nails in a soft matte finish. Two of them have miniature gingerbread figures decorated with white icing piping on a smaller scale. Tiny red buttons, smiling mouths, and puffy white cuffs accentuate the nails in various sizes. Others only have white icing scallops at their tips. All the images must be painted in a hand-pipedException style to avoid looking like printed stickers.
The gingerbread nails create a festive and playful mood that is suitable for baking days, family dinners, or girls’ Christmas parties. The warm matte color enhances the glossy look of the icing details, while oval nails imitate the shape of gingerbread cookies. Painted decorations can be replaced with printed ones for simplicity, but a dotting tool and liner brush will help achieve the desired effect with patience and precision.
How to Apply:
- Paint medium oval nails with two coats of warm biscuit brown and apply matte top coat.
- Outline small gingerbread figures on two accents using thick white nail-art gel or polish.
- Add red buttons, tiny facial details, and white scalloped icing along the other nail tips.
- Seal only the icing artwork with clear gloss to preserve the matte-and-shiny contrast.
5. Snowy Evergreen Forest Nails
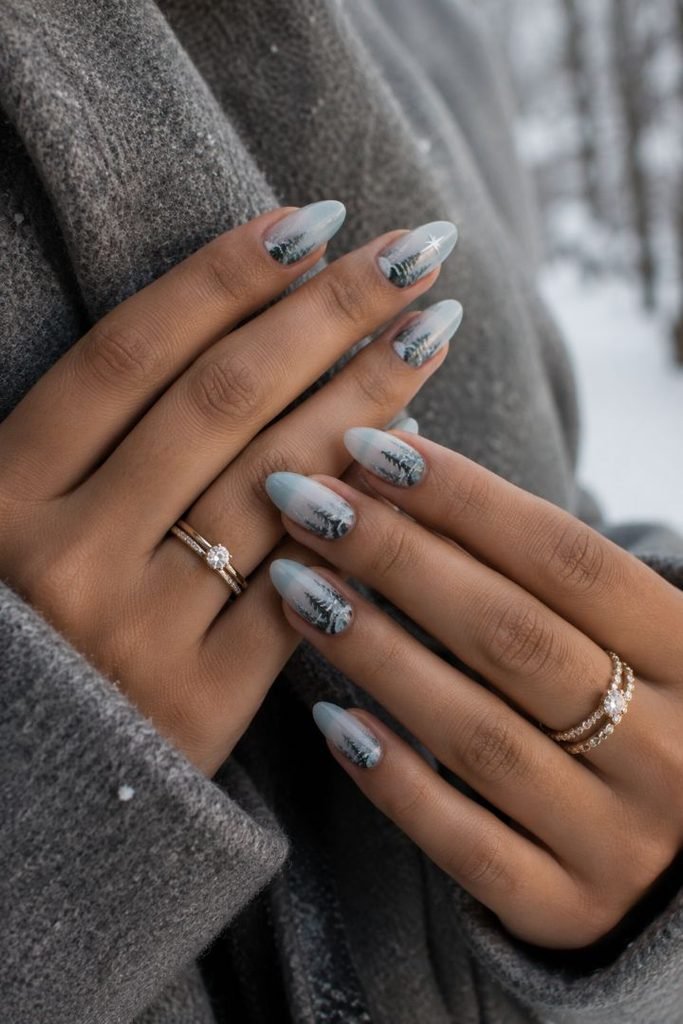
Medium almond nails fade from pale winter blue near the cuticles to cool white at the tips, creating a misty background for slim evergreen trees. The trees are layered in forest green, charcoal, and soft grey to suggest depth, with a light dusting of white snow along selected branches. One distant silver star sits above the tallest tree.
The landscape gives these winter forest nails a calm, scenic quality that works throughout December and into the colder months after Christmas. Almond nails provide enough vertical space for layered trees without the length feeling cumbersome. A salon airbrush produces the smoothest sky, but a sponge and stamping plate can create a convincing home version.
How to Apply:
- Sponge pale blue and cool white onto medium almond nails to create a soft vertical gradient.
- Paint slim triangular evergreen silhouettes in grey, charcoal, and forest green, varying their height.
- Add small broken strokes of white snow along a few branches and one silver star above the tallest tree.
- Apply glossy or satin top coat, depending on whether you prefer an icy or softly painted finish.
6. Gold Ribbon Gift-Wrap Nails
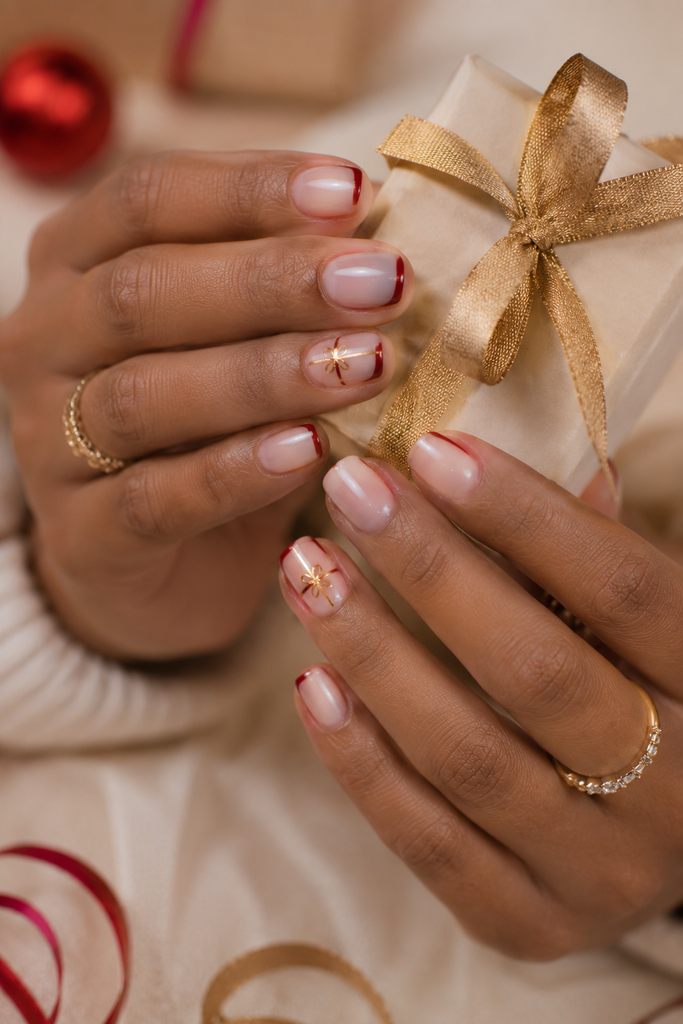
Short squoval nails begin with a translucent nude base and narrow ruby-red micro-French tips. Fine metallic-gold lines cross two accent nails like gift ribbon, meeting beneath small sculpted bows placed slightly off-center. The negative space keeps the Christmas present nail art light and modern rather than overly decorative.
This manicure is suited to office events and dressier holiday dinners because the festive reference appears in the details instead of covering every nail. Short squoval nails make the bows practical, provided they stay low and smooth. Use flat bow decals for a snag-free DIY version, or ask a technician for subtle 3D gel bows if you want more dimension.
How to Apply:
- Apply a sheer nude base and paint slim ruby-red tips on short squoval nails.
- Draw one vertical and one horizontal gold line across each of two accent nails.
- Place a flat gold bow decal or sculpt a low gel bow where the lines meet.
- Seal the lines and bow edges carefully with glossy top coat.
7. Midnight Star Garland Nails
Inky midnight-blue polish gives medium oval nails a deep, glossy background for delicate gold stars connected by curved chains of tiny dots. The garland sweeps diagonally across the set, changing position from nail to nail, while a larger eight-point star anchors one accent. Sparse navy shimmer adds depth without competing with the metallic linework.
These blue Christmas nails offer a cooler alternative to red and green while still feeling appropriate for tree-lighting events, holiday concerts, and evening parties. Oval nails soften the graphic garland, and the limited gold detailing pairs naturally with dark velvet or satin outfits. Star decals make the look accessible at home, but the dotted curves need careful spacing to remain elegant.
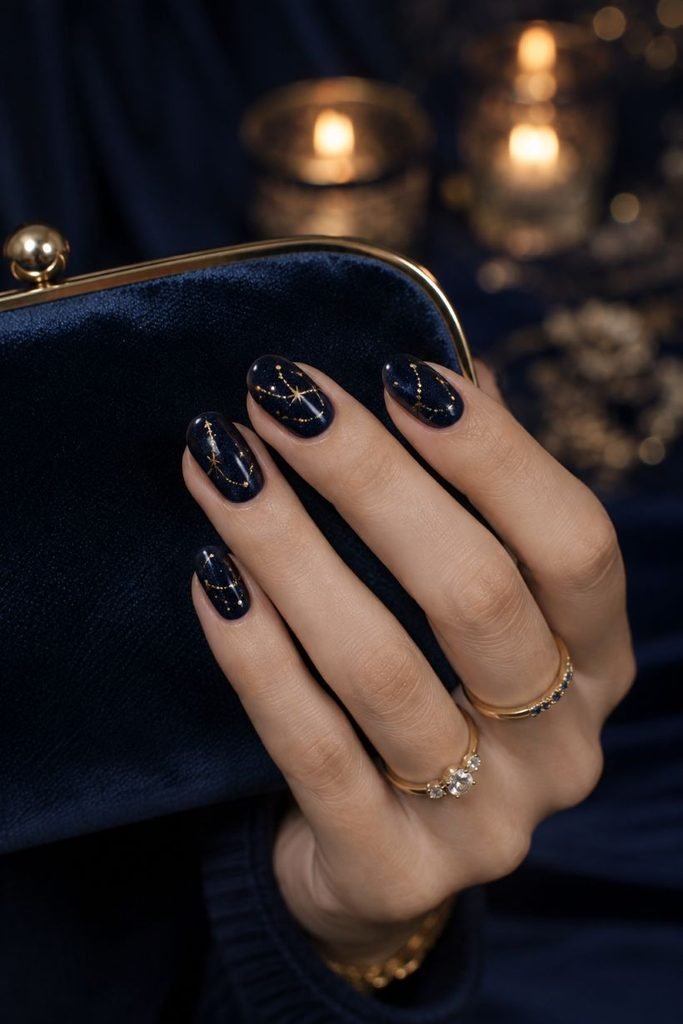
How to Apply:
- Cover medium oval nails with two thin coats of midnight-blue polish containing very fine shimmer.
- Map a curved garland across each nail using tiny gold dots.
- Add small gold stars along the curves and paint one larger eight-point star on an accent nail.
- Finish with a leveling glossy top coat to smooth the decals or linework.
8. Holly Berry Negative-Space Nails
Short almond nails are coated in sheer beige, leaving a clean background for fine holly nail art placed near the sidewalls. Deep green leaves are painted in small clusters with bright red berry dots and hairline gold stems. Two nails remain nearly bare except for a single berry cluster near the cuticle.
The open space makes traditional Christmas greenery feel airy and wearable, especially on short natural nails. This design works with casual knits, workwear, and holiday brunch outfits without demanding a matching red or green wardrobe. A dotting tool handles the berries easily, while leaf decals can replace the most detailed brushwork.
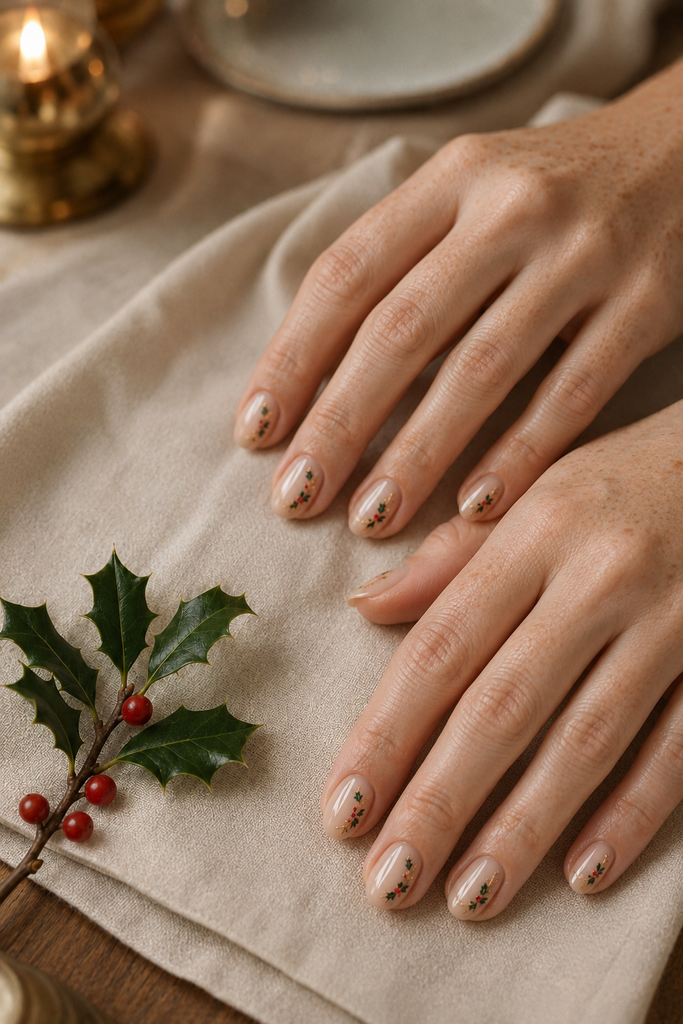
How to Apply:
- Apply a sheer beige or neutral-pink base to short almond nails.
- Paint paired deep-green holly leaves along selected sidewalls, using fine central vein lines.
- Add groups of three red berry dots and connect the clusters with thin gold stems.
- Protect the delicate art with a clear glossy top coat.
9. Sugarplum Aura Nails
Translucent pink medium almond nails bloom with blurred plum and raspberry centers, creating a soft aura nail design inspired by sugarplum tones. Tiny silver starbursts and a dusting of icy micro-shimmer sit above the gradient, while the outer edges stay pale and glassy. The color placement should look diffused rather than circular and stamped.
This set feels festive without using literal Christmas characters, making it useful for dinners, parties, and New Year’s plans that follow the holiday. The rosy palette works beautifully with silver, grey, black, and cream clothing. A salon airbrush creates the cleanest aura, although a small sponge can produce the fade if the pigment is added in several light layers.
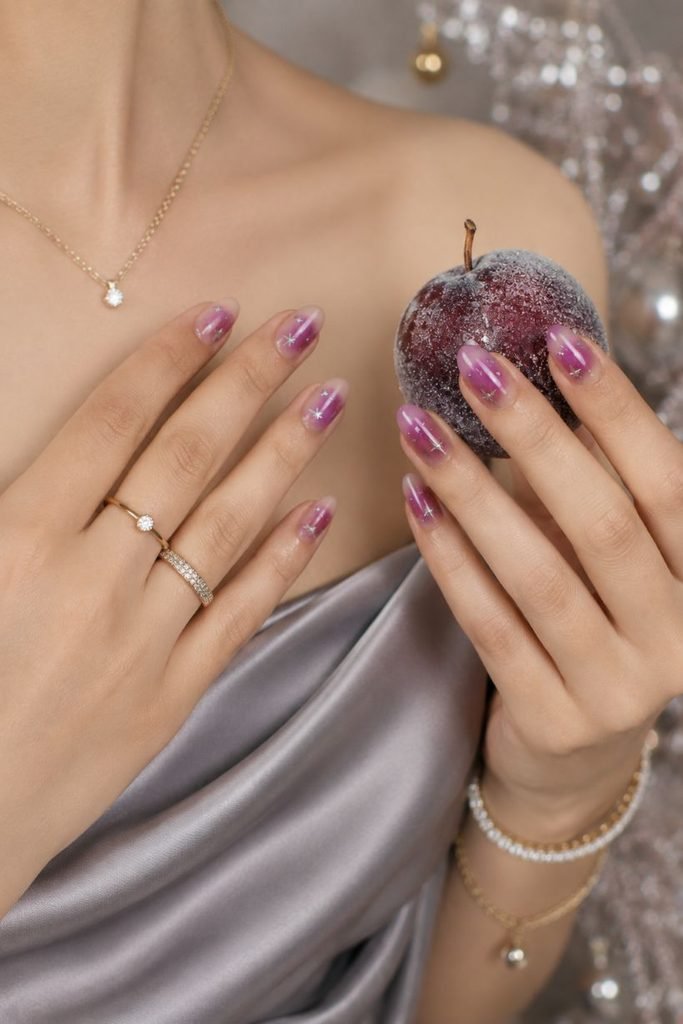
How to Apply:
- Apply a translucent pink base to medium almond nails.
- Sponge pale raspberry into the center, then deepen the smallest central area with plum.
- Add a few fine silver starbursts and a restrained dusting of icy micro-shimmer.
- Encapsulate the gradient beneath a high-gloss top coat.
10. Red and Green Tartan Nails
Short square nails alternate between deep red, forest green, and cream, with three accents carrying a precise tartan plaid pattern. Thin black lines provide structure, while narrow gold stripes cross the grid to add warmth. The finish is glossy, but the colors remain slightly muted so the pattern resembles woven holiday fabric rather than bright wrapping paper.
Plaid is a strong choice for casual December outfits, especially with wool coats, loafers, and neutral knitwear. The square shape supports straight horizontal and vertical lines, and the short length keeps the mixed pattern from becoming too busy. Striping tape helps with placement, but it must be removed while the painted lines are still wet to preserve crisp edges.
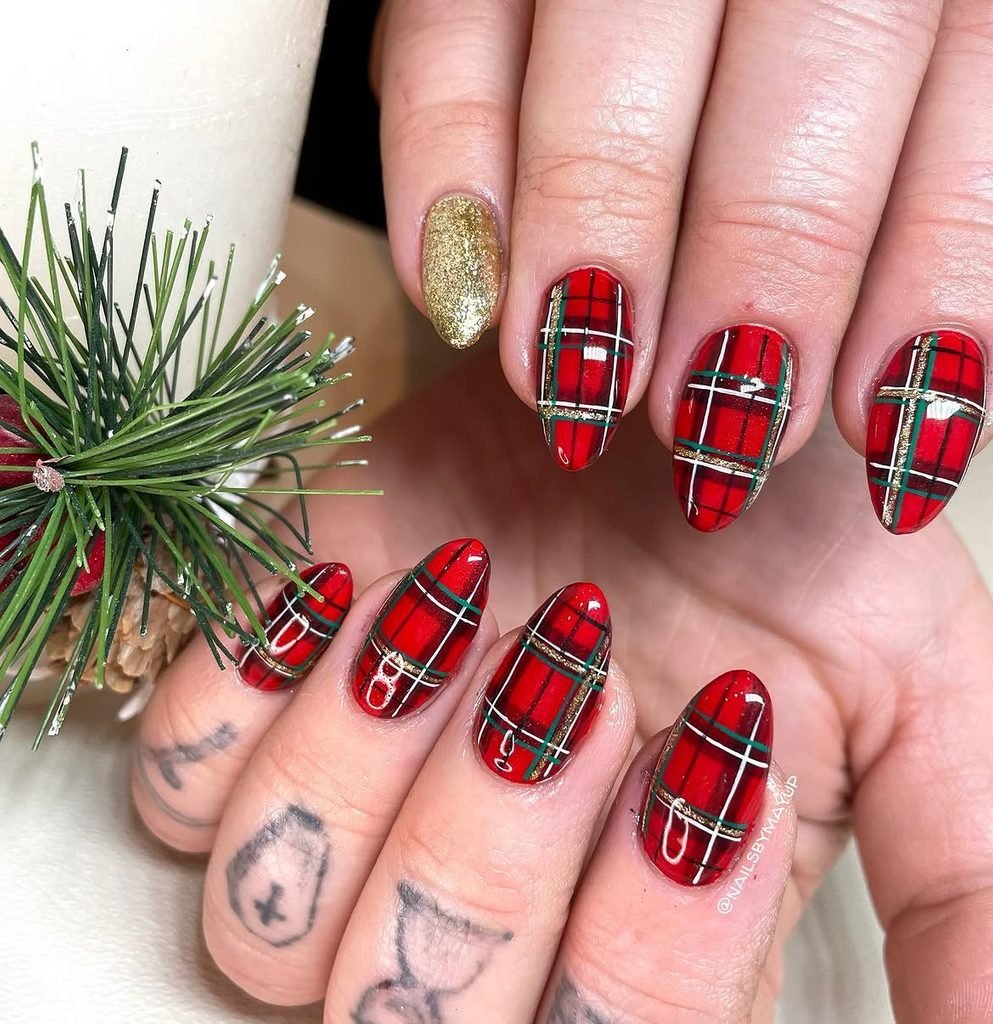
How to Apply:
- Paint the base nails in alternating deep red, forest green, and cream.
- On three accent nails, add broad crossing bands in the other two colors.
- Layer thin black grid lines and one or two narrow metallic-gold stripes over the plaid.
- Let every line set, then smooth the pattern with glossy top coat.
11. Encapsulated Snow Globe Nails
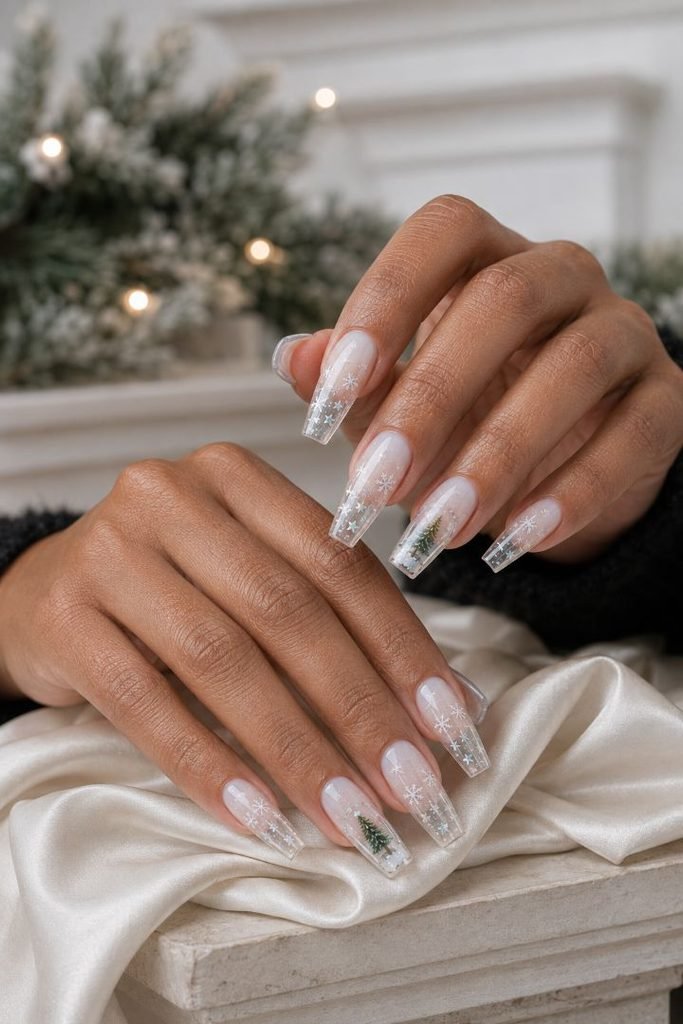
Long coffin nails use clear extensions filled with suspended white flakes, iridescent glitter, and tiny silver stars. A milky-white fade begins near the cuticle and dissolves into the transparent tips, making the embedded pieces resemble snow moving inside a glass globe. One accent nail includes a miniature painted evergreen and a curved silver base.
These snow globe nails are designed for someone who wants an elaborate salon set for a Christmas trip, party, or seasonal photoshoot. The clear coffin shape gives the encapsulated elements room to float visually, but the length requires more daily care than a natural manicure. Ask for thin layers and a refined apex so the embedded art does not leave the nails bulky.
How to Apply:
- Build clear coffin extensions with balanced structure and a thin milky fade near each cuticle.
- Place white flakes, iridescent glitter, and tiny silver stars between clear gel or acrylic layers.
- Paint one small evergreen scene and curved silver globe base on an accent nail.
- Encapsulate, file the surface smooth, and finish with a glassy top coat.
12. Champagne Chrome Party Nails
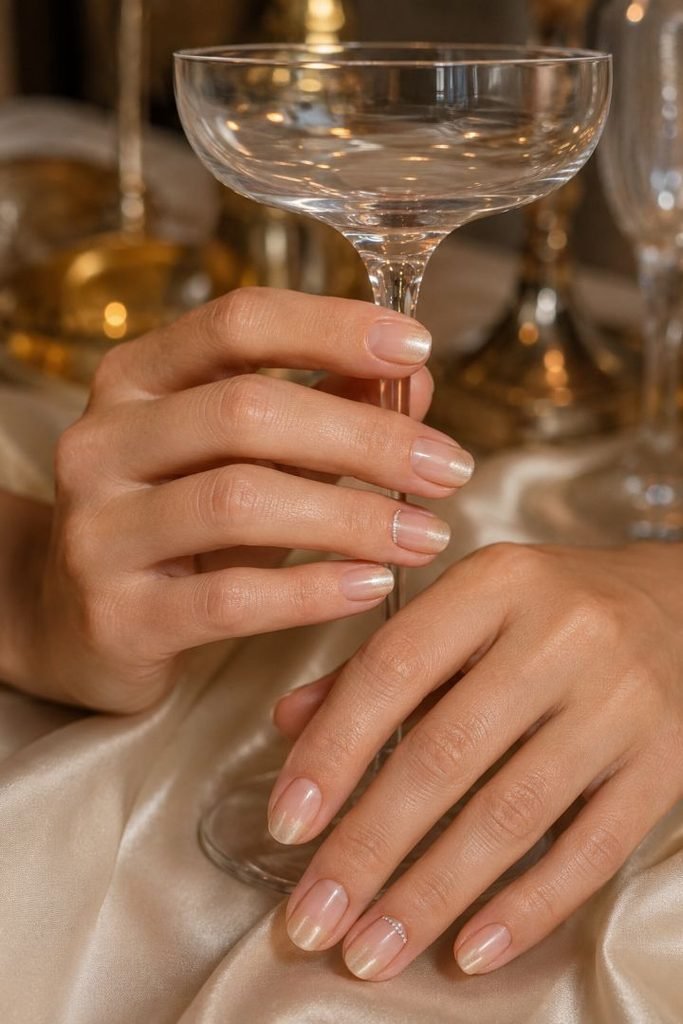
Short oval nails shine with soft champagne chrome powder, fading from a mirror-like tip into a translucent nude base. Two accent nails feature a narrow arc of tiny clear crystals close to the cuticle, positioned like understated jewelry. The metallic color sits between pale gold and warm silver, allowing it to work with either tone of accessories.
This is an elegant holiday manicure for cocktail parties, formal dinners, and celebrations that continue into New Year’s Eve. The short oval shape balances the reflective finish and keeps the crystal accents comfortable. Chrome is unforgiving of ridges, so smooth preparation and a compatible gel surface matter more than adding extra decoration.
How to Apply:
- Apply a smooth translucent nude gel base to short oval nails and cure.
- Blend compatible non-wipe gel from the tips downward, cure as directed, and rub champagne chrome over that area.
- Secure a small curved row of clear crystals near two cuticles.
- Seal the chrome edges and work top coat around, rather than over, the crystal facets.
13. Mistletoe French Manicure
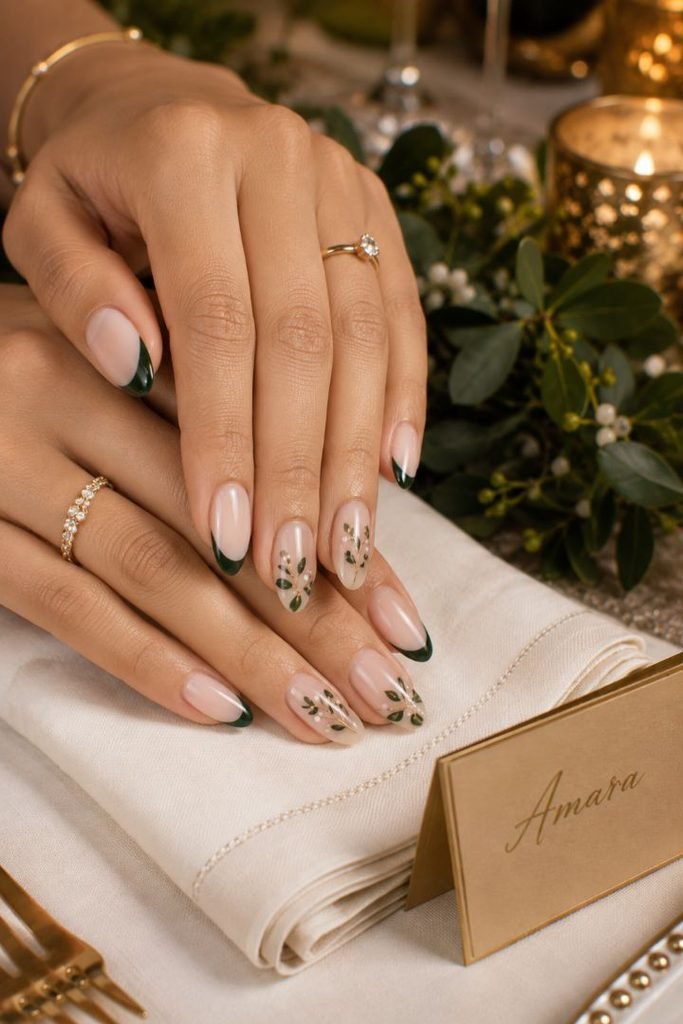
A milky nude base supports slim forest-green French tips on medium almond nails. Small mistletoe sprigs cross the smile line on three nails, with soft green leaves, tiny white berries, and a fine gold stem. The remaining nails carry clean green tips to give the detailed accents enough room.
This design feels seasonal without being overly literal and works well for Christmas brunch, dinner, or a winter wedding guest look. Almond tips mirror the leaf shape and make the green edge appear more delicate. The sprigs can be simplified with decals, but a technician will create better balance between the French curve and the botanical details.
How to Apply:
- Apply a milky nude base to medium almond nails.
- Paint a slim forest-green French tip along each free edge.
- Add fine gold stems across three smile lines, then paint paired green leaves and small white berries.
- Finish with a smooth glossy top coat that seals the tip edges.
14. Nutcracker-Inspired Nails
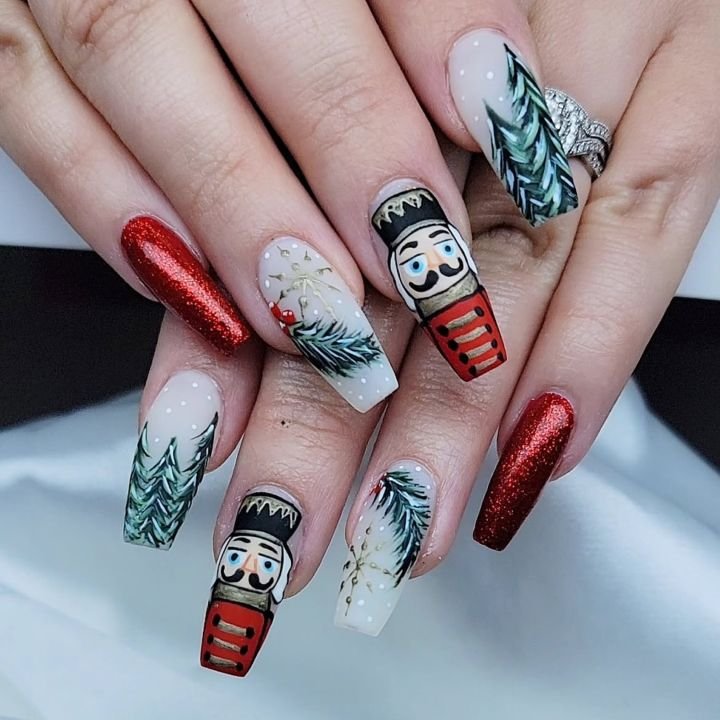
Long coffin nails alternate between lacquered red, midnight navy, and ivory, with precise gold linework inspired by a nutcracker uniform. One accent features a simplified painted face beneath a black hat, while others use gold buttons, crossed cords, and slim white trouser stripes. The illustration stays graphic and editorial rather than resembling a children’s cartoon.
The straight sides of coffin nails provide the best canvas for uniform details and the tall central character. This set suits themed parties, ballet outings, and anyone who enjoys collectible-looking Christmas art. It is technically demanding because uneven borders are obvious, so custom press-ons or an experienced nail artist are more realistic than freehand DIY work.
How to Apply:
- Paint long coffin nails in alternating red, midnight navy, and ivory sections.
- Add gold buttons, uniform cords, and clean border lines with a fine liner brush.
- Paint one simplified nutcracker face, moustache, and black hat on an accent nail.
- Seal the detailed artwork beneath a leveling glossy top coat.
15. Frosted Cable-Knit Sweater Nails
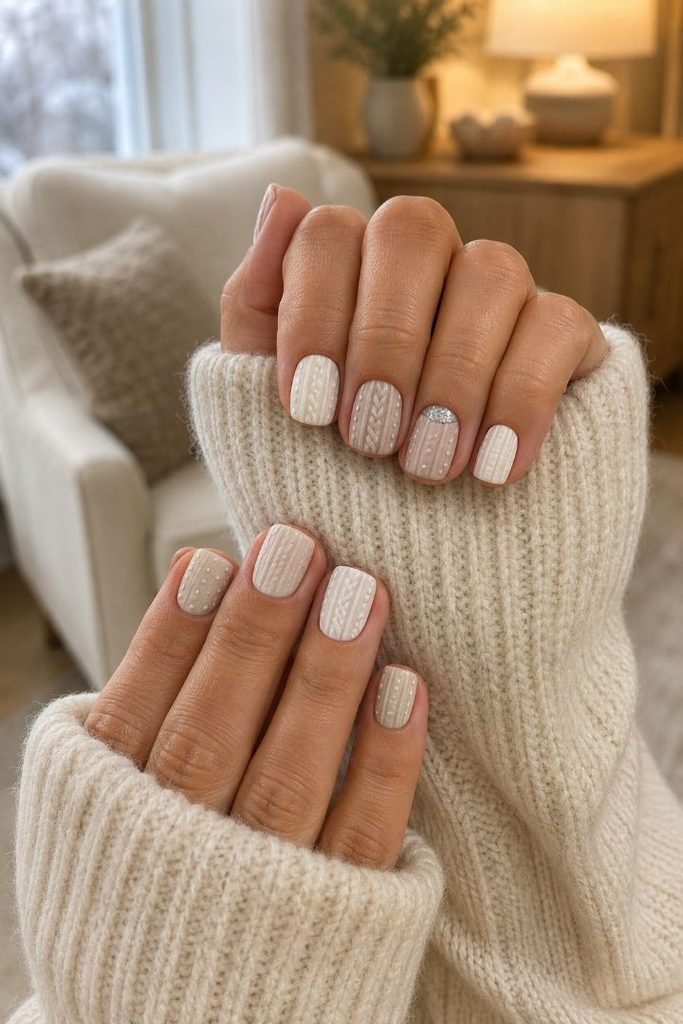
Short square nails are painted creamy white and pale oatmeal, then topped with raised cable-knit nail art in alternating braids, ribs, and small dots. A matte finish makes the textured gel resemble soft winter knitwear, while one nail receives a restrained dusting of fine silver shimmer near the cuticle. The relief should be low and evenly cured rather than thick and lumpy.
This neutral set is ideal for anyone who wants seasonal nails without red, green, or character art. It works with everyday winter outfits and remains useful after Christmas Day. The short square canvas supports the vertical knit pattern, but creating consistent raised lines is an advanced gel technique best handled at a salon or practiced first on press-on tips.
How to Apply:
- Paint short square nails in alternating creamy white and pale oatmeal, then apply matte top coat.
- Draw cable braids, ribs, and dots with thick art gel in the matching base color.
- Cure the raised pattern thoroughly in thin stages and add fine silver shimmer near one cuticle.
- Leave the texture matte, sealing only where required by the gel system.
16. Minimal Reindeer Nails
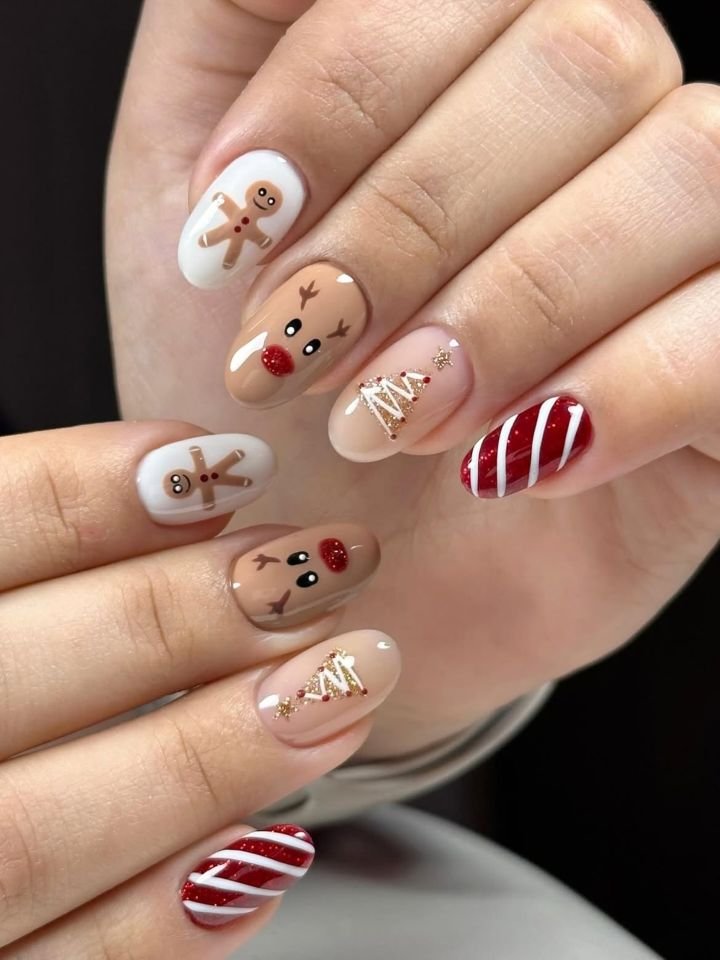
Warm chocolate brown shades alternate with sheer nude in medium oval nails. One of the nude nails has a fine-line reindeer drawn on it with slender antlers and a small cranberry red nose. The other has two diminutive gold hoof prints near the tips. The glossy brown nails add elegance to this festive nail design and prevent it from looking too childish.
The design is perfect for holiday parties or family events. It allows one to look festive without going overboard with novelty Christmas-themed nail art. Medium oval nails are a safe choice as they imitate the shape of the face and have enough surface to depict antlers. The reindeer could be drawn in more detail or replaced with just antlers and the cranberry red dot as a nose.
How to Apply:
- Paint alternating medium oval nails chocolate brown and sheer nude.
- Draw a small reindeer face and fine antlers on one nude accent nail.
- Add a cranberry-red nose and two tiny gold hoof-print details on another accent.
- Seal the entire set with a clear glossy top coat.
17. Black and Gold Christmas Tree Nails
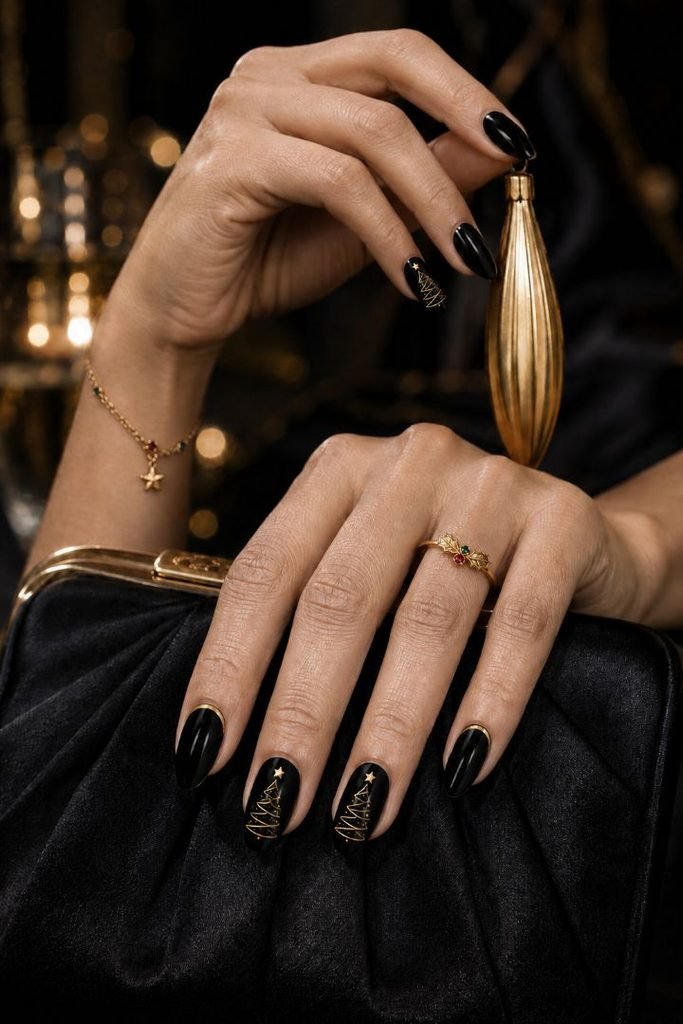
Medium almond nails in glossy black create a dramatic base for fine gold Christmas trees built from curved metallic lines. Tiny star tops and sparse gold dots resemble ornaments, while two nails remain solid black with narrow gold cuticle arcs. The Christmas tree nail art is stylized and minimal rather than painted as a realistic evergreen.
Black and gold suits evening parties and formal outfits, particularly when traditional red and green feel too casual. The almond shape supports the tree’s tapered silhouette, and the limited palette keeps the set cohesive. Gold striping tape can form simplified trees at home, but hand-painted curves will look softer and less geometric.
How to Apply:
- Paint medium almond nails with two coats of opaque glossy black.
- Build stylized tree shapes on three nails using curved metallic-gold lines that narrow toward the tip.
- Add tiny gold stars and sparse ornament dots, then paint gold cuticle arcs on the remaining nails.
- Seal the metallic artwork with a clear high-shine top coat.
18. Icy Blue Shattered-Glass Nails
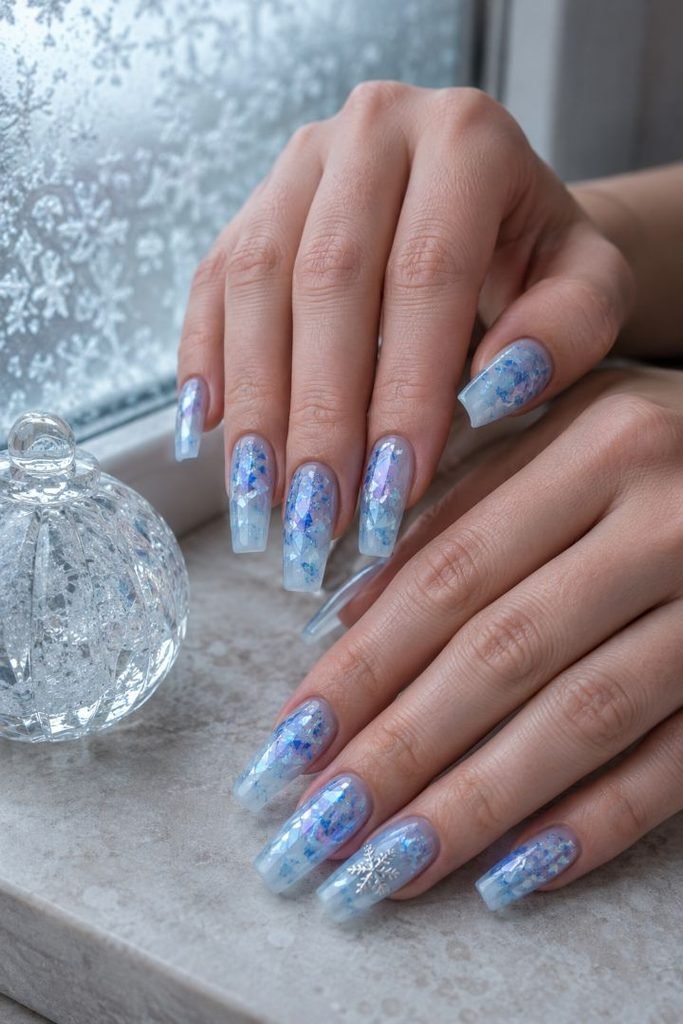
Translucent icy-blue gel covers medium coffin nails, with irregular pieces of blue, silver, and violet foil layered beneath the surface. The angular reflections create a shattered-glass nail effect, while milky white edges soften the tips like frost. One nail includes a tiny silver snowflake placed beneath the clear top layer.
This cool-toned manicure suits winter parties, ski trips, and anyone who prefers an abstract design over obvious Christmas motifs. Coffin nails provide enough flat space for the foil to catch light from different angles. The pieces must lie completely flat before sealing, so use thin foil rather than rigid craft confetti that can lift through the top coat.
How to Apply:
- Apply a translucent icy-blue base to medium coffin nails.
- Place irregular blue, silver, and violet foil shards across the tacky surface without overlapping them heavily.
- Add a milky-white glaze around the tips and position one small silver snowflake beneath the clear layer.
- Encapsulate the foil with builder gel or a smoothing glossy top coat.
19. Cranberry Jelly Wreath Nails
Short oval nails decorated with translucent cranberry red jelly polish with two sheer nude accents with miniature Christmas wreaths on them. Dark green leafy strokes create uneven circles, which are finished with tiny red berries and narrow champagne-gold bows. Transparent red nails present a beautiful shade without being too intense in the opaque color.
The set is festive and feminine but still keeps the practical side of the natural nail shape. The look is perfect for Christmas lunch, gift-opening sessions and light holiday weekends, while the jelly color is also great to use with gold jewelry. Miniature Christmas wreaths may be drawn with a dotting tool and short brushstrokes, so it will not be difficult to achieve the effect at home by keeping the shapes of the leaves and circles minimal and loose.

How to Apply:
- Paint most short oval nails with two thin coats of translucent cranberry jelly polish.
- Cover two accent nails with a sheer nude base and map a small circular wreath in dark green strokes.
- Add tiny cranberry berry dots and a narrow champagne-gold bow to each wreath.
- Apply glossy top coat over the full set to deepen the jelly effect.
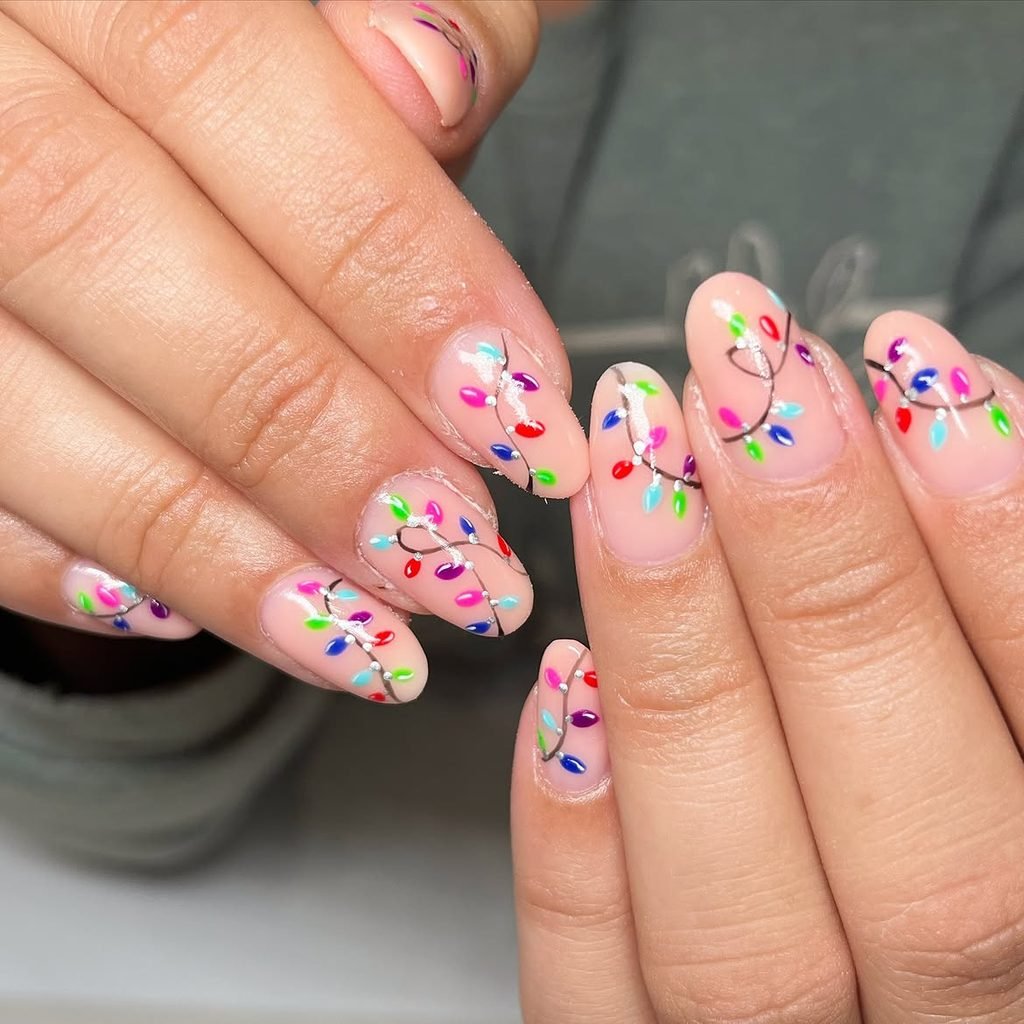
20. Multicolored Christmas Light Nails
A milky nude base gives medium almond nails a clean canvas for a thin black wire that loops continuously across the set. Tiny bulb shapes in red, green, blue, amber, and pink hang from the line, each surrounded by a faint translucent glow. The Christmas light nail art feels connected when the fingers sit together but still looks balanced when they move apart.
This cheerful design works for parties, decorating days, and anyone who enjoys color without wanting every nail painted differently. Almond nails provide space for the curved wire while keeping the bulbs delicate. Use a fine liner brush for the cable and a small dotting tool for the lights, or substitute tiny multicolored decals if matching both hands becomes frustrating.
How to Apply:
- Apply a milky nude base to medium almond nails.
- Draw one thin looping black wire that changes position across each nail.
- Add tiny red, green, blue, amber, and pink bulbs, placing a soft translucent dot beneath each for glow.
- Seal the continuous design with a glossy top coat.
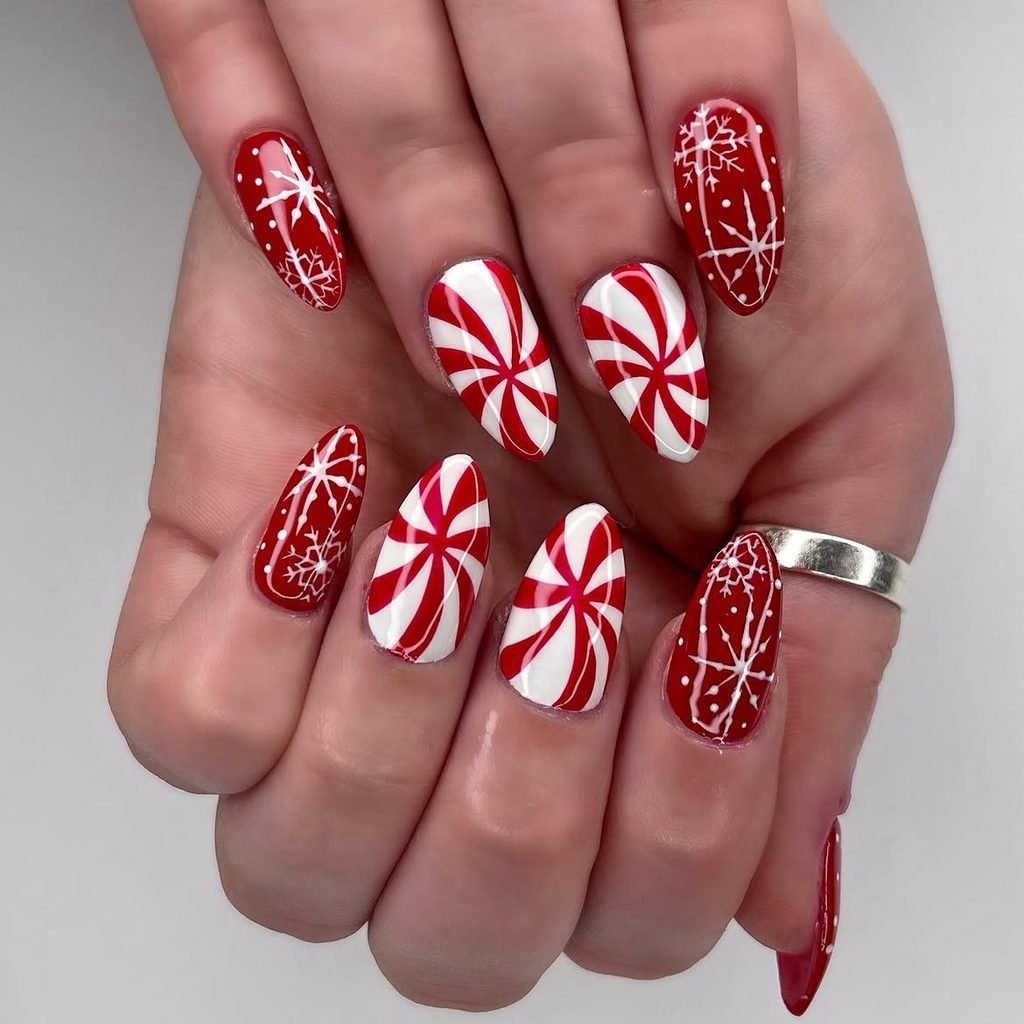
21. Peppermint Swirl Nails
Long almond nails combine glossy cherry red with creamy white, using two accent nails for tightly curved peppermint swirl nail art. The spiral begins at the center and expands outward in alternating red and white sections, while the solid nails carry a thin pearl-white outline near the cuticle. The curved pattern follows the almond silhouette instead of fighting it.
This bold manicure is made for Christmas parties, festive photos, and anyone who enjoys graphic color. Keeping most nails solid prevents the spirals from creating visual overload. The swirls demand controlled linework because an off-center starting point is immediately noticeable, so nail wraps are a sensible alternative for DIY application.
How to Apply:
- Paint most long almond nails glossy cherry red and cover two accents in creamy white.
- Mark the center of each accent and draw curved red sections spiraling toward the sidewalls.
- Refine the white spaces and add a fine pearl-white cuticle outline to the solid red nails.
- Smooth the graphic pattern beneath a leveling glossy top coat.
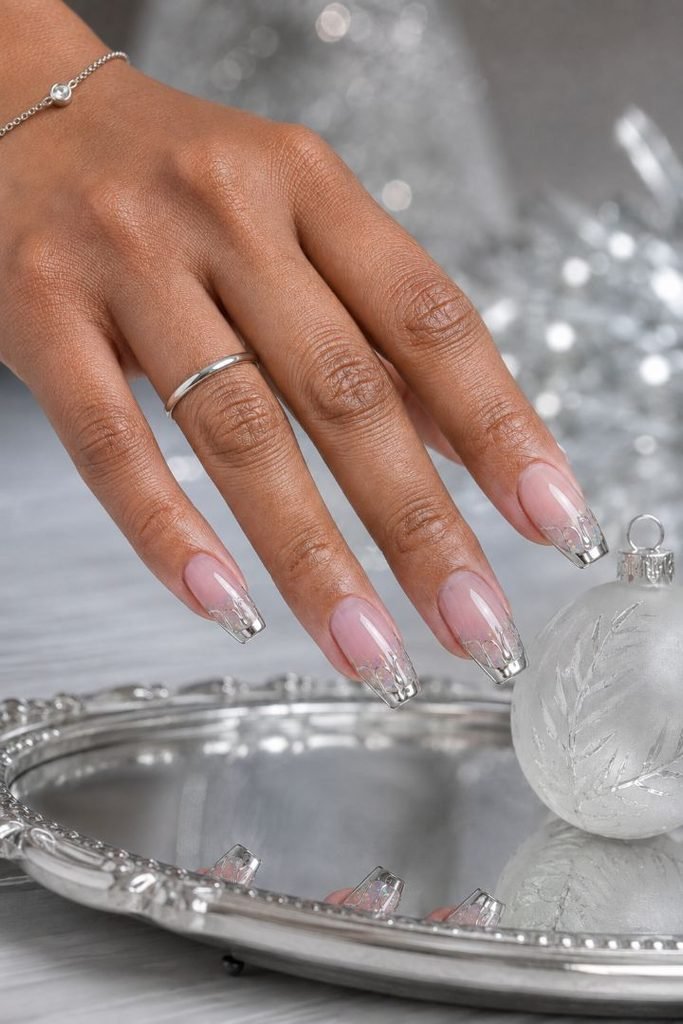
22. Silver Icicle Drip Nails
Medium coffin nails begin with a sheer cool-pink base and reflective silver French tips. Clear raised gel descends from the tips in slim uneven points, creating dimensional icicle nail art that catches highlights without looking like heavy glitter. A few tiny holographic flakes sit beneath the clear drips to mimic frozen light.
This manicure is an icy, modern choice for winter parties and formal holiday outfits in silver, navy, white, or black. The straight coffin tip gives the drips a stable edge, but the texture must remain low enough not to snag. Because thick uncured gel can move and cure unevenly, ask a technician for the raised version or use flat icicle decals at home.
How to Apply:
- Apply a sheer cool-pink base to medium coffin nails and paint reflective silver French tips.
- Place a few holographic flakes just below the tip line.
- Form slim uneven icicle drips with clear 3D gel, curing the raised sections as directed before they spread.
- Seal around the texture and smooth any sharp edges without flattening the clear points.
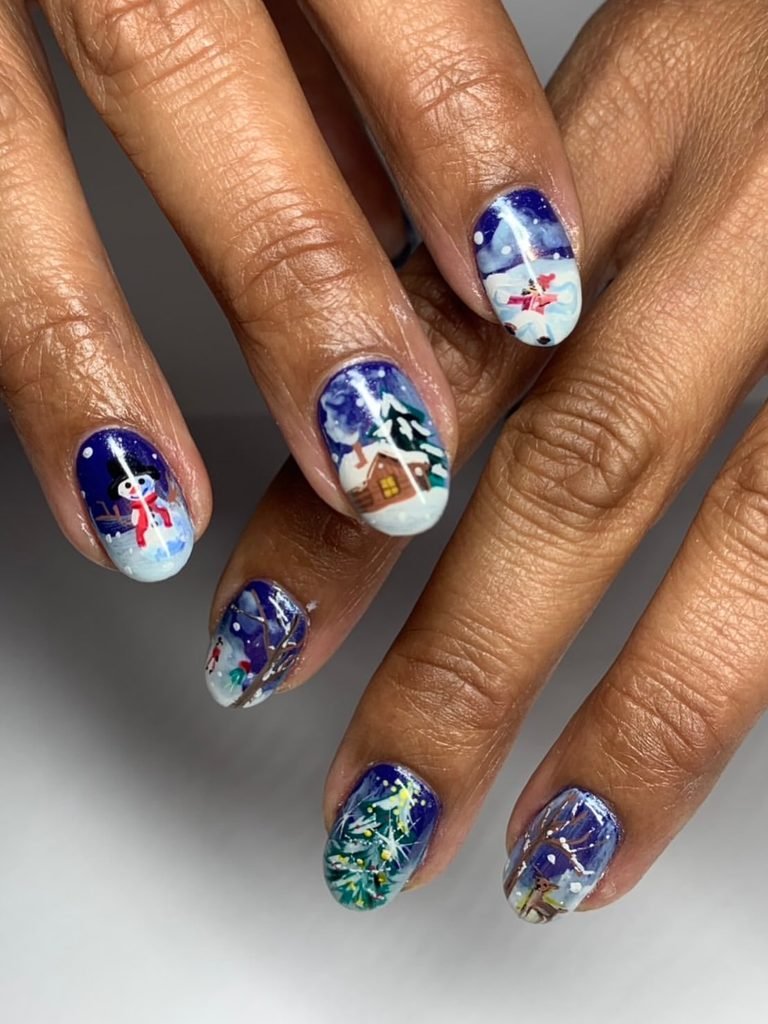
23. Snowy Winter Village Nails
Long coffin nails display a continuous winter village scene painted over a milky blue-grey base. Tiny cream houses with warm yellow windows sit beneath snowy roofs, dark pine trees separate the buildings, and fine white dots fall across the sky. Each nail shows a different section of the landscape, creating a complete scene when the fingers meet.
This detailed set is best reserved for a Christmas trip, special event, or appointment where hand-painted art is the main attraction. Coffin nails provide the width and length needed for the buildings to remain readable. A custom press-on set is a practical alternative because the artist can complete the panorama before application and you can reuse it carefully.
How to Apply:
- Paint long coffin nails with a smooth milky blue-grey base.
- Sketch a shared snowy horizon, then add small cream houses, dark roofs, and pine trees across the set.
- Dot warm yellow windows and scatter fine white snow through the sky.
- Seal the landscape with a glossy top coat for a glazed storybook finish.
24. Minimal Gold Star Nude Nails
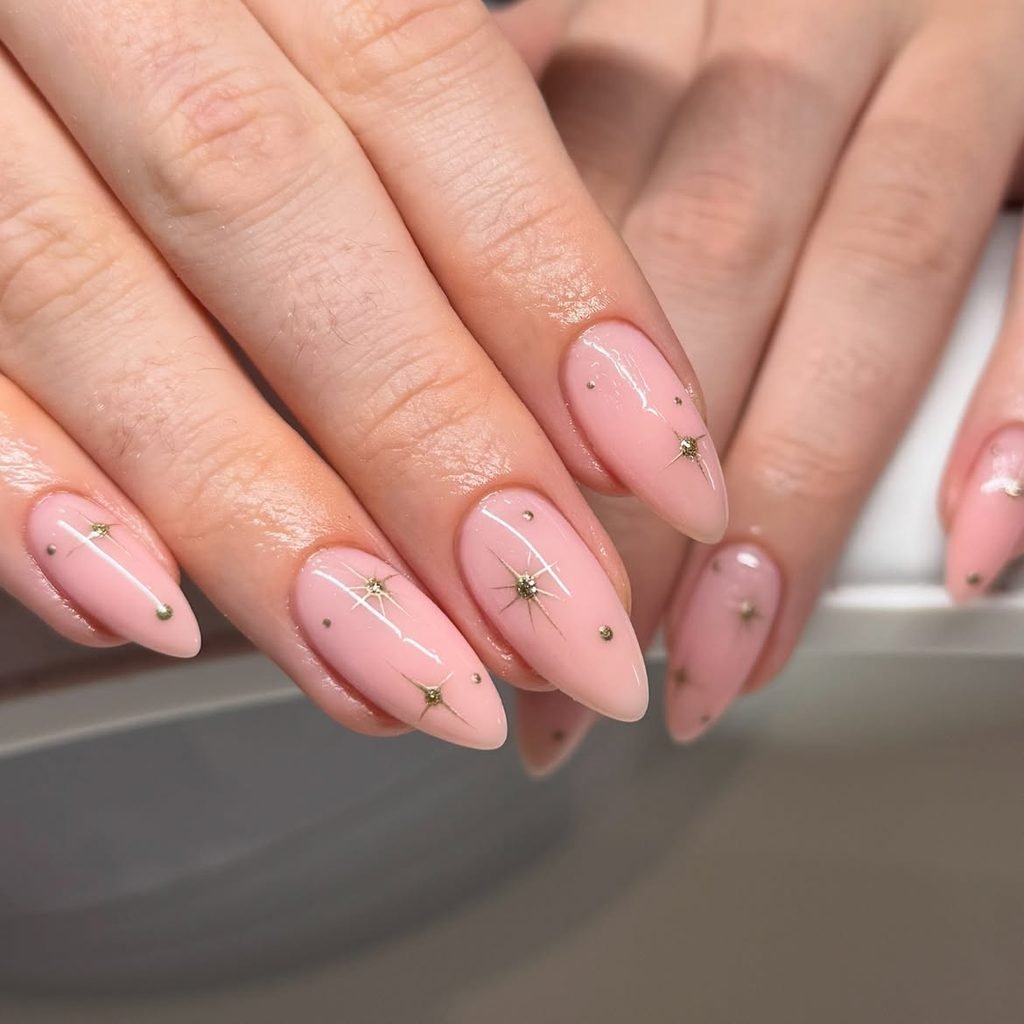
Short natural round nails are covered in translucent beige-pink polish, then decorated with tiny champagne-gold stars placed asymmetrically near the tips and sidewalls. One nail carries a fine trail of microdots, while the others feature only one or two stars. A glossy finish gives this minimal holiday manicure a clean, jewelry-like quality.
This is the easiest option to wear through work, travel, Christmas celebrations, and New Year’s Eve without needing a color change. The short length and sparse artwork also make it suitable for beginners and natural nails. Metallic star decals provide sharper points than most people can paint by hand, and their placement does not need to match across both hands.
How to Apply:
- Apply two thin coats of translucent beige-pink polish to short round nails.
- Place one or two tiny champagne-gold star decals asymmetrically on each nail.
- Add a short trail of metallic microdots to one accent nail.
- Press every decal edge flat and seal the set with a glossy top coat.
25. Pink Coquette Christmas Nails
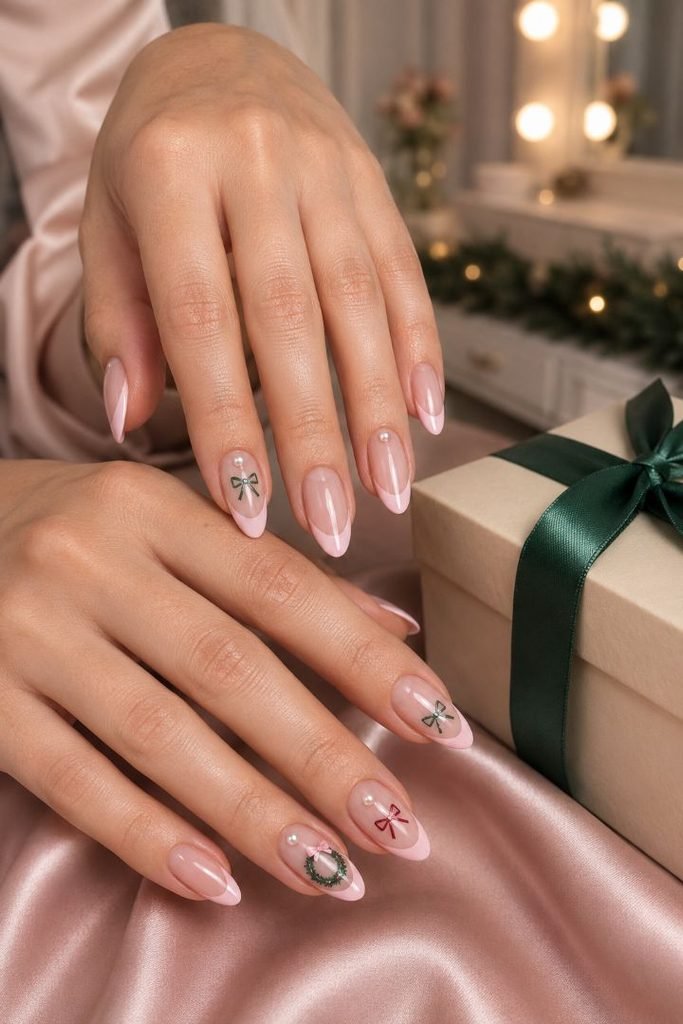
Medium almond nails mix sheer blush, soft pink French tips, and miniature forest-green bows. Tiny pearls and narrow red ribbons appear on alternating accents, while one nail features a small green wreath tied with a pink bow. The coquette Christmas nails stay delicate by using raised details sparingly and leaving plenty of translucent space.
This feminine palette suits brunches, gift exchanges, and anyone who wants holiday art that coordinates with pink, cream, or green outfits. Almond nails echo the tapered loops of the bows and offer enough space for small pearl accents. Flat decals make the design easier to wear, while sculpted gel ribbons are better reserved for a salon appointment.
How to Apply:
- Apply a sheer blush base and paint soft pink French tips on medium almond nails.
- Add small forest-green and red ribbon bows to alternating accents.
- Build one miniature green wreath with a pink bow and place a few tiny flat-back pearls across the set.
- Seal around the decorations with a glossy top coat, keeping the raised details low.
26. Red Poinsettia Floral Nails
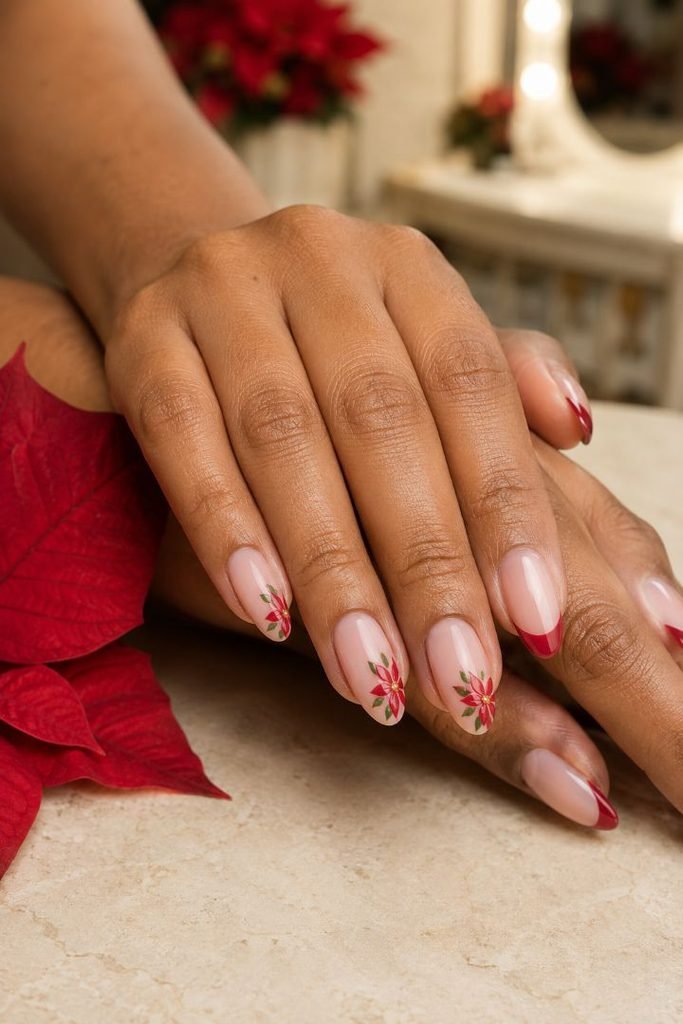
Sheer nude medium almond nails provide a light base for hand-painted poinsettia nail art in deep red and cranberry. Layered pointed petals sit near the corners of three nails, finished with tiny gold centers and muted green leaves. The remaining nails carry narrow cranberry French tips and one small gold dot near each cuticle.
This floral design feels distinctly Christmassy while remaining polished enough for dinners, winter weddings, and formal parties. Placing the flowers off-center keeps the almond shape visible and prevents the petals from appearing crowded. A technician can create translucent petal layers for extra depth, while floral decals offer a simpler version for natural nails.
How to Apply:
- Apply a sheer nude base and narrow cranberry French tips to medium almond nails.
- Paint pointed deep-red and cranberry petals in overlapping layers on three corner accents.
- Add tiny gold flower centers, muted green leaves, and one gold cuticle dot to the remaining nails.
- Protect the floral artwork with a clear glossy top coat.
Best Nail Shapes for Christmas Nail Art Designs
Match the shape to the amount of detail you want. Short square and squoval nails give candy-cane stripes, plaid, and micro-French tips clean edges. Oval and almond nails suit snowflakes, greenery, aura effects, florals, and curved garlands because the artwork can follow their softer silhouette. Coffin nails provide more room for winter scenes, encapsulated elements, uniforms, and dimensional icicles, but the extra space is only worthwhile if the length fits your routine.
Can You Wear Christmas Designs on Short Nails?
Short nails can be made to look extra festive by playing up the art instead of shrinking it to the point of guesswork. Pick a single small graphic, like a snowflake, gold star, holly bunch, wreath, bow, or striped tip, and leave plenty of room around it. Another way to add holiday cheer without intricate detailing is to use magnetic polish, jelly color, chrome gradients, or matte effect.
Choosing Between DIY and Salon Nail Art
Simple snowflakes, stars, berry dots, decals, and striped tips are realistic home projects when you work in thin layers and let regular polish dry before sealing it. The application order in OPI’s candy-cane tutorial follows a practical sequence: prepare the nail, build the pale base and tip, add diagonal red lines, then finish with top coat. A fine liner brush is useful, but striping tape or wraps are often the cleaner choice if you struggle to paint with your non-dominant hand.
Magnetic gel, chrome powder, encapsulated glitter, long extensions, and raised 3D details require more product control. Shape magnetic pigment before curing, then cure each nail promptly and seal the result, following the same basic order shown in OPI’s magnetic gel guidance. For textured art, keep the relief controlled and cure it according to the specific gel system rather than piling on thick, unsupported product.
Final Thoughts
The best Christmas nail design is not the one with the most characters – a cranberry gel color, a narrow mistletoe tip, or even one gold star could be a more thoughtful design than ten different figures on the same hand. The key is to decide on the desired mood and pick one dominant technique and a few small additions to go with it.
Another essential aspect to consider is how long the design will stay on the nails. If you want to enjoy it throughout the holiday season, go for snowflakes, evergreens, champagne chrome, and neutral sweater motifs. More detailed motifs like gingerbread men or Christmas villages are better enjoyed for a short period. Take into account your daily schedule and nail length when picking a design, rather than trying to squeeze a motif that does not suit your lifestyle on your nails.