Seasonal · The nail edit
27 Valentine’s Day Nail Designs You’ll Adore
There is a way to let a Valentine manicure make its statement, be it in a bold cherry red or with the subtle hint of...
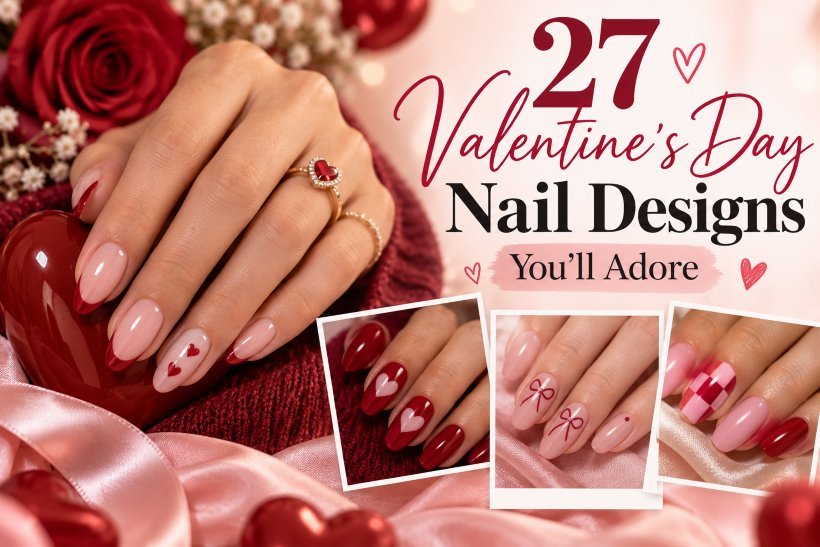
There is a way to let a Valentine manicure make its statement, be it in a bold cherry red or with the subtle hint of a heart as you move your hand. It has less to do with cramming hearts onto every finger and more with knowing where the colour and detail should go. A burgundy cutout, a sheer pink base or a fine red tip will all convey something different for the occasion.
The 27 designs we have put together for Valentine’s Day run the gamut from short natural nails to graphic patterns, romantic linework and some darker tones. They also include a selection of salon quality finishes. Every one of these ideas is presented as a whole and gives you a practical means of putting it on your own hands, through an artist’s appointment or by way of a decal, dotting tool or custom press-ons.
1. Short Glossy Cherry Red Nails
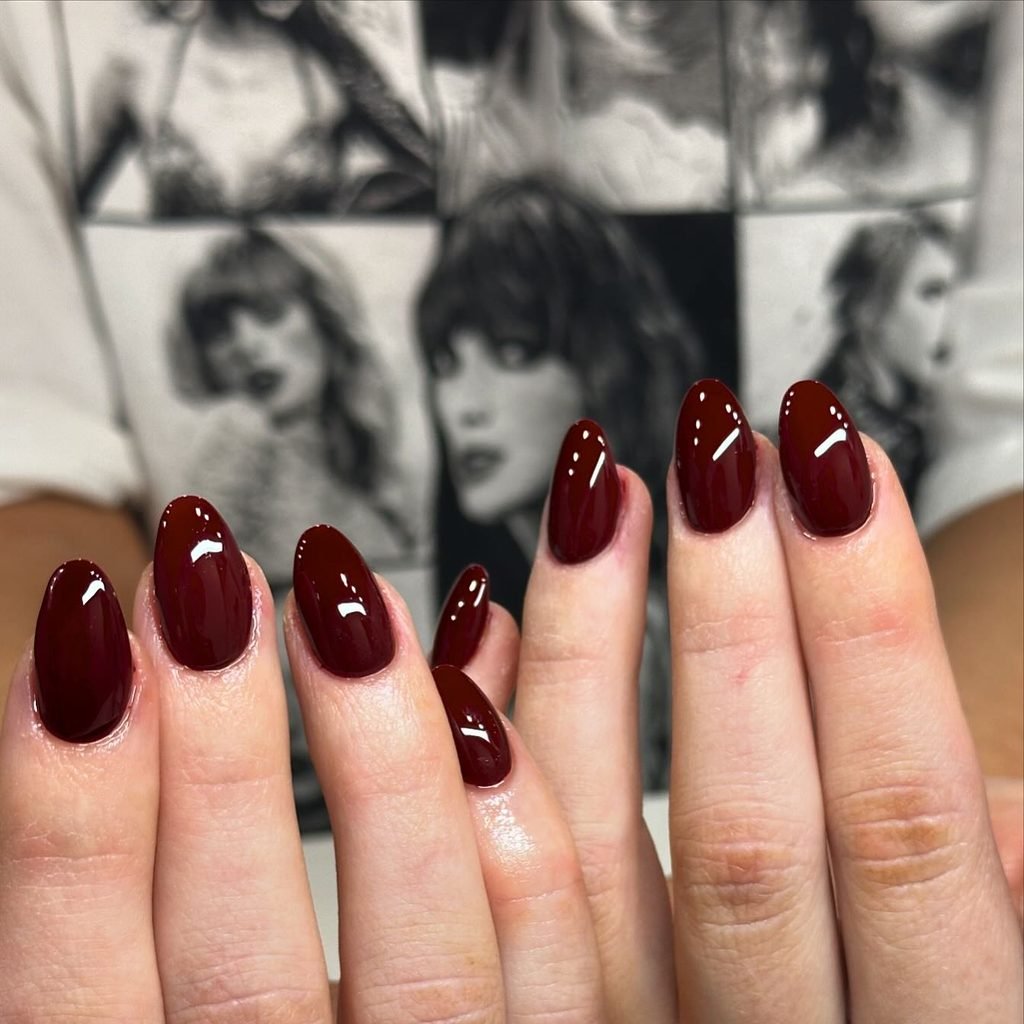
Sometimes, the most straightforward color for Valentine’s Day does not require any design. File the nails into short, softly rounded squares and paint all five nails in a solid cherry red that falls somewhere between orange-red and burgundy. The color extends to the cuticle line and also the free edge without an accent nail, shimmer, or glitter. High gloss is used to add the saturation to the cream polish.
The color will be comfortable to wear for the whole month of February as well as after the holiday. Squared nails are practical if you work with your hands the whole day, while red nail polish will complement any black outfit, jeans, or gold jewelry. However, the problem here is the shape; bold nail polish highlights the flaws in the outline. For more shades and finishes, compare Nail Blooms’ red nail polish ideas.
How to Apply
- Shape natural nails into even short rounded squares and apply a protective base coat.
- Paint two thin coats of opaque cherry-red lacquer, leaving a clean cuticle margin.
- Remove stray red at the sidewalls with a small cleanup brush.
- Finish with a clear high-gloss top coat and lightly cap the free edges.
2. Milky Pink Nails with One Tiny Red Heart
Use a translucent milky pink polish on short ovals, leaving the natural nail peeking through slightly under the shine. Four nails will remain completely blank. On the ring nail, apply one tiny red heart not quite at the center of the nail, below but not touching the cuticle line, and noticeable while moving the hand. It consists of two round parts that join at a single point; there are no dots or words or other hearts competing for attention.
This is the most quietest way to create holiday-specific manicure without using the design on all nails. The little heart can be painted using two dots merged into a heart or applied as a thin decal after the base is totally dry. If your nails are short, use a smaller heart instead of moving it to the free edge where it may look too big. Milky pink color fades out easily, which makes this set suitable for at least one week.

How to Apply
- Paint five short oval nails with one or two thin coats of translucent milky pink.
- On the ring finger, place two tiny crimson dots slightly off center.
- Pull each dot toward a shared lower point with a fine brush to form one heart.
- Let the red dry and float a clear glossy top coat over the set.
3. Red Micro-French Tips with Offset Hearts
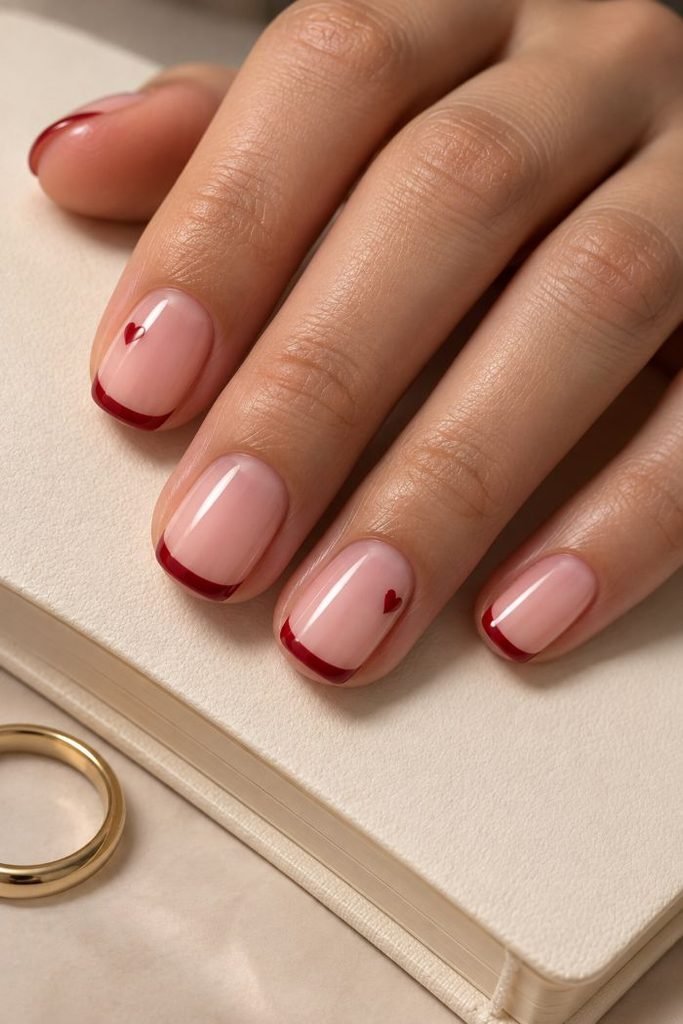
Squoval nails with a short length start with a sheer beige-pink base and a thin red line across each free edge. The design should include a small red heart on the outer side wall of the index finger and the ring finger at different heights. These hearts stay apart from the micro French line to have some empty space between them. Gloss protects the red line on the clear base.
This narrow shape allows for adding a Valentine touch to the classic manicure without wasting space on short nails. This is what makes the design unique since having two hearts aligned in the same place would look like a stamp. A long liner brush can be used to draw the lines and a dotting tool for the hearts. If you need different tip widths first, Nail Blooms’ French tip nail designs show how a thicker band changes the overall balance.
How to Apply
- Apply a translucent beige-pink base to short squoval nails.
- Trace a hairline cherry-red tip across each free edge with a liner brush.
- Paint one small red heart at the index sidewall and one at a different height on the ring.
- Let the red details dry and finish with clear gloss.
4. Blush Heart-Shaped French Tips
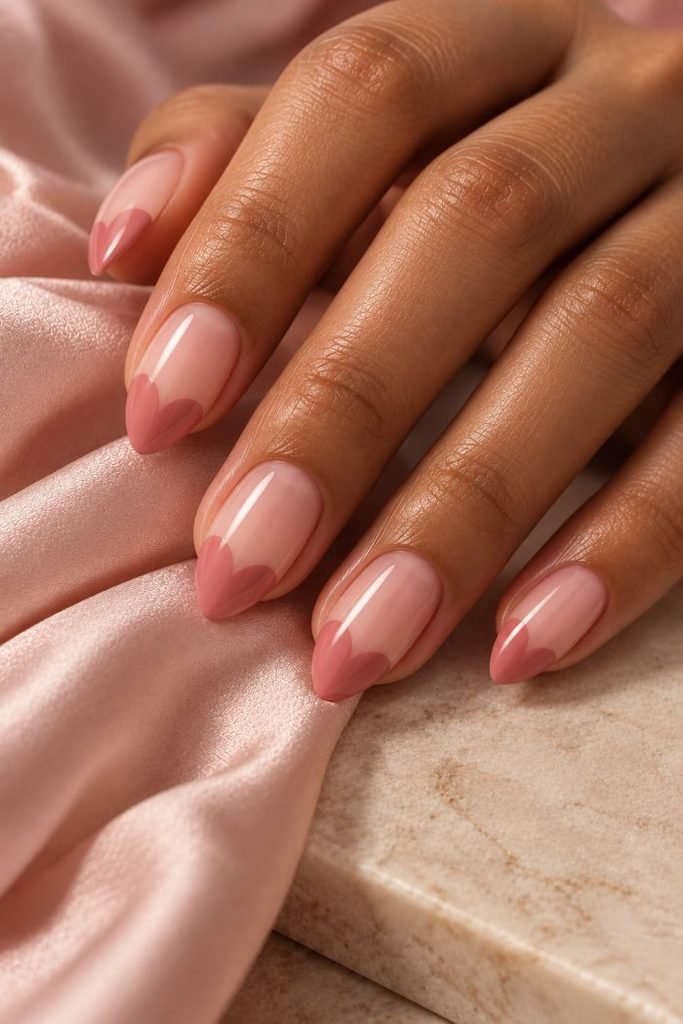
The two curving halves of each tip converge at the almond point to create a heart-shaped outline. The medium almond nails retain their sheer nude-pink background, but dusty blush nail polish covers two lobes that originate from opposite sidewalls and converge at the free edge. There is no heart placed in the middle: the nail tip is the shape itself. The glossy topcoat covers the blush polish without hiding the sheer background.
The almond shape serves as an element of this nail art, which means that the points should be centered first before applying nail polish. It looks romantic without being too dramatic, and the dusty blush still looks good even after February. A fine brush comes in handy when creating symmetrical lobes; custom press-on nails will be a wise choice if you have not got sufficient free edge for the lower point.
How to Apply
- Shape medium almond nails and apply a sheer nude-pink base.
- Sketch two dusty-blush lobes on each free edge, starting from opposite sidewalls.
- Fill the lobes so they meet at the centered almond point as one heart-shaped tip.
- Refine the curves and seal with a clear glossy top coat.
5. Burgundy Outline Hearts on Nude Nails
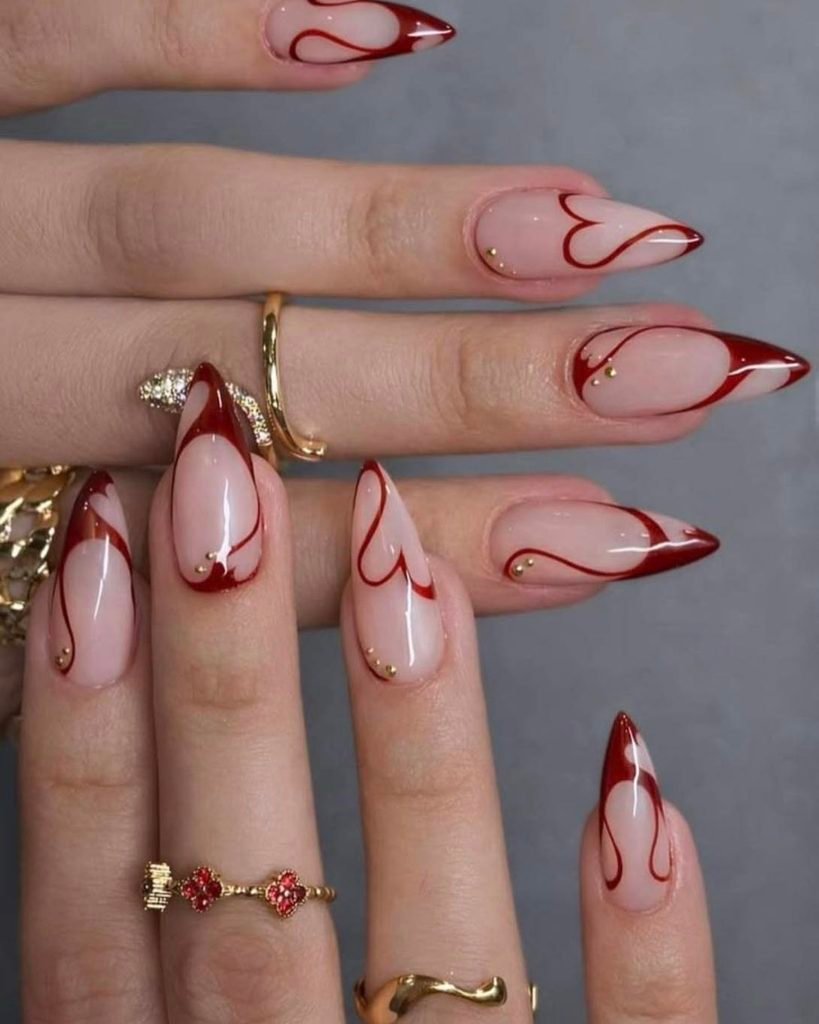
The hearts are empty designs outlined in thin burgundy lines. One small open heart should be placed high on the middle finger nail, while the other – slightly lower on the ring finger nail. The other three nails have just one burgundy pin dot placed on the outer side of the nail. Gloss makes the nude nail bed visible through the heart shapes.
It is a more conservative option than the red design, especially when you wear patterned clothes or your rings are the key accessories. The line should close properly at the end of the heart, otherwise it will look like two separate arcs. You may use a fine liner brush or decals instead of a wide brush for polish application. The hearts should be of the same size, but in different heights to create the feeling of connection without making it look like a pattern.
How to Apply
- Apply a translucent beige base to five medium oval nails.
- Draw one fine burgundy open-heart outline on the middle finger and another lower on the ring.
- Add a tiny burgundy side dot to each remaining nail, leaving the heart centers sheer.
- Let the linework set and cover with clear gloss.
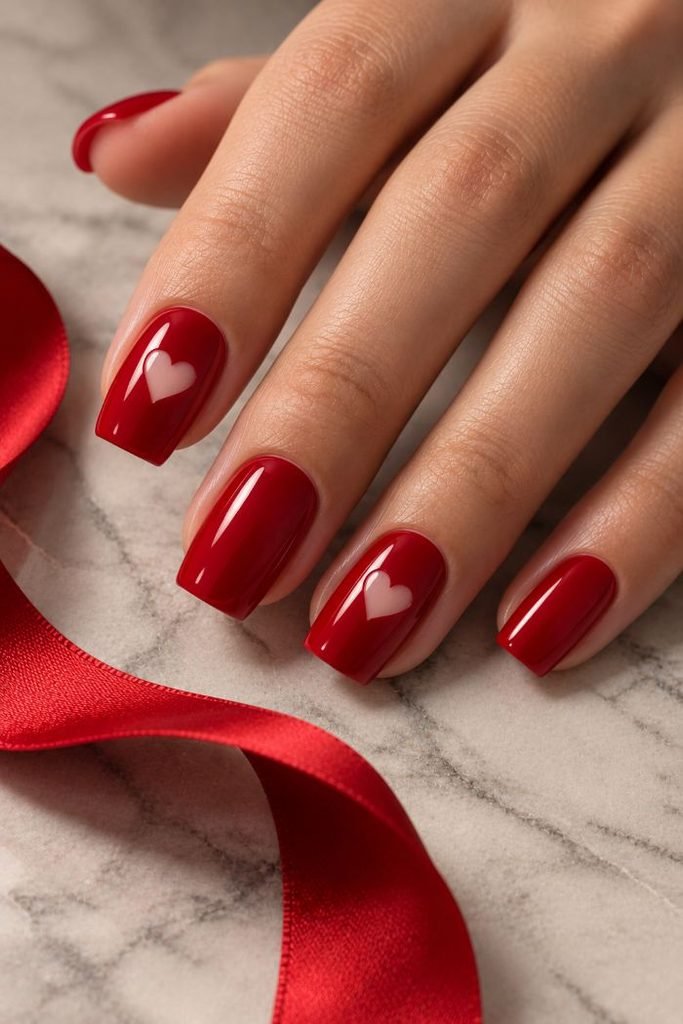
6. Cherry Red Nails with Bare Heart Cutouts
For medium square nails, paint the hand in cherry red but create a heart-shaped window in sheer base on the index and ring fingers. The clear heart shapes are positioned slightly above center, and their borders remain sharp despite being next to the opaque red. The other three nails are painted in solid cherry, and a clear gloss is applied over the red and the negative space windows.
The heart-shaped window appears lighter than a heart painted in light color because the natural nail color also adds to its appearance. This window also becomes the most difficult part of the design, as correcting a tiny window after crossing the border with red polish may ruin the symmetry of the shape. You may use a heart stencil over dried sheer base, but a professional nail artist at the salon or press-on nails will provide you with more precision. Keep the windows relatively small to keep red as the primary color of the design.
How to Apply
- Coat medium square nails with a sheer neutral base and let it dry thoroughly.
- On index and ring, map small heart windows slightly above the middle.
- Paint cherry red around those windows and cover the other three nails fully red.
- Refine the heart borders, then seal the design with a clear glossy top coat.
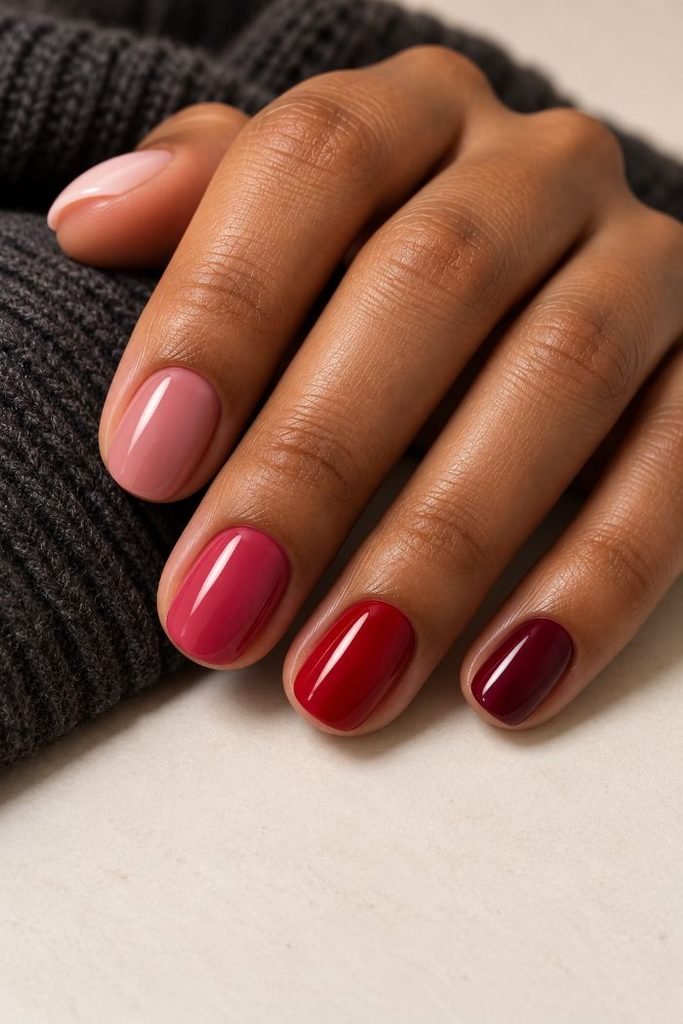
7. Red and Pink Skittle Nails
The Valentine palette itself can serve as the whole design. Apply five short round nails with coordinating creams: pale blush on the thumb, dusty rose on the index, raspberry pink on the middle finger, cherry red on the ring finger, and dark berry on the pinky. Maintain the same opacity and gloss for all five nails for the gradient effect to be noticeable. No hearts or any other decorative elements are present.
It is perfect for those who like the colors of the holiday but do not want their manicure to make sense only during the celebration. Line up the nail polishes next to each other before painting because a neon pink polish will break the gradient among four others. It is simple to achieve using regular nail polish but requires five bottles of the product or a salon with a wide palette. For a less vivid gradient, start with the darkest berry on the thumb.
How to Apply
- Prepare five short round nails with a clear base coat.
- Paint thumbs through pinkie blush, dusty rose, raspberry, cherry red, and berry respectively.
- Add thin second coats as needed so all five colors have comparable opacity.
- Finish each nail with the same clear glossy top coat.
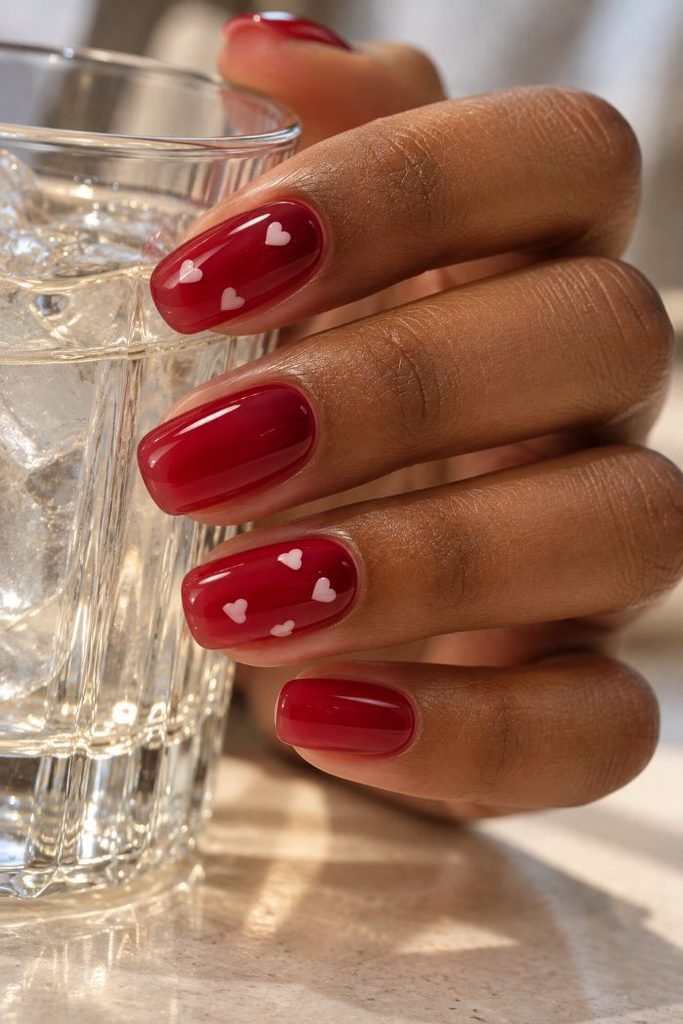
8. Strawberry Jelly Nails with White Heart Confetti
Transparent strawberry red appears to be edible on medium round-square nails. Use a sheer red jelly polish in thin coats, leaving the natural nail slightly visible around the sides. Place three to four tiny opaque white hearts in different directions on the index and ring fingers; all other fingers remain jelly red without any details. The gloss intensifies the color, but does not make the white details invisible.
The hearts must look like scattered confetti rather than a dense print. It is much simpler to use a sticker sheet with several sizes rather than paint eight tiny identical hearts. Jelly polish is naturally more transparent than a cream one; if you put extra coats of polish to make your nails opaque, then the overall effect becomes too heavy. It is an amusing manicure for a party or Galentine’s Day celebration, which does not require length and 3D details.
How to Apply
- Apply two thin layers of translucent strawberry-red jelly to medium rounded-square nails.
- Place three or four tiny white heart decals at varied angles on the index and ring fingers.
- Press each decal flat and keep the thumb, middle, and pinkie free of art.
- Seal the complete hand with a clear glossy top coat.
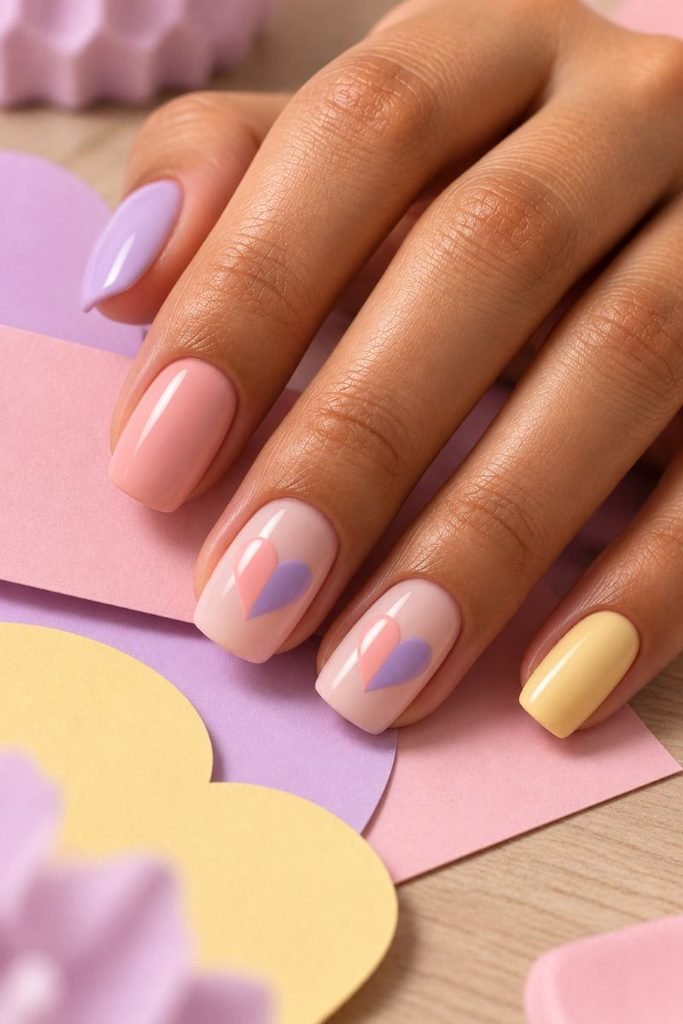
9. Pastel Candy-Heart Color-Block Nails
Steal the chalky palette and sharp shape of candy hearts without the teeny-tiny printed messages. Medium squoval nails are painted in pastel colors like pale lilac, peach-pink, and butter yellow in alternating order. For the middle and ring nails, there is a contrast of pastel heart that is split evenly into two colors, blush on one side and lavender on the other. The other nails have only a pastel background with glossy top coat on top of them.
The inspiration of the sweet shop comes from the color and geometric design rather than the tiny lettering that is impossible to read when printed on the nail. Make sure the two hearts have enough space to reveal their split centers with a border of base color around them. It is more accurate to paint the hearts using this method rather than dot tool ones since both parts of the heart should touch at the center point.
How to Apply
- Paint medium squoval nails in alternating opaque pale lilac, peach-pink, and butter yellow.
- In the middle and ring, outline a small heart with enough space around it.
- Fill one half of each heart blush and the other lavender, meeting at a neat center seam.
- Let the blocks set and finish with a soft glossy top coat.
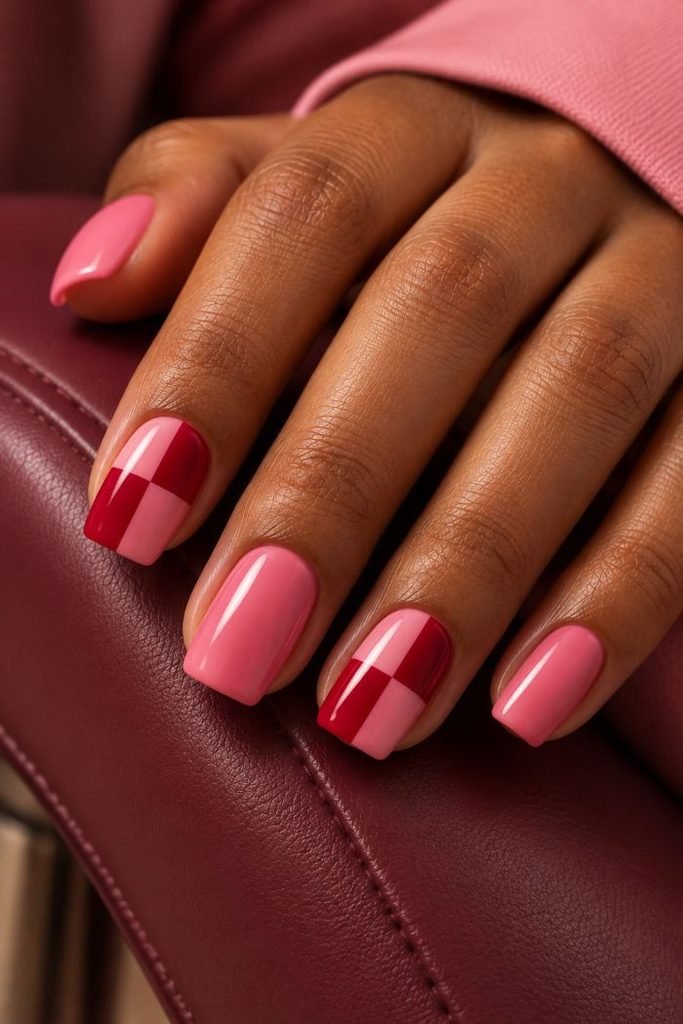
10. Red and Pink Checkerboard Accents
Use large checkerboard blocks for the index and ring nails instead of many small squares. On medium square nails, alternate between pink and cherry red for the index and ring nails. Paint the thumb, middle, and pinkie all in pink and use clear gloss for each nail. The blocks will make the checkerboard red and pink easily recognizable without hearts.
It is perfect for people who enjoy Valentine colors but would rather go for graphic art than romantic art. Square nails are good because they have straight edges for dividing the design while round nails will make the blocks look cut off. Make sure to draw the center lines vertically and horizontally before painting the alternating sections. Ensure that the first color is dried enough so that the second color does not pull through it. Press-ons are a good idea if you want your four blocks to be aligned on both hands.
How to Apply
- Paint three medium square nails opaque warm pink and two accents with the same pink base.
- Divide the index and ring into four broad blocks with one vertical and one horizontal guide.
- Fill opposite blocks in opaque cherry red, preserving the pink blocks between them.
- Clean the joins and finish all five nails with clear gloss.
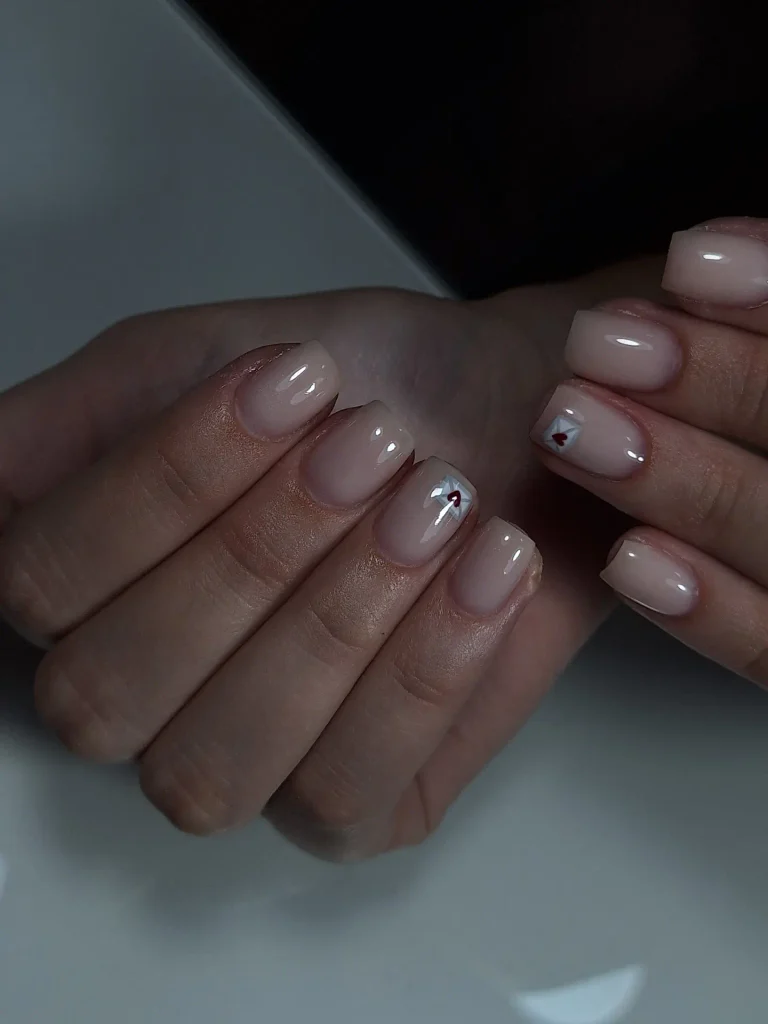
11. Love Letter Envelope Accent Nails
The envelope design is an illustration rather than a mini message. For medium square nails, apply a sheer nude base color and paint an ivory rectangle with a triangular folded flap on the index and ring fingers. The tiny pin-sized red heart lies where the flap folds over. The thumb, middle, and pinkie nails feature a slim red French tip, linking the envelope design to the overall manicure. Glossy topcoat makes sure the flat design remains smooth.
The envelope requires room for its folded flap, which means that you should not attempt to fit it onto a short nail. Center the envelope design on the nail with the base visible on all sides and avoid adding any lettering, which will overcrowd it. An experienced nail artist may trace the fold with a thin gray line; using a flat decal is simpler at home. This is an amusing idea for a person who wants to tell a Valentine’s Day story on two nails without making the entire manicure look like illustrated stationery.
How to Apply
- Apply a sheer nudebase to five medium square nails.
- Draw small ivory rectangles on the index and ring, adding triangular flaps with fine warm-gray outlines.
- Place one tiny red heart at each flap point and paint narrow red tips on the remaining nails.
- Let the illustrations dry and cover them with clear gloss.
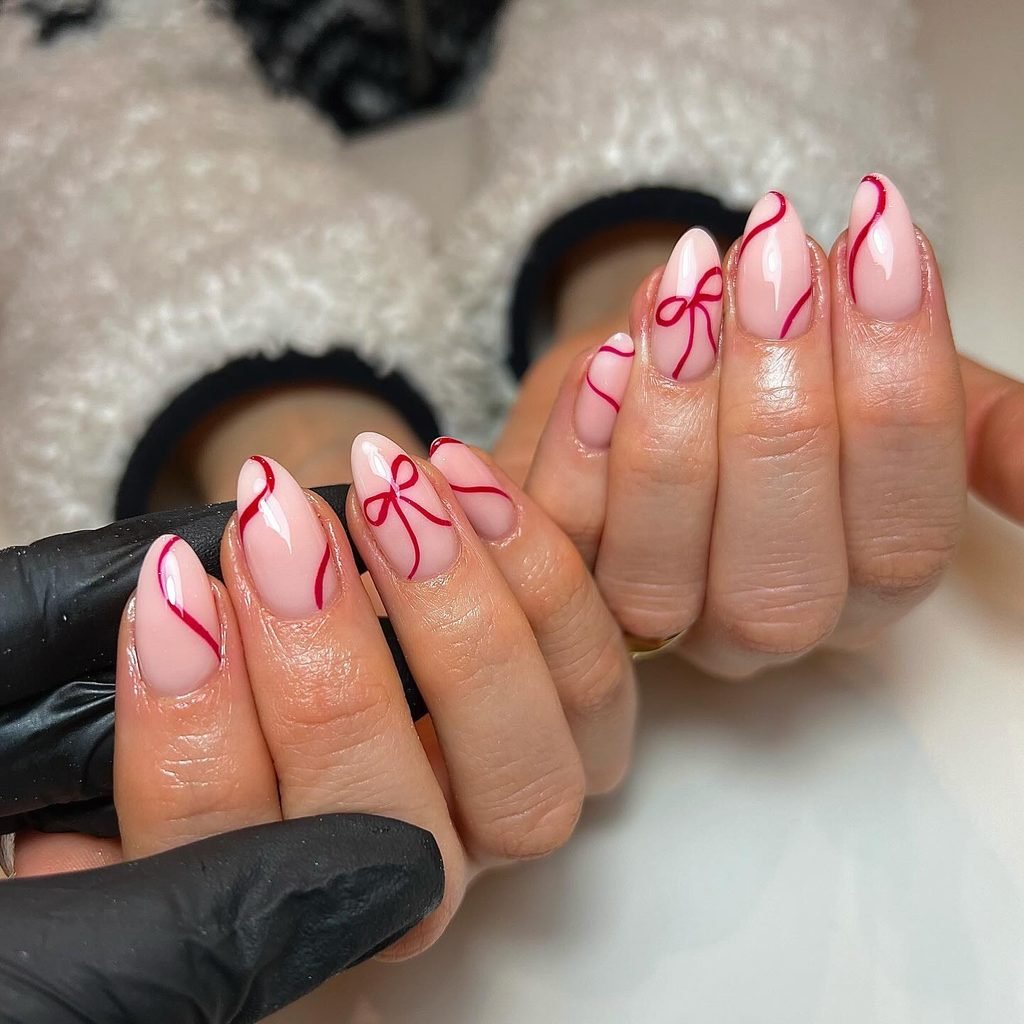
12. Sheer Pink Nails with Painted Ribbon Bows
Imagine the bow as a sketch rather than a raised plastic decoration. Medium almond nails have a see-through ballet-pink base. On the middle and ring nails, add a small wine-red knot on the lower sidewall with two fine loops and short ribbons. Each bow will be oriented differently. The other nails will have a wine-red dot on the base of the nails, and the whole manicure will be glossy.
Flat bows lie more comfortably on the clothes and allow the almond shape to be seen. The center of each loop must be left empty; otherwise, you may end up with a red blotch due to the small size. Bring an example of the manicure to your salon or use nail stickers if you do not feel like painting with a fine brush. This is a great choice for dinner and will look delicate even after the holidays if there is no pattern on your dress or blouse.
How to Apply
- Apply a translucent ballet-pink base to medium almond nails.
- On middle and ring, paint a tiny wine-red central knot and two open ribbon loops.
- Add short trailing ribbons at varied angles and one small base dot to each other nail.
- Let the flat art set, then seal with clear glossy top coat.
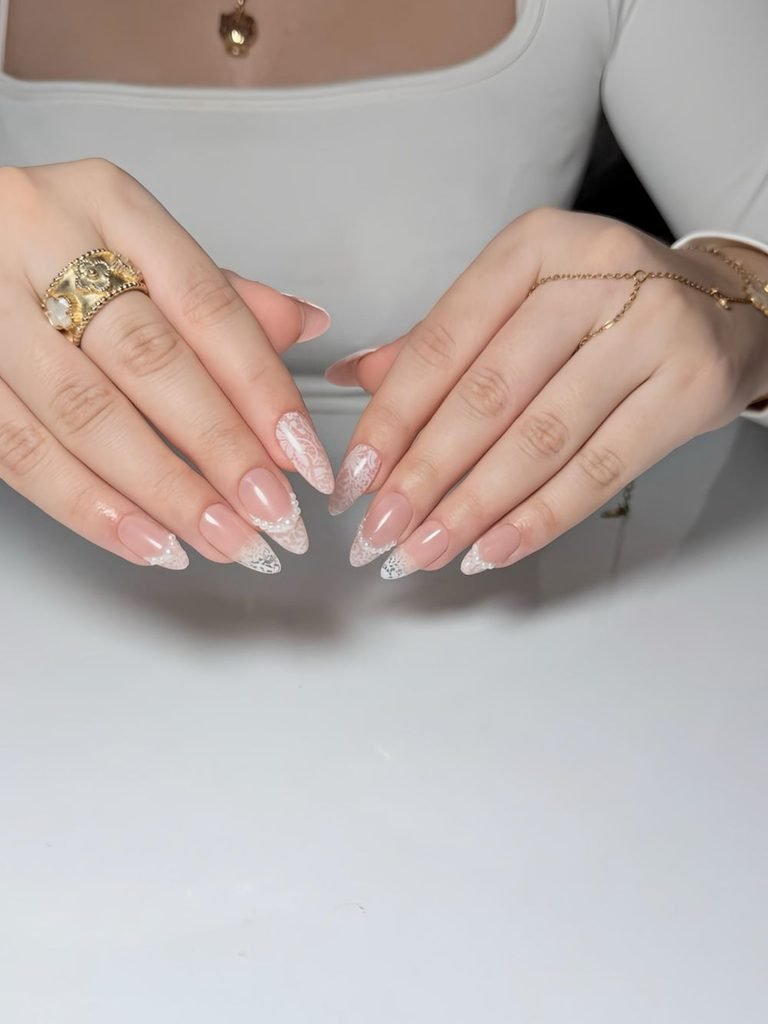
13. Ivory Lace-Edge French Nails
Do not use lace on the entire nail but only at the tip as an accent border. The medium oval nails have a base color of translucent mauve-pink with a thin French tip in warm ivory. On the index and ring nails, add small alternating scallop and dot shapes along the tip’s bottom border; all other tips will be ivory only. A clear coat seals the delicate details in place.
The design is romantic but no hearts are involved. The oval free edge shape allows the scallop designs to flow naturally, while the two decorative tips keep the manicure from looking like five doilies. Hand painting requires good control; stamping or using the right-sized lace sticker works better for a DIY job. If you need the pattern to be soft against cream colors or pearl jewelry, request ivory instead of white.
How to Apply
- Paint medium oval nails with a sheer mauve-pink base and narrow warm-ivory French tips.
- Add tiny ivory scallops beneath the index and ring smile lines.
- Place fine ivory dots in alternating gaps, leaving the other tips plain.
- Let the lace detail dry and seal with clear glossy top coat.
14. Chocolate-Covered Strawberry Nails
This fruit-themed illustration does not include each nail in the dessert nail art but clearly conveys the theme. Round square medium nails have opaque color cocoa brown and strawberry pink alternately. On the ring finger, paint a little red strawberry on a pink base and apply a dark chocolate dip over its bottom half along with two green leaves above it.
The strawberry should be painted on the nail in such a way that there is sufficient room for the red body of the strawberry, the brown dipped part, and the leaves. You do not have to make a three-dimensional effect on the chocolate part by using regular nail polish. It is ideal for a fun-filled Galentine’s party or a weekend nail art. If you wear more than one ring, you may keep the painting only on one nail so that the colors appear to be a two-toned set even from afar.
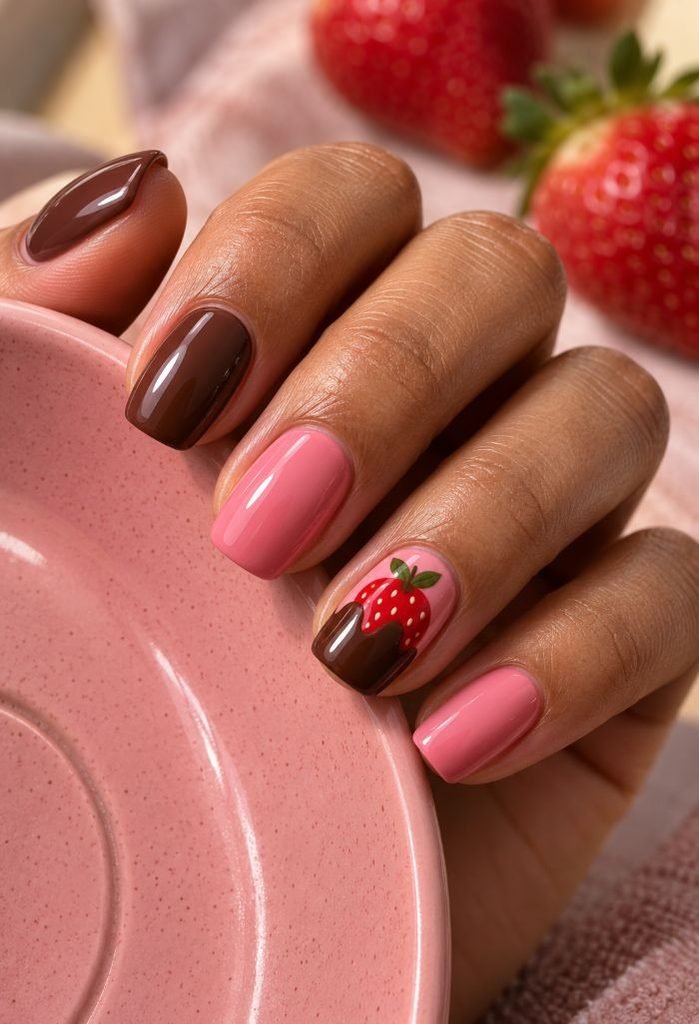
How to Apply
- Paint medium rounded-square nails in alternating opaque cocoa brown and strawberry pink.
- On the pink ring nail, draw one small red strawberry with two green leaves.
- Fill its lower half in dark cocoa brown with a gently uneven dipped edge.
- Let the flat illustration set and seal all nails with clear gloss.
15. Black French Tips with a Red Heart
Black makes the single red heart appear more vibrant. Create a thin line of black French tip on each nail with short square shapes and nude color underneath. Draw one tiny heart of cherry-red color close to the bottom corner of the ring finger, keeping it far from the black strip. The rest of the nails will be without red, and a shiny top coat will define the contrast clearly.
This design is for someone who likes their nails dark but does not want to miss the Valentine message. The presence of one heart prevents the design from being a black and red print, while the nude nail base leaves room for short nails. A steady liner brush can create the straight tips in the comfort of your own home, making the heart from two dots meeting in one point. If you like your dark palette stronger, Nail Blooms’ gothic nail ideas explore black details beyond this restrained holiday version.
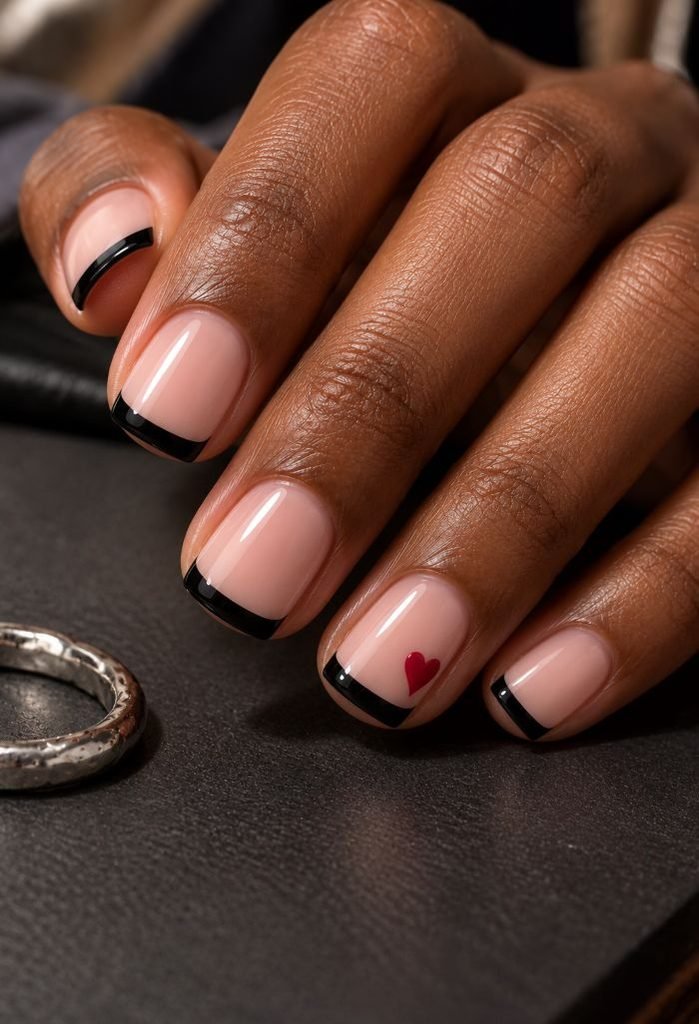
How to Apply
- Apply a sheer nude base to short square nails.
- Paint a narrow black tip along each straight free edge with a liner brush.
- Add one tiny cherry-red heart at the lower ring-finger corner, separated from the tip.
- Let the artwork dry and finish with clear gloss.
16. Matte Wine Nails with Glossy Hearts
Finish contrast helps see the all-burgundy manicure without any additional colors. Medium almond nails get an opaque wine-red base and matte finish. On the index and ring fingers, a flat heart-shaped sticker gets applied with clear glossy finish and placed slightly off center. Other nails stay fully matte. In slanted lighting, hearts look darker and glossier than the velvet-like base around.
This is a burgundy manicure in low light and shows the pattern when you move your hand. Do not make the hearts raised, because this will become a completely different design. Wait until the matte finish dries completely and then apply glossy stickers using a thin brush. You should not cover the whole set again after applying the stickers. Medium almond nails give room for a large heart sticker that will reflect light without touching the sidewalls. Use this design with a dark outfit instead of a bright pink.
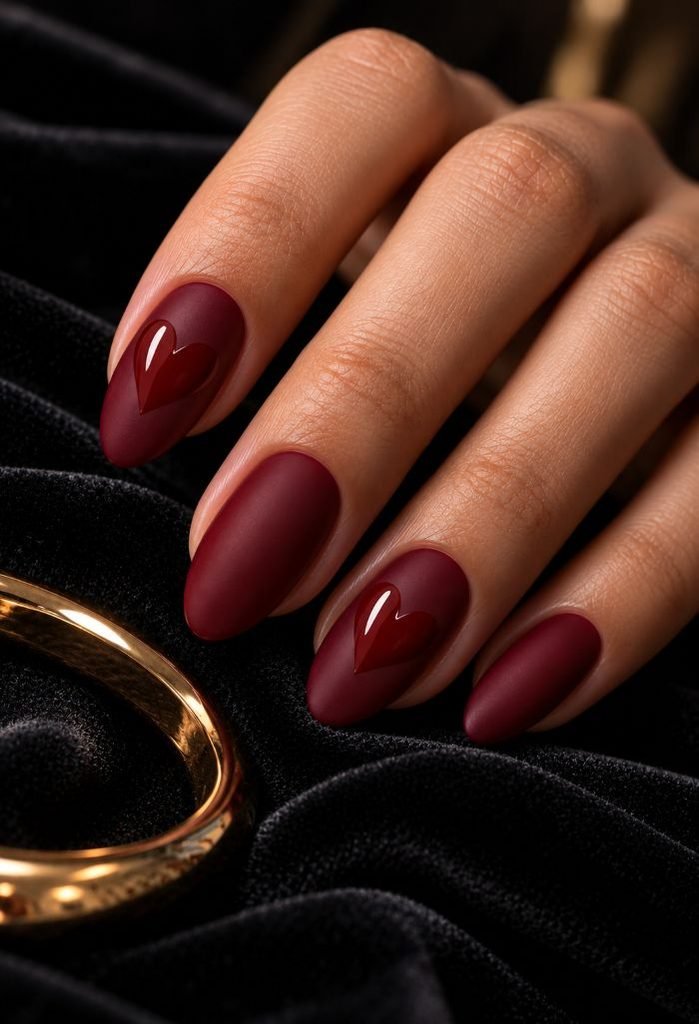
How to Apply
- Coat medium almond nails with opaque wine-red lacquer and let it dry.
- Apply an even matte top coat across all five nails.
- Paint one off-center flat heart in a clear glossy top coat on index and ring.
- Let the hearts set without adding another top layer to the matte nails.
17. Floral Heart-Wreath Accent Nails
Small flowers make up an open heart rather than fill a closed design. On medium ovals with a sheer blush base, create a floral heart by using small burgundy flowers and sage leaves to outline a heart shape on the ring finger. Place a small flower near the sidewall of the middle finger, leaving the other three nails sheer. A clear top coat will preserve the delicate painting.
An empty center allows the floral heart design to look airy compared to a bouquet of flowers. This design is challenging from a technical point of view, as every flower and leaf have to be small enough for the whole design to be easily recognizable. The wreath can be painted with a fine brush or arranged from tiny flat floral stickers applied on custom press-on nails. Stick to only two colors to avoid overcrowding the design with flowers. This manicure will go well with any anniversary dinner just as well as February 14.
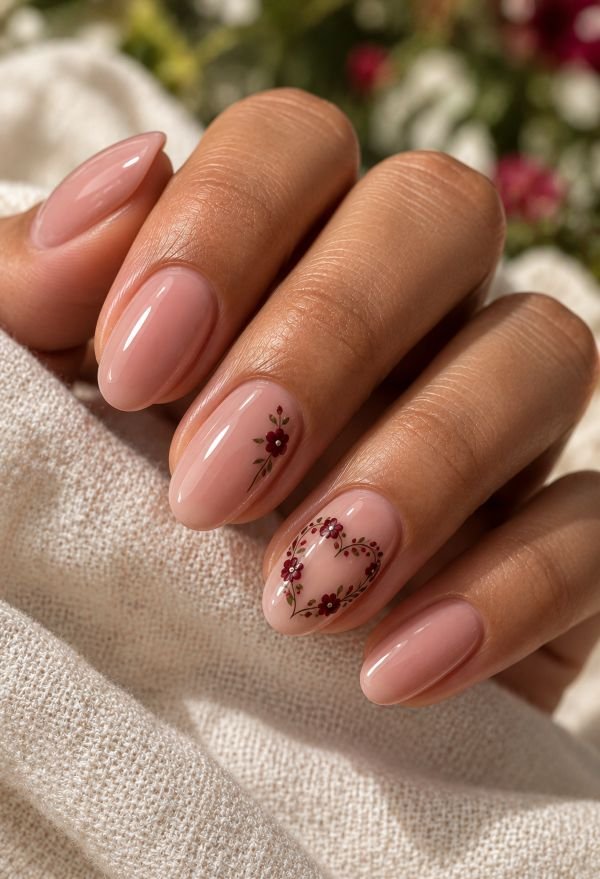
How to Apply
- Apply a sheer blush base to medium oval nails.
- Lightly map an open heart shape on the ring finger, then place small burgundy blossoms and sage leaves along it.
- Add one matching blossom to the middle sidewall and leave other nails sheer.
- Allow the miniature artwork to set and seal with clear gloss.
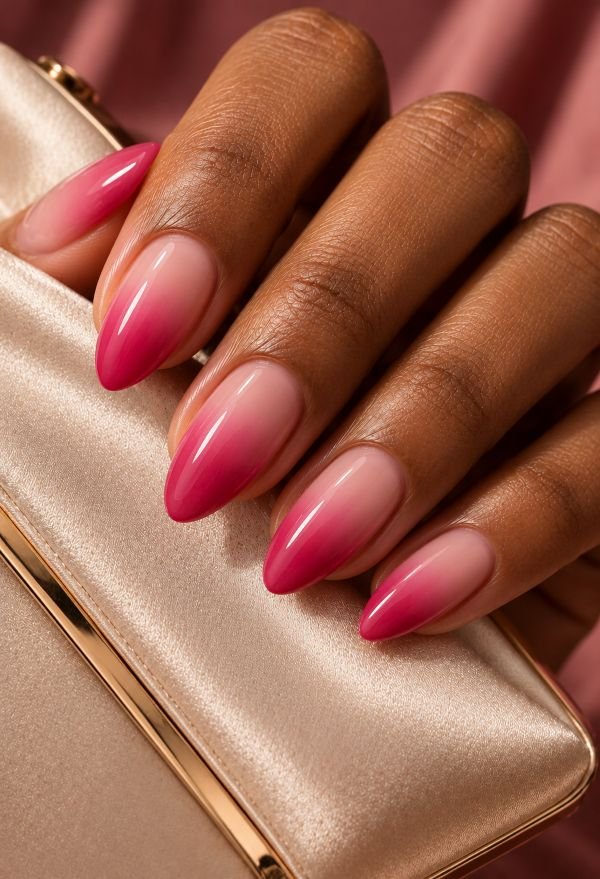
18. Blush-to-Raspberry Ombré Nails
A color fade can imply Valentine’s Day without using any hearts. Almond nails start with a light blush color near the nail beds and end up with a raspberry pink color at the tips. It is important that the gradient between the two colors should be wide enough in the middle and that the raspberry should be limited to the free edges only; the gloss top coat makes the colors flow seamlessly into one another. All nails are painted in the same way.
It works well if you would like to keep this manicure throughout the entire month. The dark-colored tips make the almond shape more distinguishable and the blush color makes the grow-out less harsh compared to a solid color. A sponge can help create a homemade version, yet it is better to apply it lightly in order for the two pinks not to appear as a chalky line. Nail Blooms’ ombré nail ideas show other gradient placements and palettes.
How to Apply
- Paint medium almond nails with a thin blush-pink base and let it dry.
- Put blush and raspberry side by side on a small cosmetic sponge.
- Dab lightly, keeping raspberry at the tips and softening the join with a second restrained pass.
- Clean the surrounding skin and finish the dry gradient with clear gloss.
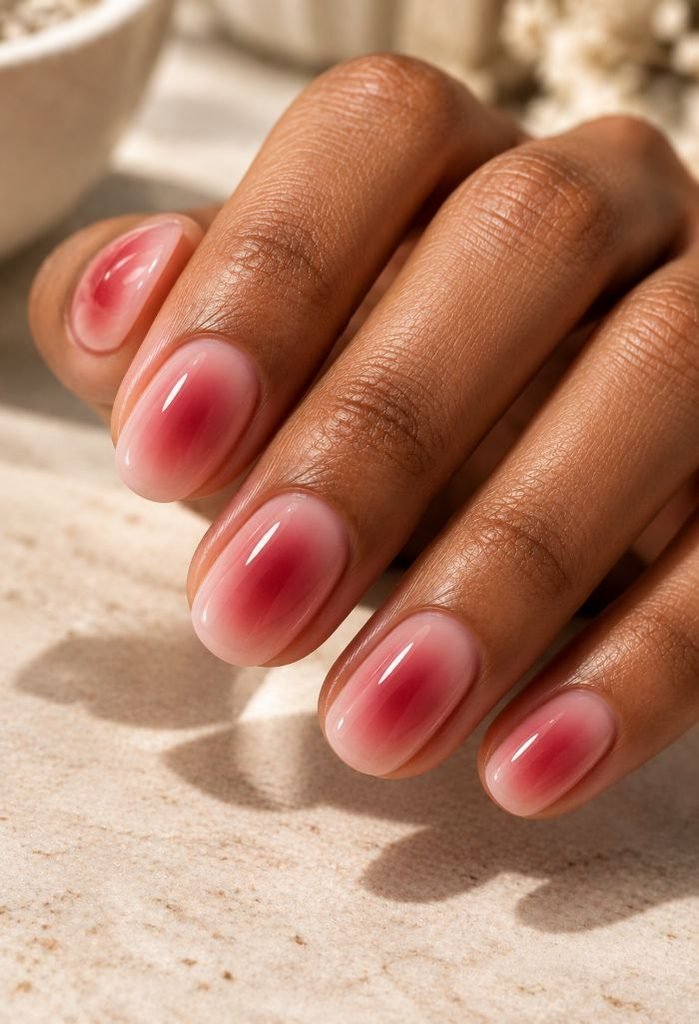
19. Rose-Red Aura Nails
The most vibrant color must be reserved for the center of each nail. If you are working on oval nails that are short, you will want to use a translucent milky-pink base first, followed by a warm rose-red halo in the center, which should leave a faint border all around the sides and cuticles. The five halos should be relatively the same size and should have a glossy finish. No hearts will be seen, but the color positioning will be the Valentine association.
This looks less harsh than a red manicure and provides just enough space so that short nails do not look crowded. A halo is different from an ombré in the way that it blends outwards in all directions and not from one end of the nail to the other. Airbrushing is the best professional technique, while using a nearly dry sponge can create the center with light strokes. Do not let the red reach the sidewalls of the nail as the aura would become a coat of pink.
How to Apply
- Apply a translucent milky-pink base to short oval nails.
- Airbrush or gently sponge rose-red into the center of each nail.
- Keep a pale border around all sides and deepen each center with one light pass if needed.
- Allow the blend to set and finish with clear gloss.
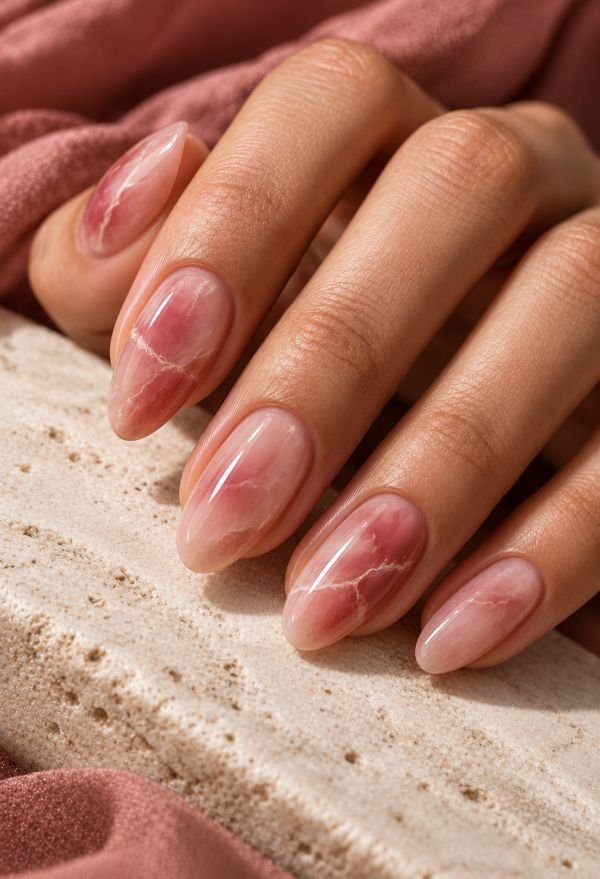
20. Rose Quartz Marble Nails
Medium almond nails should look like translucent pale rose quartz, not like heavy white squiggles. Milky blush color will have faint dusty rose clouds and only a few thin ivory veins that run differently on every finger. Some nails should be left nearly transparent, while the marble effect should be concentrated on the index and ring fingers. A glassy top coat will make the colors look like they are floating under the surface.
This is a romantic look for the one who would prefer to have a stone-like effect instead of a heart. The amount of the veins is important since too many high-contrast white veins can give the impression that the nails look like printed marble tiles. It is possible to create such a design using compatible gel colors or painting it in lacquer with a very light-loaded detail brush.
How to Apply
- Prepare medium almond nails with a translucent milky-blush base.
- Blend faint dusty-rose patches on the index and ring, with lighter traces on other nails.
- Add a few fine irregular ivory veins, avoiding identical routes on every finger.
- Let or cure the layers according to the chosen system, then seal with clear gloss.
21. Pearly Pink Nails with Pearl Hearts
A fine pearl sheen covers medium oval nails painted pale shell pink. On the index and ring fingers, place one small flat pearlescent heart near a sidewall, making the shapes look like light-catching inlays rather than raised charms. Keep the other nails unadorned and all five surfaces smooth beneath clear gloss. The hearts can appear ivory or blush as the hand moves, but the pink base should remain visible.
This is a good choice when your jewelry already includes pearls and you want the manicure to echo their sheen without attaching bulky pieces. Look for thin, flexible heart decals; rigid embellishments will sit proud of a curved nail and catch against clothing. Apply the pearly overlay before the hearts so the small shapes retain their clean outline. Nail Blooms’ pearl nail ideas show other ways to carry the finish into everyday manicures after the holiday.

How to Apply
- Paint medium oval nails pale shell pink and add one fine translucent pearl lacquer topper.
- Place a small flat pearlescent heart decal near the index sidewall and another on the ring.
- Press both decals down to follow the nail curve, leaving the remaining fingers plain.
- Seal the complete set with clear glossy top coat.
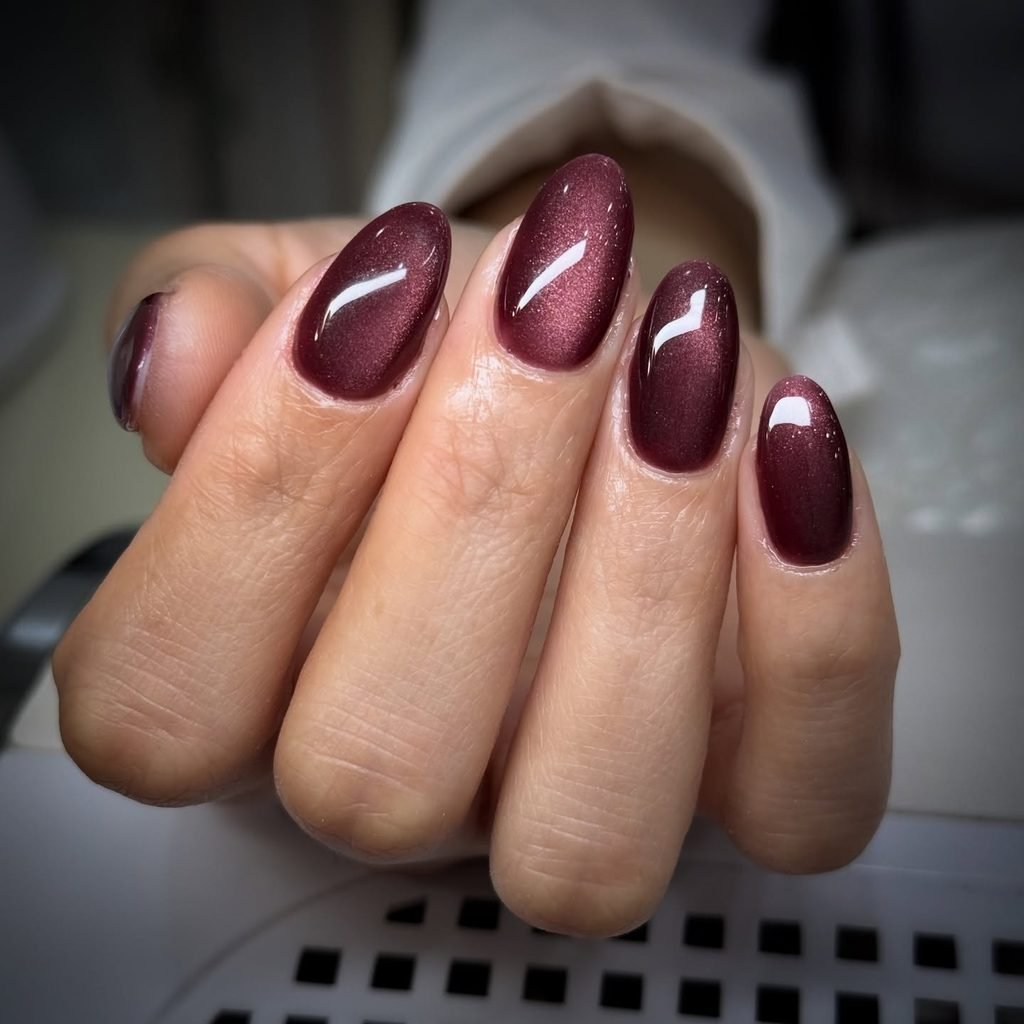
22. Cherry Velvet Cat-Eye Nails
Use deep cherry-red magnetic gel to give the color movement without adding painted art. Medium almond nails have a darker wine base beneath red magnetic particles drawn into a broad glow through the center of every finger. The highlight shifts from crimson to blackened red as the hand turns. A smooth glossy top coat covers the set; velvet describes the light effect, not a fuzzy surface.
This is an evening manicure that still reads as rich red once the holiday passes. Tell the technician whether you want a wide glow or a narrow cat-eye beam, because magnet placement changes the result before curing. The GelBottle’s cat-eye application guidance explains that step. For other colors and beam shapes, browse Nail Blooms’ cat-eye nail ideas. Regular red shimmer polish cannot reproduce the same controlled reflection.
How to Apply
- Have a professional apply and cure a compatible gel base and dark-wine color on medium almond nails.
- Apply cherry-red magnetic gel without curing the reflective layer yet.
- Move the magnet to gather a broad central glow on each nail, then cure as directed.
- Finish with the system’s clear glossy gel top coat and cure fully.
23. Pink Chrome Nails with Tiny Red Dots
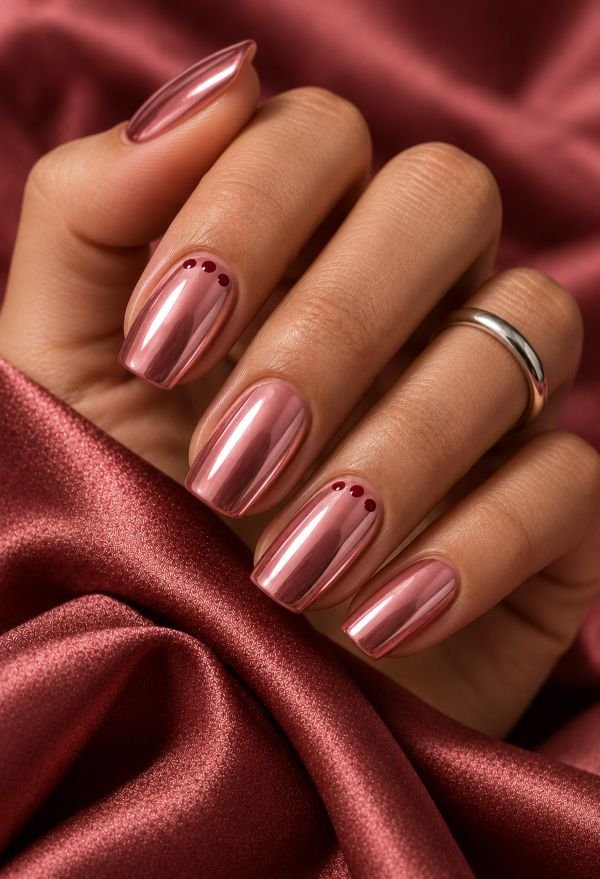
These medium squoval nails have a rose-pink chrome reflection rather than a pearly lacquer sheen. Keep all five nails metallic pink, then add three pin-size cherry-red dots near the cuticle of the index and ring fingers only. The dots form a shallow arc without becoming little hearts. The smooth reflective surface and restrained red placement make the set playful at close range but simple from a distance.
True powder chrome needs a compatible gel application and careful sealing; a metallic pink polish creates a softer alternative if you are working at home. Have the technician finish the chrome layer before placing the red dots so their color stays clear against the reflection. The GelBottle’s chrome application guide describes the pigment-and-seal process. If dots seem too small for your nail width, use just one on each accent rather than growing them into a pattern.
How to Apply
- Have a nail professional apply a compatible gel base, rose-pink color, and chrome-ready layer.
- Rub pink chrome pigment over all five nails and seal it according to the product system.
- Add three tiny cherry-red dots in a shallow cuticle arc on index and ring.
- Set the dots and protect them with a compatible final top layer, curing as directed.
24. Mini Lip-Print Accent Nails
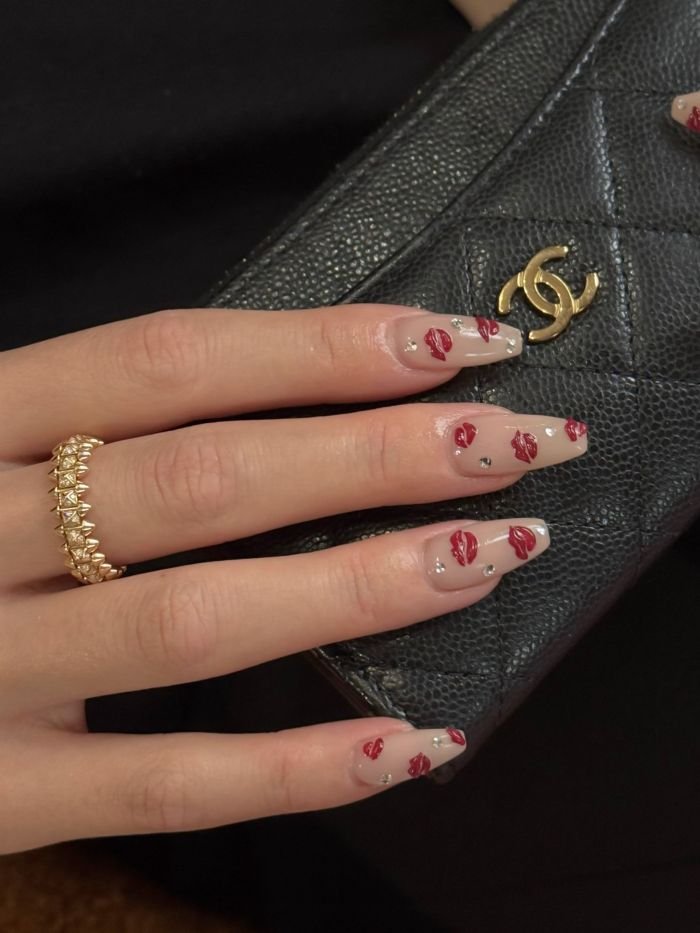
Lip prints feel different from hearts even within the same red-and-pink palette. On medium coffin nails, paint three fingers dusty pink. Keep the index and ring nails sheer nude with one miniature crimson lip-print silhouette near the outer half of each nail. The upper lip has a small central dip and the lower lip is a single rounded curve; no lettering or glitter surrounds either print. Finish everything in gloss.
The silhouette must read at arm’s length, so choose a precise decal or a nail artist comfortable with miniature linework. Two different angles feel less like a rubber stamp, but keep their scale consistent. A lip print can suit a Valentine’s date or a night out after the holiday; the rest of the hand stays understated. For a home version, buy flat decals sized for your nails and press them onto a dry base.
How to Apply
- Paint thumb, middle, and pinkie dusty pink; apply sheer nude to index and ring.
- Place or paint one small crimson lip-print silhouette near the outer half of each nude accent.
- Angle the two prints differently while keeping their overall size similar.
- Press decals flat or let paint dry, then apply clear glossy top coat.
25. Silver and Red Heartbeat Line Nails
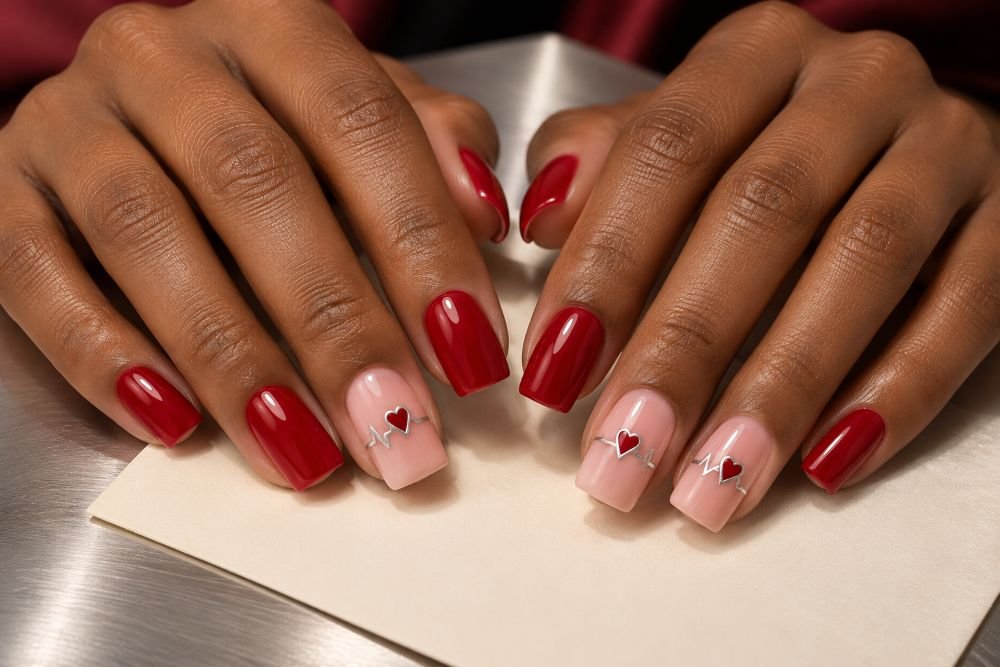
One fine metallic line travels across a sheer base, rising into an angular peak before continuing toward the free edge. On medium square nails, paint the index and ring fingers translucent pink and draw that silver zigzag across their centers, with a tiny red heart at the peak. The other three nails are opaque cherry red. A glossy finish keeps the silver line flat and the heart distinct.
Think of this as a graphic rhythm motif rather than a medical diagram. The peak should be broad enough for the red heart to sit on it, while the rest of the silver line remains fine. Metallic striping polish or a nail-art sticker is easier than loose foil for this path. This suits someone who wants a modern Valentine symbol without bows or florals. Keep the line away from sidewall skin and avoid extra peaks that would make the accents look busy.
How to Apply
- Paint three medium square nails opaque cherry red and the index and ring sheer pink.
- Draw a fine silver zigzag across the center of each sheer accent, including one clear angular peak.
- Place one small red heart at each peak, keeping the silver path visible on both sides.
- Let the details set and cover all nails with clear gloss.
26. Clear 3D Jelly Heart Nails
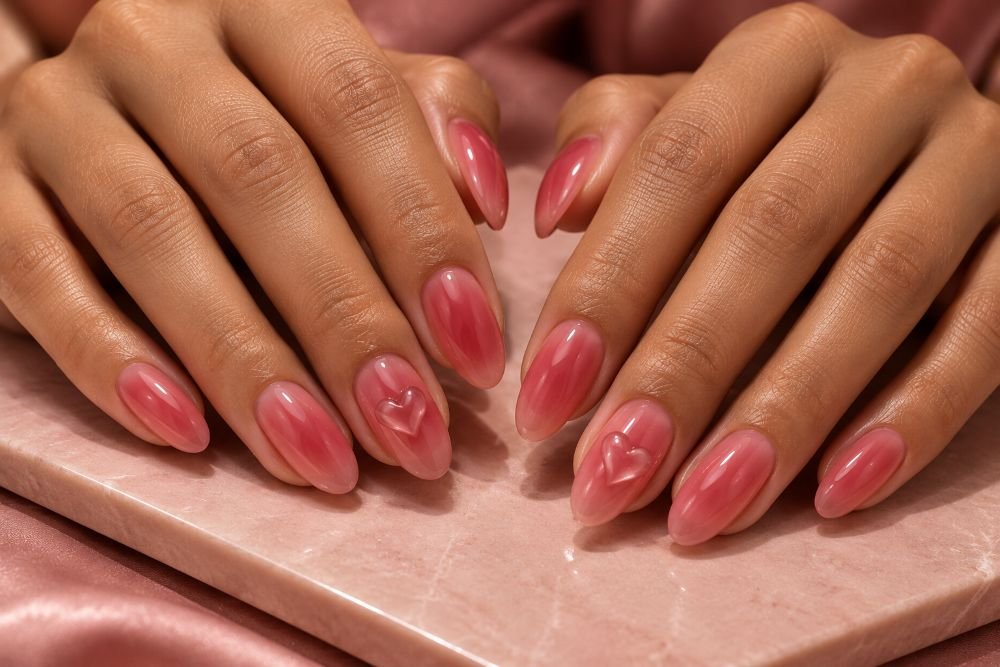
The hearts depicted here are colorless spheres that are seen due to their texture. For the almond-shaped nail plates, create a transparent strawberry pink nail plate. Then sculpt one small clear heart in the middle of the middle finger and another slightly offset from the center on the ring finger, making the silhouette rounded and free of any corners. As for the pinkie, index and the thumb, they are smooth glossy pink without any details added to them.
Note, this nail design is a custom press-on or salon design: the regular top coat will simply flatten the shape. Ask to apply appropriate clear 3D gel properly. If you need a more plain design for every day, then just choose the heart shaped decal on the jelly base.
How to Apply
- Have a nail professional prepare medium almond nails with a compatible translucent strawberry-pink gel base.
- Place suitable clear 3D gel into one small heart on the middle nail and another off center on the ring.
- Cure each raised shape fully according to its product directions and check for sharp or lifted edges.
- Finish the surrounding color with compatible gloss, preserving the smooth clear domes.
27. Garnet Rhinestone Heart-Outline Nails
For a full event look, use tiny stones to draw two open hearts rather than covering the entire nail in crystals. Long soft-coffin nails wear a translucent rose-beige base. On the index and ring fingers, small garnet-red flat-back rhinestones form neat heart outlines with open centers. The remaining nails each carry one tiny clear stone near an alternating lower sidewall. The exposed base stays glossy.
Longer nails give each stone room to sit inside the nail perimeter, which helps the hearts remain readable and less likely to catch at the sidewalls. This is best handled by a technician or a custom press-on maker using appropriate gem adhesive. Ask for small, low-profile stones and a secure seal around their bases rather than a thick gloss over the facets.
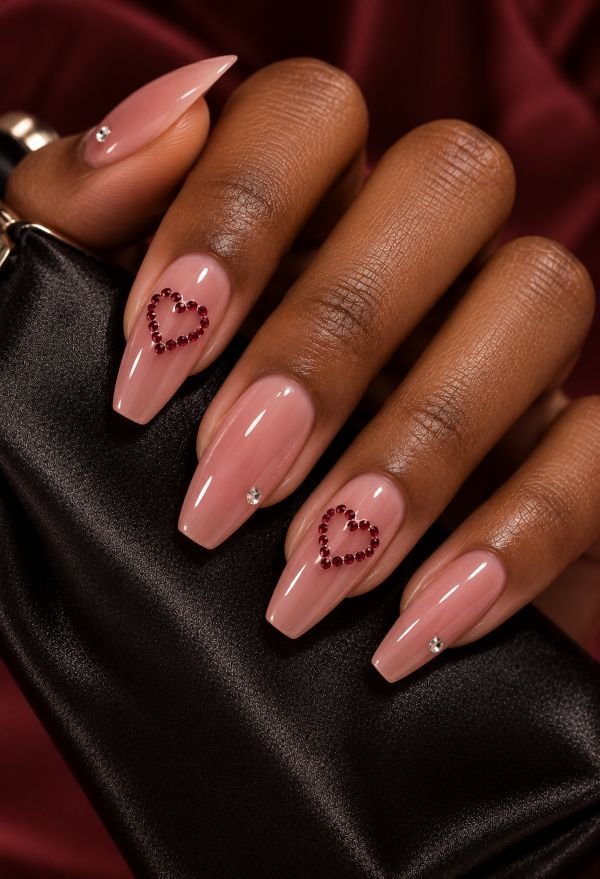
How to Apply
- Have a nail professional prepare long soft-coffin nails with a translucent rose-beige base.
- Map two small open-heart outlines on the index and ring using appropriate gem adhesive.
- Place tiny garnet flat-back stones along the outlines and one clear sidewall stone on each other nail.
- Set securely and seal around the stone bases while leaving the facets exposed.
Which Valentine’s Day Nail Designs Work on Short Nails?
Short nails are ideal for a motif done in one go. The milky pink single heart, red micro-French, black tip with one red accent, and plain cherry red design are still clearly visible on the small nail. Do not cover the entire surface with the design, leave some white space around the small heart, so that it does not come in contact with the sidewalls. In case you wish to do dots, lip prints or bows, pick one or two accent nails and let the rest of the nails be of the same color.
Certain shapes require some space to be effective. Heart-shaped French tips make use of the point of almond shaped nails, while rhinestone heart outline requires sufficient space for several stones to fit in the border. These can be adapted in such a way that you could use a very small heart or one stone on a small oval shaped nail without extending its length. Always show the nail artist a sample along with your nail length.
How to Wear Your Valentine Manicure Beyond February 14
To have a manicure longer, use the decorations on one or two fingers and put the elements of the holiday on them. The little things, like the heart and the lip marks, can be removed during the touch-ups, but the main part – the red or the pink nails will stay. If the design uses only color, or the rose quartz marble, or the blush to the raspberry gradient, then it will work perfectly for the dates, business day, and regular weekend after Valentine’s Day. The sheer base will look more delicate where the nail meets the skin.
Think about the finish and your habits before you go to the salon. You do not have to use gloss nail polish to restore the glossy design because gloss on the top of a matte wine design will remove the heart pattern. Try not to use the gel hearts and rhinestones, as it will take some effort from you to wear them close to the knit. Ask for the tips about maintenance and removal of the gel hearts and rhinestones at the same salon where they put them.
Final Thoughts
Valentine’s Day manicures may be direct, subtle, whimsical, or morbid. You can keep it simple with one red heart on milky pink if you prefer your regular nails modest; an open floral wreath or heart-shaped French tip will lend more form to the theme. Checkerboard pattern, lip prints, chrome color, and raised clear hearts create different atmosphere for a person who wishes his manicure to fit the occasion.
Keep the source that corresponds to your nail length and level of details you wish to maintain after the procedure. Pay attention to base transparency, heart size, positioning, finish, and any other elements that go above the nail plate. These elements will help a nail technician to reproduce what you really like about the picture, and will also assist you in choosing a realistic DIY version of it.
Ready to give your nails a little Valentine’s Day charm? From glossy cherry reds and delicate heart accents to romantic French tips, playful bows, and shimmering finishes, find a design that feels like you. Save your favorite and preview how it looks on your hands before your next DIY manicure or salon visit.
Use our AI Nail Generator

Bloomie
Bloomie (I) is the founder and author of Nail Blooms, a nail inspiration website dedicated to manicure ideas, nail art, colors, shapes, and emerging beauty trends. My interest in nails began with a simple habit of collecting beautiful manicure ideas and exploring different styles, from timeless nude shades and French tips to creative nail art and seasonal looks. What started as a personal interest gradually grew into Nail Blooms, a space created to make discovering nail inspiration easier and more enjoyable. At Nail Blooms, My goal is to help readers give new ideas, find different possibilities, and feel inspired when choosing their next manicure.
About the editor ↗