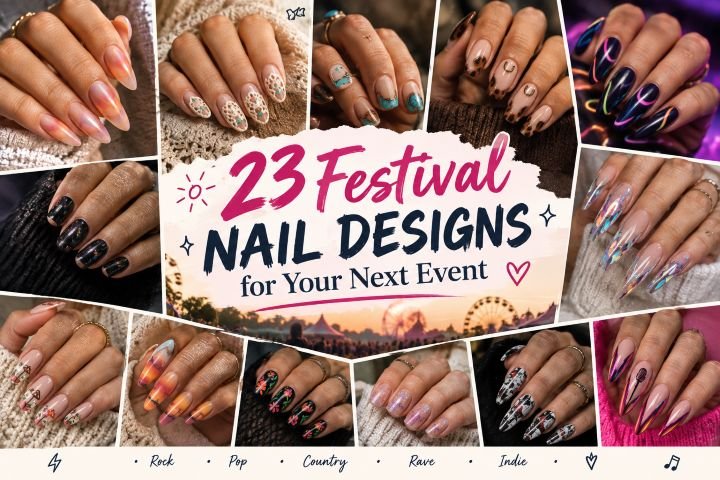
23 Festival Nail Designs for Your Next Event
A festival manicure has two lives. In the afternoon, it has to look deliberate in full sun beside denim, crochet, boots, or a barely-there outfit. Hours later, the same nails need enough contrast or reflection to register beneath stage lighting and phone flash. The best festival nail designs manage both without turning every finger into a crowded collection of stars, flames, flowers, and gems.
This edit moves between desert color, Western details, psychedelic pattern, rave-ready finishes, and compact art for short natural nails. Current festival coverage from Cosmopolitan points to lace, chrome, butterflies, watercolor, and aura effects, while InStyle adds magnetic color and animal print to the conversation. The 23 ideas below use those broader directions selectively, giving each manicure its own shape, placement, finish, and practical reason to exist.
1. Desert Sunrise Aura Almond Nails
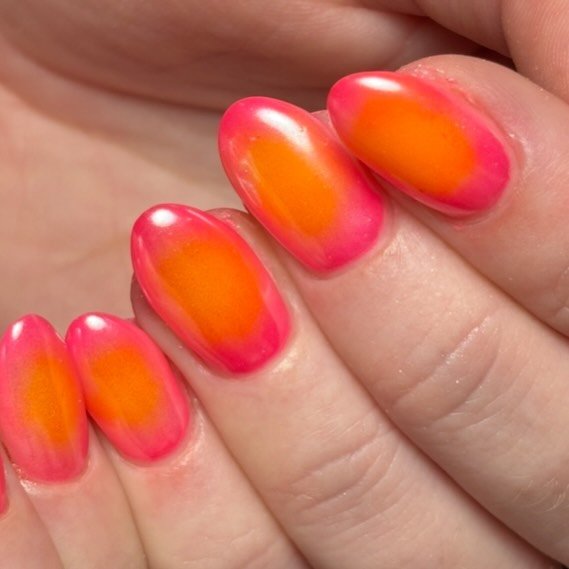
A translucent sandstone base warms medium almond nails without disguising the natural nail underneath. Apricot, coral, and dusty mauve form soft off-center halos, with the brightest color drifting toward a different sidewall on each finger. Two nails carry a hairline antique-gold arc through the blur, like the first sharp edge of sun appearing over a hazy horizon.
The muted outer colors make this desert festival nail design easier to wear than a five-shade neon aura, yet the coral centers still show clearly in outdoor photographs. Almond tips stretch the gradient vertically and keep the irregular placement graceful. Ask for an airbrushed fade at the salon; a small makeup sponge can produce a softer DIY version if every layer is tapped on almost dry.
How to Apply
- Apply one thin coat of translucent sandstone-pink polish to medium almond nails.
- Blend apricot, coral, and dusty mauve into off-center halos, changing the placement on each nail.
- Draw a fine antique-gold arc through the aura on two accents.
- Let the color settle, then seal the gradients beneath a glassy top coat.
2. Sun-Bleached Crochet Grid Nails
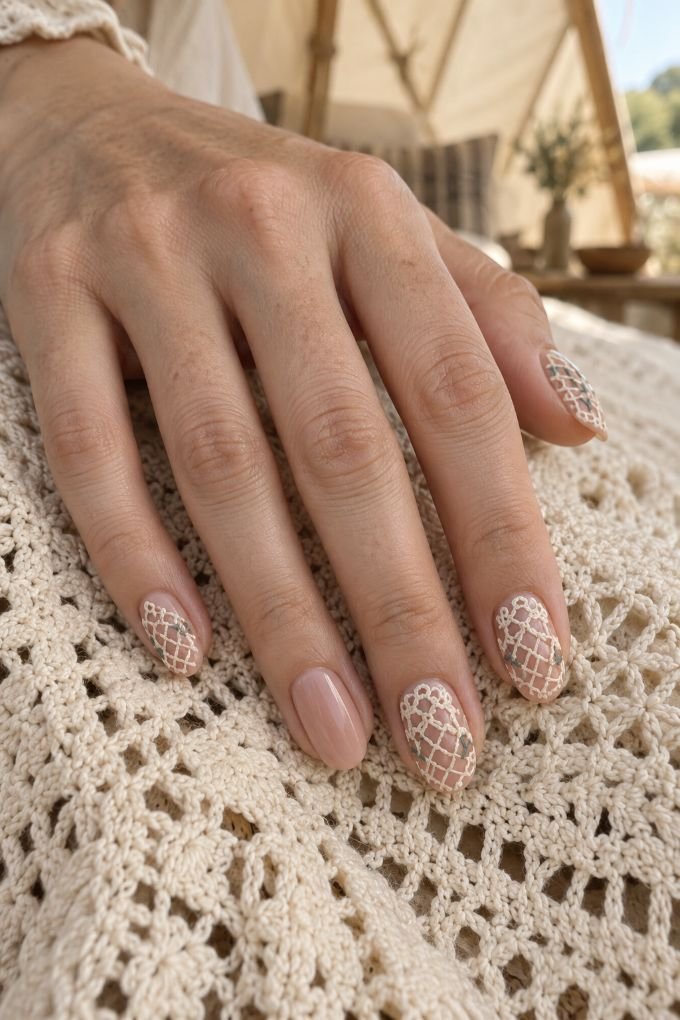
Medium oval nails wear a sheer clay-pink wash, interrupted by cream openwork patterns on three fingers. Tiny loops, squares, and scalloped lines follow the tip or one sidewall rather than covering the whole nail. A few dusty-teal stitches break up the cream, and a satin finish on the base contrasts subtly with the glossier painted grid.
Instead of reproducing fabric literally, the pattern borrows crochet’s rhythm and visible gaps. That restraint prevents boho festival nail designs from becoming costume-like, especially when the outfit already includes fringe or lace. The oval surface gives curved loops enough room without requiring extensions. Fine stamping decals are the most realistic home option; freehand work needs a long liner brush, diluted gel paint, and pauses between sections so the pattern stays open rather than merging into white lace.
How to Apply
- Cover medium oval nails with a translucent clay-pink base and finish it softly satin.
- Paint small cream loops, open squares, and scalloped lines along three tips or sidewalls.
- Insert a few dusty-teal stitch details while preserving visible gaps in the pattern.
- Seal the linework selectively with clear gloss, keeping the underlying base softly muted.
3. Turquoise-and-Copper Inlay Square Nails
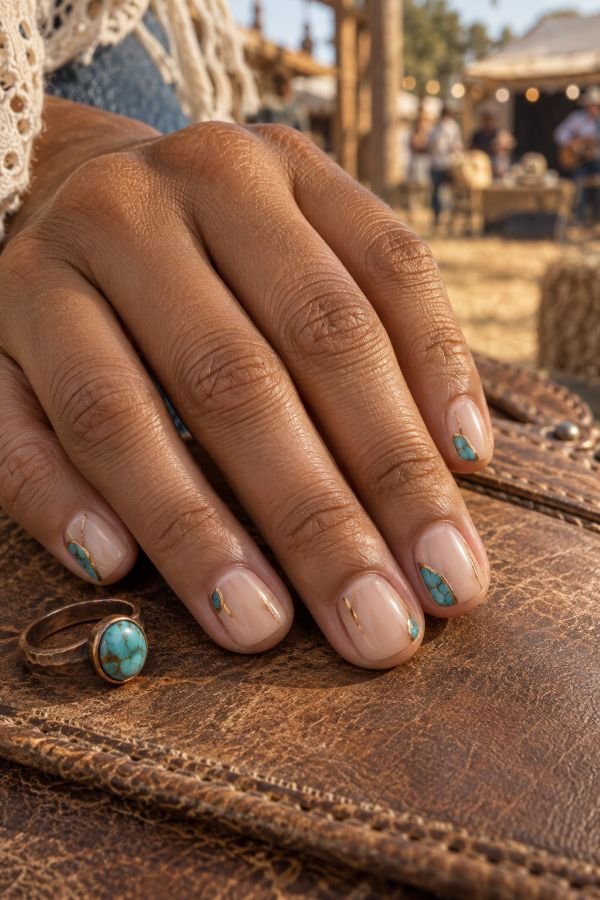
Short soft-square nails begin with warm translucent beige. At alternating lower corners sit irregular turquoise inlays veined with tiny brown lines and edged in brushed copper. The fragments differ in size, but none reaches the center of the nail; three fingers remain nearly bare except for a narrow copper dash that repeats the metal elsewhere in the set.
Turquoise introduces a clear country music festival reference without resorting to painted boots, hats, or cow-print tips. Keeping the stone effect in the corners protects the clean proportions of short square nails and makes the manicure manageable around zippers, bags, and camping equipment. A technician can marble turquoise gel inside the copper frames. For home use, thin stone-pattern decals trimmed into uneven chips will look more convincing than trying to paint identical ovals.
How to Apply
- Shape the nails into short soft squares and apply a warm translucent-beige base.
- Paint irregular turquoise corner fragments on alternating nails.
- Add delicate brown veining, frame each fragment with brushed copper, and repeat copper dashes elsewhere.
- Smooth the flat inlay effect beneath a durable glossy top coat.
4. Fawn-Print Negative-Space Nails
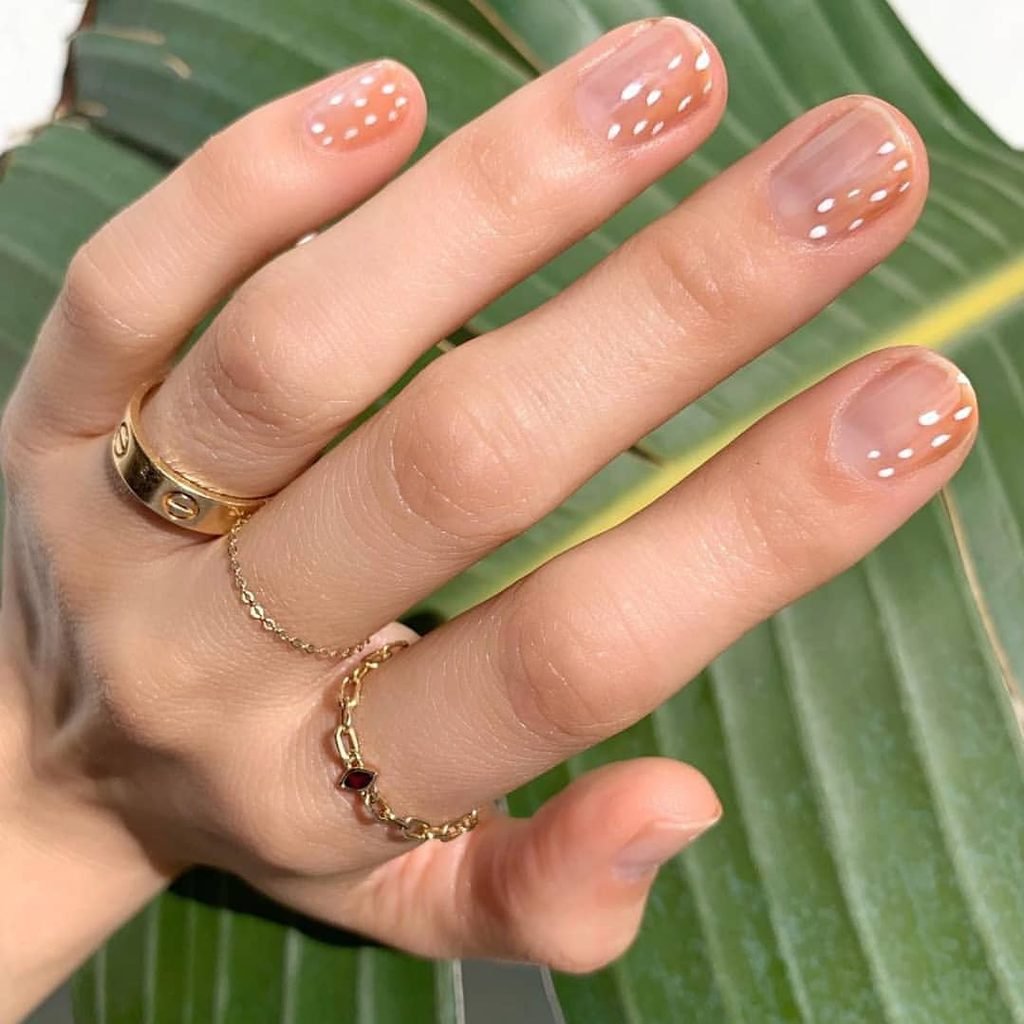
A clear caramel glaze sits over short squoval nails, leaving the natural nail line faintly visible. Loose clusters of cocoa-brown fawn markings angle across two sidewalls and one tip, accompanied by a handful of tiny cream flecks. The pattern never fills an entire nail, and the smooth satin surface keeps the neutral colors soft rather than glossy and cartoonish.
Animal print is easier to integrate into an outfit when it behaves like an accent instead of a full ten-nail pattern. Here, negative space separates every cluster and stops the short shape from looking compressed. The manicure works particularly well beside suede, faded denim, chocolate brown, or plain white, but it does not depend on a Western wardrobe. Irregularity is useful when painting at home: vary the marks deliberately, keep the brush nearly dry, and judge the balance from a full-hand view.
How to Apply
- Apply a transparent caramel glaze to prepared short squoval nails.
- Add angled clusters of uneven cocoa-brown fawn markings along selected tips and sidewalls.
- Place a few tiny cream flecks between the darker marks while retaining broad clear areas.
- Finish with a smooth satin top coat that leaves no physical texture.
5. Tangerine Solar Cat-Eye Nails
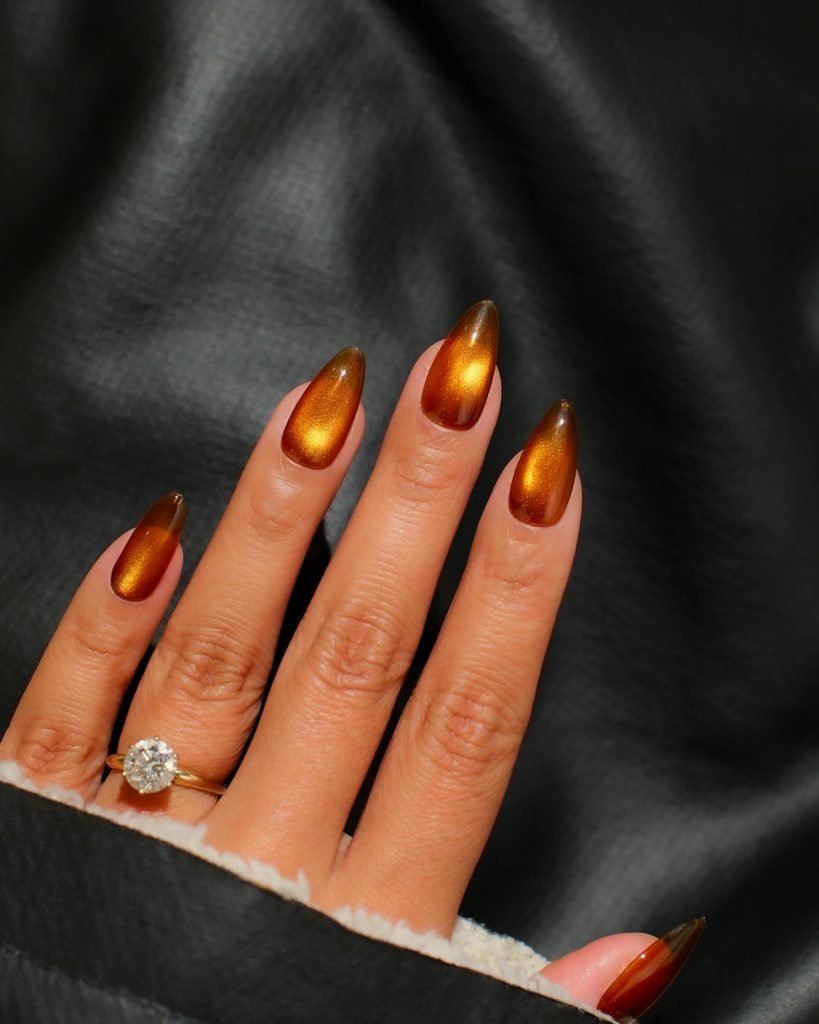
Burnished tangerine covers medium almond nails, deepening to red-orange around the edges. A magnet draws fine gold pigment into a rounded flare just above each center, but the highlight leans toward alternating sidewalls instead of forming five identical stripes. One accent carries a slim copper orbit around the glow; the rest rely entirely on the moving color.
Under daylight, the base reads like lacquered citrus. When the hand turns under stage light, the magnetic cat-eye gel develops a bright, floating core that ordinary shimmer cannot reproduce. That transformation gives a single-color set enough interest for a full weekend. Readers considering other orange undertones can compare these orange nail ideas, while Nail Blooms’ cat-eye nail ideas show how magnet placement changes the final effect.
How to Apply
- Apply a red-orange foundation to prepared medium almond nails and cure as directed.
- Layer tangerine magnetic gel over one nail at a time.
- Pull the gold particles into off-center rounded flares, adding one slim copper orbit to an accent.
- Cure each placement promptly and finish with a high-gloss gel top coat.
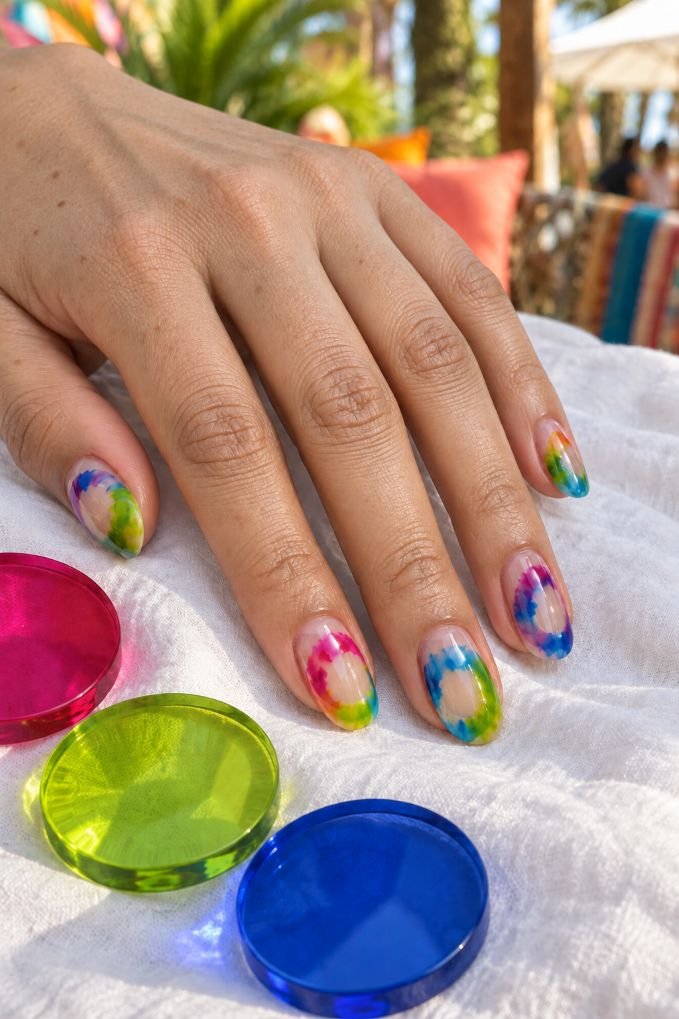
6. Berry-Lime Washed Tie-Dye Nails
Raspberry, sharp lime, and cobalt float through a transparent base on medium oval nails. Rather than meeting in dense pinwheel spirals, the translucent colors form loose washed rings with clear gaps between them. Some edges bleed softly; others stop abruptly, and a final layer of clear jelly makes the overlapping areas appear purple, teal, or burnt orange.
Tie-dye belongs naturally in music festival nail ideas, but transparency keeps this interpretation from resembling a souvenir T-shirt. The shared clear base also makes three high-contrast colors feel connected across the hand. Blooming gel creates the easiest salon diffusion. With regular lacquer, work one nail at a time, dot small amounts of color into clear polish, and drag them gently with a detailed brush. Stop early—overworking is what turns the clean secondary colors into mud.
How to Apply
- Cover medium oval nails with a thin transparent or clear-jelly base.
- Place raspberry, lime, and cobalt in loose rings, leaving open space between the colors.
- Soften selected edges and allow a few overlaps to create secondary shades.
- Encapsulate the washed pattern beneath a clear, wet-look top coat.
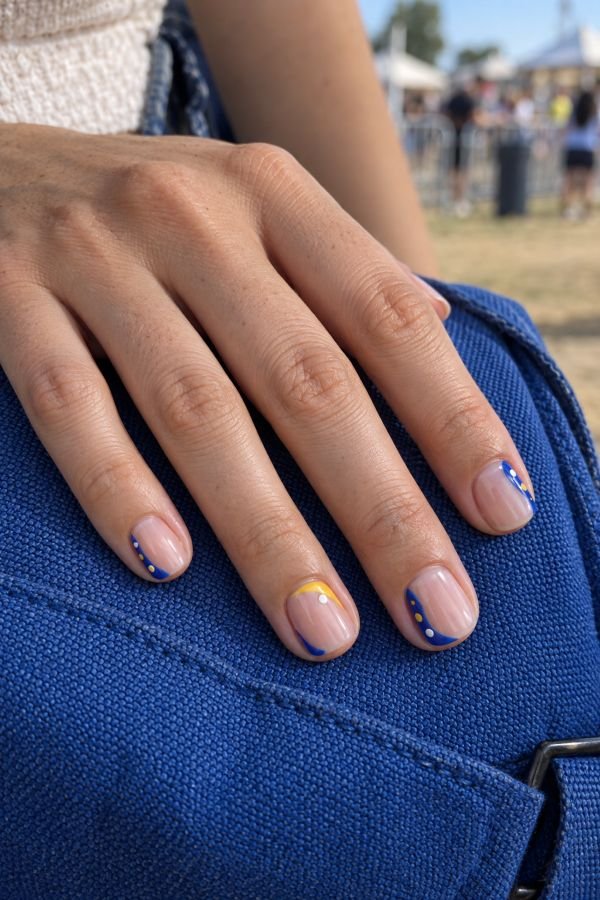
7. Cobalt Polka-Dot Side French Nails
Short square nails retain a sheer neutral-pink base while saturated cobalt enters from one side of each free edge. The angled side French tips alternate direction across the hand and carry disciplined rows of lemon and white micro-dots. One nail reverses the palette with a lemon corner and two cobalt dots, giving the set a deliberate break in rhythm.
This is colorful enough for a festival but compact enough for readers who do not want extensions or raised decoration. Straight sidewalls help the diagonal tips look sharp, while the dots keep the cobalt from becoming a heavy block. More conventional curves appear in these French tip nail designs, but the side placement gives this version a stronger graphic identity. A striping brush and dotting tool are sufficient for a careful home attempt.
How to Apply
- Apply one or two coats of sheer neutral-pink polish to short square nails.
- Paint alternating cobalt side tips, keeping their diagonal edges crisp.
- Add even rows of lemon and white micro-dots, reversing the colors on one nail.
- Float glossy top coat over the design and cap every straight free edge.
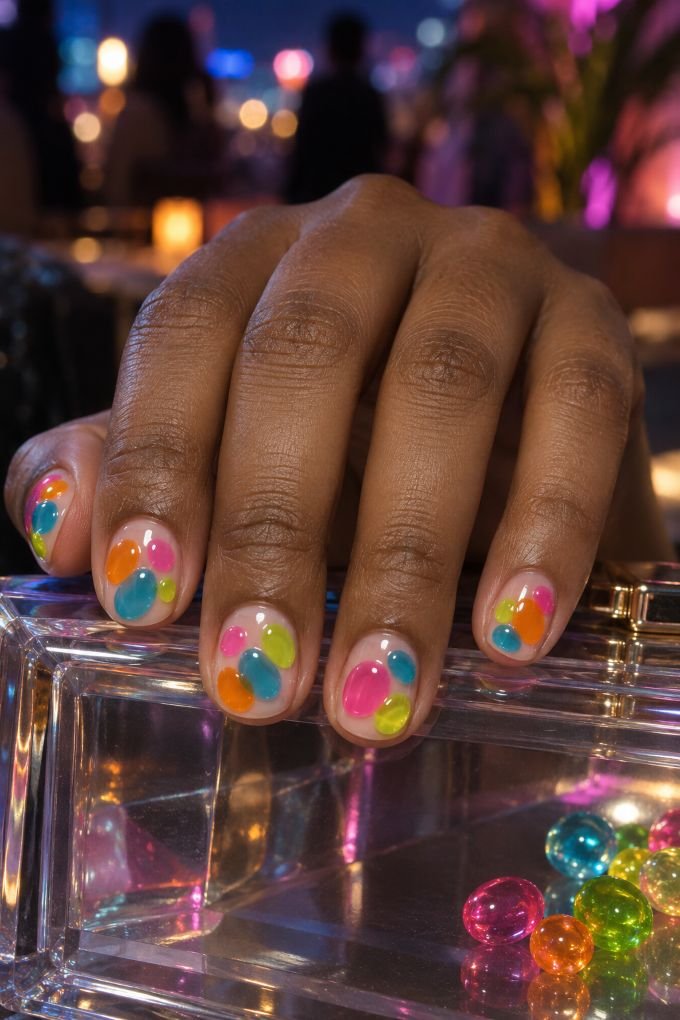
8. Neon Jelly Pebble Nails
Short round nails resemble colored glass scattered over a clear surface. Irregular pebble shapes in translucent cyan, acid lime, tangerine, and neon pink sit apart from one another, with narrow clear channels preserving the outline of every form. Several pieces overlap at their corners, creating darker flashes without adding black borders or metallic detail.
The compact proportions make this a practical answer to short rave nails: the colors remain visible, but there is nothing raised to catch while reaching into a bag or adjusting a wristband. Neon pigment does not automatically glow under ultraviolet light, so choose an explicitly UV-reactive formula only if that effect matters. For an all-pink variation, the palettes in these neon pink summer nails provide a more focused route. At home, sheer jelly polishes and a rounded brush do most of the work.
How to Apply
- Prepare short round nails and apply a clear neutral base.
- Paint separated translucent pebbles in cyan, acid lime, tangerine, and neon pink.
- Overlap a few corners while retaining narrow clear channels around most shapes.
- Smooth the complete design under a thick-looking but properly leveled glossy top coat.
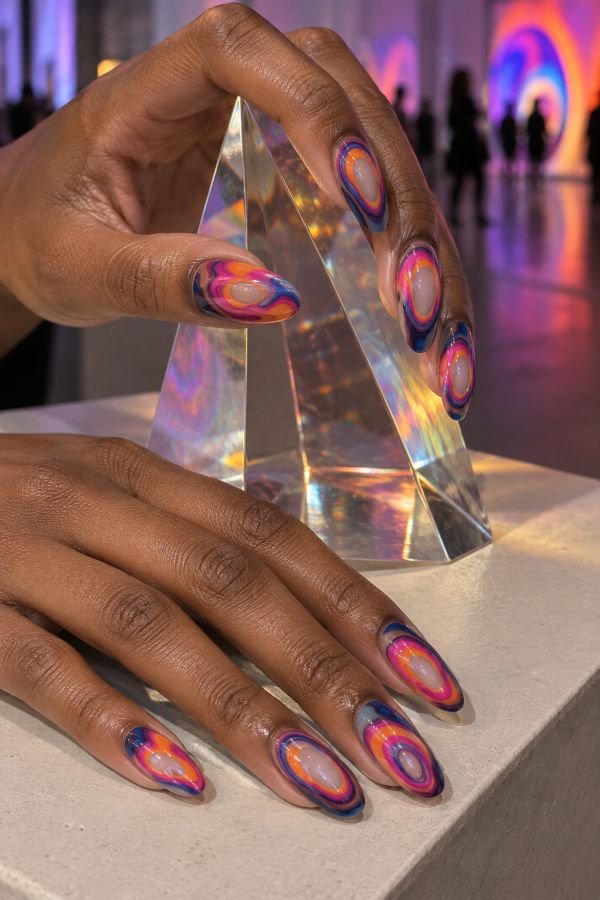
9. Psychedelic Heat-Map Nails
Long oval nails become fluid maps of saturated color. Distorted bands of magenta, orange, violet, and cobalt radiate from small clear centers, widening and narrowing as they travel toward the edges. The rings never form perfect targets; each one bends as though warmth were shifting the image, and a translucent smoke glaze lowers the intensity at selected sidewalls.
The pattern answers the search for trippy festival nails without relying on smiley faces, alien decals, or repeated rainbow swirls. Extra length gives every warped band enough room to remain legible, while the oval silhouette prevents the concentric artwork from feeling rigid. This is demanding freehand work because neighboring colors need clean separation and purposeful distortion. Bring a full-hand reference to a technician, or commission press-ons so all ten heat maps can be composed together before application.
How to Apply
- Apply a clear or sheer nude base to long oval nails.
- Map irregular centers and surround them with distorted magenta, orange, violet, and cobalt bands.
- Thin and widen the rings differently on every nail, adding a smoke glaze at selected sidewalls.
- Refine the color boundaries and finish with a smooth high-gloss top coat.
10. Iridescent Butterfly-Veil Tips
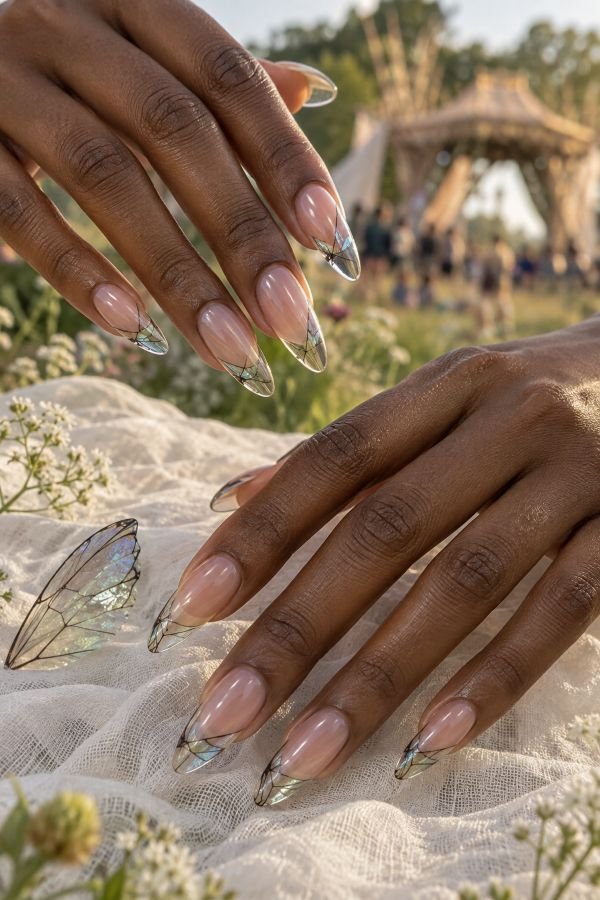
Sheer rosy nail beds flow into transparent tips on long almond nails. Fine black-brown veins enter only from the outer corners, accompanied by fragments of blue-green iridescent film that resemble light passing through a wing. No nail contains a complete butterfly; the broken details appear suspended inside the clear structure, and the untouched center keeps each extension visually light.
Fragmenting the familiar motif gives butterfly festival nails a more editorial finish than placing identical decals on every finger. The almond taper reinforces the wing-like movement, though the clear construction and encapsulated film make this a salon or custom press-on design. Ask for ultra-thin material so the tip can be refined without exposing an edge. Readers collecting other high-impact social references can browse viral TikTok nail designs, but this set should remain airy rather than trend-stacked.
How to Apply
- Build or fit long clear almond extensions over a sheer rosy nail bed.
- Position fine black-brown wing veins along alternating outer corners.
- Add ultra-thin blue-green iridescent film fragments while leaving the centers transparent.
- Encapsulate, refine, and seal the tips with a crystal-clear glossy top coat.
11. Mushroom Meadow Cuticle Nails
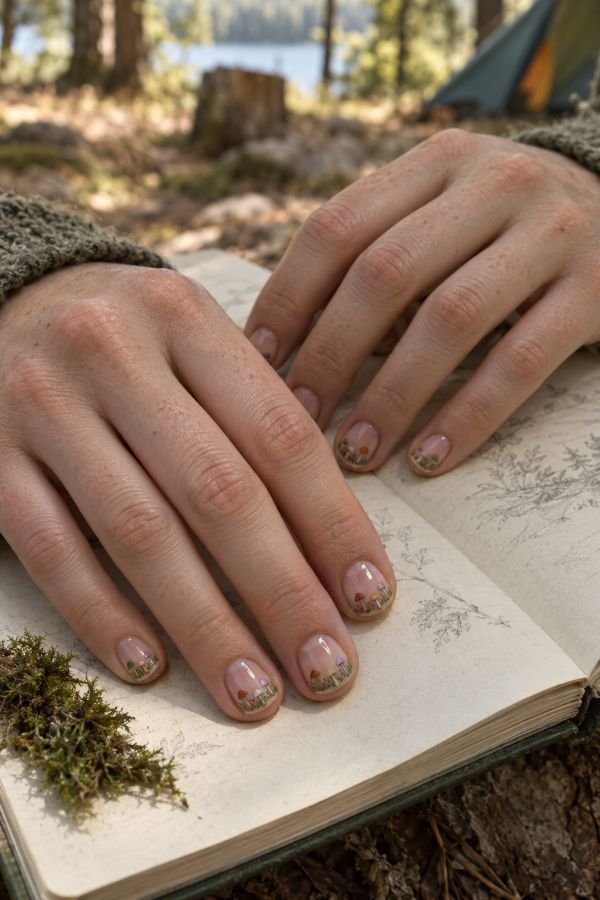
Most of these short natural ovals remain bare beneath a transparent blush coat. Along the cuticles, miniature mushrooms rise from irregular moss-green dots: rust, coral, cream, and lilac caps sit on thin taupe stems, never more than two to a nail. Several tiny grass strokes connect the small scenes while the upper two-thirds stay almost completely clear.
This placement turns a familiar hippie nail art motif into something that reads as a tidy nude manicure from a distance. It also respects short nail beds; moving the detail to the cuticle leaves an uninterrupted vertical area that makes them appear longer. A dotting tool can form the caps, followed by a liner brush for stems and grass. If painting with the non-dominant hand becomes frustrating, use mushrooms on two accents and repeat only moss dots on the remaining fingers.
How to Apply
- Apply a transparent blush base to clean short oval nails.
- Dot tiny mushroom caps in rust, coral, cream, and lilac close to selected cuticles.
- Add fine taupe stems, moss-green ground dots, and several short grass strokes.
- Protect the miniature artwork with a clear glossy top coat.
12. Solar-Disc Half-Moon Nails
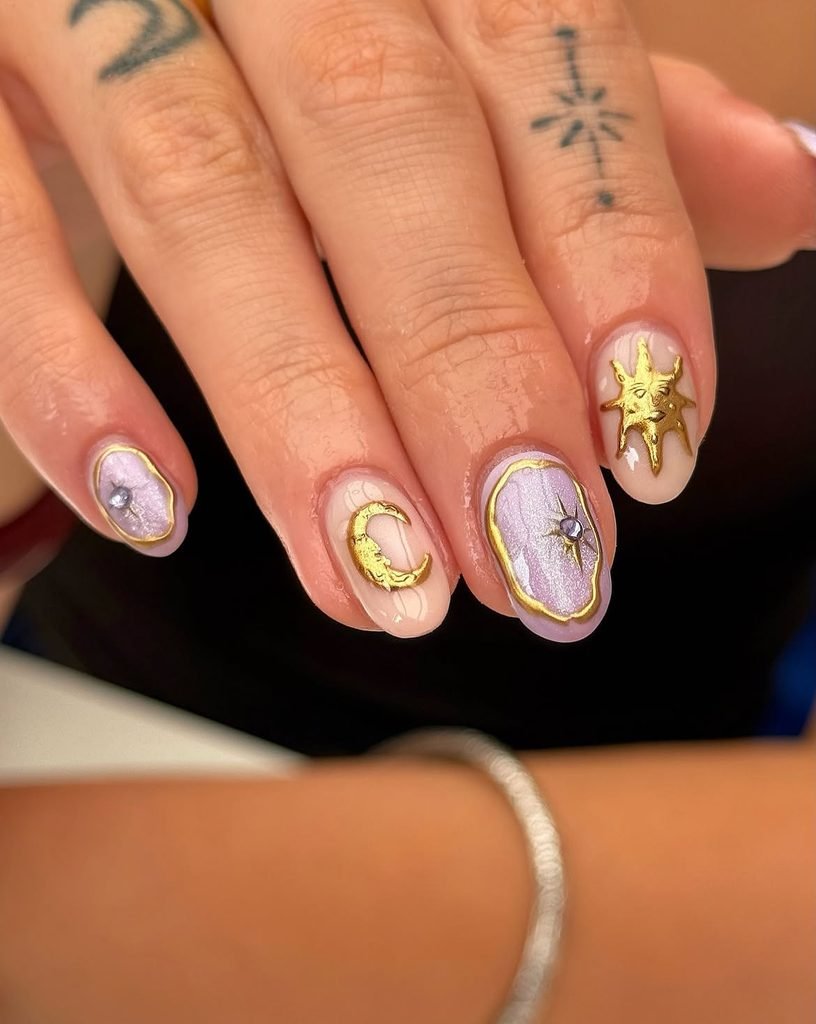
Medium oval nails carry a translucent honey-beige base and bold semicircles rising from the cuticles. Ochre, coral, and muted gold alternate across the hand, with each disc reaching a slightly different height. Only two contain fine rays; the other half-moons remain solid, allowing the repeated curved shape and sun-warmed palette to establish the design.
For someone seeking simple festival nails, the manicure communicates the setting without miniature illustrations or elaborate extensions. Color sitting at the cuticle also makes new growth less abrupt because the lower edge already belongs to the composition. Curved French guides can establish the half-moons at home, although the rays need a nearly dry liner brush. Keep the gold softly metallic rather than mirrored; a highly reflective disc would overpower the quieter ochre and coral shapes surrounding it.
How to Apply
- Coat medium oval nails with a translucent honey-beige base.
- Position curved guides and fill the cuticle half-moons with alternating ochre, coral, and muted gold.
- Remove the guides carefully and add fine rays to only two solar discs.
- Correct the curves before applying a clear high-gloss top coat.
13. Meadow-Grass Micro-Tip Nails
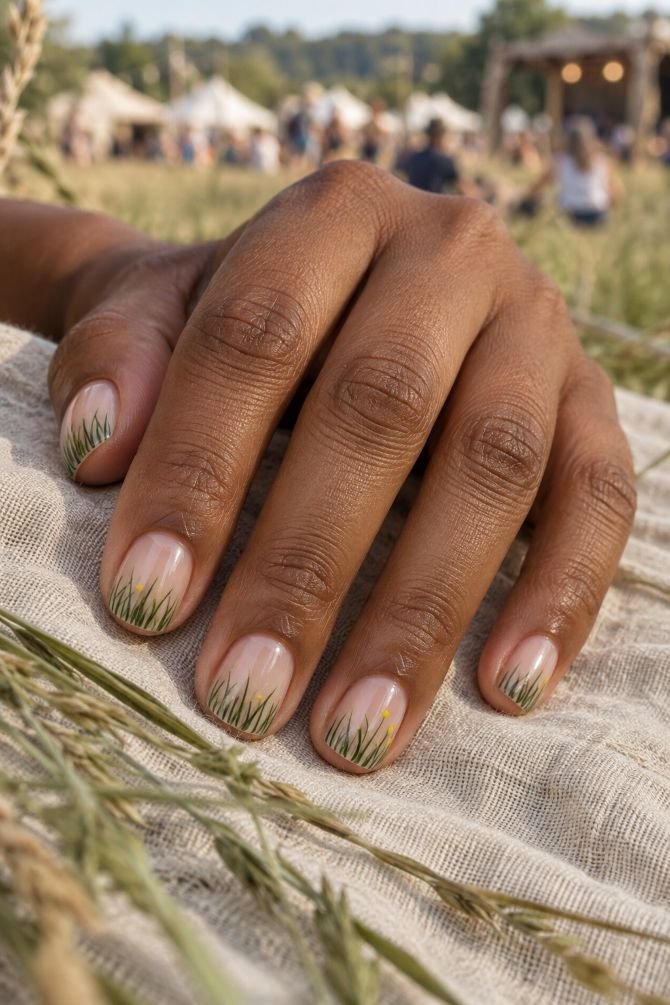
A milky pink-beige base keeps short squoval nails clean and translucent. From the free edges, exceptionally fine blades in sage, grass green, and deep olive rise only a few millimeters. Pin-sized butter-yellow seed dots appear on three nails, while the others rely on varied blade heights and a narrow strip of visible base between the greenery.
The idea suits an open-air folk or garden festival, but its real strength is scale. Because the artwork behaves like a broken micro-French tip, it adds color without dividing a compact nail in half. A long liner brush loaded with very little polish will create tapered blades; pressing harder produces clumsy blocks. Paint the greenery in two shades first, assess the density, and add the darkest olive only where the edge needs definition. More tip structures can be found among Nail Blooms’ French manicure ideas.
How to Apply
- Apply one or two thin coats of milky pink-beige polish to short squoval nails.
- Flick fine sage and grass-green blades upward from each free edge.
- Add a few deep-olive blades and tiny butter-yellow seed dots to three nails.
- Let the linework set fully, then seal it with a glossy top coat.
14. Friendship-Bracelet Threadline Nails
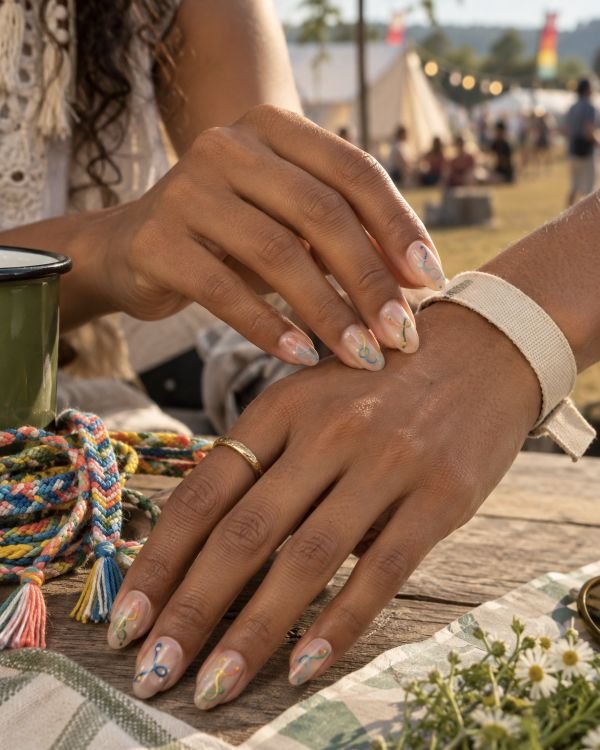
Hairline strands in coral, cobalt, butter yellow, and leaf green loop diagonally over a sheer nude base on medium almond nails. Two lines twist together, separate, and rejoin on each finger, while tiny flat dots imitate occasional beads without introducing actual charms. The routes change across the hand, but every composition travels lengthwise and leaves broad areas untouched.
The reference feels especially appropriate for a festival shared with friends, yet the manicure remains abstract enough to wear afterward. Almond nails allow the painted threads to curve without bunching at square corners. Rather than matching every outfit color, repeat one shade from a bracelet, bag, or eye makeup and let the other strands supply contrast. The technique is manageable with gel paint and a long liner; on regular lacquer, remove excess polish first so the lines do not swell midway through a curve.
How to Apply
- Prepare medium almond nails with a smooth sheer-nude base.
- Draw two fine looping threads in coral and cobalt, allowing them to cross and separate.
- Add shorter butter-yellow and leaf-green strands plus sparse flat bead-like dots.
- Float a leveling glossy top coat over the fully set linework.
15. Heat-Haze Chrome Ribbon Nails
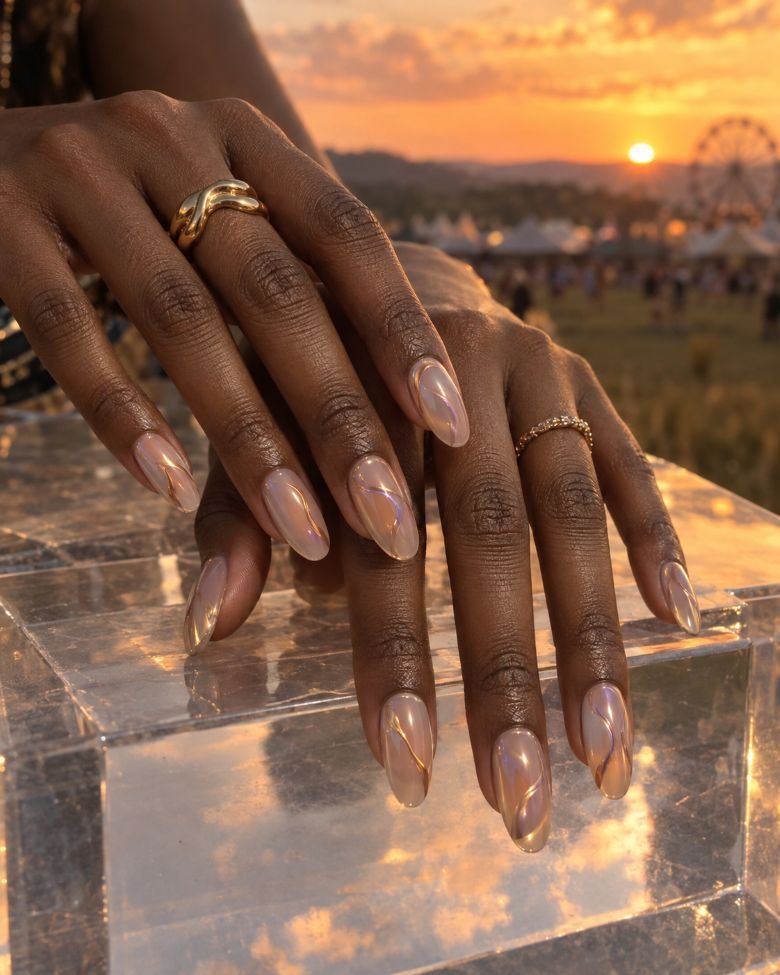
Long oval nails begin with a translucent peach-grey wash that appears warmer at the centers and cooler near the sidewalls. Isolated ribbons of peach-gold, lilac, and pale copper chrome powder bend across the surface, their sharp metallic edges dissolving into blurred color at selected turns. No two ribbons follow the same path, and at least half of every nail remains sheer.
Chrome earns its place here because it changes with movement rather than merely adding shine. The soft underpainting suggests hot air wavering above a festival field, while the clear intervals prevent three metallic shades from competing. This is precision salon work: the artist must isolate the ribbon areas before rubbing in pigment and seal every edge without dulling the reflection. A chrome-effect lacquer can approximate the palette at home, but it will not create the same crisp-to-blurred transition.
How to Apply
- Apply a translucent peach-grey base to long oval nails, warming the centers slightly.
- Map varied curved ribbon shapes while preserving at least half of every nail as sheer space.
- Isolate and rub peach-gold, lilac, and pale-copper chrome into the selected routes.
- Remove stray pigment and seal the ribbons and free edges with a compatible glossy top coat.
16. Painted Metallic-Fringe Square Nails
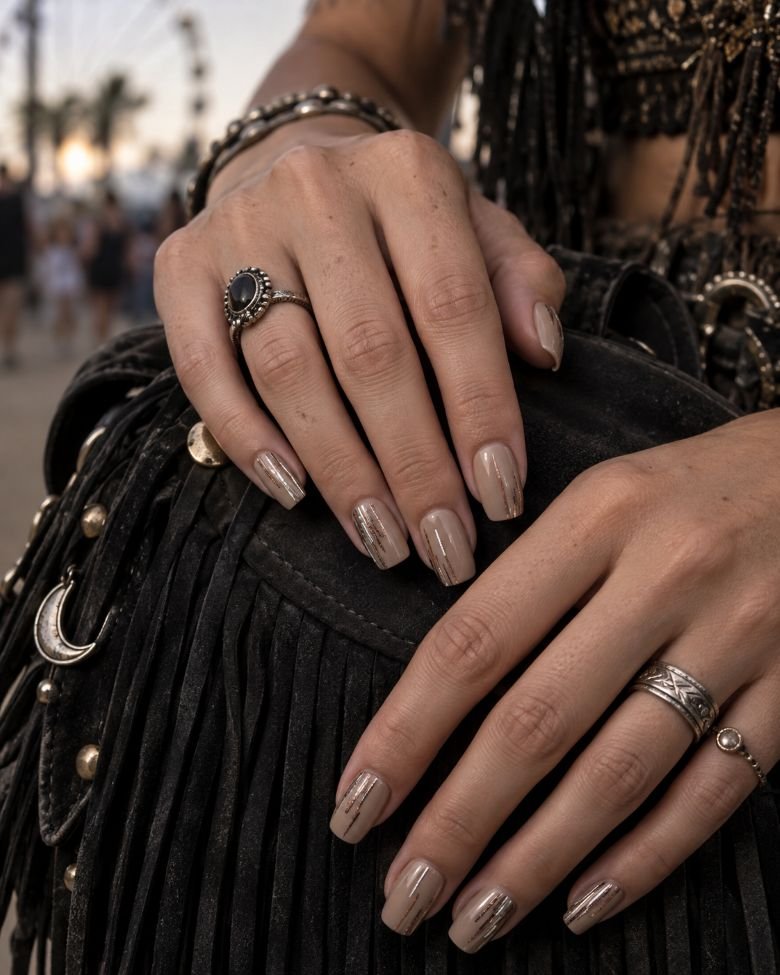
Medium square nails wear a transparent taupe base beneath dozens of pin-thin metallic strokes. Silver, rose gold, and gunmetal lines begin near alternating sidewalls and fall toward the tips at uneven lengths, resembling fringe caught in motion. Several strands cross, but their roots remain sparse, and two nails use only three isolated lines to keep the hand from becoming uniformly striped.
Actual chains and dangling charms may look dramatic in a photograph, but they introduce unnecessary snag points during a crowded event. Flat painted fringe provides the same sense of movement while preserving a smooth surface. Square nails give the fine lines a structured boundary and enough width to show differences in length. A striping brush is more effective than tape because perfectly parallel strokes would remove the loose, fabric-like quality. Use metallic gel paint with good opacity so each line stays narrow.
How to Apply
- Apply a transparent taupe base to prepared medium square nails.
- Pull fine silver, rose-gold, and gunmetal strokes from alternating sidewalls toward the tips.
- Vary their lengths, cross a few strands, and leave two nails deliberately sparse.
- Encapsulate the completely flat fringe beneath a smooth glossy top coat.
17. Festival Route-Map Doodle Nails
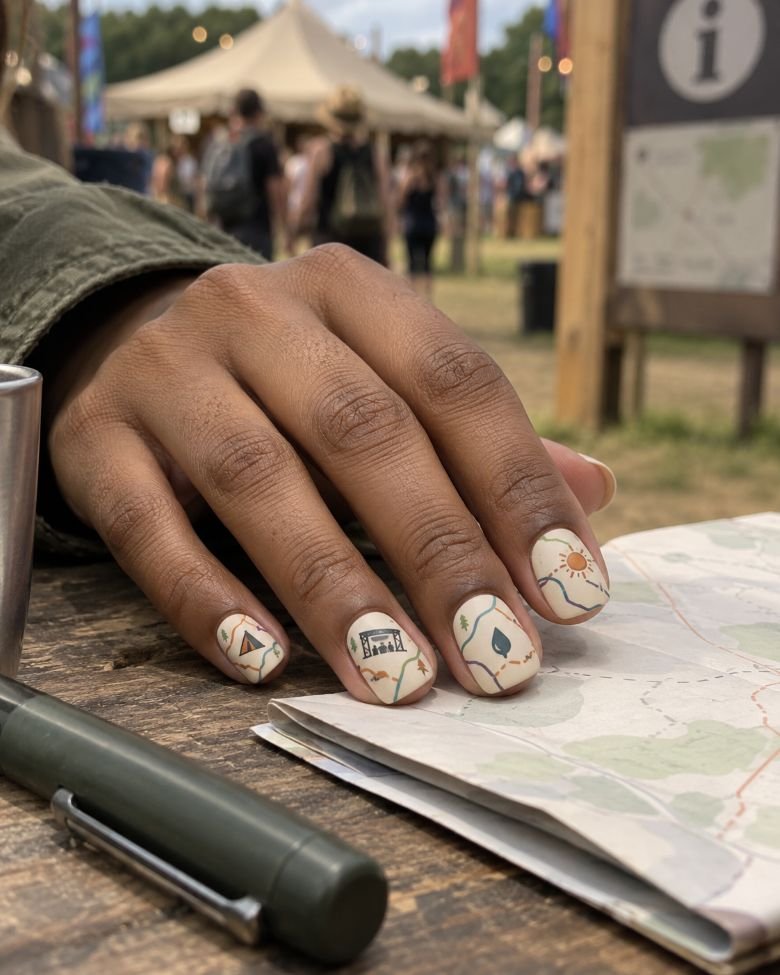
Short soft-square nails resemble fragments of a neatly illustrated event map. A warm cream base supports thin roots in teal, orange, plum, and grass green, joined by miniature symbols for a stage canopy, tent, water point, and setting sun. The icons are distributed across the hand rather than repeated, and no tiny labels or pretend logos compete with the linework.
Few manicures refer to the practical experience of navigating a festival, which makes this design more specific than a random mix of hearts and stars. The matte paper-like finish strengthens the map idea, while the compact length remains convenient for holding a phone and opening a crossbody bag. Fine water-slide decals can simplify the icons at home. If an artist paints them, ask for recognizable silhouettes rather than microscopic detail; the concept should remain readable without enlarged photography.
How to Apply
- Paint short soft-square nails with a warm cream base and allow it to set evenly.
- Draw thin winding routes in teal, orange, plum, and grass green across separate nails.
- Add one small stage, tent, water-point, or sun symbol at selected route intersections.
- Finish with a smooth matte top coat that creates a printed-map appearance.
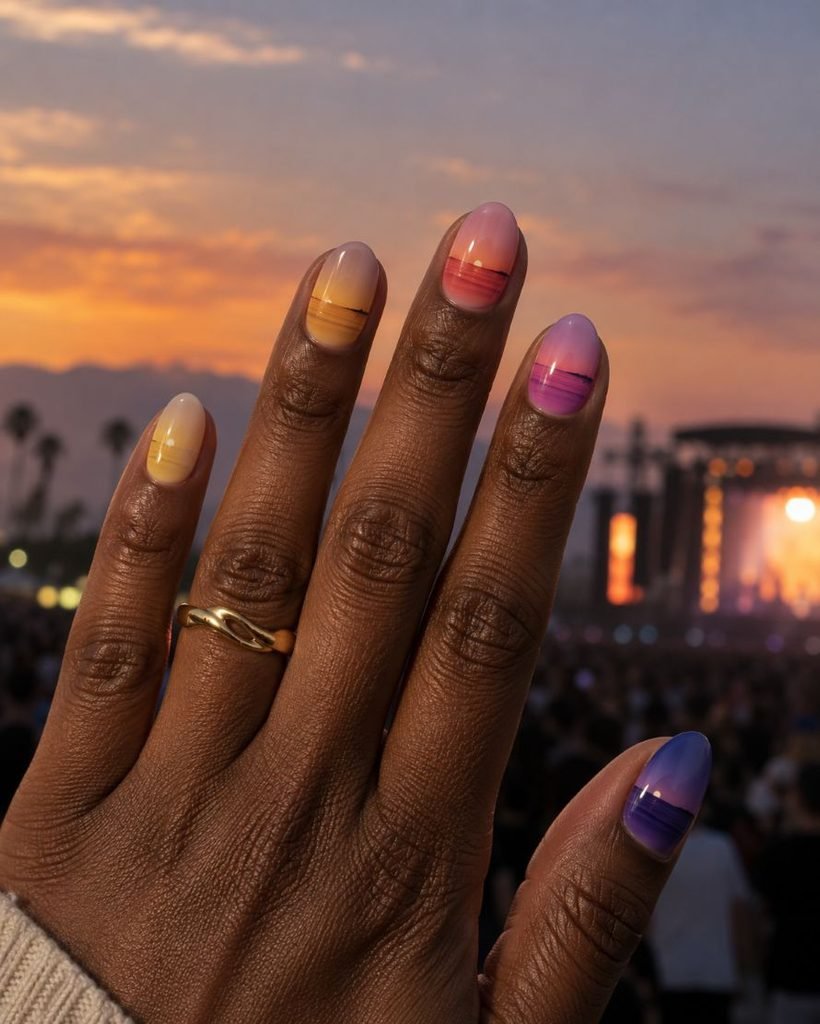
18. Five-Stage Sunset Gradient Nails
Across one hand, the sky appears to change hour by hour. The thumb begins in translucent butter yellow, followed by apricot, hot coral, violet, and finally indigo on the pinkie. Each short almond nail fades from a lighter cuticle to a deeper tip, and a hairline graphite horizon sits at a different height on every finger.
A coordinated color sequence has more narrative than a standard mismatched manicure, yet it remains easy to understand at a glance. The short almond shape turns each gradient into a compact vertical scene and avoids the maintenance of long sunset extensions. Choose this when the wardrobe is mostly white, denim, black, or another quiet color; a heavily patterned outfit may compete with all five shades. A sponge handles the fades at home, but clean the skin between colors rather than letting residue muddy the progression.
How to Apply
- Apply a sheer neutral base to short almond nails.
- Assign butter yellow, apricot, hot coral, violet, and indigo to consecutive fingers.
- Sponge each shade from a light cuticle wash into a deeper tip and add varied graphite horizons.
- Clean the sidewalls thoroughly and finish every gradient with a glossy top coat.
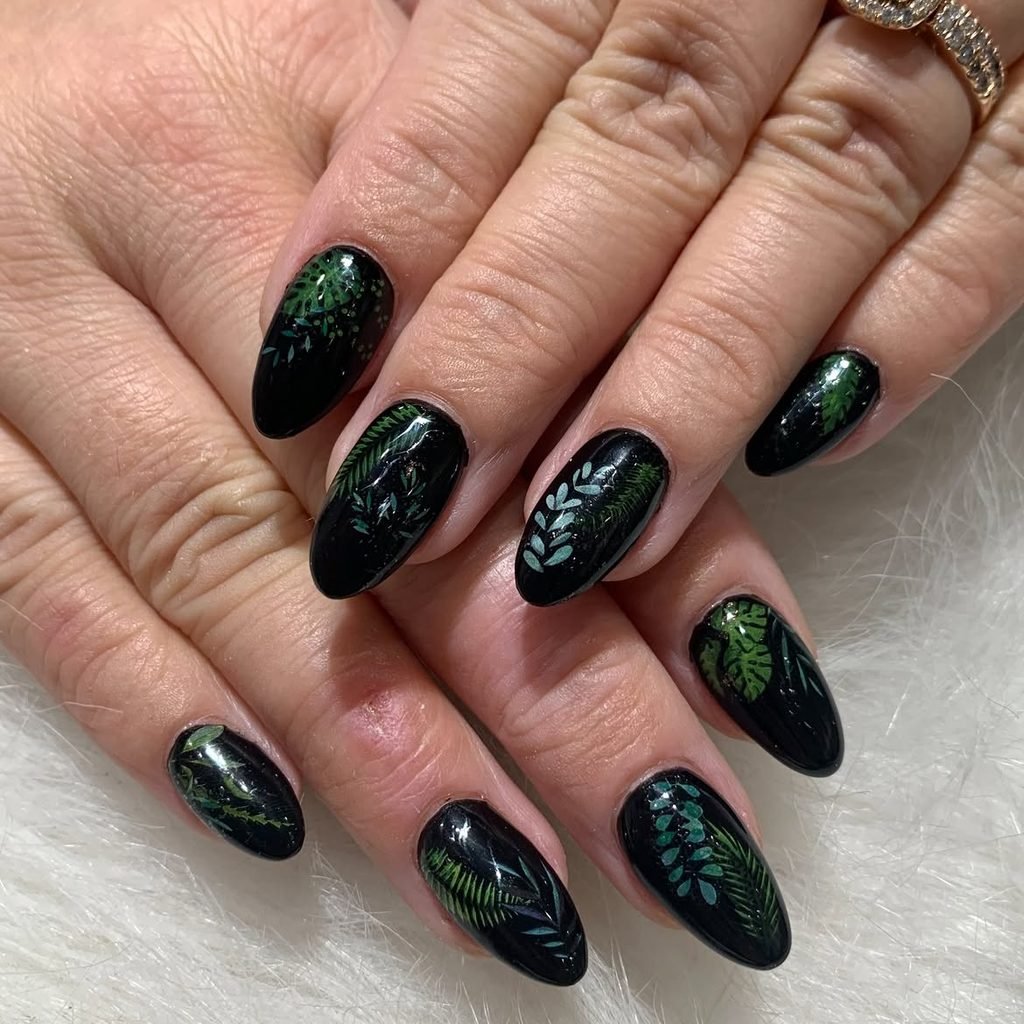
19. Black Neon Botanical Nails
Velvety black turns medium almond nails into a dark field for fluorescent line art. Acid-green stems, hot-pink petals, and electric-orange seed shapes travel diagonally over three nails, while the remaining two hold a single cropped leaf or petal at the edge. The artwork stays glossy against the matte base, giving every fine curve a lacquered, light-catching outline.
This is the darker branch of festival nail inspo, suited to a rock lineup or late-night set without repeating the soundwaves and hardware expected from concert-themed nails. Botanical forms soften the black, while the limited palette keeps them visible from more than a few inches away. The colors are neon in appearance, not necessarily UV-reactive; check the formula if blacklight performance is important. Use a detail brush for the curved stems and reserve dotting tools for the compact seed shapes.
How to Apply
- Apply opaque black polish to medium almond nails and cover it with a smooth matte top coat.
- Paint diagonal acid-green stems across three nails using glossy gel paint.
- Add hot-pink petals, electric-orange seeds, and cropped details to the two quieter nails.
- Seal only the line art with clear gloss if the product system allows, preserving the matte background.
- Image Prompt: Moody realistic salon photograph of medium almond nails with velvety matte-black bases and glossy fluorescent botanical line art in acid-green stems, hot-pink petals, and electric-orange seed shapes, three fuller compositions and two cropped edge accents; hands rest across a plain black mesh sleeve with fingers naturally staggered, natural deep olive skin with realistic cuticles, pores, fine lines, and tonal variation, anatomically correct fingers and proportional almond nails, professional 85mm macro portrait photography, soft commercial low-key lighting with controlled colored reflections, controlled depth of field, realistic blurred nighttime rock-festival background, natural imperfections preserved, polished but not airbrushed.
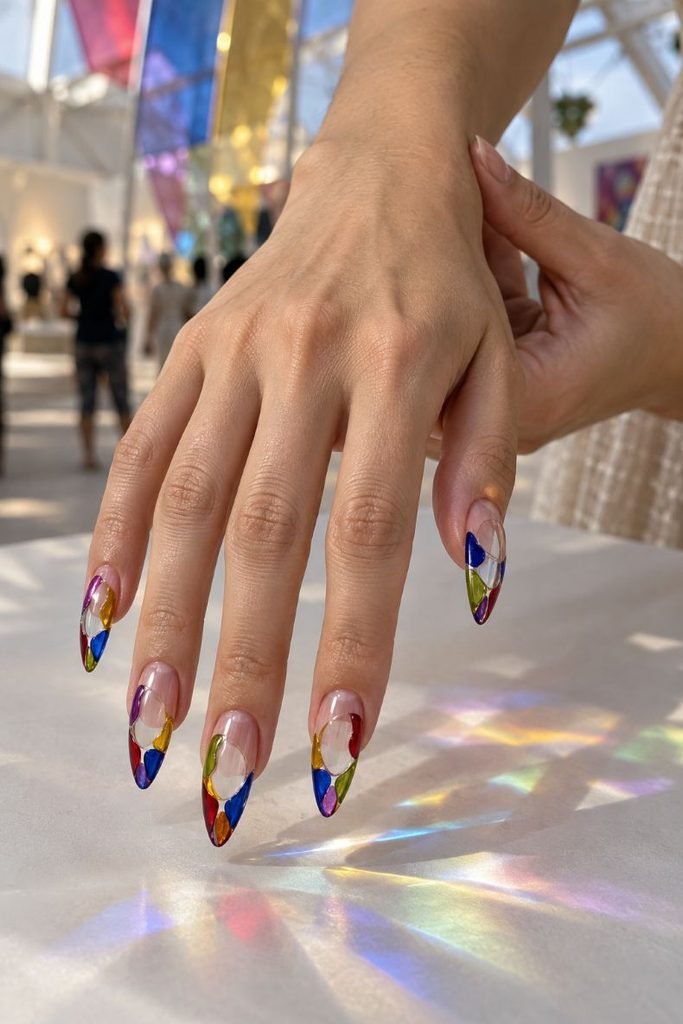
20. Kaleidoscope Clear-Tip Nails
Long almond extensions shift from sheer pink nail beds into transparent tips divided into irregular color panels. Ruby, cobalt, amber, lime, and violet jelly sections meet through narrow clear channels, allowing light to pass cleanly between them. The layouts rotate and change scale across the hand, but every tip preserves one larger transparent window near its center.
The result behaves like a handheld kaleidoscope rather than conventional stained glass: there are no black outlines, religious references, or repeated symmetrical windows. Daylight makes the colors project softly onto nearby surfaces, while evening light intensifies their edges. Clear extension work demands correct structure and complete encapsulation, so ordinary top coats cannot substitute for builder products. Ask a trained technician for thin color layers and a balanced apex; too much material will make transparent panels look cloudy and bulky.
How to Apply
- Build long clear almond extensions over softly blended sheer-pink nail beds.
- Divide the transparent tips into irregular ruby, cobalt, amber, lime, and violet sections.
- Preserve narrow clear channels and one larger uncolored window on every nail.
- Encapsulate the panels, refine the architecture, and finish with crystal-clear gloss.
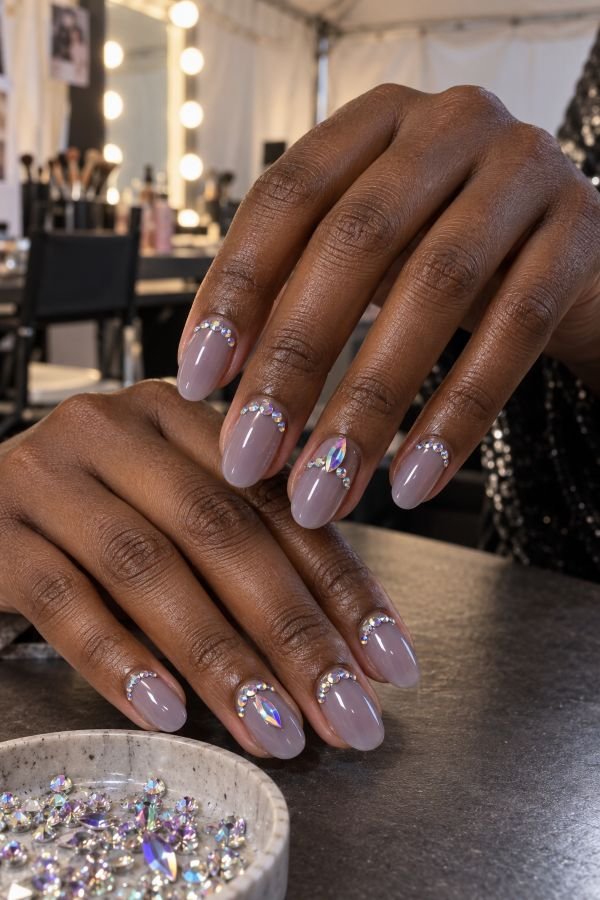
21. Face-Gem Cuticle Halo Nails
Lilac-grey translucency serves as a near-nude background for the medium-sized oval-shaped nails. A low curve of iridescent small crystals is located along each cuticle, increasing from three gems on the pinkie to seven on the thumb. Accent nails feature additional navette-shaped gems added above the central part of the curve; the top nail stays blank, and all gems remain without the top coat.
Such placement represents festival face gems in manicure design without covering everything with rhinestones. Placing weight at the bottom of the nail will help to preserve balance of oval shape, yet a secure attachment is more important than aesthetic during a long event. Gems need to be attached only to the nail plate and not to the surrounding skin, and also have to be glued with the suitable product under the base. Press-ons will be a practical solution due to the possibility to preview the design prior to the weekend and remove it afterward without filing away sculpted nails.
How to Apply
- Apply a translucent lilac-grey base to medium oval nails and cure or dry it fully.
- Arrange low iridescent crystals in graduated arcs just above the cuticles.
- Add one slender navette stone to the center of two accent halos.
- Secure around each stone with compatible gel or adhesive without coating its reflective face.
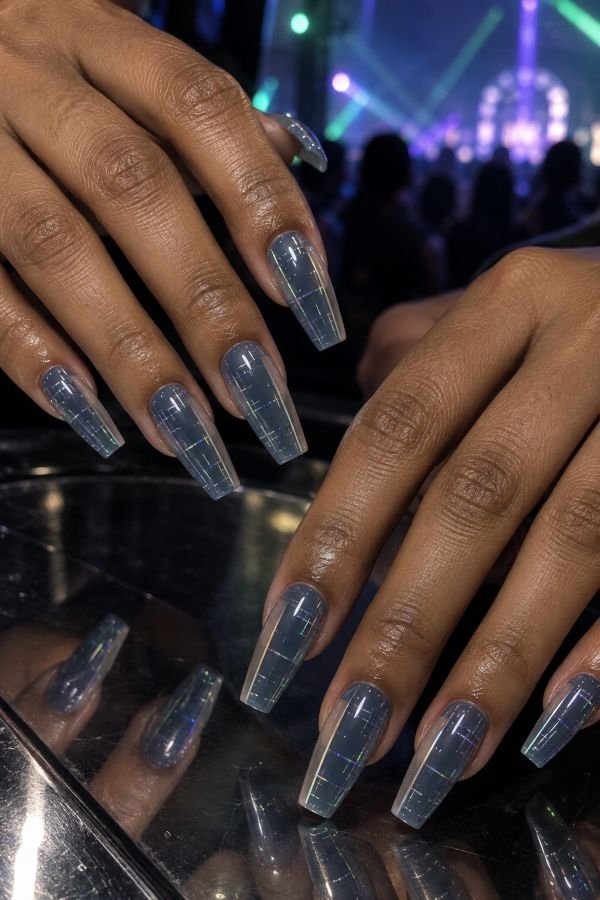
22. Holographic Laser-Grid Coffin Nails
A translucent smoke-blue base sits beneath an exceptionally fine holographic grid on medium coffin nails. Vertical and horizontal lines break unexpectedly, shift out of alignment, and disappear into one clear side strip on each finger. In direct light, the grid flashes green, violet, cyan, and silver; in shade, it recedes into a disciplined gunmetal drawing.
These EDM festival nails deliver a futuristic effect without neon flames, bulky hardware, or a fully mirrored surface. Coffin nails provide straight boundaries for the grid, yet the interrupted intersections prevent the pattern from looking like graph paper. Readers comparing proportions can explore other coffin nail designs before committing to the length. Holographic striping foil produces the cleanest lines; freehand chrome gel works only if the brush can maintain equal weight from sidewall to sidewall.
How to Apply
- Cover medium coffin nails with a smooth translucent smoke-blue base.
- Apply hairline holographic vertical and horizontal strips in an offset grid.
- Interrupt selected intersections and preserve one narrow clear side strip per nail.
- Seal the lines carefully with a leveling glossy top coat and cap the squared edges.
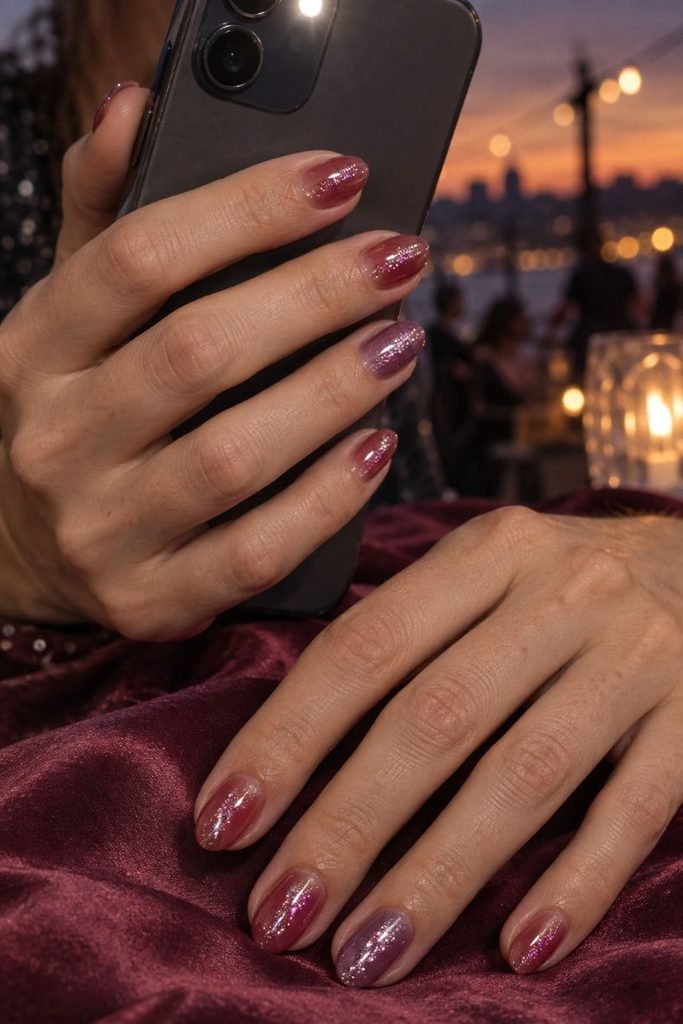
23. Afterglow Reflective-Glitter Nails
Short almond nails glow through a smoky raspberry-jelly base. Fine magenta and silver reflective glitter runs in a narrow vertical fade down each center, becoming sparse near the sidewalls and stopping above a clear cuticle crescent. Two nails include a faint violet layer beneath the particles, which gives the flash a cooler shadow without adding another visible motif.
Ordinary light keeps the manicure rich and relatively restrained; direct phone flash ignites the central particles and changes the whole set. That dual behavior makes it a fitting final option for a festival that moves from daylight into night. Reflective glitter can look textured if it is overloaded, so use thin layers and a leveling top coat rather than building one thick stripe. Readers who want a softer or more monochromatic sparkle can continue with these pink glitter nails.
How to Apply
- Paint short almond nails with one or two thin coats of smoky raspberry-jelly polish.
- Add a faint violet center to two nails and preserve clear crescents above every cuticle.
- Sponge fine magenta and silver reflective glitter into narrow vertical fades.
- Smooth the particles with a leveling glossy top coat and seal each tip.
Choosing Festival Nails for Different Events and Outfits
Start with the atmosphere rather than trying to place every festival symbol on one hand. Desert and indie events suit softened earth colors, translucent auras, crochet-like linework, or botanical details. Turquoise, copper, fawn print, and warm neutrals give a country lineup a clear Western inflection without requiring literal hats and boots. For an EDM or rave setting, jelly neons, holographic grids, chrome, and reflective particles respond well to changing light; a rock event can carry matte black, acidic outlines, or a restricted metallic palette.
The outfit should determine how much visual information the manicure needs. Patterned crochet, sequins, fringe, or printed denim usually looks sharper beside one controlled motif. A plain tank, slip dress, or monochrome set can support warped color, transparent panels, or multiple finishes. Coastal events may suit the sea-glass and shoreline references in these beach nail designs. If the goal is more celebratory than festival-specific, Nail Blooms’ confetti nail ideas offer a separate route built around scattered decoration.
Best Nail Shapes and Lengths for a Festival Weekend
Short round, squoval, and square nails are not the compromise category. They give polka dots, corner inlays, cuticle art, micro-tips, map doodles, and reflective fades a clear boundary while making it easier to use a phone, handle luggage, or reach into a small bag. A neat short shape also reduces the number of sharp edges likely to catch on mesh, crochet, or hair. Oval and medium almond nails provide more room for aura gradients, linework, animal print, and magnetic movement without becoming difficult to manage.
Long almond, oval, or coffin extensions make sense when transparency, encapsulation, or a wide geometric composition genuinely needs space. Clear kaleidoscope tips and chrome ribbons benefit from that extra length; a simple solid color does not. Before choosing, inspect the design from the side as well as from above. A balanced apex and proportional free edge matter more than an exaggerated silhouette, particularly during several active days outdoors.
Festival Nail Colors and Finishes From Day to Night
Festival color does not have to mean ten fluorescent shades. Cobalt with lemon feels graphic, turquoise and copper read earthy, and raspberry beside lime creates deliberate tension. Apricot, coral, ochre, tangerine, and indigo also remain visible in the sun without losing their character after dark. Early-season palettes can borrow softer combinations from these spring nail designs. If one vivid family is enough, these neon-pink summer manicures show how finish and placement can vary within a tighter palette.
Finish determines how the color behaves. Jelly polish glows because light passes through it; magnetic pigment produces a moving highlight; chrome throws back a sharper reflection; reflective glitter reacts most dramatically to direct flash. Matte surfaces make glossy line art look brighter by contrast. Choose one dominant light effect and let the other elements support it. Combining cat-eye, chrome, glitter, gems, and holographic foil on every nail usually buries the palette instead of making it more visible.
Final Thoughts
The best festival nail looks do not simply compile all elements connected with a music weekend. They pick one concept and realize it correctly: rays of sunshine passing through jelly-colored light, a magnetic explosion appearing only during nighttime, a little Western insert, or a map leading to the place of festivities without turning into merchandise. It is that selection process that distinguishes the deliberate manicure from a messy mood board translated to ten nails.
First, choose the length since it will determine the amount of artwork the hand can bear comfortably. Second, define the behavior of the artwork under changed lighting: it can deepen, sparkle, transform to a different color, or balance matt and gloss effects. Last, cut out whatever is not needed for achieving that result. Make sure there is a sample photo of the whole hand and its side view and provide instructions to the nail artist about the details to be kept.