Trending · The nail edit
19 Hoco Nail Ideas to Match Your Dress, from Simple to Sparkly
While it is essential for your manicure to coordinate with your dress, it is equally important that your manicure feels like you. A flashy silver...
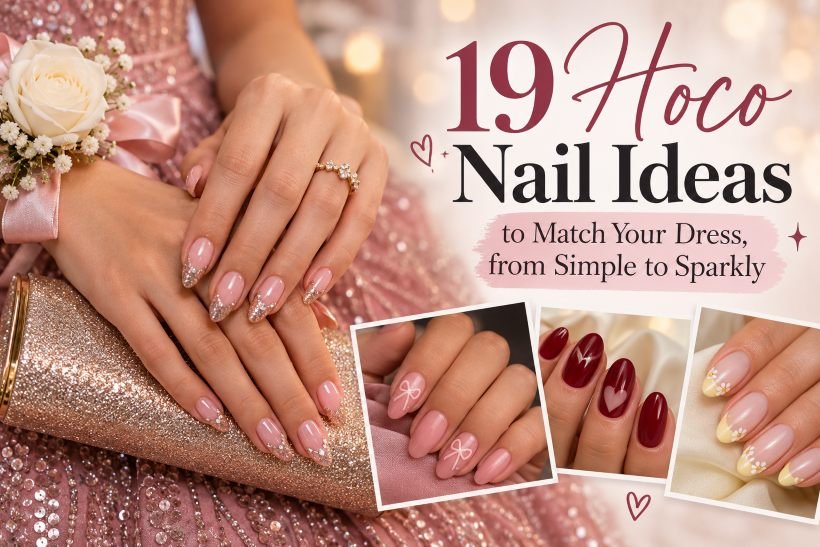
While it is essential for your manicure to coordinate with your dress, it is equally important that your manicure feels like you. A flashy silver set may get lost among sequins, while a small bow design may be much more effective if you wear something more plain. What is needed is to think about how you want your nails to complement the entire look.
Here are several hoco nail designs that include understated polish, cute nail art, rich jewel colors, and sparkly finish. Each design has its own pattern which you can either show to your nail technician or do yourself using the proper products. Start by choosing the color of your dress and your standard nail length, then think about how you want your manicure to relate to your outfit.
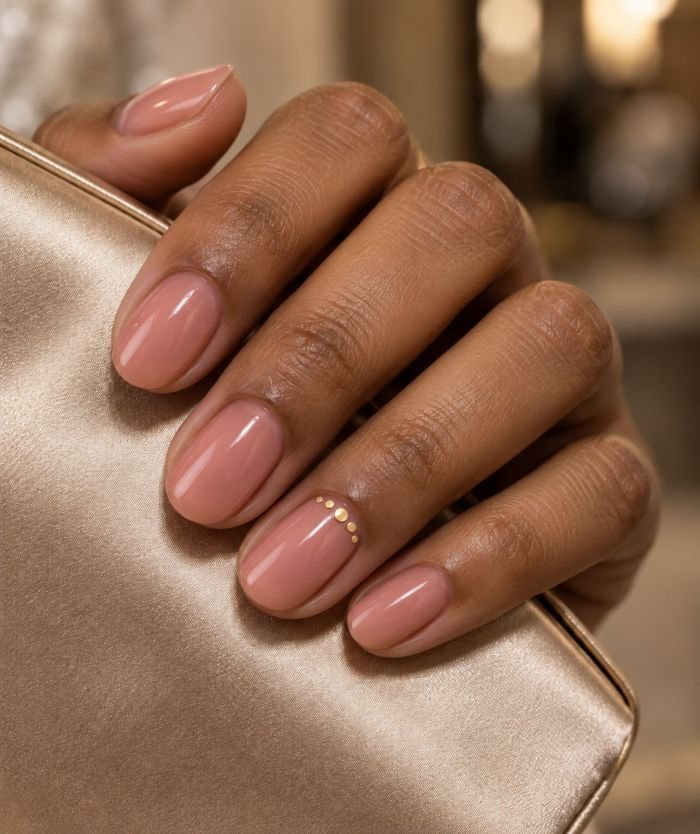
1. Simple Hoco Nails: Sheer Pink with a Gold Cuticle Dot
The translucent rose-pink color creates a glossy finish on the short oval nails without covering the natural nails completely. Four nails remain bare. The ring finger nail has one small golden dot placed just above the middle part of the cuticle, within a pink space. This dot looks purposeful in a close-up image without creating the metallic appearance in the manicure. It should not exceed the size of a pin head.
It is a great choice when wearing a beaded or printed dress which has a lot going on. The warm gold dot complements the earrings or the bag clasp without having to match exactly the fabric of the dress. The metallic lacquer or nail-art decal would be preferable here, rather than a raised stud, if you do not want to catch the delicate fabric when preparing for the occasion.
How to Apply
- Shape short ovals, apply a clear lacquer base coat, and brush on thin sheer rose-pink layers until the nail looks even but translucent.
- Let the color dry, then place one small flat gold lacquer dot just above the ring-finger cuticle with a dotting tool.
- Check that the dot is centered and fully within the nail; leave the other fingers plain.
- Once the dot is dry, finish all nails with a glossy lacquer top coat.
2. Dress-Color Micro-French Tips on Short Squovals
Base is a sheer beige-pink on short squoval nails with a thin French line in one color taken from your dress. If you wear raspberry satin, apply a cool raspberry tip; if your dress is sage, apply a muted green tip. Tips of all five nails are rounded in soft corners and kept equally thin compared to the nail size. The subtle base gives some breathing space, making the small color strip seem like an intentional accent of the outfit.
Provide a picture of the dress in both daylight and indoor light. Pictures of fabric may make a burgundy appear more red and make a dusty blue look bright, so the exact color match is not always required. It may be easier to match the undertone. This is a convenient method to add some personal touch to regular hoco nails without switching the short nails style. See other French tip nail designs for alternative shapes.

How to Apply
- File short squoval nails and apply a lacquer base coat followed by a thin sheer beige-pink layer; let it dry.
- Test the chosen dress-color lacquer against a fabric swatch or reliable dress photo.
- Use a fine liner brush to paint shallow, very narrow curved tips on each nail, including the thumb.
- After the lines dry, apply a glossy top coat and lightly cap the free edges.
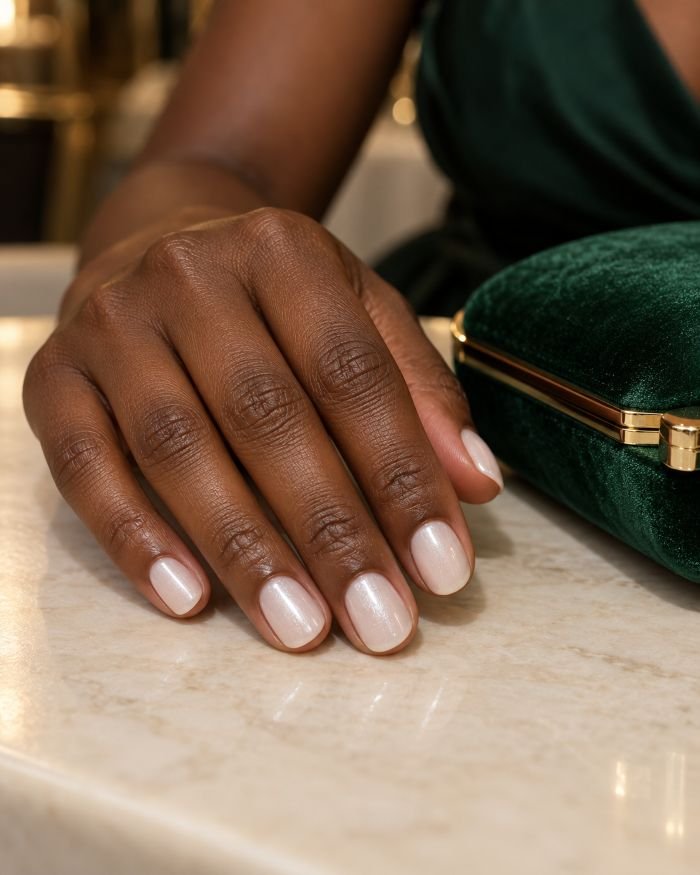
3. Milky White Pearl-Shimmer Nails
There is a color that is milky white and slightly pearlescent with shiny particles dispersed evenly on short round nails. The natural free edge of the nails is not hidden under the color and it is simply softened. Reflections will be caught by light from the particles as you move your hand, yet every finger will stay uniformly glossy. There are no pearls or chrome glitter here, just the nail polish itself.
This choice is best for you when you wear an elegant dress of another shade with a complex neckline design and need nails to be completed. As you see, there is a difference between an ivory shade and icy white in combination with gold jewelery. Pearl nail designs below will help to enhance the effect if your shade appears too modest to you. When at home applying the nail polish, apply thin even coats to maintain transparency; otherwise, the finish will become matte and streaky.
How to Apply
- Shape short round nails and apply a clear lacquer base coat.
- Paint one thin layer of translucent milky-white polish and let it dry.
- Apply a fine pearl-shimmer lacquer in an even thin coat, adding a second only if the free edges still look balanced.
- Let the shimmer dry and finish with a clear glossy top coat.
4. Cute Hoco Nails: Blush Pink with Mini Bows
The medium oval nails have an opaque cool blush-pink base with a glossy shine. A tiny ivory ribbon bow is painted flatly on the index and ring fingernails on the outside rather than on the nail center. The thumb, middle, and little nails stay solid blush. The bow has two loose loops and two short tails with enough pink surrounding the bow to be visible at normal viewing distance.
The adorable hoco nail art makes the most sense if there is a ribbon in your hair, a bow on your shoe, or a simple dress that needs just one whimsical accent. The flat nail art design will look perfect if you have a delicate tulle or lace fabric in the dress. The raised bow made in advance may look nice in a photograph but will be uncomfortable to apply while being dressed up in haste. The white stamping or decal nails are realistic substitutes for matching bows on both hands.

How to Apply
- Apply lacquer base coat and two thin layers of cool blush-pink polish to medium oval nails; let them dry.
- On the index and ring nails, mark a tiny ivory bow center near the outer sidewall with a detail brush.
- Add two loops and short tapered tails around each center, leaving plenty of blush visible; let the art dry.
- Seal all five nails with a glossy lacquer top coat.
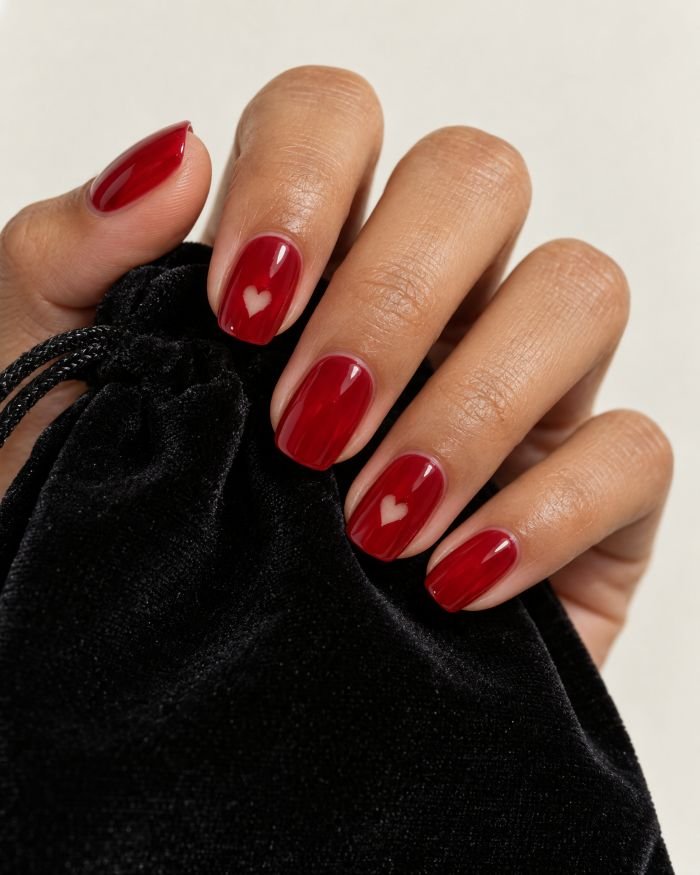
5. Cherry Red Jelly Nails with Negative-Space Hearts
Cherry red coats medium-sized squoval nails in thin, glossy layers. Cherry red with a clear heart accent appears on the index and ring fingers at the lower part of the nail, while the other three nails have jelly color unbroken by any accent. Hearts expose the natural nails through a clear base coat, having clear outlines and no white fill. Owing to the translucency of the red, the look seems lighter than candy apple manicure due to its color.
Clear hearts should be applied carefully before the application of red nail polish. Hand painting around a little heart may be done using a brush, but you may get better results from a salon manicurist or a press-on nail maker. It can be worn with red, pink, ivory, and black clothes without the need for a heart on each nail. Ensure that you get a sample of the first accent under daylight since the cherry layer should not be too opaque.
How to Apply
- Prepare medium squoval nails with a clear lacquer base coat and let it dry completely.
- On the index and ring nails, sketch a small clear heart near the lower center, leaving that area unpainted.
- Brush thin cherry-red jelly lacquer around the hearts and across the other nails, refining each heart edge with a fine liner brush.
- Let the red dry fully and cover every nail, including the clear hearts, with glossy top coat.
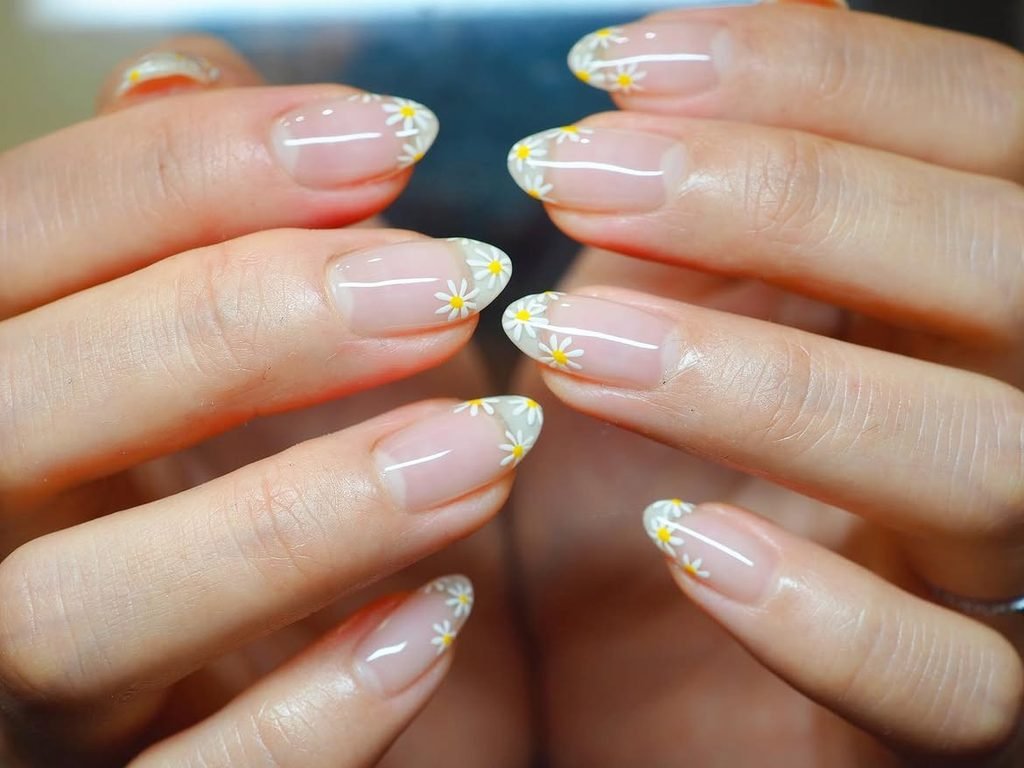
6. Butter-Yellow Daisy Tips
With a straight peach-beige background, slender butter-yellow French tips are applied following the shape of the medium almond-shaped nails. On the index and ring fingers, there are two small white daisies with amber centers on each tip; the rest of the tips remain yellow without any decoration. Make sure that the flowers fit within the colored stripes so that the floral element looks like part of the French design and not just a sticker on the nail plate. Apply a glossy top coat.
This is a fun nail art option for a light-yellow dress or cream separates, or even a floral accessory. This nail art design also prevents you from trying to paint a whole bouquet on your nails. In case your natural nails are too short and there is no space left for petals in the yellow stripe, place one flower in the center of an accent nail. To create rounded petals, use a dotting tool.
How to Apply
- Apply lacquer base coat and sheer peach-beige polish to medium almond nails; let the base dry.
- Paint narrow butter-yellow curved tips across the full hand and allow them to dry.
- Place two tiny white five-petal daisies on each index and ring tip; dot the centers soft amber.
- Let the flowers dry completely, then finish all nails with glossy top coat.
- Image Prompt: Professional beauty photograph of a fair freckled hand resting on pale butter-yellow fabric beside a small unmarked cream clutch, five medium almond nails with sheer peach-beige bases and narrow butter-yellow French tips, glossy finish. Index and ring tips each have two tiny white five-petal daisies with soft amber centers confined to the yellow bands; other tips plain. Anatomically correct fingers, realistic nail structure and proportions, natural skin texture, believable cuticles, small imperfections. Professional 85mm macro aesthetic, soft commercial afternoon lighting, controlled depth of field, polished but not airbrushed. No text, logos, watermarks, or readable labels.
7. Powder-Blue Nails with Silver Cuticle Crescents
All the five short squoval nails have an opaque powder blue color with rounded corners and a glossy finish. On the thumb and ring fingers, there is a fine silver crescent that appears just a little above the cuticle and follows the contour of the cuticle without touching the skin. The rest of the nails remain blue all the way through. The cool shade complements the pale blue satin fabric, and the curves create a harmony between the silver earrings and shoes.
The crescents should be painted thinner than a typical reverse French half-moon. If the silver is too thick, it will become the dominant part of the design, especially for short nails. This can be difficult to capture from a distant photo, so provide a close-up picture or draw the approximate width of the arc for your manicurist. It is easier to work with metallic paint than glitter and it will look smooth after sealing. Make sure to leave some blue space under each line.

How to Apply
- File short squovals, apply a lacquer base coat, and paint even layers of opaque powder blue; let them dry.
- With a fine liner brush, trace one thin silver arc just above the cuticle on the thumb and ring nail.
- Keep a visible blue gap between each arc and the skin, and leave the other three nails plain.
- Allow the metallic lines to dry and apply a glossy top coat over the full set.
8. Navy and Silver Split French Tips
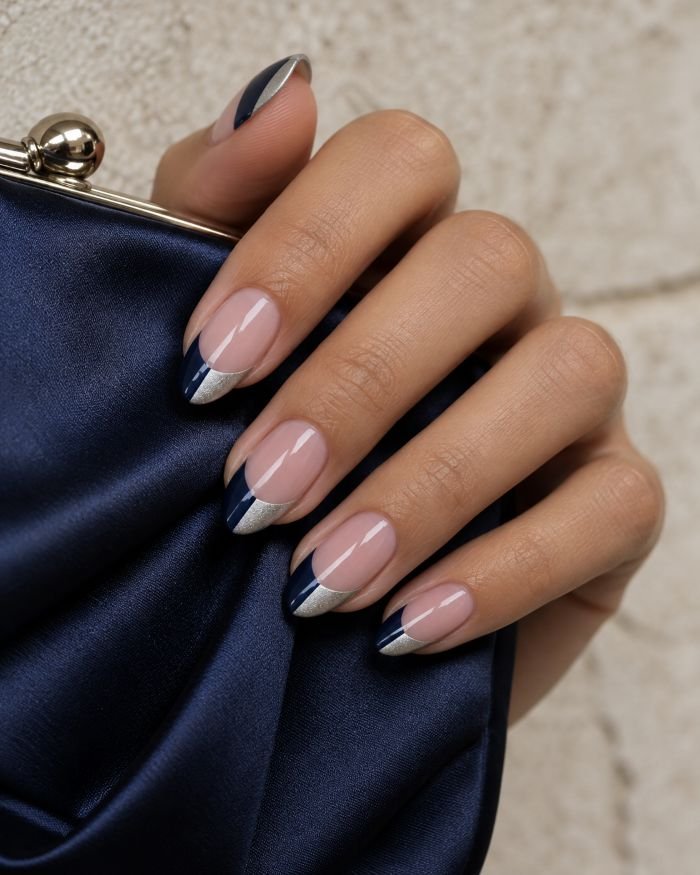
Every medium almond-shaped nail will have a transparent cool-pink nail polish with the French tip split into two neat parts. The left part of the French tip is painted in deep navy, whereas the right part is in metallic silver color. The dividing line should run from the smile line to the almond shape tip point. Try to keep the width of navy and silver colors almost equal, leaving the nail beds without any additional decorations.
This combination will look perfect when combining a navy dress with silver shoes or jewelry. This way you will be able to include both options in one manicure without using sparkles all over the nails. Ask your nail technician to create a sketch on the thumb first because this nail is the largest to spot out any crooked dividing line. The medium size nail will give enough tip area for painting. If you have shorter nails, create a straight squoval edge and make the diagonal splitting.
How to Apply
- Apply lacquer base coat and a sheer cool-pink layer to medium almond nails; let the base dry.
- Outline a balanced French tip on each nail, then fill its left half with deep navy lacquer.
- After navy dries, fill the right half with fine metallic silver lacquer, refining the central boundary with a liner brush.
- Let both colors dry completely and seal with a glossy lacquer top coat.
9. Emerald Green Nails with a Gold Foil Diagonal
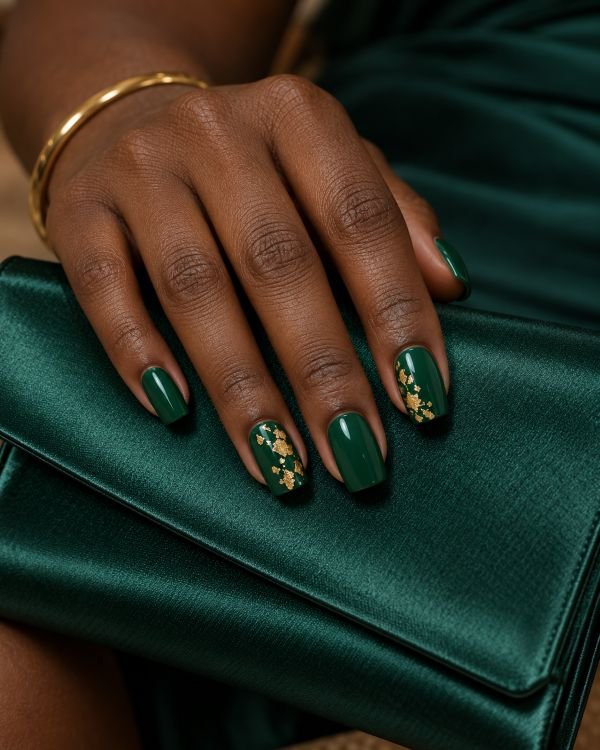
Opalescent emerald green coats medium soft-square nails from cuticle to tip. The index finger and ring finger each have an unfinished trail of flat warm-gold foil, starting on one edge at the bottom third and rising diagonally up to the opposing top corner. Make sure the green nail shows through between the pieces. The remaining nails are just solid green.
Follow this method if you’re wearing a green dress or gold accessories, but make sure your emerald green matches the fabric. Green satin becomes blue under flash lighting, while some very yellow emerald greens look out of place with it. Warm-gold foil can be placed with normal nail polish if the pieces are flat and thin. Raising the foil pieces makes them more likely to snag a fine dress sleeve, so make sure to check the side view before securing. Don’t cover both accent nails in a gold stripe; it’s the breaks that are important.
How to Apply
- Shape medium soft-square nails, apply lacquer base coat, and paint thin opaque emerald layers; let them dry.
- Tear nail foil into small uneven flat fragments and arrange a sparse diagonal on index and ring nails.
- Set the pieces into a suitable foil adhesive or tacky clear layer, pressing each edge flat and leaving emerald gaps.
- Seal the foil and free edges with the recommended glossy top coat once the adhesive is ready.
10. Plum-to-Lilac Ombré Nails
The color goes from light, dusty purple at the cuticles and through mauve and into cool plum towards each free edge. The gradient effect is on all five medium-sized ovals and has a glossy coat on its own, not with glittering accents and accent nail. The transition area does not get smudged up so you can still see both colors despite the distance between the fingers and camera.
The gradient effect helps when the purple you wear in your clothes and accessories does not have an exact match in your nail color. For example, the lighter color will complement silver and lavender hues in clothing and the dark plum will create harmony with dark fabric. Compare both polish colors before applying them; if one of them is very pink and another one very blue, an intermediate mauve will bridge them. These ombré nail ideas show how the width of the transition changes the whole look.

How to Apply
- Apply lacquer base coat and a thin dusty-lilac base to medium oval nails; let it dry completely.
- Place lilac, a little mauve, and cool plum in adjoining stripes on a fine cosmetic sponge.
- Dab lightly so lilac remains near each cuticle and plum builds toward each free edge; repeat after the layers dry.
- Clean the surrounding skin, let the gradient dry, and smooth it with a glossy top coat.
11. Champagne Glitter Fade on Short Rounds
Glitter from fine champagne forms at the bottom of rounded fingernails up to about one-third of their height while it becomes increasingly thinner near their center; therefore, sheer peach-beige fingernails almost lack anything on top. Warm glitter particles appear on all nails. A clear coat smoothes everything to make the nail polish application look more like a reflection than a sparkling dust on top of nails.
Applying glitter on the cuticle side makes you less likely to create an overly thick appearance of a short free edge of your nails. Such manicure style suits simple and plain dresses in either black, ivory, or other warm colors especially if your handbag or earrings have champagne metal pieces. Glitter from lacquer is applied thinly with a sponge. Chunks require levelling and can snag on fabrics. Always allow your nail polish base to become completely dry before applying glitter with a sponge on top. If there are sequins everywhere on the dress, test this on some other nail.

How to Apply
- Apply base coat and a sheer peach-beige lacquer to short round nails; let the base dry fully.
- Blot fine champagne-gold glitter lacquer onto a small sponge, then tap it near each cuticle.
- Use the nearly dry edge of the sponge toward the nail center, leaving the tip mostly clear.
- Let the glitter set and apply a leveling glossy lacquer top coat, adding a second thin layer if the surface feels rough.
12. Mirror-Silver Chrome on Medium Almond Nails
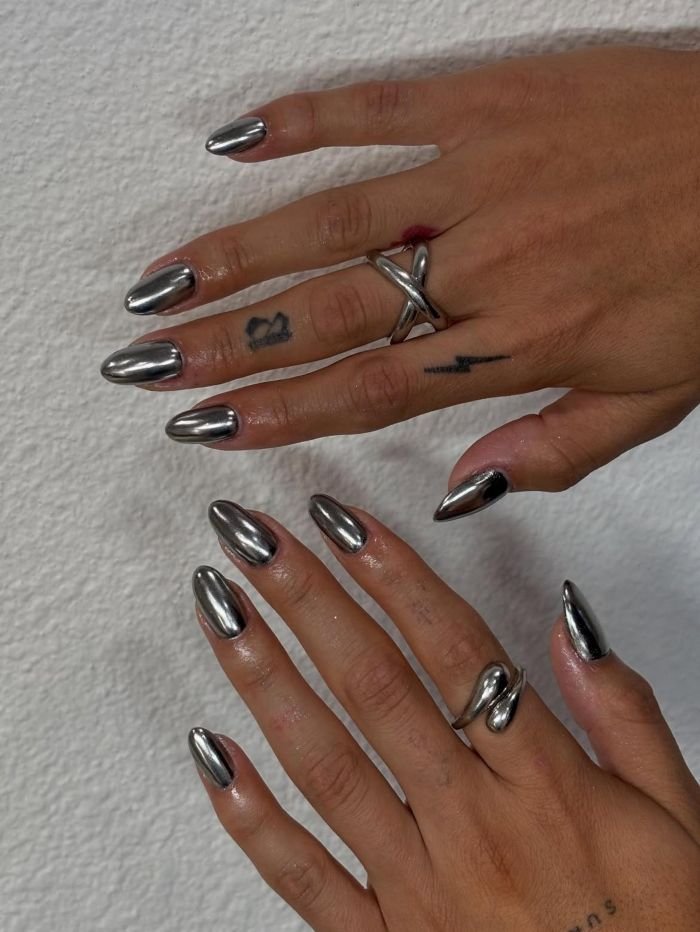
A seamless silver reflection is on five almond-shaped nails. The nail shape has a slight point and a thin free edge with a liquid metal effect on a neutral grey color background. There are no gemstones or nail art on top of the reflection. Not making the nails very long helps to keep the silver color in the frame next to a formal dress without drawing attention just to the hands in all pictures.
Ask to see a picture done with regular lighting and with the kind that is used to take pictures. The chrome is reflective and one perfectly-lit picture might show an exaggerated brightness of the finish throughout the event. The powder chrome needs to be part of a compatible gel system and a smooth surface; The GelBottle provides detailed instructions on the no-wipe layer, the powder and the seal. The Metallic Silver lacquer by The GelBottle Inc is an easier but not a fully reflective option.
How to Apply
- Have a trained technician prepare medium almond nails, apply a compatible gel base and neutral gray color, and cure each layer as directed.
- Apply the system’s chrome-compatible no-wipe layer and cure according to its instructions.
- Rub fine silver chrome powder into the prepared surface and brush off any loose pigment.
- Seal the entire surface and free edges using the chrome system’s recommended top coat; cure fully.
13. Matte Black Nails with Glossy Checkerboard Accents
Matte black square-nails of medium length adorn the thumb, middle, and little finger. The index and ring fingers boast of checkerboard pattern in matte-black and gloss-black alternated squares. There is no white grid or any other colors between the squares. The effect arises from light falling on the accents, creating the impression of a nearly plain set against a graphic one close up.
The design is an option for the textured black dress and the colored dress with the need to have a plain manicure. The sample must be shown under directional light as the glossy squares are too tiny to show in the photo. It requires precise checks and application of the gloss accents from the gel products, although it is possible to use the custom press-ons once for the weekend. The use of the regular top coat will destroy the effect.

How to Apply
- Have a technician apply and cure a compatible black gel base on medium soft-square nails.
- Cover the set with a matte gel top coat and cure according to the product instructions.
- On index and ring nails, paint alternating checkerboard squares with compatible glossy black art gel, leaving matte squares exposed.
- Cure the glossy artwork as required and clean up the boundaries without adding an overall glossy coat.
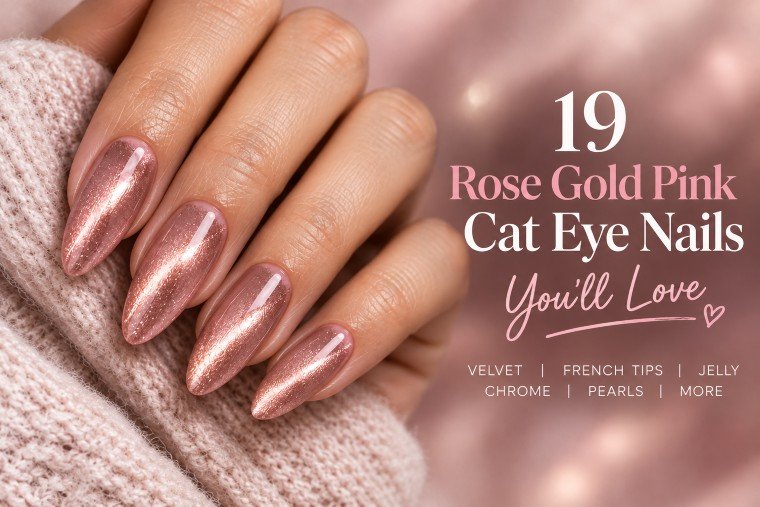
14. Rose-Gold Magnetic Velvet Nails
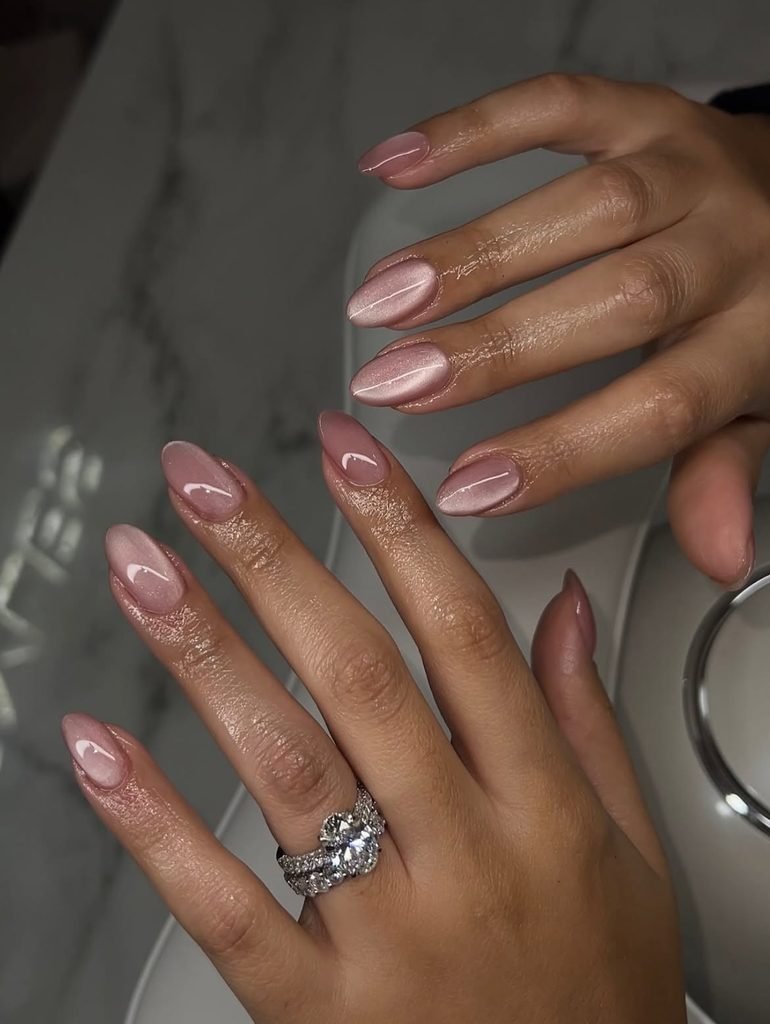
This medium oval shape gives a glow to the nails like they are glowing from the inside, alternating between warm pink and copper rose gold colors depending on how the hand is moving. This magnetic reflection covers a wide area on each nail without being a sharp diagonal cat eye shape. Each nail on all five fingers has this soft glow and a glossy finish.
Use a video reference for this design to see the reflection in different angles, since the still picture will only show one angle. Warm jewelry and blush, bronze or black dresses will complement the rose gold reflection, although make sure to test the reflection with the dress if it is cold pink. Magnetic gel should always be shaped with the help of a magnet before being cured, as per the OPI® professionals’ guide. OPI® UK Professionals Check out some of these cat eye nails if you want a beam.
How to Apply
- Have a trained technician prepare medium oval nails, apply a compatible gel base and any required color base, and cure as directed.
- Work one nail at a time with a thin wet layer of rose-gold magnetic gel.
- Move the magnet around the wet nail to spread the highlight into a broad velvet glow, then cure using the system’s lamp instructions.
- Repeat across the hand and finish with a compatible glossy gel top coat and full cure.
15. Ivory Lace Accent Nails with a Nude Base
Sheer warm nude is applied to medium almond nails; fine ivory lace art is done on the outer corner of the index and ring fingers. Both accents consist of a small scalloped edge and several open loops; the nail bed is left mostly visible. All other fingers are painted with nude color only.
If your dress has lace elements, follow the scale or the form of the lace pattern rather than trying to replicate each thread. A heavy white stamp will seem like a foreign element to the delicate ivory fabric. Let your nail artist show you an accent nail and decide if the second one requires less loops for its smaller nail bed. Fine stamping, small decals or press-ons make sense when replicating such small elements on both hands. The art must be flat and within the nail bed to avoid competition with the fabric.

How to Apply
- Prepare medium almond nails with lacquer base coat and a sheer warm-nude color; let each thin layer dry.
- Stamp or paint a small ivory scalloped arc at one outer corner of the index and ring nails.
- Add a few open lace loops beside each arc, keeping the center and opposite side of each nail sheer.
- Allow the linework to dry and seal with a smooth glossy lacquer top coat.
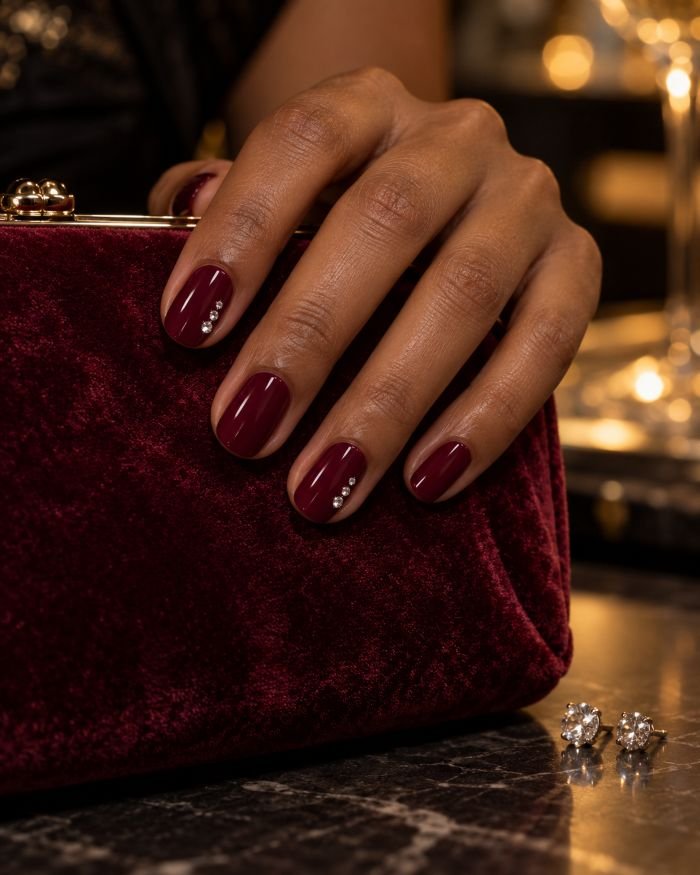
16. Burgundy Nails with a Tiny Crystal Side Cluster
Short oval nails are coated with dark red lacquer that has a shiny look. On the index and ring fingers, there are three small clear flat-back stones located near the lower outer part, from largest to smallest as they move further inward. The clusters leave much space until the free edge. The thumb, middle, and pinky fingers remain a solid red color of wine so that the stones could reflect light without turning the whole manicure into a jeweled one.
Such a design can resemble clear earrings or a rhinestone bag when the dress itself is plain. Let the technician know about the things you will hold in the evening because of the fact that you may have a delicate clutch or sleeves. Stones that are low-profile and not located at the tip of the nail are more comfortable to wear than a tall charm, but still, they should be attached with a proper glue. Here you have some rhinestone nail designs to choose another scale of stones.
How to Apply
- Shape short ovals, apply lacquer base coat, and paint thin layers of opaque burgundy; let them dry.
- Plan a small diagonal trio of flat-back clear crystals near the lower outer side of each index and ring nail.
- Set the stones with a dedicated nail-gem adhesive according to its directions, keeping them inside the nail perimeter.
- Once secure, seal around the stone bases without burying their reflective faces, and top-coat the plain nails.
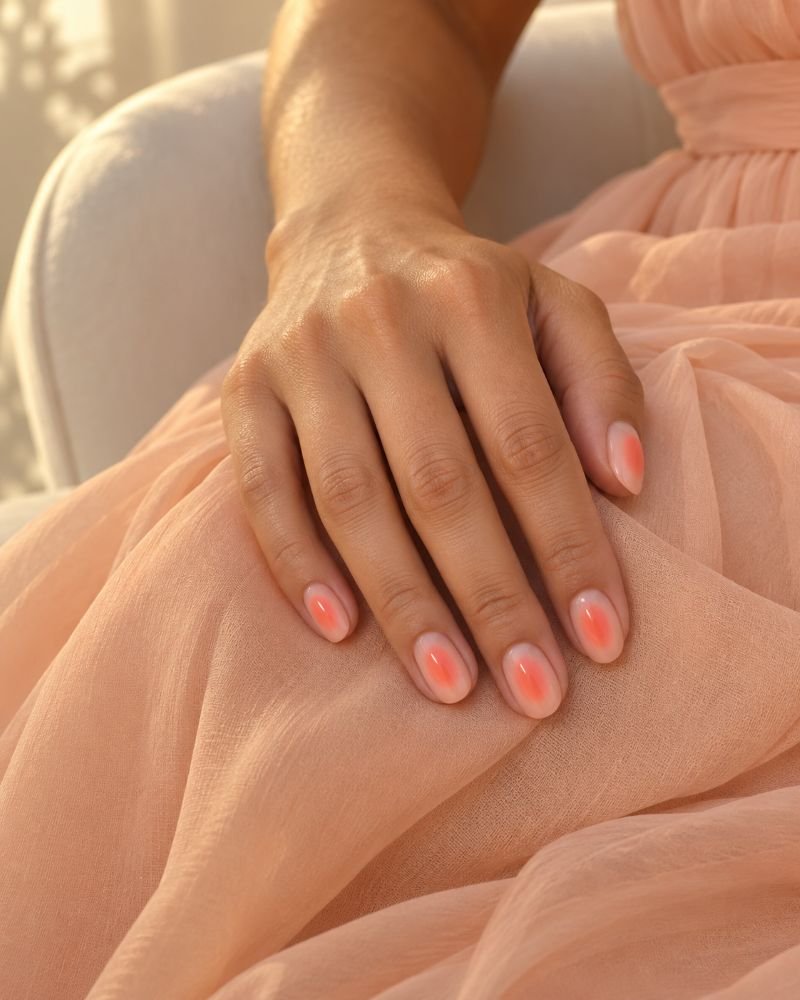
17. Peach and Coral Aura Nails
At the center of each short oval nail, there is a diffused coral glow which is surrounded by a sheer peach border that stays visible throughout. The coral is brightest at the center and gets lighter towards the sides, without having any sharp edge or glitter. The same pattern is applied to all five nails under a glossy coating. The glow will stay at the center even as the hand rotates.
Use this look with a peach dress for a little bit more depth than a straight matching manicure, or with an ivory one for which a warm manicure will add color. A technician may airbrush the center; while applying it yourself, ensure you have a dry sheer base and light sponge applications. Do not apply too much coral to fill up the whole nail, especially in case of a short oval. If your outfit already has an orange undertone, try testing the combination of the peach and coral.
How to Apply
- Shape short ovals, apply lacquer base coat, and paint a sheer peach wash; let it dry completely.
- Blot excess coral lacquer from a small cosmetic sponge onto a palette.
- Tap a faint oval in the center of each nail, building brightness gradually while leaving a peach border on all sides.
- Allow the aura to dry, then add a glossy top coat to smooth the sponged texture.
18. School-Color Pinstripes on Short Ovals
The homecoming celebration does have its school spirit component, and these tiny oval nails will reflect that without any mascot or lettering. Begin by painting the nails on both hands with a nude shade of pink. Two thin parallel stripes of each of the school colors will decorate the nails of the thumb, index, and middle and little fingers, starting from the left side of each nail. Move these stripes to the right part of the ring finger nail and reverse their order.
These nails will be decorated with your school colors. You can get inspiration from your school uniform or even sash online; the logo might look different there. You can wear this manicure with your neutral clothing without any additional clothing in the matching color. These two stripes will be sufficient for decorating a short nail. In case the school colors are dark, select different shades or separate the stripes.

How to Apply
- Apply a lacquer base coat and sheer neutral-pink color to short oval nails; allow them to dry.
- Test two school-color lacquers next to each other on a palette for sufficient contrast.
- Draw slim parallel lines near the left side of four nails, stopping before cuticle and tip; reverse the order on the ring nail’s right side.
- Let the lines dry completely and seal the set with a glossy top coat.
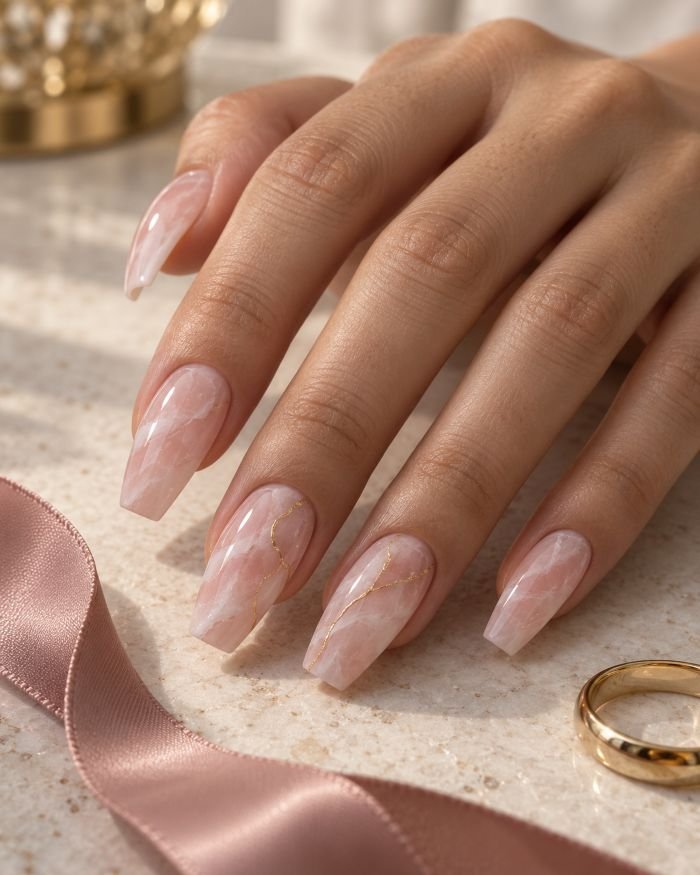
19. Rose Quartz Marble Nails with Fine Gold Veins
The medium coffin nails have cloudy layers of sheer blush and milky white, with delicate movement that reminds of rose quartz. All nails feature straight and pointed tips and smooth shiny finish. Only the middle and ring fingers have hair-thin gold veins on one side of each nail. The blush can still be seen through the milky layer; no opaque pink stripes or golden frames for all swirls are used.
The stone nail art will provide you with details without contrast to other nail polish colors. The warm golden veins can hint at your jewelry, while the few veins will let you distinguish the stone nail art from decorated fabric. Make an example nail and see that an excessive amount of white makes the entire set of nails look foggy and gold turns the effect into a metallic art piece. It is recommended to apply the blooming gel one nail at a time.
How to Apply
- Have a technician prepare medium coffin nails and apply and cure a compatible sheer-blush gel base.
- Work one nail at a time: place a thin uncured blooming-gel layer, add small milky-white and blush gel-polish touches, then gently guide and allow the color to diffuse.
- Cure when the marble is balanced; paint fine broken gold gel-paint veins along selected boundaries on middle and ring nails, then cure those details.
- Seal the full set with a compatible glossy gel top coat and cure according to the product system.
How Do You Match Hoco Nails to Your Dress and Jewelry?
Start by determining if the manicure will match a color, take inspiration from accessories, or offer a neutral touch alongside the dress. The dress with lots of sequins may only need sheer pink or pearl shimmers. The navy dress would allow a navy and silver split tip to stand out. Matching one element tends to be more purposeful than matching everything that is in the dress at once. In case the fabric behaves differently under flash, take the time to compare swatches in daylight and indoors before making any plans.
The jewelry could help decide when it’s difficult to choose. Gold details work with champagne, emerald foil, and rose quartz; silver works for powder blue or navy. It is possible to select a different undertone purposefully, but do test the combination first. For those who want something else besides the homecoming party nails, there are more party nails that match dresses and lighting. Take a picture of the whole outfit to the appointment, not just the nails.
Which Hoco Nail Shapes Work on Short Natural Nails?
Short round and oval shapes leave no sharp corners to catch when you handle a zipper, bag, or corsage. Squoval nails provide a straighter edge for a micro-French tip or tidy color block. Choose according to the shape you already wear comfortably; homecoming does not require an extension. If your nails are very short, a single cuticle dot, tiny side crescent, or fine pinstripe has more room to read than a crowded floral French band.
Proportion matters more than the photo’s original length. Ask a technician to narrow the tip, reduce the number of petals, or move artwork from the free edge onto one accent nail. If you do want medium almond or coffin nails, try their length in ordinary tasks before the event. Holding your phone and fastening the dress should feel manageable. A custom press-on set can be measured and photographed in advance so you can assess the shape before the night itself.
Should You Choose Regular Polish, Gel, or Press-Ons for Homecoming?
Regular lacquer is a sensible route for solid color, micro tips, dots, and simple painted art if you have time to let every layer dry. A magnetic velvet effect and powder chrome involve product-specific gel sequences, while marble diffusion may call for a technician experienced with blooming gel. Ask the salon which products it uses and show the exact finish you want; a metallic lacquer swatch is not the same thing as mirror chrome.
Press-ons are useful when you want detailed art without wearing an extension beyond the event. Size each nail to its natural nail bed before application and follow the adhesive kit’s instructions. KISS’s application guidance, for example, stresses choosing the right size and aligning the nail at the cuticle. Friday Slay – KISS USA A custom set gives you more control over a dress-specific shade or small motif. Try the length and fit in advance rather than discovering an uncomfortable shape while dressing.
When Should You Do Your Nails Before Homecoming?
Start with the one that takes the most time – finding out which dress color to choose, ordering a custom one or making an appointment for detailed salon art. This needs to be arranged early enough to have time to see swatch or nail samples before the dance. The nail technician will tell you the right time for your last appointment concerning your chosen product and design. In case you need crystals or foil in your manicure, check out the side view and adhesion before leaving the salon.
For regular lacquer at home, leave enough time for drying. You shouldn’t take a dry to the touch surface as the right signal to get dressed in a hurry. Press-ons need to be measured before, then put on and taken off in accordance with specific glue recommendations. Prepare your dress, shoes and jewelry before picking up your last nail color, as the visual comparison is more effective than comparing five photos in your cell phone.
Final Thoughts
Your hoco nails will have to be done in a way that shows thought in terms of what you have on. When your dress has flow and sparkle, a sheer pink dot or a milky pearl finish may be just enough. A plain dress gives leeway to details such as a bow, a split French tip, a chrome surface or a marble accent. Short nails will allow all these details as well, but adjusted in size and pressed on nails making it easier to prepare for that one night only.
Remember to save the design at your comfortable nail size and your favorite detail, and take down notes of the nail shape, base color, accent nails, and finish used. Use the reference photo along with this description while visiting a nail salon or finding yourself an acrylic alternative. The distinction between plain, cute and sparkling hoco nails comes less from the number of details added and their placement rather.
Ready to find the perfect nails for your homecoming look? From delicate French tips and cute bows to sparkling chrome and glitter accents, explore designs that complement your dress and personal style. Save your favorite and preview how it looks on your hands before your next DIY manicure or salon visit.
Use our AI Nail Generator
Bloomie
Bloomie (I) is the founder and author of Nail Blooms, a nail inspiration website dedicated to manicure ideas, nail art, colors, shapes, and emerging beauty trends. My interest in nails began with a simple habit of collecting beautiful manicure ideas and exploring different styles, from timeless nude shades and French tips to creative nail art and seasonal looks. What started as a personal interest gradually grew into Nail Blooms, a space created to make discovering nail inspiration easier and more enjoyable. At Nail Blooms, My goal is to help readers give new ideas, find different possibilities, and feel inspired when choosing their next manicure.
About the editor ↗