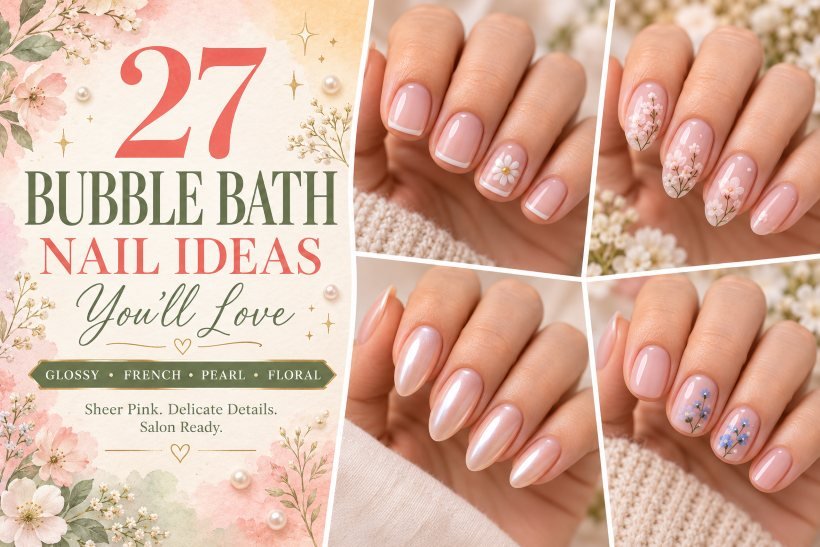
27 Bubble Bath Nail Manicure Ideas You’ll Love
The only thing that differentiates an almost invisible pink manicure from an outstanding one is the width of the French tip. If you leave the base of the nail translucent, you can see through the natural nail; the sheer white color will make the nail more milky and the pearl shimmer will give a unique glow to the color. OPI Bubble Bath, which refers to the pale-pink color of the lacquer, will help you achieve these effects.
These bubble bath manicures include a short shiny manicure, lace tips, metal outlining, and even a sculpted shell accent on top of the nails. All these nail designs have everything needed to create a beautiful look: proportion advice, application instruction, and the features of your design that your nail artist must pay attention to. You may work with the original nail polish or with the Bubble Bath-inspired nail polish in another product line.
1. Classic Glossy Bubble Bath Nails
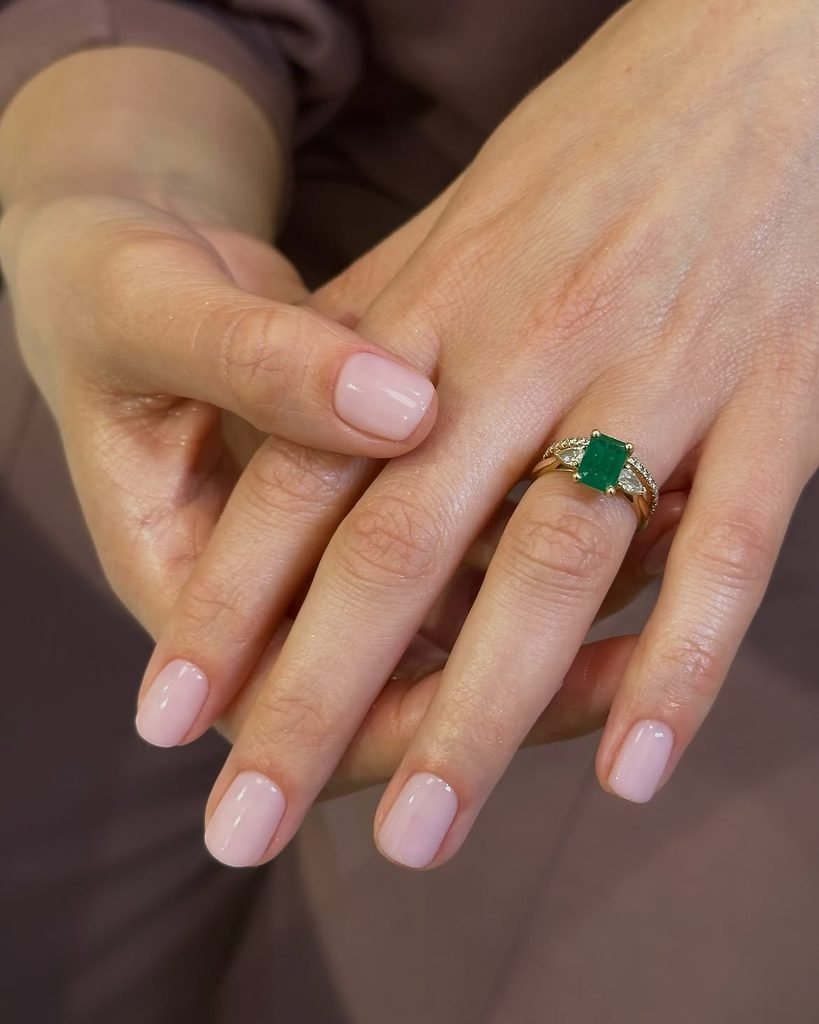
Short squoval nails give the simplest version of this manicure a neat, gently rounded outline. The pale pink stays translucent enough for the free edge to show softly underneath, while a glossy top coat creates one clean reflection down each nail. There is no accent finger here. The interest comes from even coverage and a shape that looks consistent across the hand.
The coverage is the decision to make first: how much of your natural nail do you want to see? Show your technician that detail alongside the color reference. It is part of the appeal of quiet luxury nails, where a little polish still leaves the hand looking familiar. At home, let each coat settle; repeatedly brushing a partially drying patch can leave the finish less even.
How to Apply
- Shape the nails into short squovals, clean away filing dust and apply a suitable base coat.
- Mix the lacquer as directed, then brush on a thin coat of Bubble Bath.
- Allow the recommended interval before adding a second thin coat.
- Apply a glossy top coat, lightly covering the free edge, and allow the manicure to dry.
2. Bubble Bath Nails With White Micro-French Tips
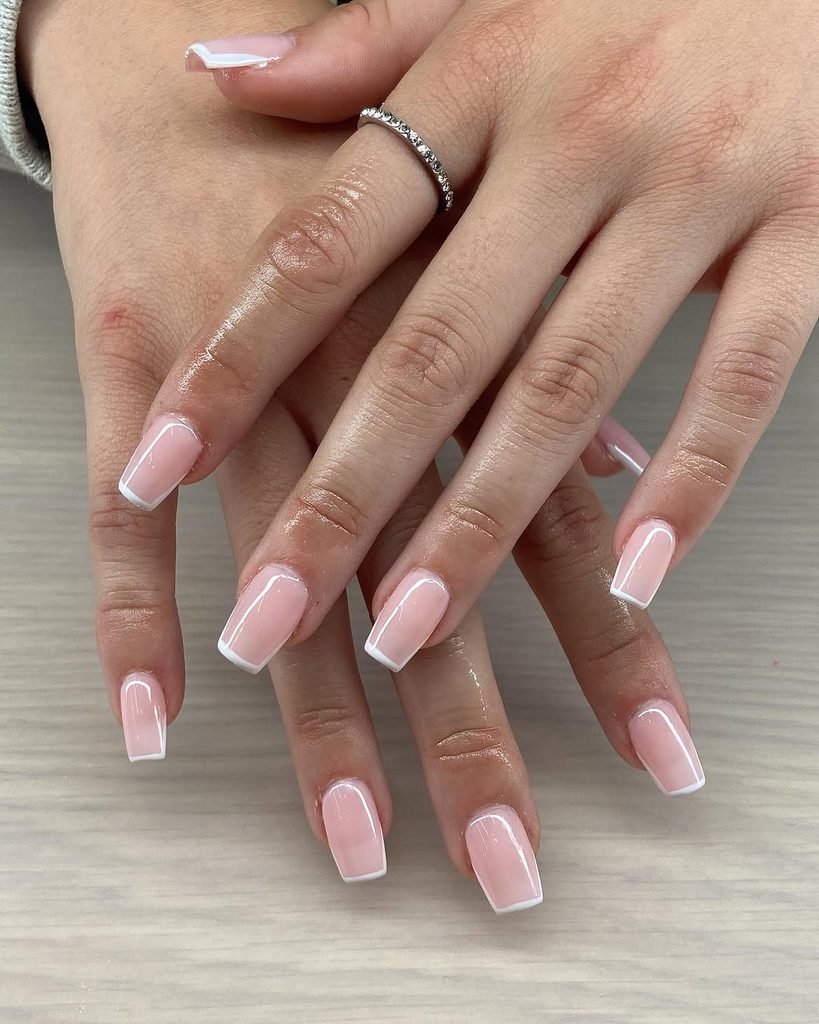
A sliver of white across the free edge gives the pink a crisp boundary. On short square nails, the line follows the straight center of the tip before curving slightly into the corners. Keep the base transparent enough to show the nail underneath. The result has the familiar contrast of a French manicure, scaled down to suit a compact length.
The proportion to watch is the white band. If it creeps too far down the nail, it takes over the pink and makes the tip look heavier. Among French tip nail designs, this shallow smile line asks for particularly careful brush control. Use a narrow liner brush to join a few short strokes, keeping the corners softly finished.
How to Apply
- Apply a base coat and two thin coats of pale-pink lacquer to short square nails.
- Once the pink has dried, mark the center and corners of each tip with tiny white strokes.
- Join the marks into a narrow, continuous smile line using a fine liner brush.
- Let the white set, then seal with a glossy top coat.
3. Pearly Glazed Bubble Bath Nails
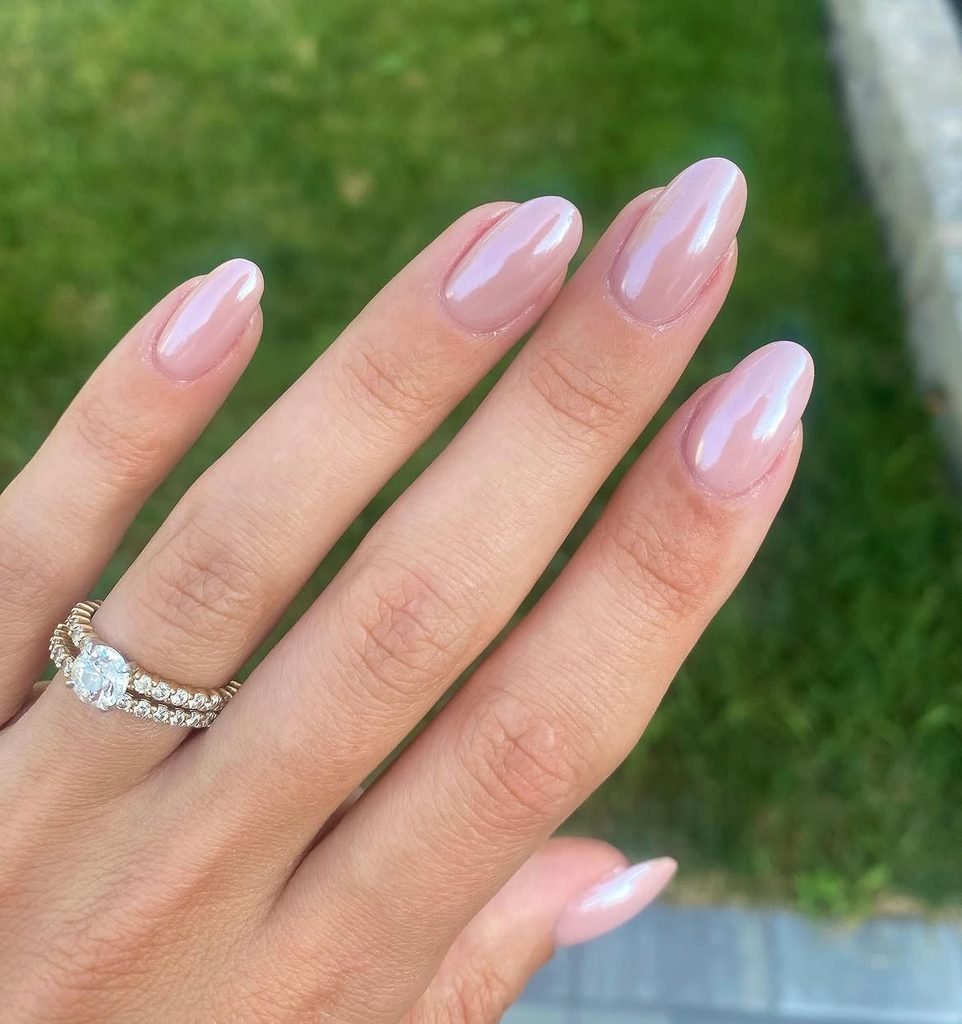
Light travels across these almond nails in a soft pearly band, revealing pink beneath the reflection. The glaze is fine and almost transparent, with a slight ivory shift as the fingers turn. Medium length gives the highlight room to follow the curved nail surface. There are no visible glitter pieces or metallic borders competing with that smooth, luminous finish.
When requesting bubble bath chrome nails, bring a reference that shows the pink in ordinary daylight. A dense white powder can change the look substantially, so ask your artist to demonstrate the glaze over the chosen base. For a home manicure, a sheer pearlescent lacquer topper offers a softer interpretation. It will have its own shimmer character, but it is a straightforward way to try the combination before booking a powder-chrome service.
How to Apply
- For a salon chrome version, apply a compatible gel base and pale-pink gel color, curing each as directed.
- Apply the chrome system’s designated top coat and follow its specified curing stage.
- Rub in a small amount of fine pearl powder with an applicator, then remove loose pigment.
- Seal the chrome and free edges with the compatible gel top coat and cure as directed.
4. Milky Bubble Bath and Funny Bunny Nails
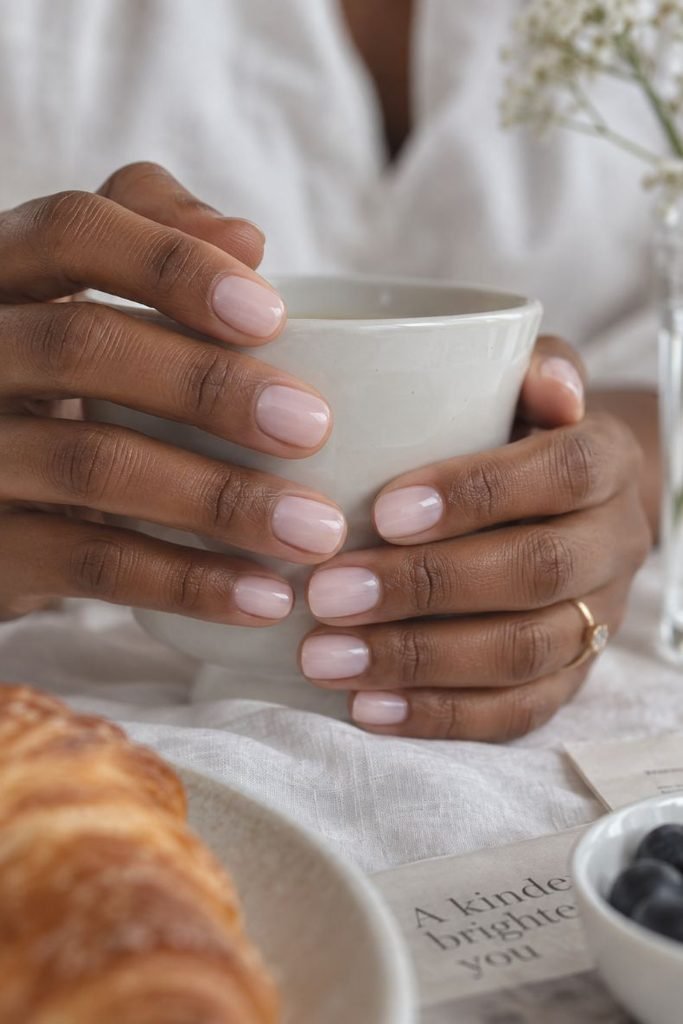
A sheer white veil over pale pink gives this manicure a softer, milkier appearance. The natural free edge is less distinct than in the classic glossy version, although the nails still have some translucency. Short oval tips keep the outline gentle. In daylight, the finish should look like a delicate pink wash seen through frosted glass, with a smooth glossy surface.
For this Bubble Bath and Funny Bunny combination, try a thin pink layer followed by a thin white layer on a practice tip before painting the full set. The balance can change with the formula and amount applied. OPI identifies this layering order as the inspiration for its separate OPI’m a Bubble Bunny shade. Save a photograph of the finished swatch so your next appointment has a clear coverage reference.
How to Apply
- Prepare short oval nails and apply a base coat suitable for regular lacquer.
- Brush on one thin coat of Bubble Bath and let it set according to the directions.
- Add one thin coat of Funny Bunny, keeping the white layer even.
- Finish with a glossy top coat once the color layers are ready.
5. Satin Bubble Bath Nails With Glossy Waves
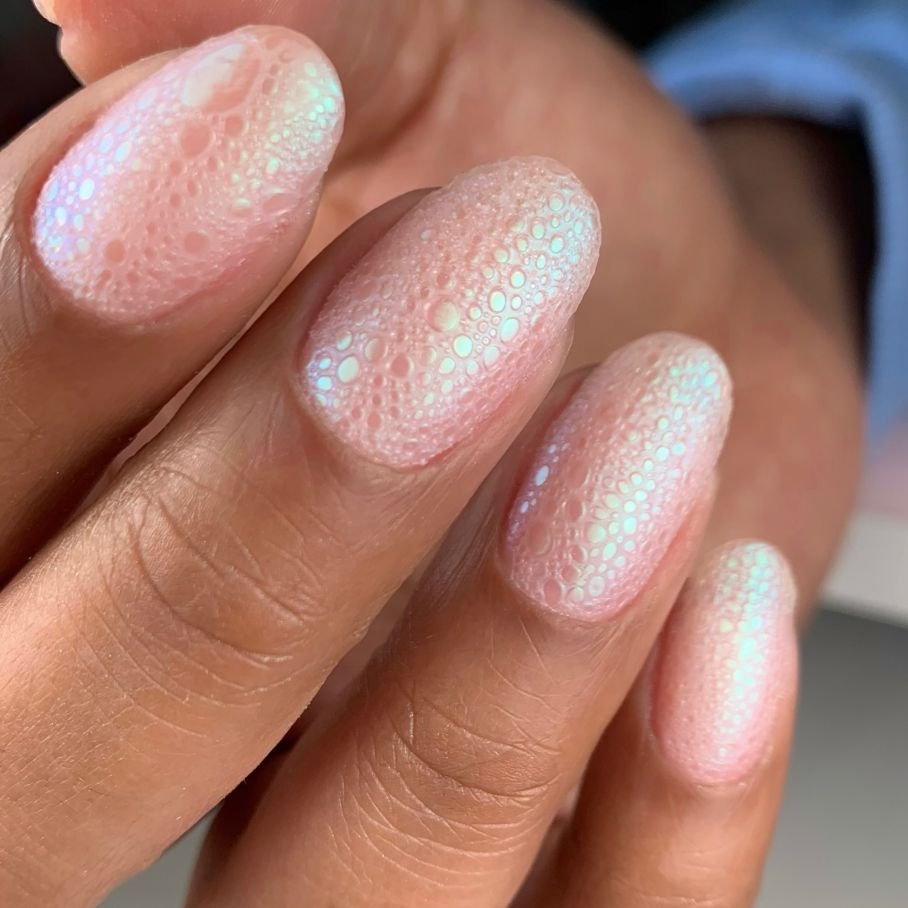
At first glance, this looks like a soft pink manicure with a muted finish. Move the hand and a clear, glossy wave appears on each nail, catching light against the satin background. The curves are broad enough to register but lie flat on the surface. Short oval nails keep the effect intimate, especially when the waves follow different paths across the set.
Finish does the work here, so you can keep the color palette to a single pink. It suits someone who enjoys subtle detail and would rather notice the manicure while moving than see a pattern from across the room. For a lacquer version, complete the satin finish before painting the clear waves. A final all-over glossy coat would remove the contrast you have just created, so leave the surrounding surface untouched.
How to Apply
- Apply base coat and pale-pink lacquer to short oval nails, allowing the color to dry.
- Cover the nails with a satin top coat and let it set fully.
- Use a clean detail brush and glossy top coat to paint one flat, flowing wave per nail.
- Allow the clear waves to dry without applying another coat over the entire nail.
6. Bubble Bath French Ombré Nails
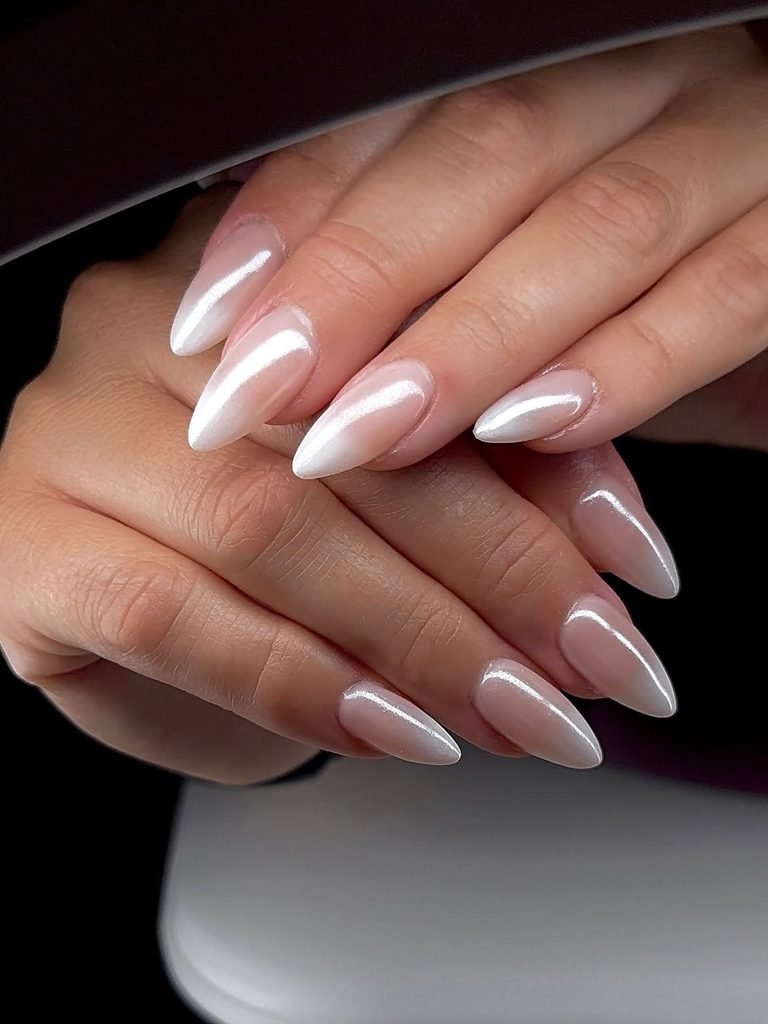
The white at these oval tips dissolves gradually into pink, leaving the transition difficult to pinpoint. Color is strongest along the free edge and becomes increasingly transparent toward the middle. A glossy finish smooths the appearance of the fade. Medium length gives both shades space, with enough pink remaining near the cuticle to keep the manicure warm and delicate.
Choose French ombré when you like a pale tip but want a gentler boundary than a painted smile line. The difficult part is controlling where the white stops; a fade that reaches too close to the cuticle can turn the whole manicure milky. For a lacquer attempt, use a small piece of cosmetic sponge and build with light taps. An artist can create a more controlled version using a compatible gel blending or airbrush system.
How to Apply
- Apply base coat and a sheer pale-pink lacquer to medium oval nails; let the base dry.
- Dab a small amount of white lacquer onto a cosmetic sponge and blot away excess.
- Tap the white over each tip, reducing pressure toward the center; repeat lightly after it sets.
- Clean any surrounding polish and smooth the gradient with a glossy top coat.
7. Bubble Bath Nails With Gold Cuticle Arcs
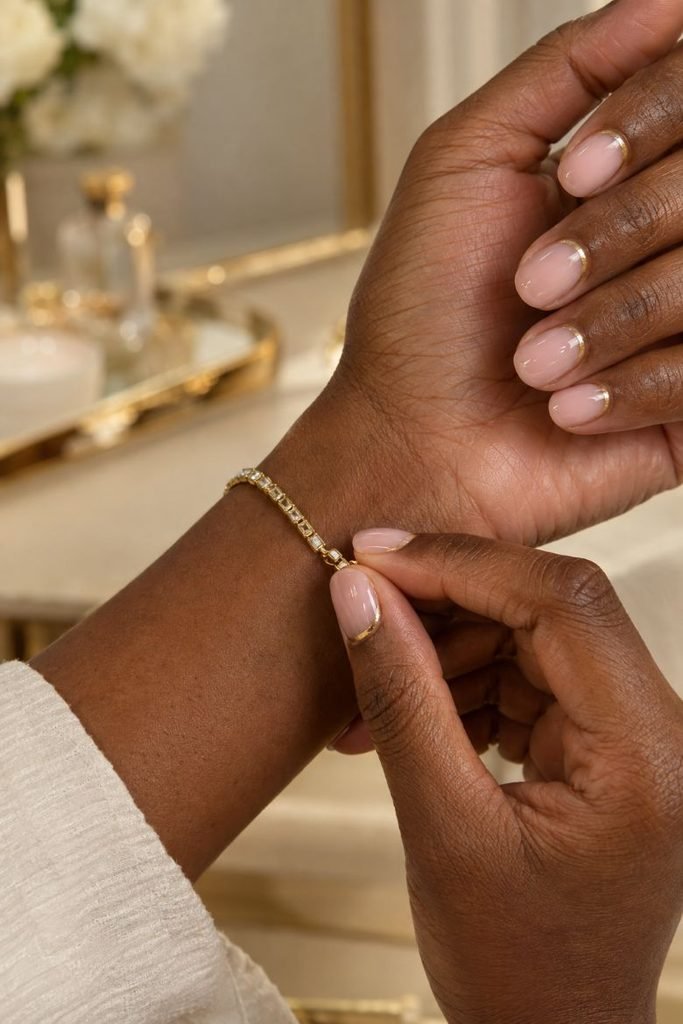
Fine gold arcs sit just inside the cuticle border, following the curve at the base of each short round nail. The pale pink remains visible across the rest of the surface, including the softly rounded tips. Because the metal occupies such a small area, its warm reflection feels precise. A glossy finish keeps the gold and pink looking smooth together.
A fine gold ring echoes the arc without introducing another color. Leave a slim, even margin between the metal and surrounding skin so the curve has a clear outline. A curved metallic decal can simplify the work on your non-dominant hand. Before sealing it, check the arc from above; a slight tilt is noticeable against the bare pink.
How to Apply
- Paint prepared short round nails with base coat and sheer pale-pink lacquer.
- Let the pink dry, then mark a small gold curve just inside each cuticle border.
- Extend and refine each arc with a liner brush, keeping polish off the skin.
- Allow the metallic detail to set and finish with a glossy top coat.
8. Bubble Bath Nails With Silver Frames
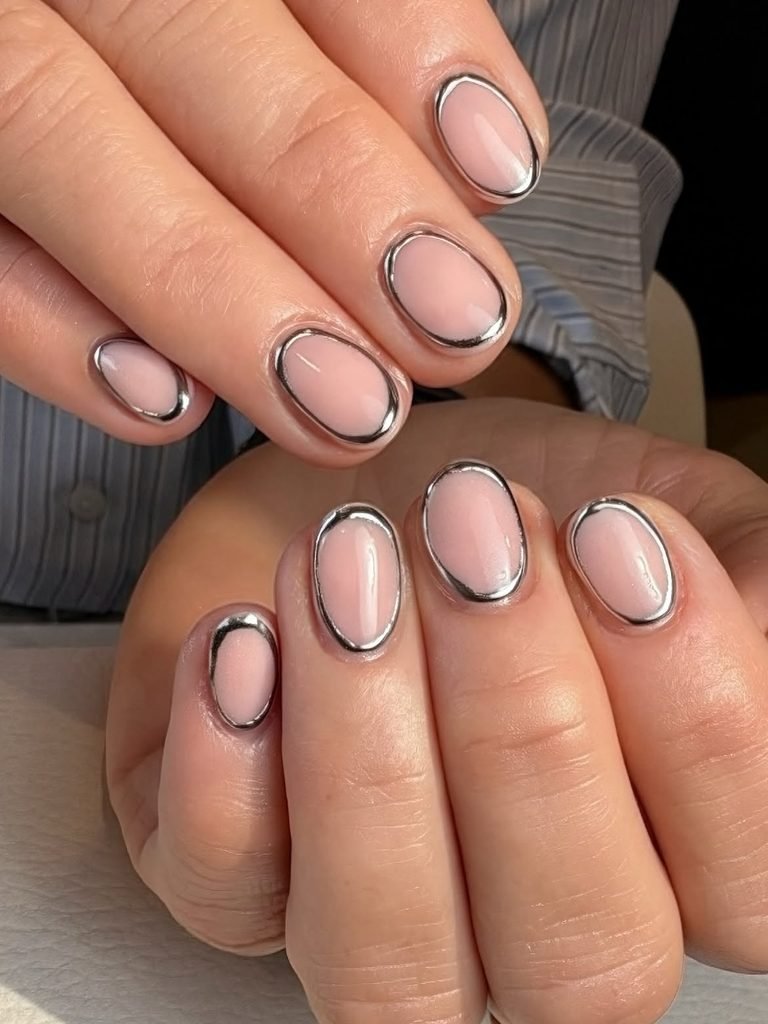
Silver follows the sides and free edge of each squoval nail, creating a slender frame around the sheer pink. The outline stays open near the cuticle, where both ends taper away. That small break gives the design a lighter appearance and keeps the lower nail from feeling crowded. Medium length provides enough pink space inside the frame for the border to remain distinct.
For a clean result, ask for flat silver linework with a consistent width. Thick metallic edges can make an otherwise delicate manicure feel quite different. This is a useful choice when your everyday jewelry is silver and you want a detail that echoes it without adding stones. If painting the entire perimeter feels fiddly at home, practice the two side lines separately on a tip before attempting their curved connection.
How to Apply
- Apply base coat and translucent pink lacquer to medium squoval nails, then let the color dry.
- Draw a thin silver line along each side, stopping short of the cuticle.
- Join the lines around the free edge and taper the two open ends.
- Let the frame set before covering the surface and tip with glossy top coat.
9. Bubble Bath Nails With Espresso Side Tips
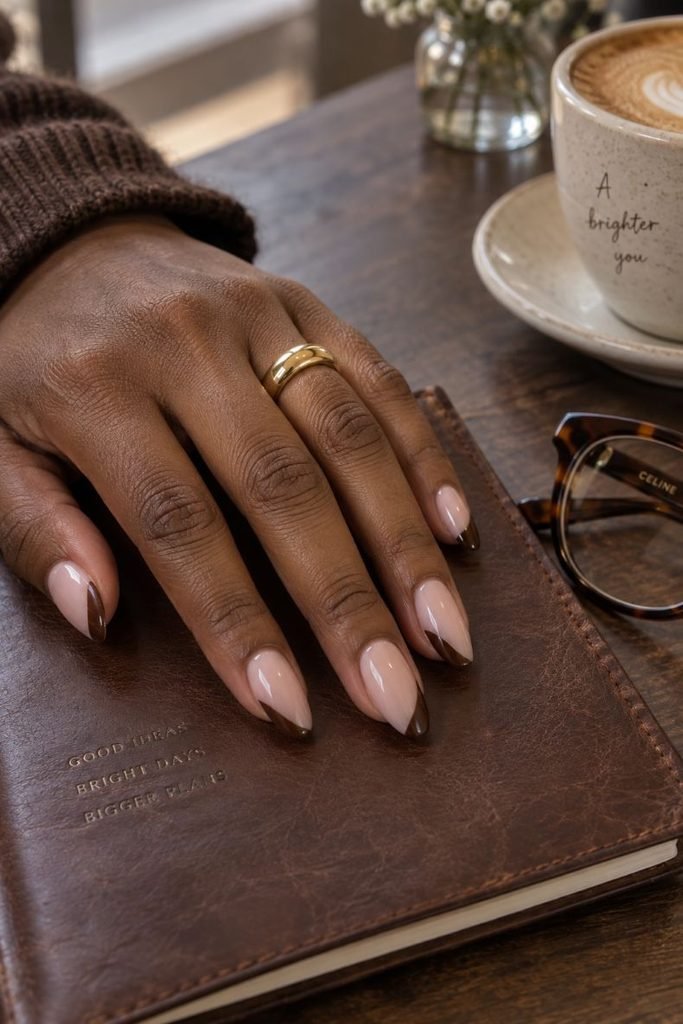
An espresso-brown wedge crosses one corner of each almond tip, leaving the opposite side pink. The diagonal is slightly curved so it follows the taper of the nail. Against a translucent base, the brown looks rich and clearly defined, while the glossy surface ties the two colors together. The wedges alternate direction across the hand for a little asymmetry.
The small dark area gives this manicure enough contrast to sit comfortably beside brown leather, tortoiseshell glasses or a charcoal sleeve. It is also a way to carry bubble bath almond nails into autumn while keeping most of the familiar pink. Before painting, decide where each diagonal will end. Matching the height of those endpoints helps the set feel cohesive even though the brown changes sides from finger to finger.
How to Apply
- Prepare medium almond nails and apply a base coat followed by sheer pink lacquer.
- On the dry base, outline a curved diagonal across one corner of each free edge.
- Fill the small wedges with espresso-brown lacquer, alternating their direction.
- Refine the borders, allow the brown to set and seal with a glossy top coat.
10. Bubble Bath Nails With Lace Edges
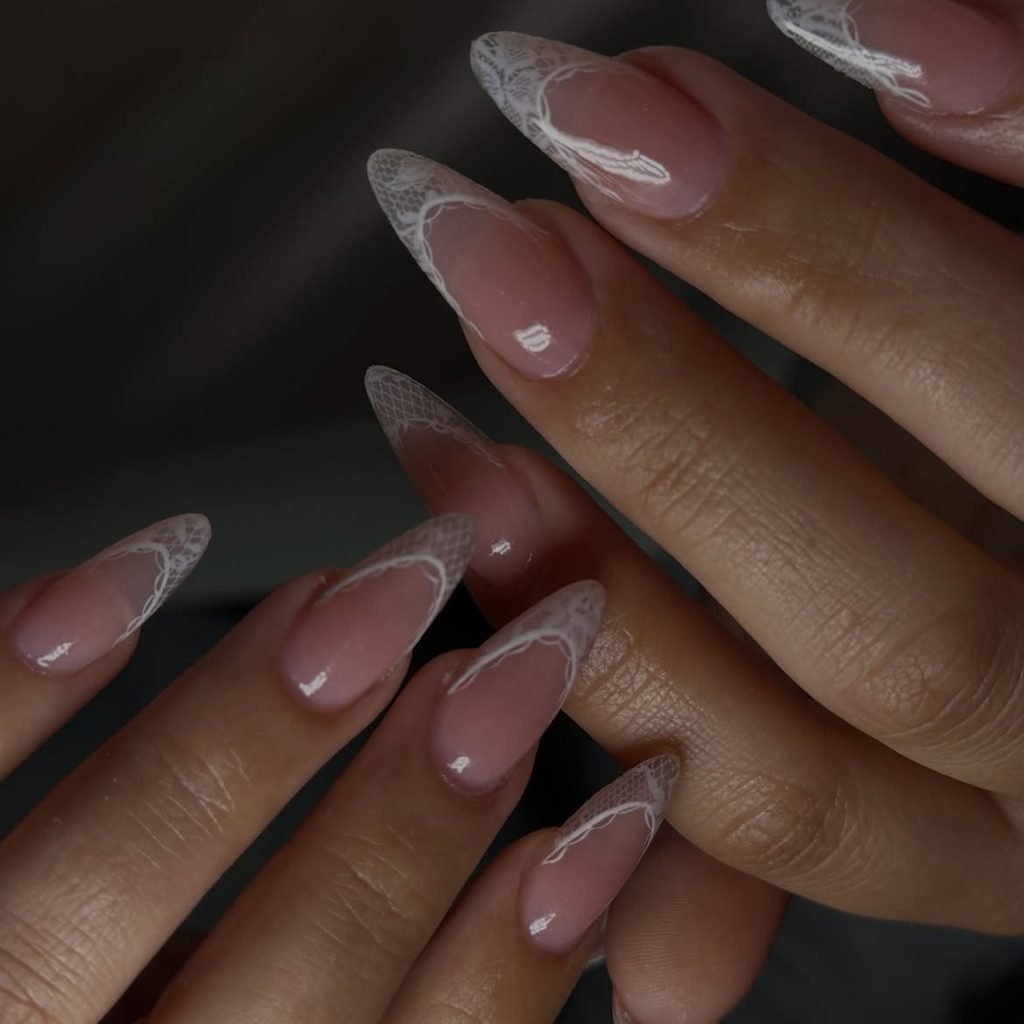
Tiny ivory loops connect along the tips of two oval nails, forming a fine lace border over the pink. Small dots sit at selected joins, and the open spaces allow the base to show through the pattern. The other nails stay plain and glossy. From a little distance, you see a delicate pale edge; closer up, the individual loops become visible.
For bubble bath wedding nails, lace gives you a detail that can echo a dress without needing a miniature copy of its fabric. Keep the pattern open if your outfit already has dense embroidery. It also fits among these bridesmaid nail ideas, especially when everyone shares a base color but chooses different accents. A fine lace decal is a sensible option if you want consistent detail on both hands.
How to Apply
- Apply a sheer pale-pink manicure to medium oval nails and let the lacquer dry.
- Paint a row of tiny connected ivory loops along two accent tips.
- Add a few smaller connecting strokes and dots, keeping the spaces between loops open.
- Allow the linework to set, then finish the full manicure with a glossy top coat.
11. Bubble Bath Nails With Black Polka Dots
Two or three tiny black dots sit on each short round nail, their positions changing slightly across the hand. Some fall near the tip, others just below the center, with generous pink space between them. The dots have clean circular edges and similar sizes. Over a sheer glossy base, this simple arrangement has enough contrast to remain visible without requiring a larger motif.
Start with less polish on the dotting tool than you think you need. A heavy bead spreads quickly and can change the scale of the whole pattern. This is an approachable design for a home manicure because you can practice each dot on a spare tip first. It looks particularly considered with black-and-white clothing, although the transparent pink keeps it easy to wear with color as well.
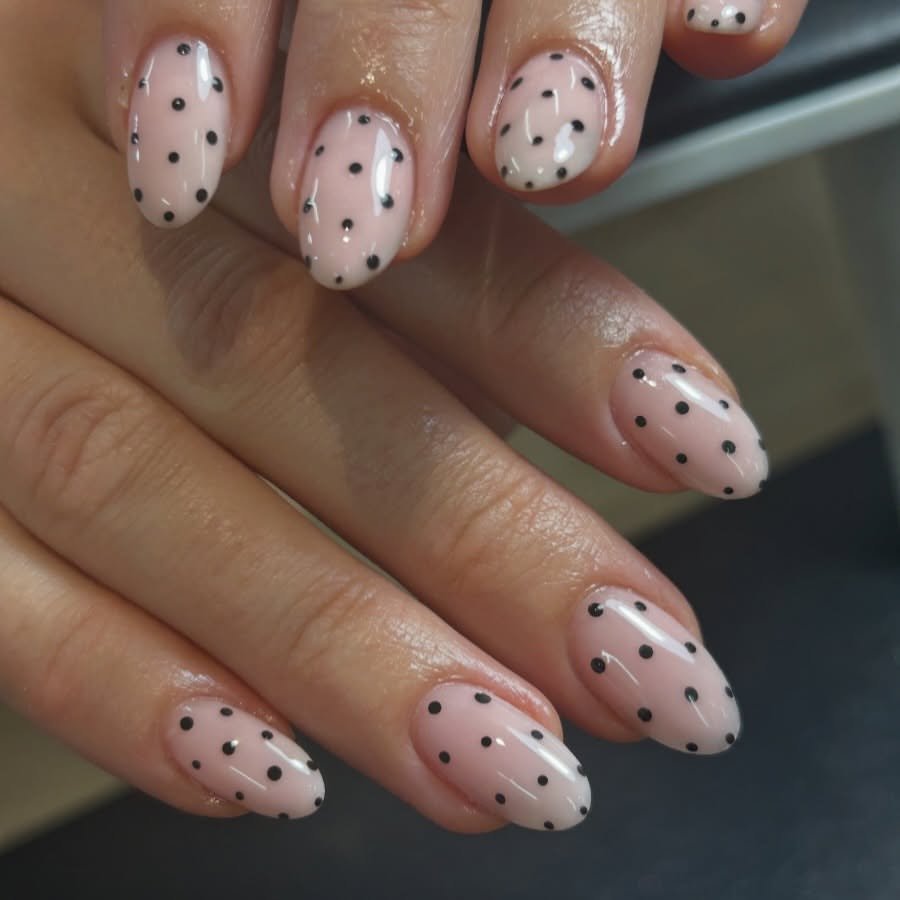
How to Apply
- Paint short round nails with base coat and sheer pink lacquer; allow the base to dry.
- Pick up a small amount of black nail polish with a fine dotting tool.
- Place two or three separated dots per nail, varying their positions while keeping their sizes similar.
- Let the dots set thoroughly before floating a glossy top coat over them with light pressure.
12. Rose Quartz Bubble Bath Nails
Fine white veins wander through the pink on three oval nails, fading in some places and becoming clearer in others. A translucent pink layer softens selected lines, giving the artwork a sense of depth. The remaining nails are plain, with the same glossy finish. Keep the veins irregular and widely spaced so the result resembles a softly clouded piece of rose quartz.
The most useful reference for this design shows both the linework and how much pink covers it. Fully exposed white stripes can look much sharper than the intended stone effect. This is painted marble nail art, built in layers; the look does not require dipping your fingers into polish on water. For a manageable home version, start with one accent nail and let each lacquer layer settle before drawing or glazing over it.
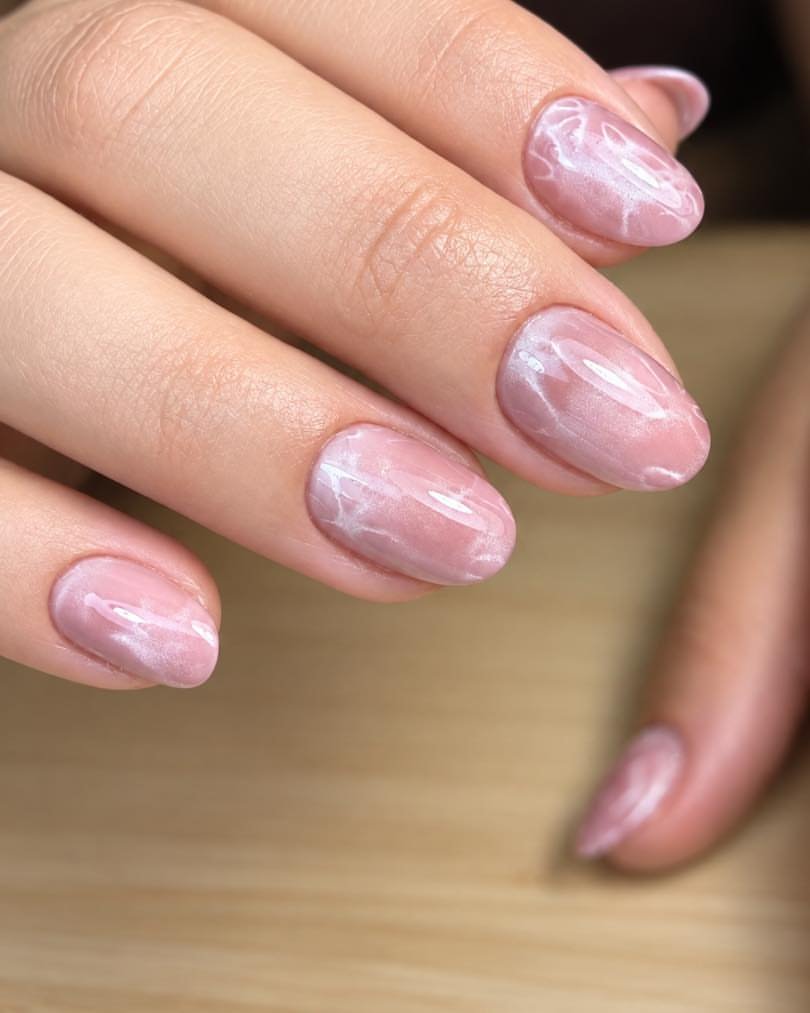
How to Apply
- Apply base coat and a sheer pink lacquer to medium oval nails.
- Once dry, draw several fine, irregular white veins on three accent nails.
- Let the veins set, then veil selected areas with another very thin pink layer.
- Add one or two delicate surface veins where needed and seal the dry artwork with a glossy top coat.
13. Bubble Bath Nails With Rosy Aura Centers
A warmer rose-pink bloom sits at the center of each almond nail and fades before reaching the sidewalls. The surrounding Bubble Bath-inspired base stays pale and translucent. There is no visible ring around the deeper color; its edge looks softly diffused beneath the gloss. The rounded center and tapered tip give the manicure two gentle shapes to follow.
The effect shares the softly concentrated color seen in Korean blush nail designs. For this version, ask your artist to keep the blush within the middle of the nail so it leaves a clear pale border. That distinction matters more than making every center exactly the same size. If you are using regular lacquer, a small sponge can build the color gradually, though achieving equally soft edges on both hands takes practice.
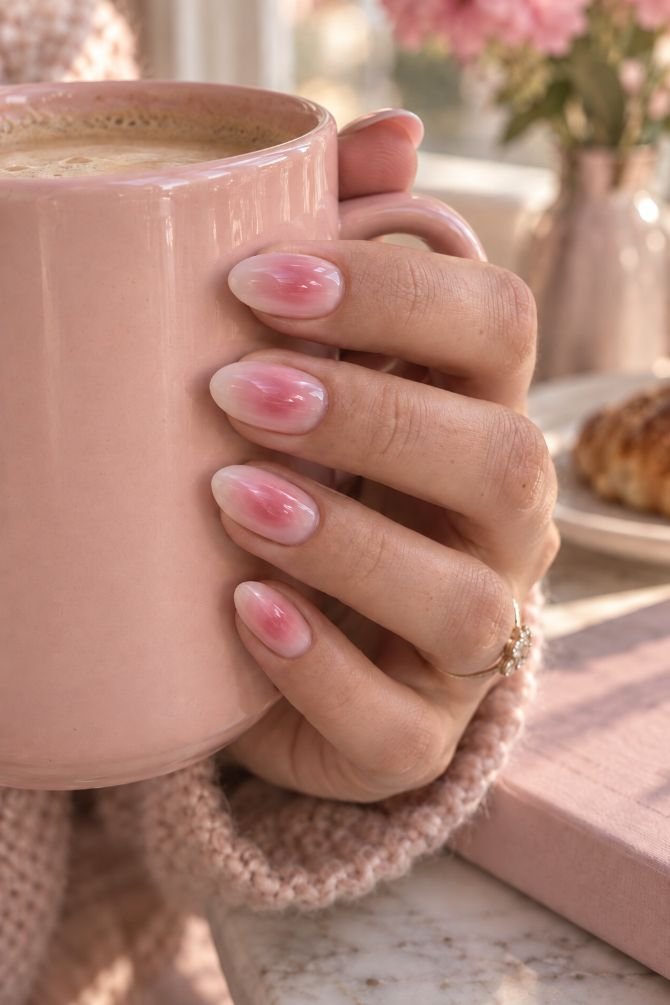
How to Apply
- Apply base coat and a sheer pale-pink lacquer to medium almond nails; let it dry.
- Blot a small amount of sheer rose-pink lacquer onto the tip of a cosmetic sponge.
- Tap the center of each nail lightly, concentrating color in the middle and feathering the edges.
- Allow the blush to set, then finish with a glossy top coat.
14. Bubble Bath Nails With Champagne Velvet Accents
Two short oval nails carry a champagne shimmer that appears to move beneath the glossy surface. The pink remains visible through the reflective particles, while the other nails wear the same base without shimmer. The magnetic highlight is broad and softly rounded. When the hand turns, the accent changes from a gentle glow to a brighter sweep of light.
Choose a sheer magnetic topper if you want to preserve the pink; an opaque magnetic color will create a different base altogether. Your artist can use the magnet to adjust the reflection before curing each accent. These cat-eye nail ideas show how much the effect can vary with placement. For this manicure, ask to see the highlight from the front and side, since a beautiful reflection at one angle may look much quieter at another.
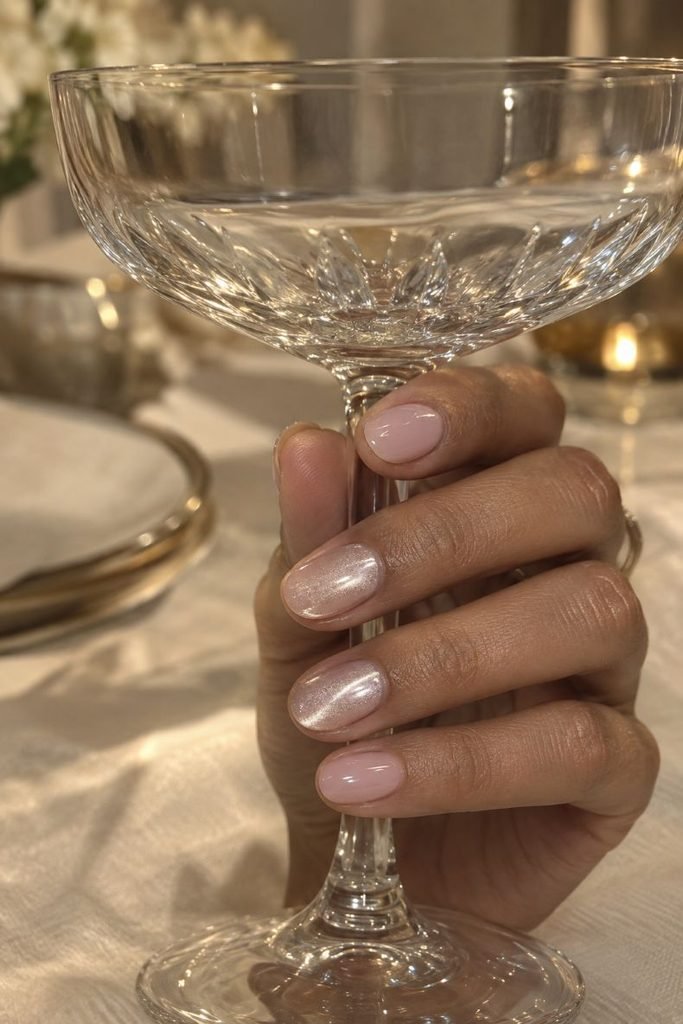
How to Apply
- Apply a compatible gel base and pale-pink gel color to short oval nails, curing each layer as directed.
- Brush a thin coat of sheer champagne magnetic gel topper over two accent nails.
- Shape a broad reflection with the product’s magnet without touching the gel, then cure each accent as directed.
- Apply the compatible glossy gel top coat to the full set and complete its required cure.
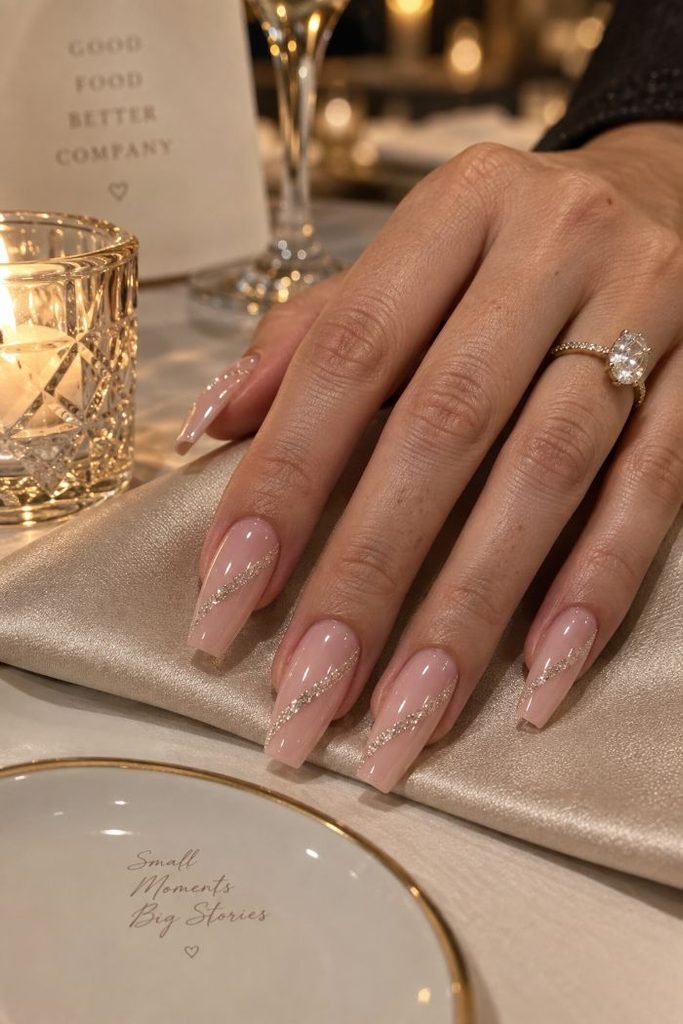
15. Bubble Bath Nails With Glitter Ribbons
One slender champagne-glitter ribbon runs diagonally across each pink nail, bending slightly as it approaches the sidewall. The glitter is fine enough for the line to have a clean edge, with no loose pieces scattered across the base. Medium coffin nails give the diagonal a longer path. Their squared tips add a little structure to the otherwise soft color and flowing detail.
This is a useful halfway point between a plain manicure and a fully sparkling party set. The pink still dominates in daylight, while the ribbon becomes more noticeable under direct light. If you prefer more coverage, these pink glitter nails offer denser finishes to compare. For the narrow version, use a fine glitter polish that a liner brush can pick up evenly; large flakes make it harder to control the border.
How to Apply
- Apply base coat and sheer pale-pink lacquer to medium coffin nails; allow the color to dry.
- Load a liner brush with fine champagne-glitter nail polish.
- Paint a narrow, gently curving diagonal ribbon on each nail, letting the first pass set before filling gaps.
- Cover the dry artwork with a glossy top coat to smooth and protect the glitter.
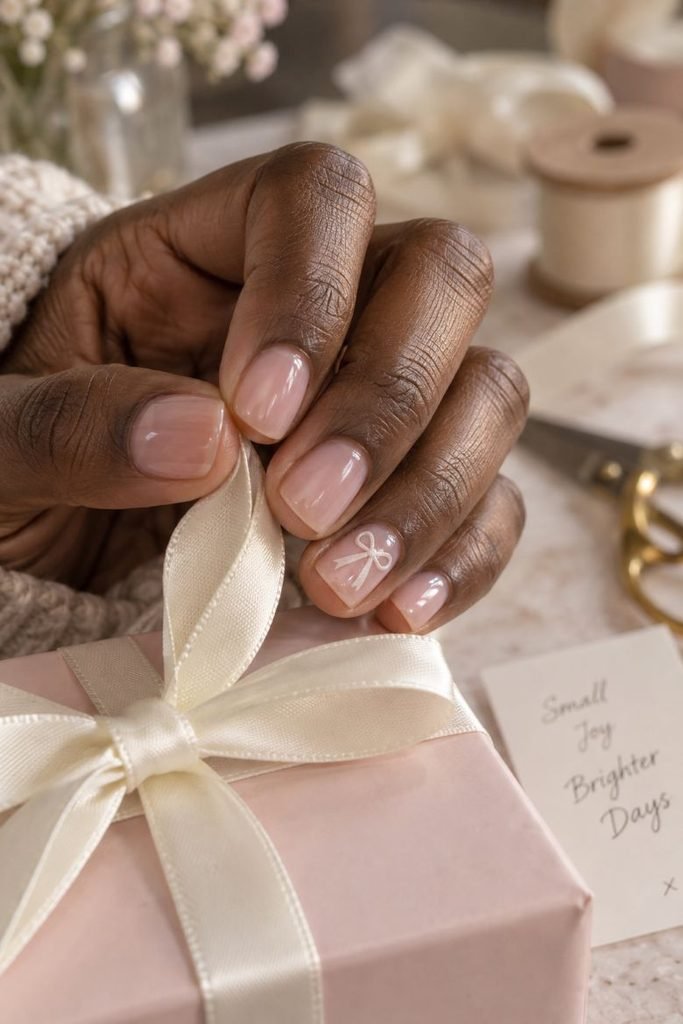
16. Bubble Bath Nails With an Ivory Bow
A tiny ivory bow sits just above the center of one short square nail. Its two loops are open, allowing pink to show inside, and the narrow tails fall at slightly different angles. The other nails remain plain and glossy. The flat painted detail has the lightness of a ribbon drawn in a sketchbook, with enough definition to read clearly in a close-up.
Give the tails some breathing room when choosing the bow’s size. On a short nail, a broad knot and thick loops can leave very little space for the shape to unfold. A small nail decal is convenient for a birthday manicure or an afternoon of painting at home. Check it against the width of your accent nail before applying it, especially if the reference was photographed on a longer set.
How to Apply
- Apply sheer pink lacquer over the base coat on short square nails and let it dry.
- With a fine brush, paint a tiny ivory knot and two open loops on one accent nail.
- Extend two slim ribbon tails from the knot, varying their angles slightly.
- Allow the bow to set and finish all nails with a clear glossy top coat.
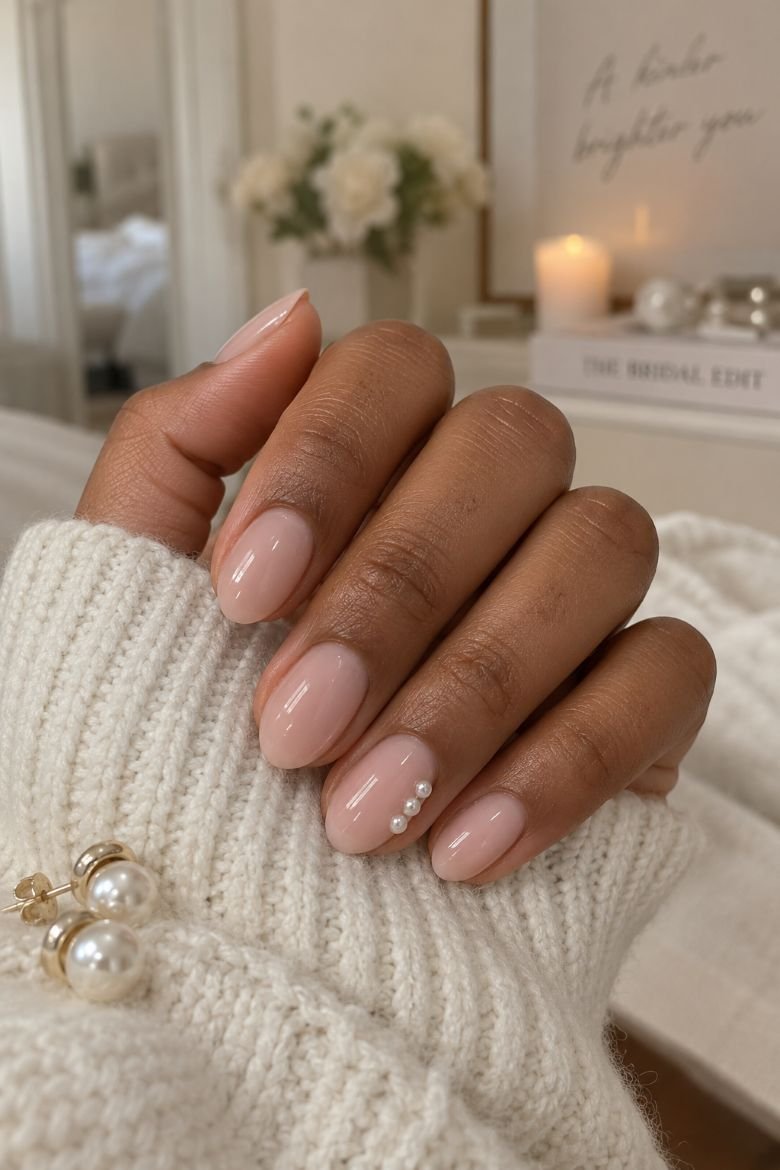
17. Bubble Bath Nails With Pearl Trios
Three tiny ivory pearls form a short crescent beside the outer edge of one almond nail. They sit close together without overlapping, each small enough to leave the pink visible around the cluster. The remaining nails are glossy and undecorated. From above, the pearls look like a curved punctuation mark; from the side, their low profile keeps the accent delicate.
Scale is especially important with pearl embellishments. Choose flat-backed nail pearls that sit comfortably within the nail plate, leaving room between the cluster and the skin. Before fixing them, arrange the trio on a practice tip to see whether the curve fits your nail width. These pearl nail ideas offer larger arrangements if you prefer more ornaments. For this version, the small cluster works well beside pearl earrings or a softly textured sleeve.
How to Apply
- Paint prepared short almond nails with base coat and translucent pale-pink lacquer.
- Apply a glossy top coat and let the manicure dry fully.
- Place a small amount of nail-embellishment adhesive at the chosen sidewall area, following its directions.
- Position three tiny flat-backed pearls in a curve and allow the adhesive to set, leaving their faces uncovered.
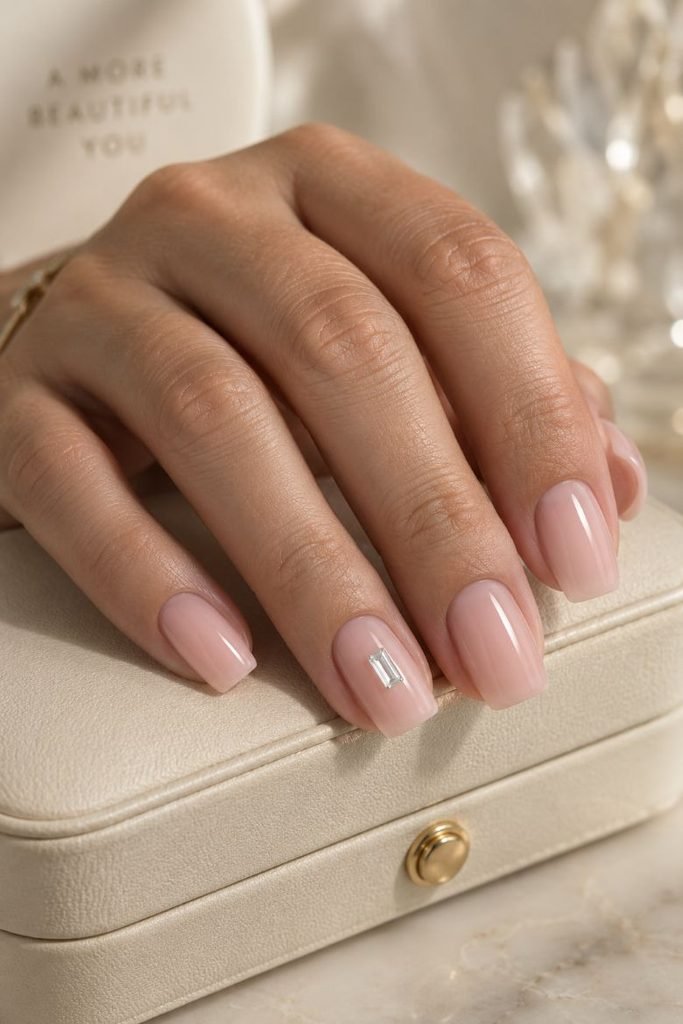
18. Bubble Bath Nails With a Crystal Centerpiece
A single clear baguette crystal sits lengthwise in the middle of the ring fingernail, framed by glossy pale pink. Its straight sides echo the square tip, and the other nails remain completely plain. Choose a low stone with a clean rectangular outline. The small geometric shape gives the manicure a defined focal point without taking up much of the nail.
Bring your rings into the decision. If you already wear a large stone on that finger, moving the nail crystal to the middle finger may give each detail more space. Flat-backed nail crystals also need to fit the curve of the nail so their edges sit neatly. For an event, a decorated press-on lets you judge the placement before wearing it. The clearest reference photograph will show the stone from above and at a slight side angle.
How to Apply
- Apply base coat and sheer pink lacquer to medium square nails.
- Finish with a glossy top coat and allow the polish to dry fully.
- Use a compatible nail-gem adhesive to attach one small flat-backed baguette crystal lengthwise on the accent nail.
- Let the adhesive set as directed and check that the crystal is secure, keeping its faceted face clear.
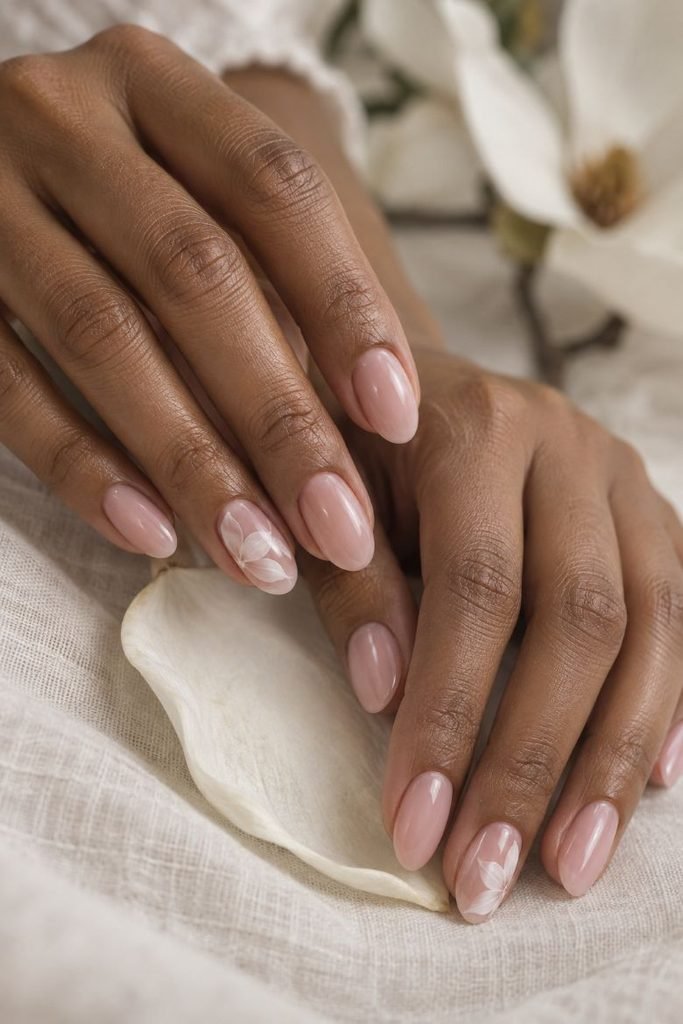
19. Bubble Bath Nails With Translucent Petals
Broad white petals overlap along one side of two oval nails, their edges soft enough for the pink beneath to remain visible. A slightly denser white stroke marks the center of each petal, but there are no stems or dark outlines. The flowers seem to extend beyond the nail’s edge. Clear space across the opposite side keeps the composition airy.
This is a good reference when you like floral nails but prefer the shape of a petal to a detailed botanical drawing. Ask for translucent nail art and show how much base you want visible through the white. Premixed sheer white polish makes the effect easier to control at home. Work with very little product on the brush; a heavy oval of white will cover the pink and change the delicacy of the design.
How to Apply
- Apply base coat and pale-pink lacquer to medium oval nails; let the color dry.
- Use a small rounded brush to press overlapping petals of sheer white nail polish along two sidewalls.
- Add a fine, slightly more opaque white stroke within selected petals and let the artwork set.
- Seal the manicure with a glossy top coat, preserving the open pink areas.
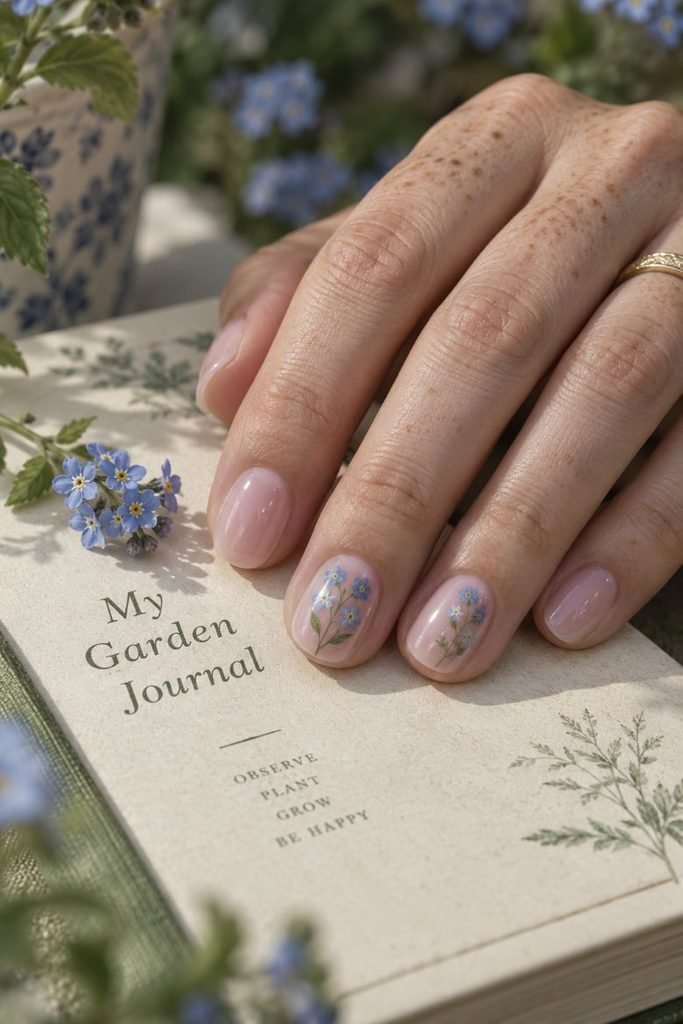
20. Bubble Bath Nails With Blue Flower Sprigs
Tiny blue flowers grow from fine green stems on two short oval nails. Each blossom has small rounded petals and a pale center, while one or two narrow leaves sit lower on the stem. The sprigs lean toward different corners, leaving most of the pink untouched. The remaining nails are plain, allowing the blue to appear as a small, clear touch of color.
The pale base gives a miniature flower enough contrast without needing a white background. For a spring manicure, place the sprigs according to the space on each nail rather than copying their height exactly. A wider thumbnail can hold a branching stem; a narrow accent may only need one blossom. Floral decals are useful here, particularly when the blue petals are too small to paint comfortably with your non-dominant hand.
How to Apply
- Paint short oval nails with base coat and sheer pale-pink lacquer, then allow them to dry.
- Draw fine green stems and one or two narrow leaves on two accent nails.
- Add tiny rounded blue petals around pale flower centers, leaving space between the blossoms.
- Let the details set and finish with a glossy top coat.
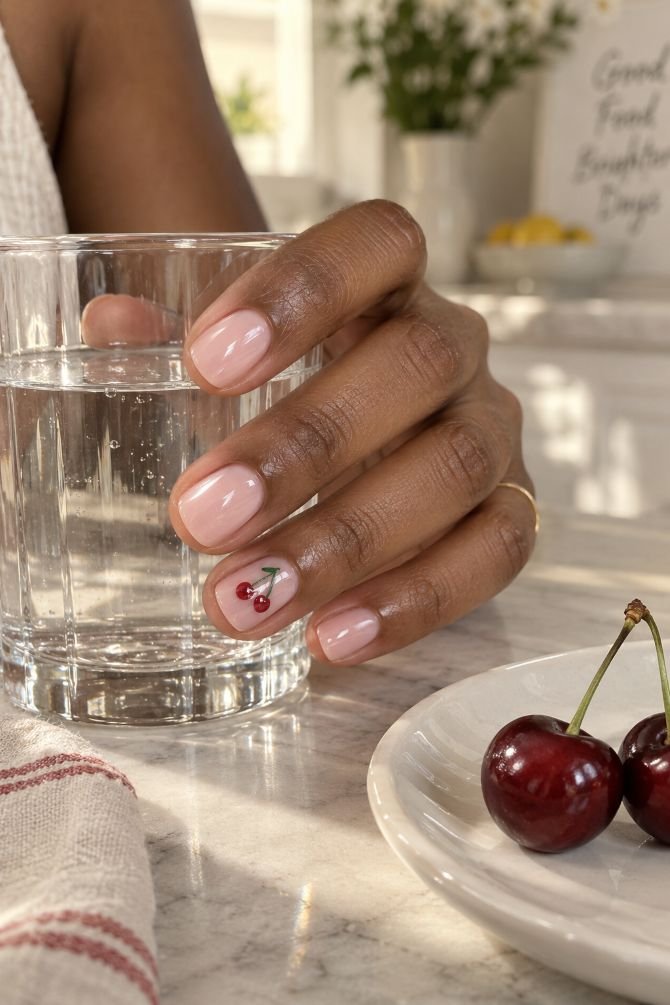
21. Bubble Bath Nails With Tiny Cherries
Two glossy red cherries sit together on a single accent nail, joined by fine curved green stems. One tiny white highlight on each fruit gives the red a rounded appearance. The short square shape keeps the illustration compact, and the surrounding pink remains completely clear. Across the rest of the hand, the manicure returns to a simple translucent wash.
The cherries are small, but the red has enough contrast to be noticed when you reach for a glass or pick up your phone. Keep the stems finer than the fruit so the motif stays legible. For a home manicure, place the two red circles first and let them set before attempting the green connection. You can position the pair toward a lower corner if you want more open space near the tip.
How to Apply
- Apply base coat and a sheer pink lacquer to short square nails; let the pink dry.
- Place two small red circles on one accent nail with a dotting tool.
- Once the red sets, join the fruit with fine green stems and add tiny white highlights.
- Allow the illustration to dry before sealing it with a glossy top coat.
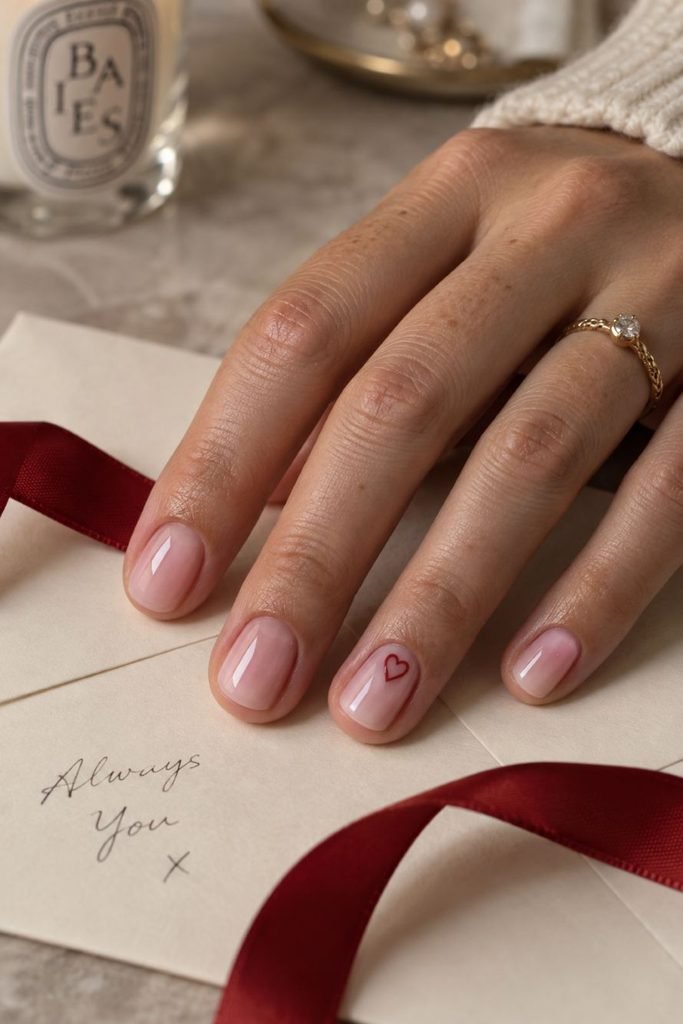
22. Bubble Bath Nails With Heart Outlines
A fine red heart outline sits in the upper half of one short round nail, its center left pale pink. The line stays delicate through both lobes and meets at a neat lower point. All the other nails are plain. With no filled red area, the design has a light, handwritten quality that sits comfortably against the transparent glossy base.
For a romantic dinner or an anniversary manicure, one heart can be enough. Its position can be adjusted around the shape of your nail bed; slightly off-center often leaves a more comfortable amount of space around the edges. For a home version, a tiny outlined-heart decal keeps the center transparent and the line width consistent.
How to Apply
- Apply base coat and sheer pale-pink lacquer to short round nails, then let the color dry.
- Mark the two upper curves and lower point of a small heart on one accent nail.
- Connect the marks with fine red linework, leaving the pink center unpainted.
- Allow the outline to set and finish with a glossy top coat.
23. Bubble Bath Nails With Tortoiseshell Corners
Small tortoiseshell panels fill the outer tip corners of two almond nails. Translucent amber surrounds irregular brown patches, with a few deeper spots giving the pattern depth. Each panel meets the pink along a curved diagonal, and the rest of the manicure stays sheer. The glossy surface brings out the amber while allowing the pale base to remain the larger area of color.
Tortoiseshell adds warmth if a completely pale manicure feels too delicate beside your autumn clothes. The key is to preserve the amber gaps between the brown marks. Once those spaces disappear, the little panel can read as a solid dark tip. Ask your artist to scale the mottling to the corner rather than shrink a full-nail pattern into it. A practice tip helps you find that balance before committing to both accents.
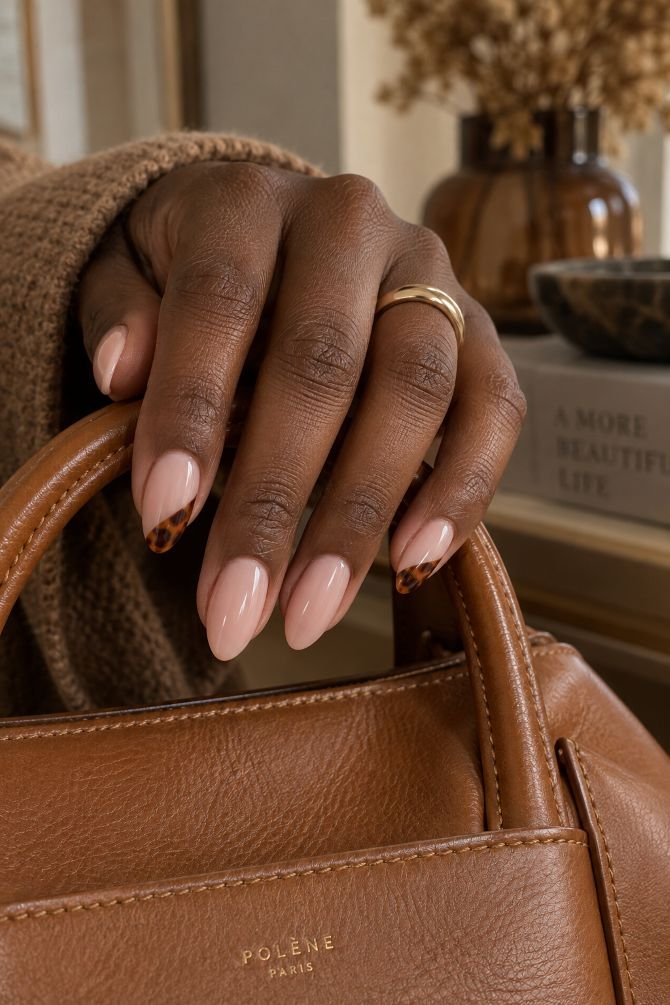
How to Apply
- Apply base coat and sheer pink lacquer to medium almond nails; allow it to dry.
- Paint small curved corner panels in translucent amber on two accent tips.
- Add scattered brown patches, then a few smaller dark-brown marks once the first layer sets.
- Preserve the visible amber spaces and seal the dry artwork with a glossy top coat.
24. Bubble Bath Nails With Taupe Pinstripes
Three fine taupe pinstripes travel vertically along two short square nails. They stop just before the cuticle and free edge, leaving a narrow pink margin at both ends. The spacing is even, and the remaining nails are plain. Against the sheer base, the muted brown-grey lines have enough definition to show their orderly arrangement without looking especially dark.
The stripes give you a small graphic detail that feels at home beside tailoring, especially a cream shirt or soft grey jacket. Their alignment is easier to judge against the straight edge of a square nail, which makes shape part of the design. If your nail plate is narrow, use two lines and give them more space. A fine nail-art pen or a liner brush with very little polish can help keep the stroke controlled.
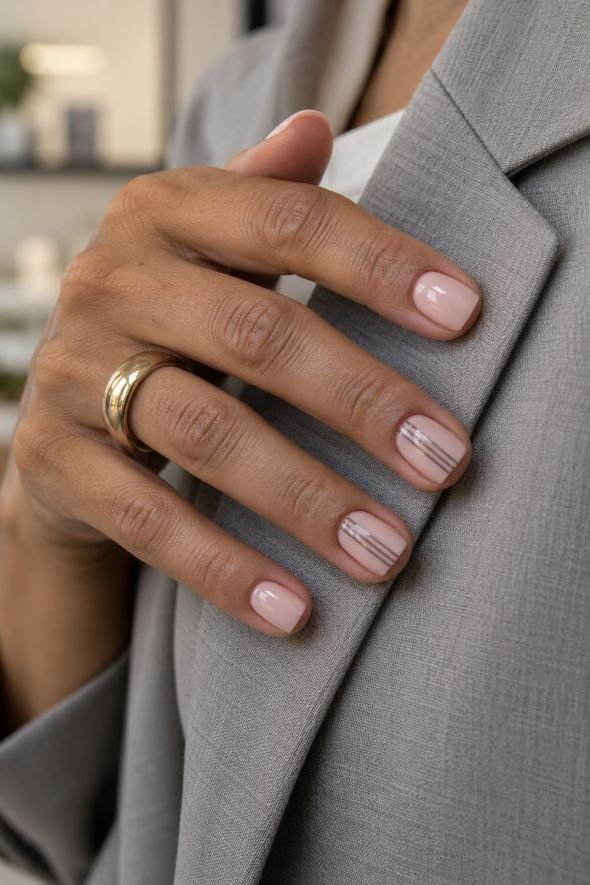
How to Apply
- Paint short square nails with base coat and translucent pale-pink lacquer.
- Once dry, mark the endpoints of three parallel lines on two accent nails.
- Join the marks with fine taupe strokes, maintaining pink margins at the cuticle and tip.
- Let the lines set before applying a glossy top coat.
25. Bubble Bath Nails With a Pink Gingham Accent
One short square nail carries a pink gingham check over a soft ivory wash. Translucent rose stripes cross horizontally and vertically, making the overlapping squares a shade deeper. The pattern stays small and regular, with enough ivory visible to separate the checks. All the surrounding nails wear glossy sheer pink, so the patterned finger becomes the focus of the hand.
Gingham brings a little picnic-table charm to the manicure, but the close pink-and-ivory palette keeps it easy to wear beyond a spring outing. Plan the stripe widths before painting; the gaps should be close to the width of the stripes if you want balanced squares. A ready-made nail wrap can be helpful for a precise home version. Choose its scale by the width of your nail, since a large check may show only one intersection.
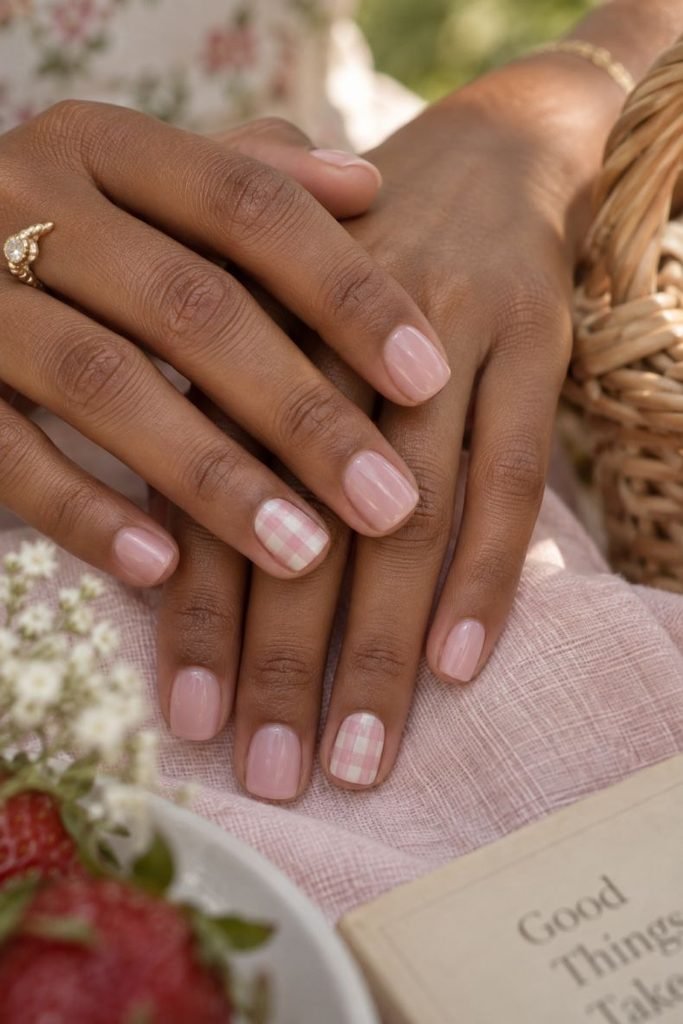
How to Apply
- Apply a base coat, then paint most nails sheer pink and one accent a soft ivory.
- Once dry, brush evenly spaced translucent rose stripes vertically across the ivory nail.
- Let those stripes set, then add matching horizontal stripes to create deeper pink intersections.
- Allow the check to dry and finish the full set with a glossy top coat.
26. Bubble Bath Nails With a Gold Initial
A small gold initial sits below the center of the ring fingernail, surrounded by uninterrupted pale pink. The fine lettering has open spaces inside the character and no border. Short oval nails give the manicure a gentle outline, while the glossy finish catches light around the small metallic detail.
Choose a letter for yourself, a partner or a personal milestone; the manicure can carry a meaning that only you need to recognize. The shape of the lettering matters on such a small surface. A simple initial with clear spacing will usually remain more legible than an elaborate script. Before attaching a decal, look at it with your hand relaxed and your fingers together to check its size and position.
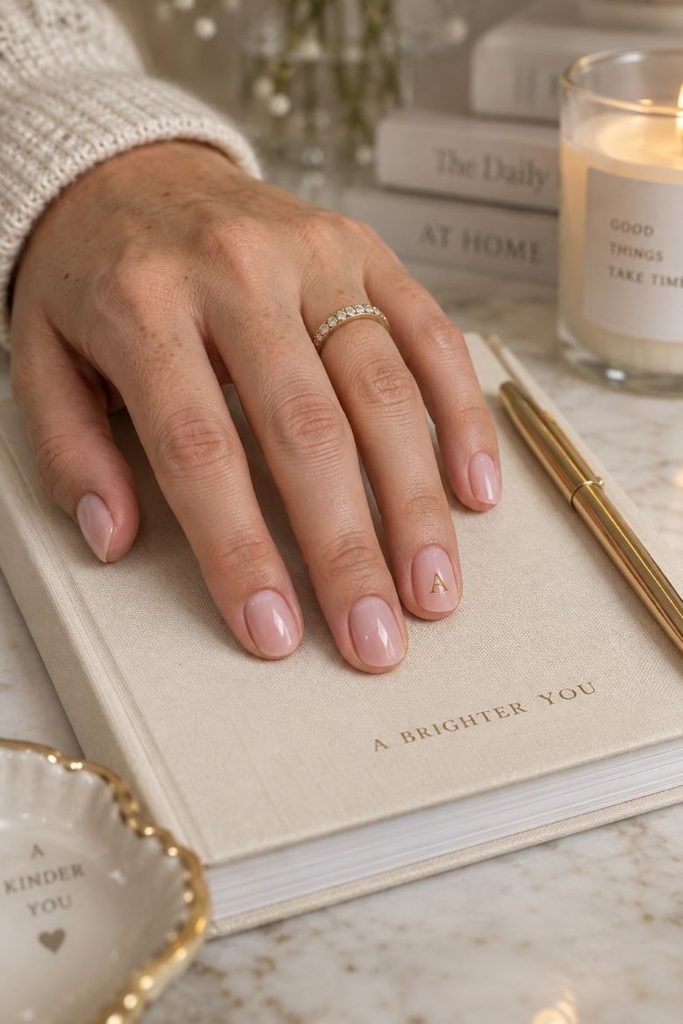
How to Apply
- Apply base coat and sheer pale-pink lacquer to short oval nails, then let the color dry.
- Select a small gold nail decal with a fine, clearly legible initial.
- Position it slightly below the center of the accent nail and smooth it down as directed.
- Seal the decal and the rest of the manicure with a glossy top coat.
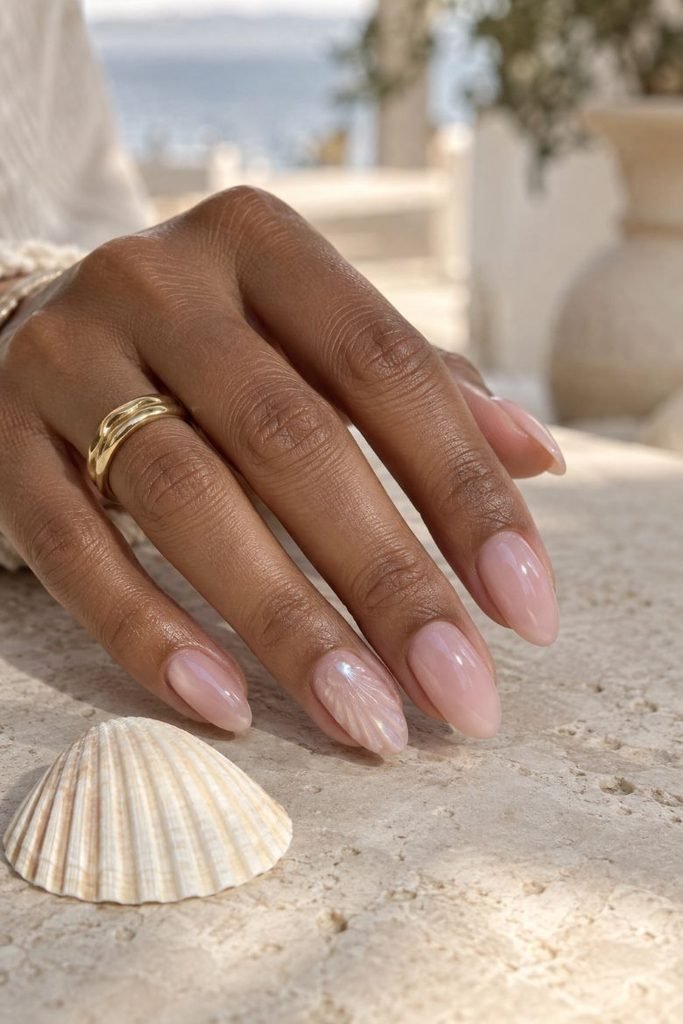
27. Bubble Bath Nails With a Pearly Shell Accent
Fine raised ridges fan outward from the lower part of one almond nail, creating the shallow relief of a seashell. A sheer pearl glaze catches along the ridges while pink remains visible between them. The other nails are smooth and glossy. Medium length gives the shell room to open toward the tip without needing a large charm attached to the surface.
This is the most sculptural option in the collection, so bring your artist a side view as well as a photograph from above. The grooves should remain visible beneath the final finish, and the ridges should have a low, comfortable profile. A professionally decorated press-on is another way to wear the detail for a coastal wedding or holiday. If you prefer a completely flat surface, ask for fine pearly fan lines to suggest the same shape.
How to Apply
- For a salon version, apply a compatible gel base and pale-pink color to medium almond nails, curing as directed.
- Use a gel intended for sculpted nail art to form low fan-shaped ridges on one accent, curing according to that product’s instructions.
- Apply a sheer compatible pearl gel glaze to the accent and cure, keeping the grooves distinct.
- Finish with a thin compatible glossy top coat and complete its required cure.
Bubble Bath vs. Funny Bunny and Bubble Bunny
The names sound related because they are, but they describe different shades. Bubble Bath is OPI’s pale pink. Funny Bunny is a soft, sheer white that can be worn alone or layered. OPI’m a Bubble Bunny is a separate milky light-pink sheer inspired by the combination of Funny Bunny over Bubble Bath. Knowing which one appears in a reference helps you ask for the color more accurately.
Layering also gives you another variable to discuss. A thin white coat over pink can look different from a heavier white layer, and changing the order can alter which tone is most visible. If a photograph credits a combination, save the formula and coat order with the image. At the salon, compare a swatch of the original pink with the proposed layered version before choosing. For an online photograph without product details, describe the visible coverage and color rather than assuming the bottle used.
Choosing a Bubble Bath Manicure for Your Nail Shape
Start with the free edge you already have. Nails that finish close to the fingertip can carry dots, a small initial, a glossy wash or a narrow cuticle arc without needing extra length. With short square nails, a micro-French line can follow the existing edge, while a gingham accent has a relatively broad surface for its checks. Softening the corners keeps that outline comfortable and visually gentle.
Oval and almond shapes give gradients, petal borders and curved linework a longer path. An almond taper needs enough free edge to form its point; if yours are very short, a rounded version can preserve the same color and motif. Medium coffin nails provide more space for a diagonal glitter ribbon, but the proportions should suit how you use your hands. Ask your artist to scale the artwork to the available nail rather than copying the reference’s measurements.
How Bubble Bath Looks on Different Skin Tones
The same pale pink can look like a shadow on one hand and stand out more clearly on another. Your skin tone, the natural color of your nail and how coverage the polish gives all affect how you see it. When looking at bubble bath nails on skin pay close attention to transparency. Within the same pale pink range a sheer glossy finish and a thicker milky layer can create very different looks.
Use daylight to test a swatch on your nail. Compare it with any rings you wear often. You might like the warmth of the pink, the cooler feel of a white layer or the shimmer, from a pearl glaze. Pick the style that matches the contrast you enjoy and how much of your nail you want to show. If you can save photos that match your skin tone. Also keep in mind the lighting. Warm indoor lights and edited photos can change how the color appears.
How to Apply Bubble Bath Without Streaks
Check the formula before following a tutorial. Nail Lacquer and Infinite Shine are air-drying systems; GelColor uses its designated gel process. OPI’s Bubble Bath overview distinguishes those options, and its GelColor instructions identify the salon system. A gel curing time should never be transferred to a bottle of ordinary polish.
For the original lacquer, OPI’s application directions call for mixing the pigment and applying two thin color coats over a base. Work with a controlled amount on the brush and leave a neat margin around the skin. Allow the stated interval between coats, then assess the overall coverage before attempting to correct individual areas. If you keep returning to a patch as it begins to dry, you can disturb the layer underneath. Finish with a compatible top coat and allow the complete manicure its required drying time before adding decals or guides.
Final Thoughts
Start with the pink you actually want to see on your hands. A translucent wash leaves the natural nail more visible; a white layer changes the milkiness; pearl chrome adds a reflection that can soften or brighten the color. Once that choice is settled, it becomes much easier to decide whether the manicure needs a fine tip, a small motif or an embellished accent.
If several of these bubble bath nail ideas appeal to you, save one photograph for the base and another for the detail. Tell your artist exactly what you like in each, including how sheer the pink looks and how much space surrounds the artwork. A short glossy set can feel complete on its own, while a single shell, pearl trio or gold initial gives you something more personal. Choose the version you will enjoy seeing through an ordinary day as well as in a close-up.