Nail Designs · The nail edit
23 Stiletto Nail Ideas That Make a Statement
The point makes all the difference. The French tip is sharper, the red manicure gets an elegant shape, and even a thin art line can...
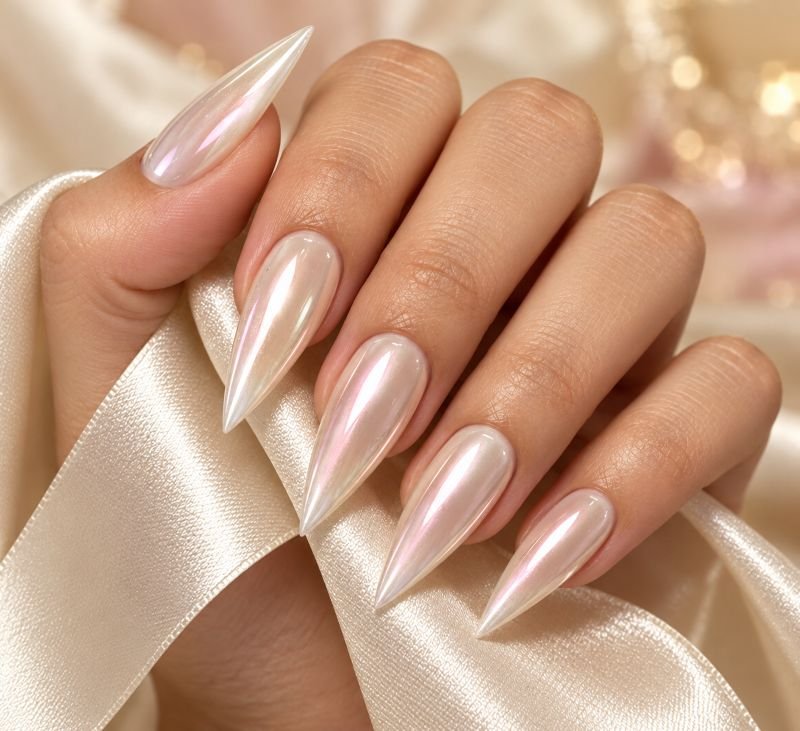
The point makes all the difference. The French tip is sharper, the red manicure gets an elegant shape, and even a thin art line can go all the way to the end of the nail. Stiletto nails look their best if the design accentuates the point rather than obscures it under too many elements.
This collection starts with glossy colors and subdued nude accents, but then moves on to magnetic hues, sculpted surfaces, and occasions-appropriate decorations. There are mid-length variations, long salon manicures, and even a miniature press-on set for anyone who wants to try this shape. The notes below each design will help you understand the positioning and technique of the manicure; they will be handy if you want to show the nail artist your favorite design or choose a realistic one to recreate at home.
1. Cherry Red Stilettos with a High-Gloss Finish
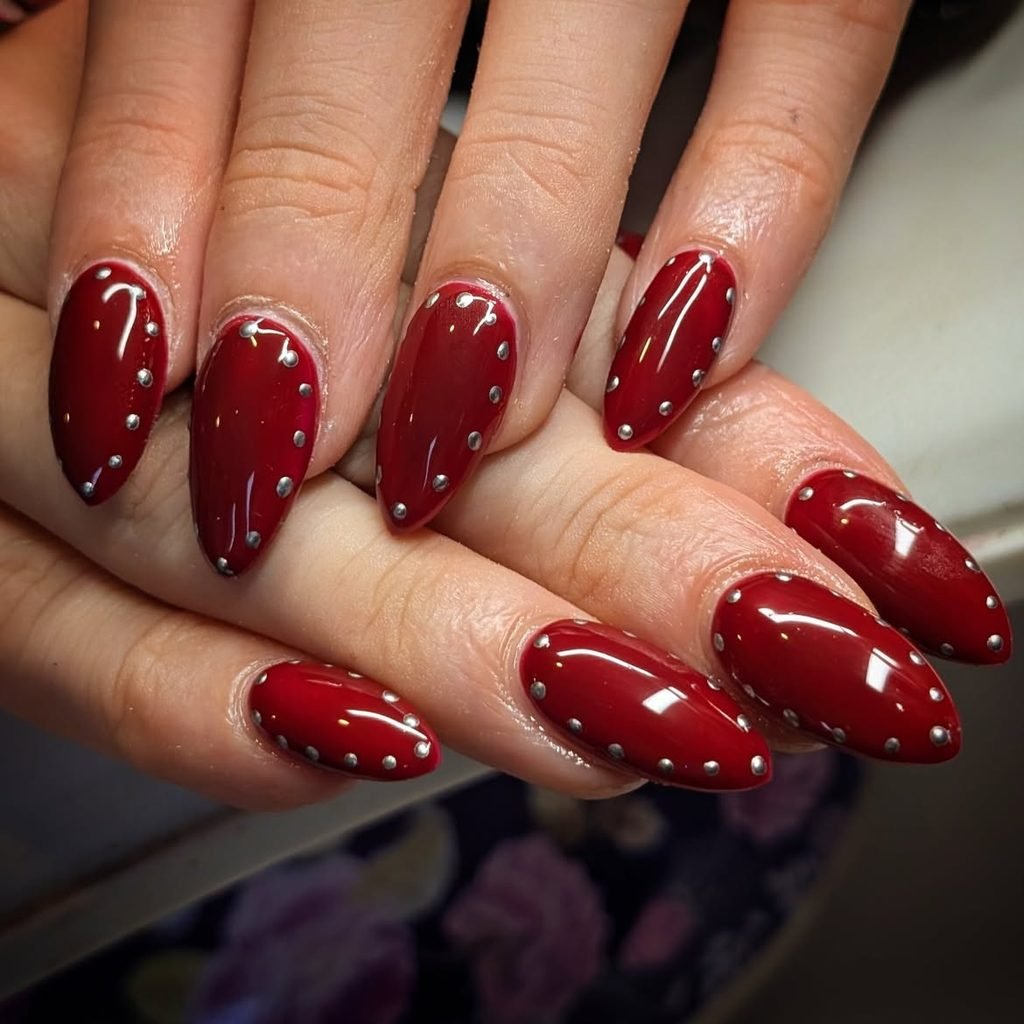
A solid cherry-red color puts the tapered stiletto outline in focus without an added motif. Keep the points centered and the sidewalls symmetrical, then choose a glossy finish if you want a clear surface reflection. Compare red swatches on your hand; depth and undertone change the appearance, but a deeper red does not automatically make the shape look flat.
For a plain-color set, compare a cooler blue-leaning cherry red with a warmer tomato red before choosing. The stiletto outline can be made with professionally shaped extensions or correctly sized, pre-shaped press-ons. Check the points from several angles so their lengths and center lines look consistent.
How to Apply
- Fit balanced medium stiletto extensions or pre-shaped press-ons, checking that all five points align.
- Apply the compatible base for your chosen nail system.
- Paint two thin, even coats of cherry red, allowing each to dry or cure as directed.
- Seal the side edges and points with a high-shine top coat.
2. Sheer Nude Stilettos with a Fine Gold Outline
The use of a translucent beige-pink base coat makes the stiletto nails seem practically naked until there is a thin line of gold that runs along the edge. The metallic line runs along both tapered sides and ends precisely at the tip of each nail without covering the tip as in a French manicure. The natural nail should remain visible under the nude nail and the entire design should be completed with a clear topcoat. The line is used as a frame for a bold shape.
Gold polish is much easier to handle than metallic tape around a sharp corner of the nail. The line should be drawn slightly inside the edge so that it remains on the nail instead of the sidewall. In case the nude color is close to the color of the nail bed, the metallic line will be more prominent without having to make it wider.

How to Apply
- Prepare long pointed extensions and cover them with one or two thin coats of sheer beige-pink.
- With a fine liner brush, trace a slim gold line just inside each side edge.
- Join the lines at each centered tip and correct any uneven joins.
- Let the liner set, then seal the outlines with a clear glossy top coat.
3. Milky White Stilettos with Pearl Chrome
The nails have soft milky white as a base, with an overlay of fine pearl chrome, which transitions from ivory to pale pink as the hand moves. The pointed nails are fully painted, but the base nails are still light, and not stark and chalky. Each of the five nails has the same pearly effect on a smooth nail surface. Since the powder goes on top of the white polish, the nails are glazed and not white polish with glitter visible.
Be sure to check the chrome over the white base you select before applying; some pearl powders will give a blue effect on a cool white. A thin milky base will keep the look soft enough for bridal or formal use, while the sharp nails give the contrast. Chrome requires the right surface to be applied and sealed, so a technician or press-on nails would be better choices. For a different pale base, compare our Bubble Bath nail ideas.
How to Apply
- Shape medium-long stiletto extensions and apply a compatible milky-white gel base.
- Cure the color and prepare the chrome-ready surface according to the product system.
- Rub a fine pearl chrome pigment evenly over each nail, then remove loose powder.
- Seal the side edges and points with the system’s glossy top coat and cure as directed.
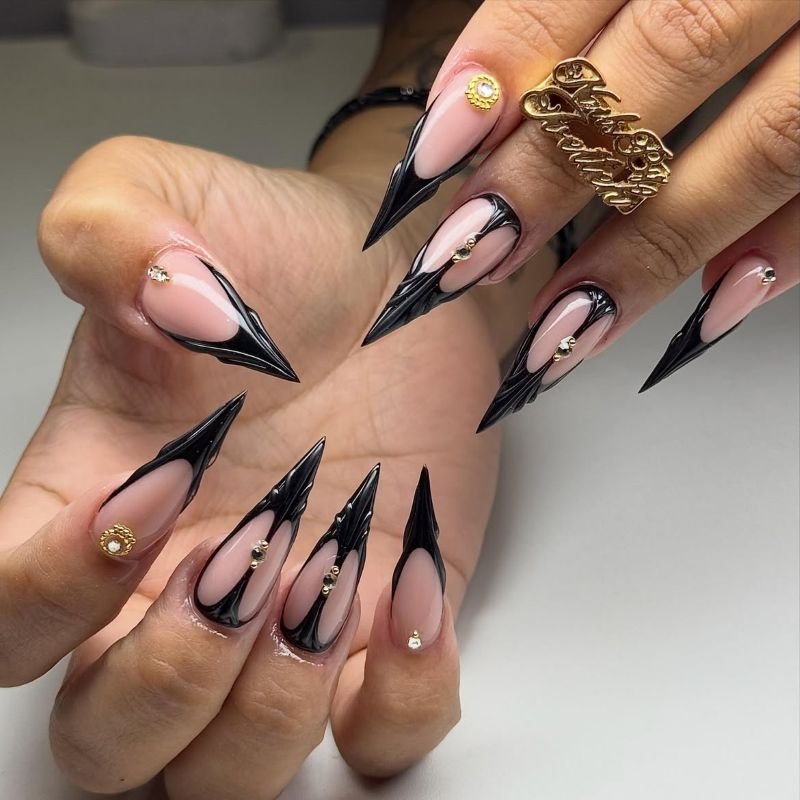
4. Black V-French Tips on Blush Stilettos
The blush is translucent for medium-length stiletto nails, while the opaque black creates a V point on each nail. There are two diagonal sides that start from the outer third of the nail plate and end right at the tip, resembling the shape rather than creating a rounded French manicure. The glossy top coat makes it look uniform with black dots and a soft pink background.
You should map one nail first and then see the height of the V point on it compared to the other nails and fill the dots after that. You will be able to achieve a straight line with the use of a fine brush rather than a bottle brush. It is a good salon-style nail art if you are interested in symmetry. For other tip placements that change the feel of a manicure, browse our French tip nail designs.
How to Apply
- Coat balanced medium-long stiletto nails with a sheer blush base.
- Mark equal starting points on both sides of each nail’s outer third.
- Draw two black diagonals to meet at the sharp tip, then fill the V neatly.
- Let the black set and cover the full nail with a clear glossy top coat.
5. Dusty Rose Mini Stiletto Press-Ons with a Slim Side Line
A mini stiletto press-on provides the visual effect of a pointed nail without the length of an extension. In this case, five short tips have a dusty rose cream polish, with a burgundy line running along the left side of the ring and middle nails. The line ends before the tip, forming a rose-colored border for it. The gloss makes the design look sleek, while the dark line draws attention to the taper of the nail.
Determine the size of the press-on according to its width and curvature, not according to how well you can fit a pointed tip into the sidewalls. Place the whole set on your hands before decorating to ensure that the tip will be centered on each nail. These mini tips may be more akin to a sharp almond than a very long stiletto – that is the price you pay for the shortness. Paint the two lines while the tips are on a stand if doing the manicure at home.

How to Apply
- Select five mini pointed press-ons that fit each nail’s width and curve.
- Paint the tips dusty rose and allow the coating to dry or cure as required.
- Draw one narrow burgundy line down the left side of the middle and ring tips, then gloss the set.
- Attach the finished nails using the press-on system’s instructions.
6. Burgundy Matte Stilettos with Glossy Wine Tips
Deep burgundy polish coats long stiletto nails with a matte finish, while a little bit of wine-colored gloss forms a narrow triangle at each tip. The effect is created through light – the main nail reflects less light, and the last one more. All five tips start from the same level; however, the glossy triangle is tapered to the tip and does not have a flat edge. No additional rhinestones are needed to form the effect of contrast.
Work with two finishes instead of using two bright reds for this manicure. In case the glossy tip turns dark black, the contrast of color will overshadow the change in finishes. Coat the entire surface of the burgundy base with a matte top coat and then paint the pointed triangle with a thin brush and cover only this part with gloss polish. This manicure is perfect for the evening look, but the pattern does not stick out from the nail.

How to Apply
- Coat balanced long stiletto nails in deep burgundy and finish the full set matte.
- Outline a shallow triangular tip area on each nail with darker wine polish.
- Fill the triangles without covering the matte bases.
- Apply glossy top coat only to the wine tips, using the product’s drying or curing directions.
7. Smoky Gray Jelly Stilettos with Clear Half-Moons
Translucent charcoal gray jelly spreads over medium-sized stiletto nails, leaving one small crescent uncoated on each finger. The crescents are covered with a clear base coat and top coat, thus forming a window instead of an unfinished edge. Since the gray jelly is translucent, one can also see a piece of natural nail through the colored layer. Shiny pointed tips make the smoky look seem liquid, not chalky.
This is an option for those who find a solid black too dark for their pointed nails. Make sure that the half-moons have the same depth on all five nails, although you should allow for some difference in the curvature to match the natural shape of each cuticle. One thin layer of jelly can be sufficient, add the second if you wish to deepen the gray shade.

How to Apply
- Apply a clear base to medium stiletto nails and let it settle.
- Place curved guides near the cuticles to protect small half-moon windows.
- Brush on one thin coat of smoky-gray jelly, adding a second if desired; remove the guides carefully.
- Refine the crescents and cover every nail with a clear high-gloss top coat.
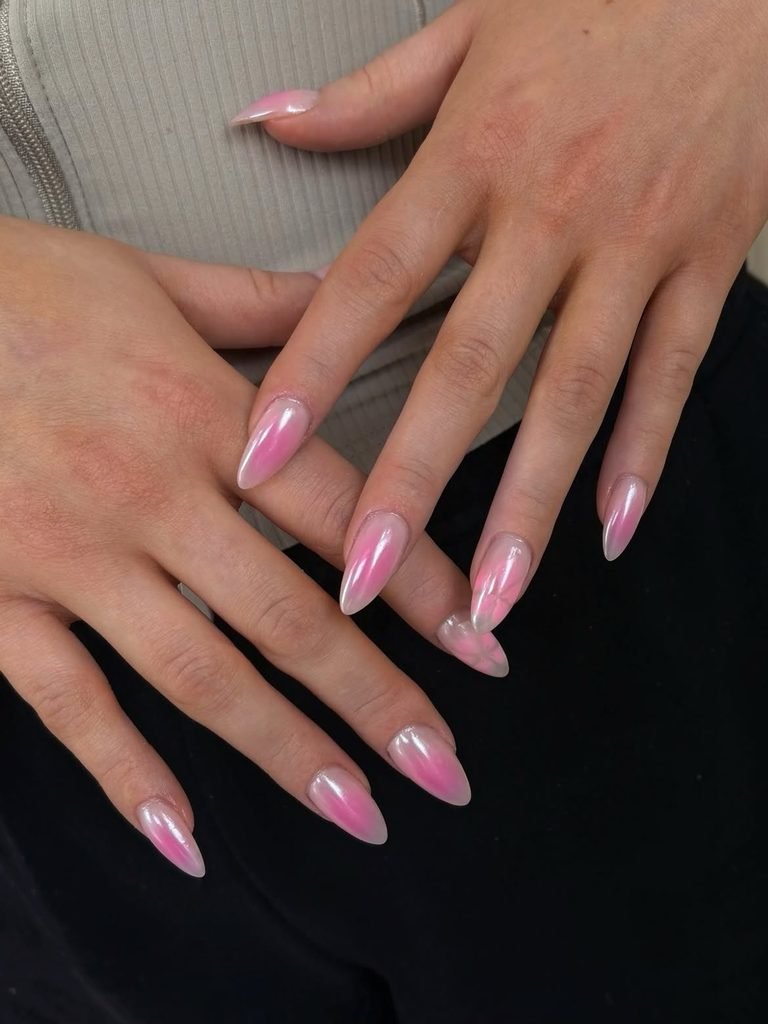
8. Pink Aura Stilettos with Raspberry Centers
Pale pink paint is applied to medium-length stiletto nails, with a diffused oval of raspberry located close to the middle of each nail. The pigment does not touch the sidewalls and the tips of the nails, leaving a ring of pale pink visible on the edge of each aura. The raspberry is brighter at the middle but not dense enough to become a dot. The top coat helps to deepen the blurred pigment and sharpen the tip of the nail.
The long and narrow form of the nail requires more careful painting, as the glow should be centered, rather than painted to the end of the nail. It is possible to use a slightly loaded sponge for diffusing the regular nail polish, or an airbrush in a salon. The raspberry should be tested on one nail first, because it might become a dot due to a large amount of pigment. If you want other color transitions, see our ombré nail ideas.
How to Apply
- Apply pale pink polish to prepared medium-long stiletto nails and let the base settle.
- Tap a small raspberry oval into the center of each nail with a barely loaded sponge.
- Feather the perimeter, leaving pink visible at the edges and sharp tips.
- Let the auras set, then finish with a clear glossy top coat.
9. Midnight Blue Stilettos with Silver Cat-Eye Beams
The midnight blue provides a dark background for the thin metallic line along long nails. Position the line from the bottom left corner towards the upper right of each nail so that the reflection will look like traveling along the line of the nail while the blue would still be seen on both sides. This design is achieved by moving magnetic powder in gel polish, not by applying the silver stripe on top of it. Gloss will give additional dimension without adding glitter.
Establish the position of magnets before curing. The vertical beam will narrow the nail visually; this slanting beam will make the highlight travel along the nail. Do nails one after another so that the powder would not relax before curing. For those who like the effect but need another nail background, you may check our cat-eye nails designs and see how changing the magnet direction affects the nail appearance.

How to Apply
- Prepare balanced long stiletto extensions and cure a deep midnight-blue gel base.
- Apply silver-blue magnetic gel to one nail, keeping the dark side edges visible.
- Hold a suitable magnet diagonally until a narrow beam forms, then cure as the system directs; repeat on the other nails.
- Seal the finished magnetic surfaces and points with compatible glossy top coat.
10. Emerald Stilettos with Broken Gold Foil
The nails are saturated with the emerald green color; however, the index and ring nails have the small parts of thin gold foils gathered on the lower right of each. They get smaller as they approach the point, leaving the long strip of the shining nail polish not to be broken by other decorations. As for the others, they remain plain, covered only with emerald polish. The gold foil looks like brief sparkling parts without fully covering the nails.
One should use flat foil flakes and press their edges so as not to create a ridge, but simply apply top coat over them. It is better to try to lay the accents on nails before fixing them: one large flake and several smaller ones near it will work better than a random scattering of confetti. An emerald-green with the slight shade of blue will look much crisper in combination with the gold. If to talk about the warmer bottle, then the result will remind of jewelry tone.

How to Apply
- Paint all five medium-long stiletto nails in opaque emerald green and let the color set.
- Dab a small amount of compatible clear product near the lower right of the index and ring nails.
- Lay thin irregular gold-foil pieces flat, reducing their size toward each tip.
- Seal every foil edge and coat the full set in smooth clear gloss.
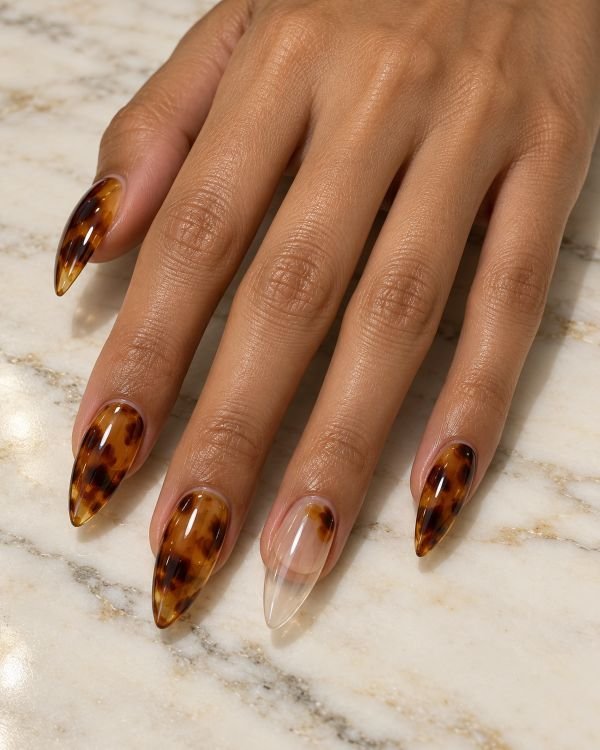
11. Tortoiseshell Stilettos with a Clear Accent Nail
Four medium-long stilettos carry layered amber, honey, and softened espresso patches that resemble tortoiseshell, each with different markings. The ring nail is clear from cuticle to pointed tip, interrupted only by one small amber patch near its base. This transparent pause prevents the rich pattern from covering the whole hand. A glassy finish gives the colored nails depth and keeps the clear accent just as polished as its neighbors.
Build the tortoise in translucent layers so the darker spots appear suspended rather than drawn as flat brown dots. Let regular lacquer dry between layers, or ask a technician to use a compatible gel system for more control. The clear accent requires a clean, properly shaped tip; visible bubbles would distract from its simplicity. If you want to test the pattern without committing to four decorated nails, reverse the balance on press-ons and use tortoise only on the ring finger.
How to Apply
- Fit medium-long stiletto tips, including a clear ring-finger tip, and prepare the surface.
- Layer translucent amber on the other four nails with irregular honey and espresso patches, allowing each layer to set.
- Add one small sheer amber patch near the base of the clear ring nail.
- Encapsulate or seal as required for the chosen system, then finish all five nails glossy.
12. Chocolate Brown Stilettos with a Cream Side French
Rich chocolate covers medium stiletto nails, and a soft cream sweep runs along the right side of each pointed tip. The cream begins halfway up that side, narrows as it curves toward the point, and leaves most of the brown surface exposed. Unlike a conventional French, the pale color does not cross the full width of the free edge. A glossy top coat sharpens the contrast between the warm brown and milky cream.
Hold your hand upright when checking the first nail: if the side sweep is too wide, it can make the tip appear bent rather than centered. Paint the cream just inside the outer edge, leaving a fine brown boundary on the opposite side. This asymmetric placement has movement without an accent nail. If your chocolate polish is dark, choose a warm ivory instead of stark white so the contrast stays softer and more wearable.

How to Apply
- Coat five balanced medium stiletto nails in glossy chocolate brown.
- With a fine liner, sketch a curved cream boundary from the mid-right side to each point.
- Fill the narrow side-tip area in cream, preserving brown across most of every nail.
- Clean the tips and seal both colors with a clear glossy top coat.
13. Coral Stilettos with Curved Negative-Space Cutouts
Coral is painted on the stiletto nails but one long clear line is left on the outer sidewall of the index, middle, and ring fingers. The cutouts start from the cuticle and stop before reaching the tip, revealing the natural nail underneath. The thumb and pinky nails are entirely painted in coral. A glossy top coat smooths out the painted and clear areas, making the design visible through the color application alone.
For creating a clean negative space, it is recommended to apply the paint on a cured or dry clear base, using a guide only where the curve is simple enough to trace. A salon liner brush might be more convenient for the three asymmetrical windows. Make sure to keep all clear openings within the boundaries of the nails, as running it through a sidewall will make the nail appear slimmer on one side. Coral is a bright color, so it is better not to add another design element to it.

How to Apply
- Prep long stiletto nails with a nude and clear base coat and let it set.
- Outline one narrow curved window near the outer side of the index, middle, and ring nails.
- Paint coral around those clear areas and coat the thumb and pinky completely.
- Refine the arcs, then seal the full set with a clear high-gloss top coat.
14. Clear Stilettos with Encapsulated Dried Flowers
Transparent long stiletto extensions hold tiny pressed flowers inside the clear structure: a lavender sprig on the index, one cream blossom on the middle, and two small pale-pink petals on the ring. Thumb and pinky remain completely clear. The botanicals sit nearer the nail beds, leaving the pointed ends open and glass-like. No flowers project from the surface; the finished set is smooth and glossy despite its layered appearance.
This is a salon construction, because the flowers must be thin, fully dried, and properly enclosed without bubbles or uneven bulk. Ask the technician to place the pieces while planning the extension’s structure, then cap and refine the nail as the system requires. Colorful flowers can darken inside clear products, so choose pale pieces with clean outlines. If you want a simpler home version, use pre-made clear botanical press-ons rather than attempting to embed loose flowers in ordinary top coats.

How to Apply
- Have a technician construct or fit clear long stiletto extensions with centered points.
- Place fully dried, flat lavender, cream, and pale-pink flowers on the index, middle, and ring nails as mapped.
- Enclose the pieces with a compatible clear enhancement product, leaving thumb, pinky, and all five points visibly clear.
- Cure or set, refine the surfaces, and finish with a clear glossy top coat according to the system.
15. Black Stilettos with a Glossy Crocodile Pattern
black paint covers long stiletto nails, whereas glossy black scale designs appear on the middle and ring fingers along the nail bed’s center line. The design tapers from large and irregular blocks at the base to smaller blocks closer to the tip. The thumb, index, and pinky nails remain plain matte. The design almost fades away in flat lighting but stands out in side lighting as a difference in reflection rather than color.
The glossy designs should be painted flat using a liner or a stamping plate. Raised bumps will snag on clothing and ruin the illusion of a sharp line, so the texture should be optical only for a professional who is making a low relief design. The design should appear on two nails since it will reduce contrast when done on all five. For more dark manicure directions, our gothic nail ideas explore other ways to use a pointed shape.

How to Apply
- Paint long stiletto nails black and complete the full set with a top coat.
- On the middle and ring nails, mark irregular scale outlines in glossy black from base toward point.
- Fill the scales with a thin glossy product, making the cells smaller near the tips.
- Dry or cure the accents as directed without applying gloss over the plain matte nails.
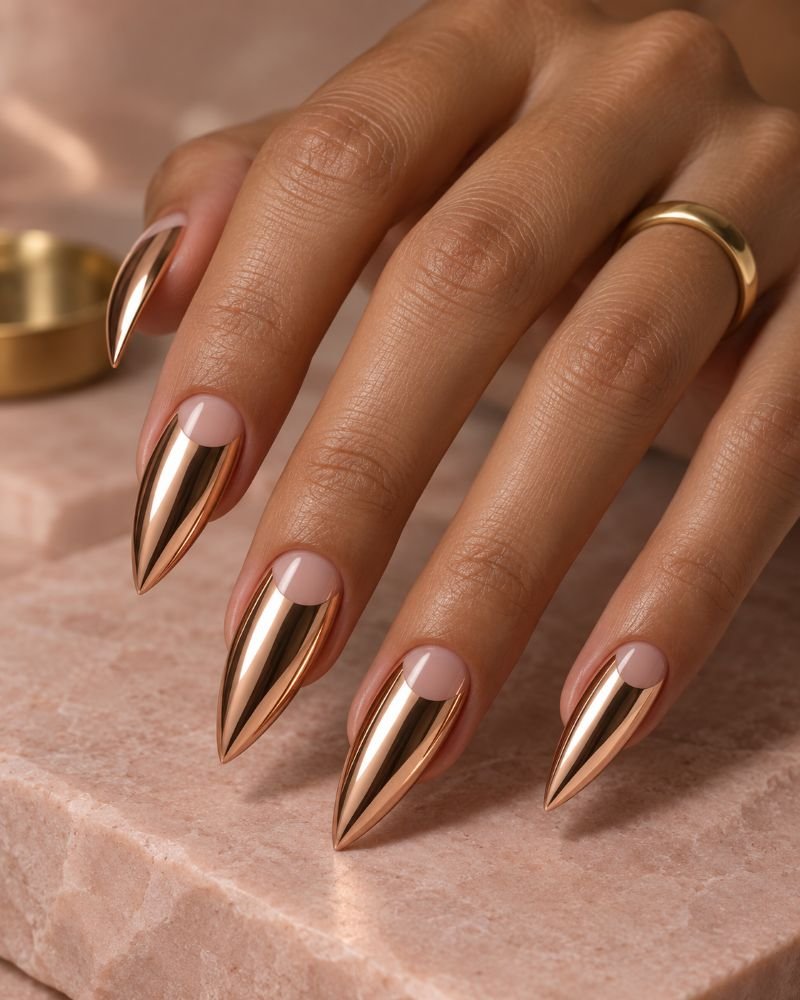
16. Rose Gold Chrome Stilettos with Nude Half-Moon Bases
Mirrorlike rose gold covers medium-long stiletto nails from just above the cuticle to each pointed end. Small sheer-nude half-moons remain at the base of all five fingers, following the natural curve rather than forming a straight gap. The rosy metal reflects light sharply, while the half-moons let the manicure breathe near the skin. A clean dividing line matters here because chrome powder will highlight every wobbly edge.
This look calls for a technician familiar with isolated chrome or a prefinished press-on set. Map and cure the sheer-nude half-moons first, then apply the rose gold powder only over a compatible prepared area; remove stray pigment before sealing. Chrome is not the same as metallic polish, though a rose gold lacquer can be an easier visual substitute. Keep the final surface smooth and the points properly capped so the mirrored finish does not look chipped at the very ends.
How to Apply
- Prepare medium-long stiletto extensions and map a small sheer-nude crescent at every cuticle.
- Apply rose gold base color outside the crescents and prepare a compatible chrome surface.
- Rub rose gold chrome pigment onto the intended area, keeping the nude half-moons clean.
- Remove loose powder and seal all chrome boundaries and pointed edges as the gel system directs.
17. Black and Ivory Checkerboard Stiletto Accents
Glossy black covers the thumb, index, and pinky of a medium-long stiletto set. The middle and ring fingers switch to warm ivory, with a small black checkerboard panel across the widest central third of each nail. The squares stop before the sides begin their steep taper, leaving an uninterrupted ivory path to the point. This keeps the pattern readable instead of squeezing tiny distorted checks onto the narrow ends.
Plan the grid on a practice tip before painting both accents. Start with a few larger squares rather than many miniature ones, and use straight, thin lines so the black and ivory stay distinct. A stamping plate can make the central panel faster, provided the print is trimmed to the same size on both nails. The solid black neighbors give the two patterned fingers a clear frame; extra gems or chrome would compete with the geometric contrast.

How to Apply
- Paint the thumb, index, and pinky of medium-long stiletto nails glossy black; paint middle and ring warm ivory.
- Mark a compact rectangular grid across the wider central third of the ivory nails.
- Fill alternating squares black, leaving ivory side margins and pointed ends clear of pattern.
- Let the grid set and seal the entire set with a smooth clear top coat.
18. Lavender Stilettos with Tiny Hand-Painted Stars
Medium stiletto nails wear a clean pastel lavender cream, with tiny midnight-blue stars scattered along the left side of each nail. Three stars sit on the thumbnail, two on the index and middle, one on the ring and pinky; each group grows sparser toward the point. The right halves stay lavender and open. A clear glossy finish lets the small dark shapes remain crisp without turning the entire set into a night-sky mural.
Use a fine liner to draw short intersecting strokes, then taper the ends of each star. A dotting tool can place a few points, but dots alone will not create the elongated shapes shown here. The limited placement suits the narrow stiletto canvas: stars spread over the entire width would lose definition at the tip. If you want a more playful look, carry the same map onto custom press-ons but keep the star count unchanged.
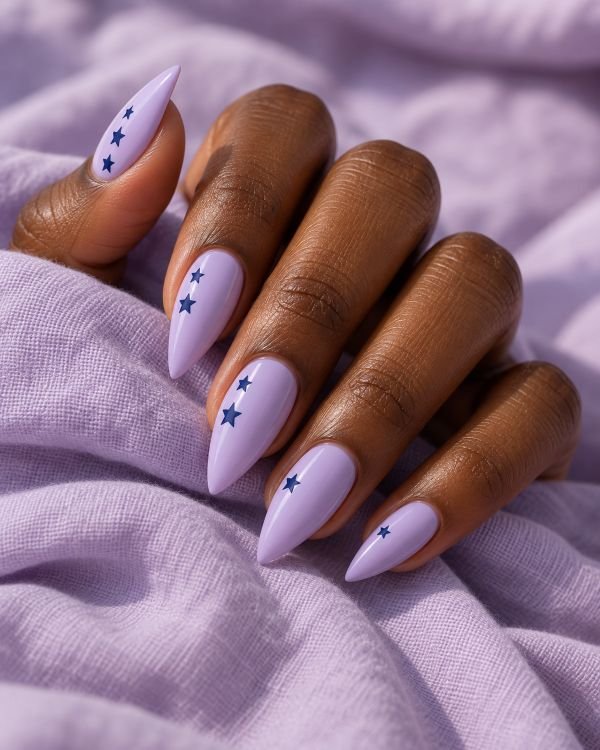
How to Apply
- Apply two thin pastel-lavender coats to medium stiletto nails and let them set.
- Paint tiny midnight-blue star strokes along each left side, using three on thumb, two on index and middle, and one on ring and pinky.
- Taper the star rays and leave the right side and pointed ends mostly plain.
- Protect the art with a smooth clear glossy top coat.
19. Icy Blue Stilettos with Angular Silver Foil Tips
Long stiletto nails are covered with frosted pale blue with a smooth cream finish. Each tip has one flat silver-foil triangle that stands higher on the left side than on the right side, creating an unbalanced facet on the tip. The metallic part stays only in the outer quarter of the nail, while the blue color can still be seen at its borders. Clear gloss is applied to flatten the foil; thus, it will not look like a sparkly but more like a small piece of cut metal.
Cut or tear off foil into controlled shapes before applying it to the nails. Every foil border needs to be placed inside the point in order not to snare it. Cooler and even gray-blue base allows for a sharper look of the silver color; the brighter aqua will ruin the entire mood. Such facet looks really edgy on the long stiletto nails, but it can be painted in metallic nail polish on pre-shapes press-ons as well.

How to Apply
- Paint prepared long stiletto nails in smooth, pale icy blue.
- Prepare five thin silver-foil triangles sized for the outer quarters of the nails.
- Press one flat triangle onto each tip, with its left edge slightly higher and all foil inside the nail perimeter.
- Secure the edges and cover the set with a leveling glossy top coat.
20. Blush Bridal Stilettos with Fine Pearl Chains
A translucent blush base softens medium-long stiletto nails, while two delicate rows of tiny flat-back pearls curve from the cuticle toward the middle of the ring nail. The index repeats one shorter row; the other three nails remain plain. These are closely spaced pearl dots forming a chain-like line, not a dangling piece of jewelry. The points stay clear of embellishment and the pink base shines through the open spaces.
Bring a close-up reference so the technician can size the pearls to the nail rather than using beads that dominate it. Secure them with a suitable nail-art adhesive or gem gel, and seal around their bases while leaving the pearl surfaces exposed. This layout draws attention toward an engagement or wedding ring without putting raised elements at the tips. For gentler shapes and other ceremony looks, compare our bridal nail ideas.
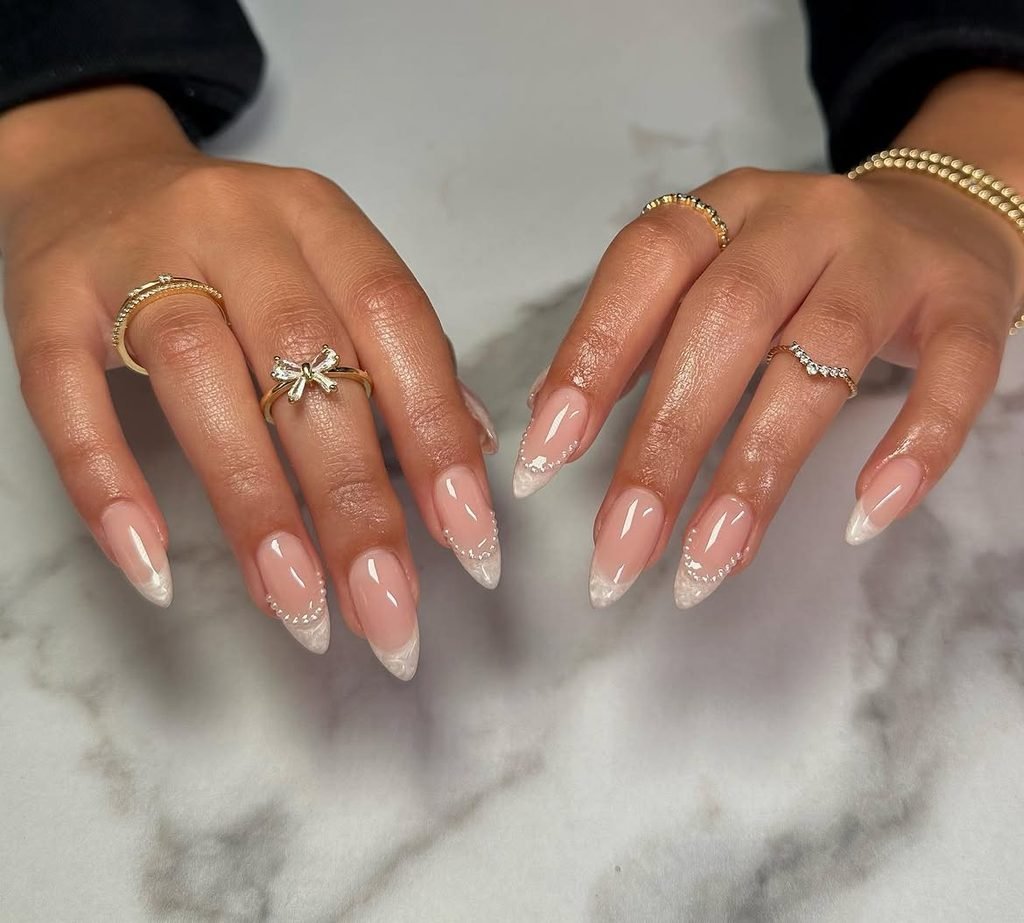
How to Apply
- Apply a sheer blush base and glossy finish to balanced medium-long stiletto nails.
- Arrange two short curved rows of miniature flat-back pearls from the ring cuticle toward its center.
- Add one shorter matching row to the index; leave the other nails and all points plain.
- Secure with appropriate adhesive or gem gel and reinforce around the pearl bases as directed.
21. Teal and Lime Double-French Stilettos
Medium stiletto nails begin with a sheer neutral base. A saturated teal V fills the outer tip, and a separate hairline of lime follows the inner V border with a narrow strip of neutral space between the two colors. Both lines converge toward each sharp point, but the lime stays below the teal rather than sitting on top of it. Gloss makes the two bright colors feel like one intentional graphic design.
This is a color-forward alternative to a plain French without covering the full nail bed. Leave the neutral strip wide enough to remain visible when the hand is relaxed; otherwise the two colors merge into a muddy edge. Sketch both Vs on one practice tip first to settle their angles. If you shorten the nail later, the teal cap may lose its pointed shape, so plan the length before painting rather than trimming the finished art.

How to Apply
- Apply sheer neutral polish to prepared medium stiletto nails and let it settle.
- Draw and fill a teal V-French tip on each pointed end.
- Paint a fine lime V just inside the teal boundary, preserving a slim neutral gap between them.
- Refine the converging lines and finish with clear glossy top coat.
22. Sheer Mauve Stilettos with Glitter-Dipped Points
Sheer mauve covers long stiletto nails, deep enough to tint the nail beds but light enough to show some natural depth. Fine pink-silver glitter gathers at the last quarter of each nail, most concentrated at the very point and thinning backward into the mauve. The fade repeats across all five fingers, with no sharp dividing line. A clear top coat smooths the particles so the tips gleam without feeling gritty.
Choose fine glitter suspended in clear polish rather than chunky loose pieces for this narrow application. Wipe most of the product from the brush, then tap it at the points and feather what remains back toward the middle. A second concentrated touch at the ends creates the dipped effect without burying the mauve. This is easier to attempt on finished press-ons than a long sculpted set. For designs that make glitter the main event, see our glitter nail ideas.
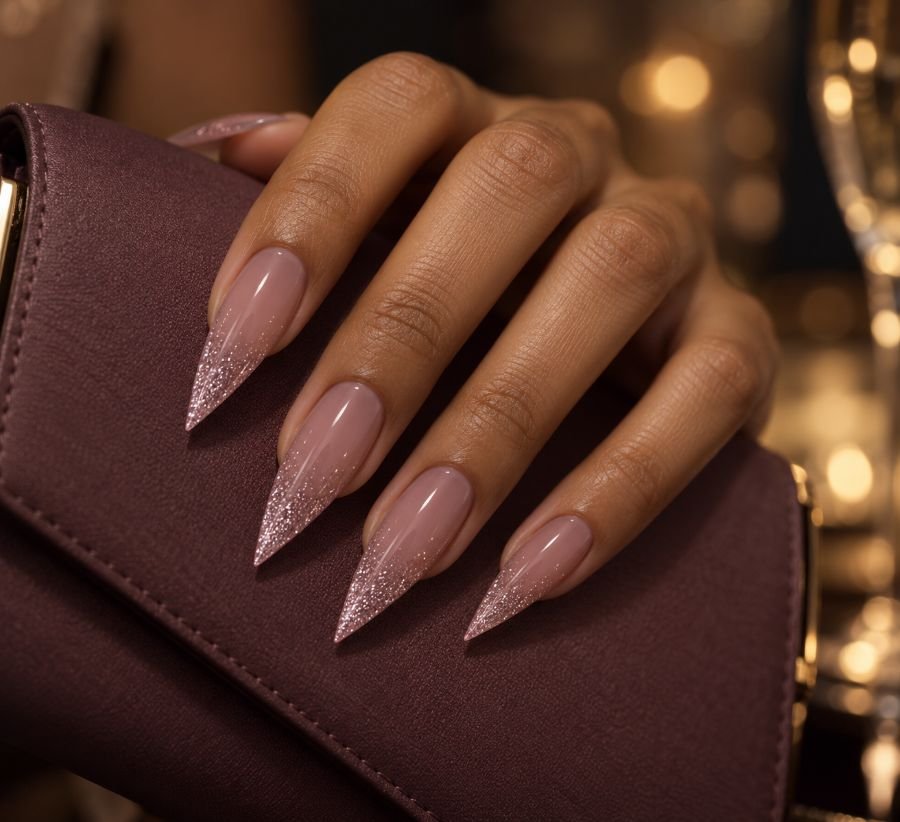
How to Apply
- Apply a sheer mauve base to long stiletto nails and let it set.
- Tap fine pink-silver glitter polish onto the outer quarter of each nail.
- Concentrate one extra thin pass at every point and feather the inner edge into mauve.
- Seal the particles and pointed edges with a smooth clear top coat.
23. Sapphire Stilettos with a Diagonal Crystal Trail
Opaque sapphire blue covers long stiletto nails, with a single diagonal trail of five tiny clear crystals across the ring finger. The stones begin near its lower left side, cross the center, and stop before reaching the narrow point. Thumb, index, middle, and pinky stay uninterrupted blue. Clear gloss gives those four plain nails a lacquered reflection, while the isolated trail supplies a concentrated flash on the accent.
Map the diagonal before using adhesive so the stones gradually get smaller toward the tip and remain inside the nail’s perimeter. A technician can secure flat-back crystals with gem gel and reinforce their bases without coating their facets. If you want a similar sparkle with less texture, use five tiny silver dots instead. Our rhinestone nail ideas show other placement scales; this version leaves enough sapphire exposed for the strong blue color to lead.
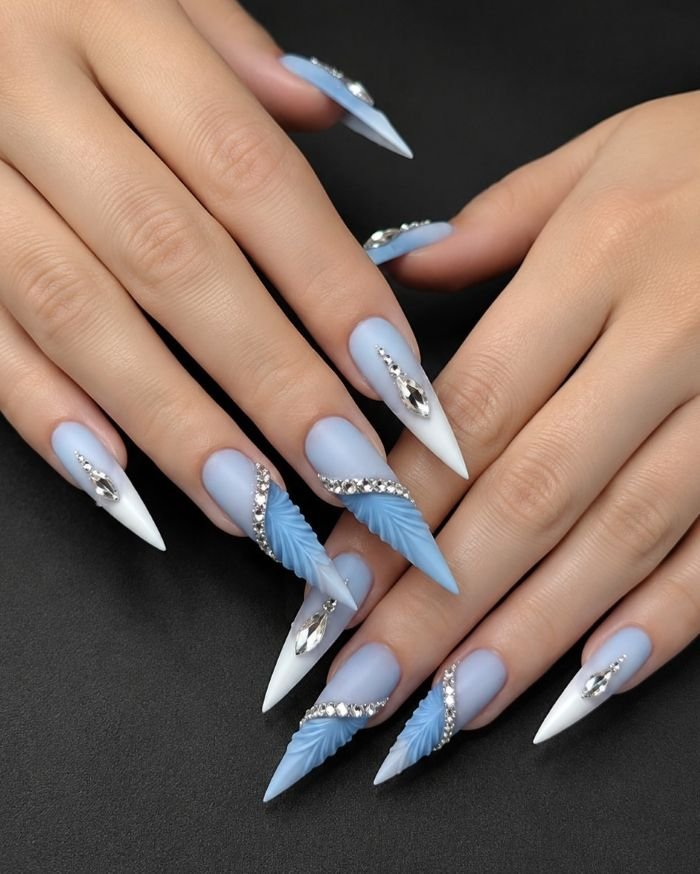
How to Apply
- Paint balanced long stiletto nails in opaque sapphire blue and finish them glossy.
- Arrange five tiny clear flat-back crystals diagonally across the ring nail, shrinking toward the tip.
- Secure them with compatible nail-art adhesive or gem gel, keeping all stones inside the perimeter.
- Reinforce around their bases as directed; leave the other four sapphire nails plain.
What Is the Difference Between Stiletto and Almond Nails?
Both shapes taper, but their endings change the impression. An almond nail narrows into a softly rounded tip; a stiletto nail continues toward a more distinct point. That difference affects art placement: a V-French can converge sharply on a stiletto, while a conventional curved French follows the rounder edge of an almond. The pointed version generally needs more free edge for the taper to develop. OPI’s nail-shape guide describes stiletto as more pointed than almond.
Look at your reference photo from above and in profile before asking for the shape. A highly edited image can make a gently tapered almond appear sharper than it is. If you want the shape to read distinctly from across the room, choose enough length and check that all five points are centered. If you prefer a softened end for daily tasks, ask for almond instead and borrow the color or artwork you liked. Our almond nail ideas show how similar colors behave on a rounded taper.
Can You Wear Short Stiletto Nails?
A pointed tip is possible in a small size, but a compromise needs to be made visually. A long stiletto provides room for both sides to narrow and come to one point. With very short tips, such tapering will look like a sharp almond, and making a pointed edge from a natural free edge that is already small does not leave much room for the shape. OPI’s guide to nail shapes states that a stiletto is associated with long and strong nails. A ready-made mini press-on is another option to experiment with the shape without sculpting a long nail.
The finished length should be chosen according to the real life of your hands. Mini point still affects the look of a French tip, side line, and solid color, although it does not have an extreme shape of an editorial set. Test sample tips on your fingers and examine side view, width, and center point before attaching. In case the point is too pronounced, ask for a short almond, not to cut down a stiletto significantly.
Acrylic, Gel Extensions, or Press-Ons: Which Gives You the Shape?
An experienced technician can build a long pointed enhancement in acrylic or any suitable builder-gel system, manipulating the side taper, profile, and point of your choice. Pre-shaped full cover soft-gel tips can be fitted and applied using the system of their choice; Aprés offers stiletto tips in various lengths. Aprés Nail Decorative press-on nails are also pre-shaped and allow you to try a dramatic style without making a long-term commitment. None of these products ensures a proper fit just by virtue of being labeled “stiletto”.
Select depending on both the design and the length. Encapsulated clear flowers and properly isolated chrome are suitable if you have access to the right products and the skill level. Red glossy, simple French, or a painted star map can be made into custom press-on nails. Before you apply any set, match each tip to the width and curvature of its natural counterpart; any pressure at the sides or an obviously misplaced point requires a new size. Apply the product according to the specific instructions for that system.
How Do You Keep Long Stiletto Nails Practical?
Consider this as a complete edge rather than a tool. Use your finger pads for the purpose of pressing buttons and for other smaller objects, and get accustomed to typing and using clasps that might be a little difficult for you. You can try a shorter length or a more rounded point that would still be recognizable and not as hard to work with. Keep the points of each nail straight; a twisted point or a lifted edge could be a reason for calling your technician, rather than covering it up with a thick layer of polish.
Flatter designs like the V tip, aura color, and checkerboard designs will affect your daily activities less than raised pearls or crystals. In case you decide to add some embellishments, make sure to put them at a distance from the point of your nails and to attach them using the right products. Gently check the edges of your nail enhancements while applying hand creams or washing hands according to the instructions of the manufacturer. To remove the extensions or crystals, follow the manufacturer’s specific instructions.
Final Thoughts
Top stiletto nails have an end purpose for the tip of the nail. On bright cherry red, the point ends the continuous stream of nail polish. For the black V-French, it ends in the point. It is what an aura brings out, leaving a pointed edge and a pale nail. Facets of foil or a glitter gradient end with the brightest accent. In fact, the sheer nudes and the chrome nail polishes get their character from the starkness of the finish against the sharp outline of the nails. Focus on one element to use and taper the rest.
Before booking your appointment, consider whether you are going for the traditional longer stiletto, a medium length, or a mini press-on that implies the shape. Make sure to keep a reference photo which includes the shape of the nails’ sides and not just the artwork, because the design is very different on an almond shape. Make sure that the instructions include all the important elements like the length of the nails, color, finish, and where the accents go.
Ready to make a statement with your next manicure? From glossy cherry red and sharp French tips to chrome finishes, bold colors, and delicate accents, explore stiletto nail designs that suit your style. Save your favorite and preview how it looks on your hands before your next DIY manicure or salon visit.
Use our AI Nail Generator

Bloomie
Bloomie (I) is the founder and author of Nail Blooms, a nail inspiration website dedicated to manicure ideas, nail art, colors, shapes, and emerging beauty trends. My interest in nails began with a simple habit of collecting beautiful manicure ideas and exploring different styles, from timeless nude shades and French tips to creative nail art and seasonal looks. What started as a personal interest gradually grew into Nail Blooms, a space created to make discovering nail inspiration easier and more enjoyable. At Nail Blooms, My goal is to help readers give new ideas, find different possibilities, and feel inspired when choosing their next manicure.
About the editor ↗