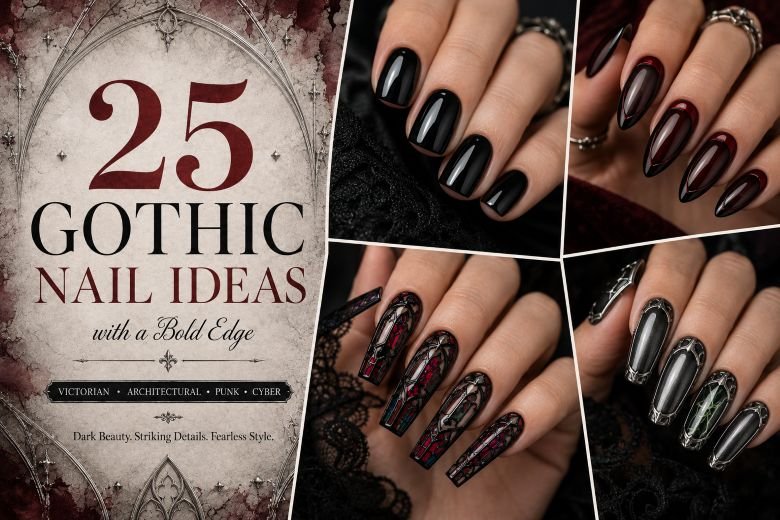
25 Gothic Nail Ideas with a Bold Edge
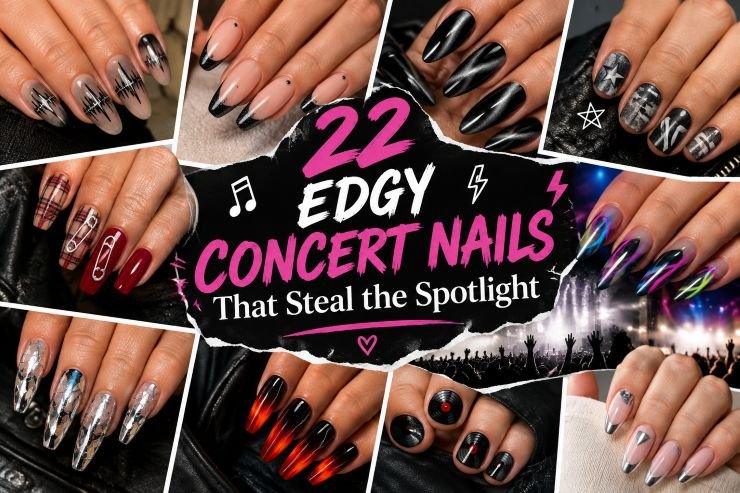
It is not necessary for gothic nails to be a set of Halloween-themed designs painted on black nail polish. The most interesting patterns will use inspiration from a more complex visual language of Gothic architecture, Victorian attire, and contemporary goth and punk style.
The gothic nail ideas featured in this article bring all these inspirations to 25 different manicures without resorting to typical moons, webs, and blood patterns. The collection includes short natural nails, almond and oval shapes, coffin and stiletto nail extensions, conservative black manicures, black and red combinations, cathedral windows, Victorian patterns, chrome plates, studs, chains, and neon cyber-goth touches. All these manicures provide clear instructions on the nails shape, finish, placement, and technique of applying these designs at home.
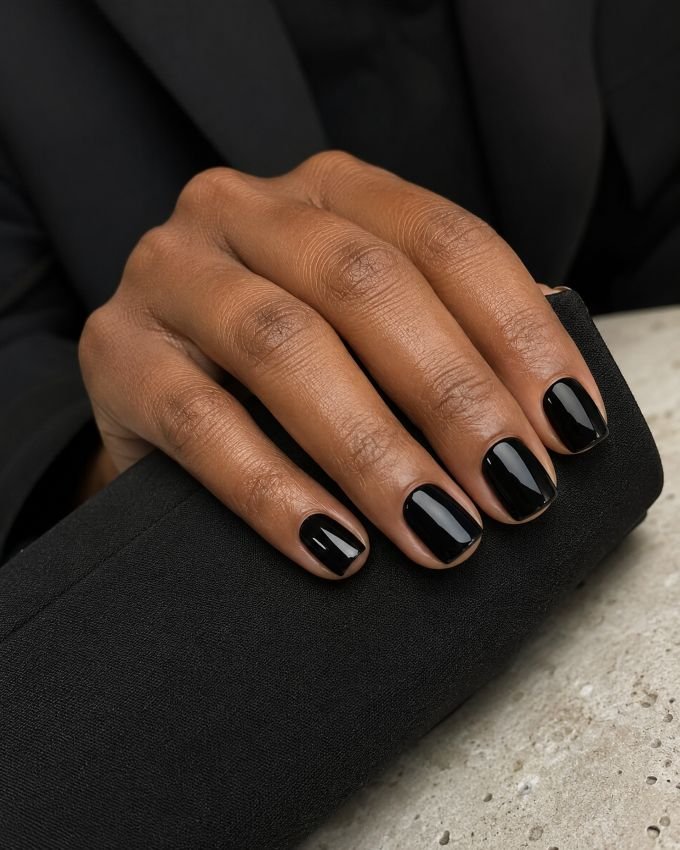
1. Short Patent-Leather Black Nails
The short square-shaped nails are painted opaque black and finished with a very glossy and smooth topcoat. The edges of the cuticles are slim and neat, the side walls are straight and the reflected highlights are moving smoothly over all the nails. There are neither glitter nor painted design; the union of thick color and a patent leather gloss gives the whole nail look.
This is the most comfortable way for everyone to get gothic-looking nails without extension and without seasonal design. The short square shape is neat instead of stern, while the mirror shine makes ordinary black paint stylish. It all depends on preparation – the rough surface, any lint, swollen cuticles and an excessively wide free edge will be more noticeable when the black polish is applied.
How to Apply
- File the nails into short soft squares, gently smooth surface ridges, and apply a suitable base coat.
- Paint two thin coats of opaque neutral-black lacquer, allowing each layer to level before adding the next.
- Clean the sidewalls and cuticle curve with a small brush lightly dampened with remover.
- Float a high-gloss top coat over each nail and cap the free edge without creating a thick ridge.
2. Black Micro-French Tips With Pewter Studs
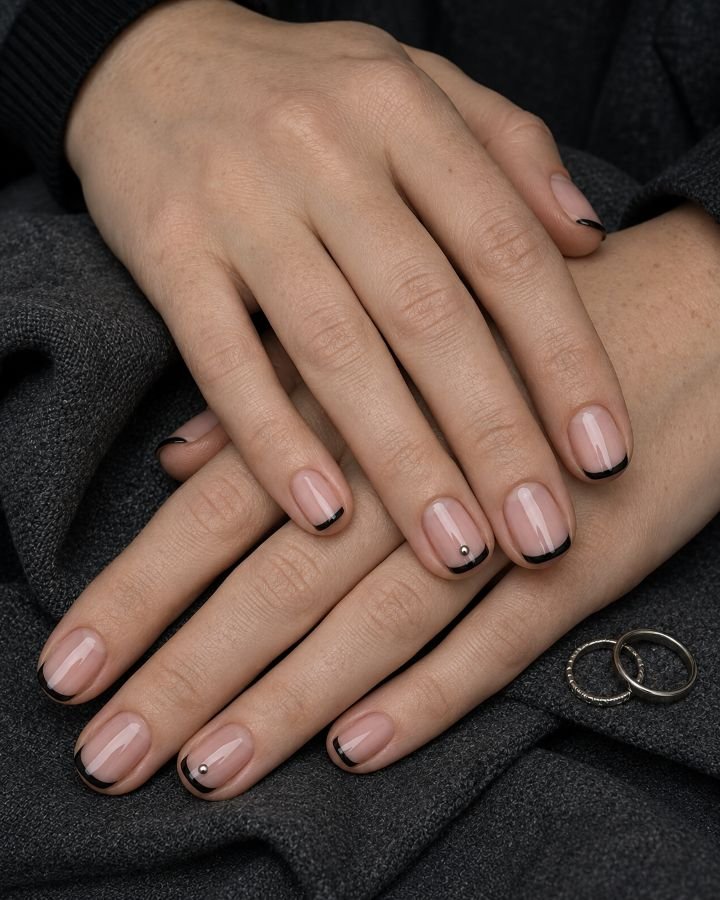
Short squoval nails begin with a transparent cool-pink base and end in narrow glossy black French tips. Two accent nails carry a single low pewter stud positioned just above the center of the smile line, while the remaining nails stay completely flat. The metallic pieces are small enough to read like jewelry rather than hardware attached without a plan.
These gothic French tip nails provide contrast without making the nail bed appear shorter. Keeping the black line fine leaves plenty of visible natural nail, which is especially useful on compact shapes and in work settings. French guides can help with the tips, and flat metallic decals are the safest home interpretation. Raised studs need compatible adhesive or gem gel and should sit well inside the edges so they do not catch on hair or clothing.
How to Apply
- Apply one or two thin coats of transparent cool-pink polish to short squoval nails.
- Draw a narrow black line across each free edge, following the natural smile line rather than making the tip unusually deep.
- Secure one small low-profile pewter stud above the smile line on two accent nails.
- Seal the tips and the perimeter around each stud with a clear glossy top coat.
3. Onyx Fleur-de-Lis Nails
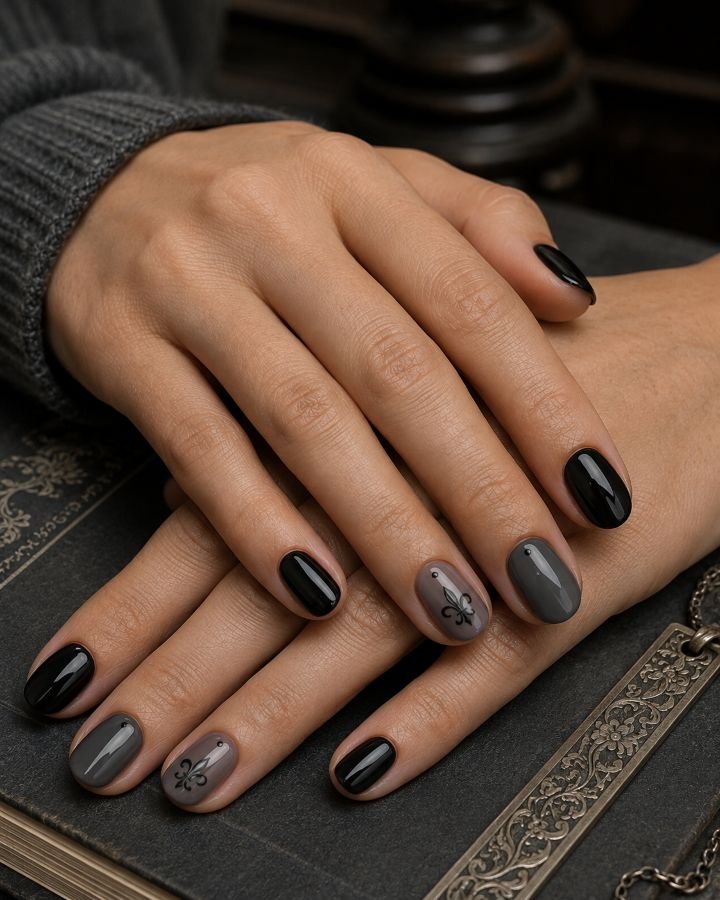
The short oval nails are alternatively coated in glossy onyx black and smoke gray transparent color. Thin black fleur de lis designs are placed length-wise on two sheer accent nails along with one small pewter dot on each cuticle. These designs are thin and centered, thus allowing the presence of a border around the nail artwork instead of covering the entire nail.
Through this design, one can have an ornamental pattern for short gothic nails without having to create long or pointed nails. Fleur de lis is not Gothic by nature, but the symmetrical and spear-like pattern of the design works well next to black nail lacquer and other architectural designs. Decals or stamping images should be used if hand painting is not feasible.
How to Apply
- Paint three short oval nails glossy onyx black and cover two accents with translucent smoke-gray.
- Center one slim black fleur-de-lis on each sheer accent using a decal, stamping plate, or fine liner brush.
- Add one tiny pewter dot close to the cuticle of each illustrated nail.
- Apply a clear glossy top coat, floating it over the motifs to avoid dragging their fine edges.
4. Raven-Wing Shimmer Nails
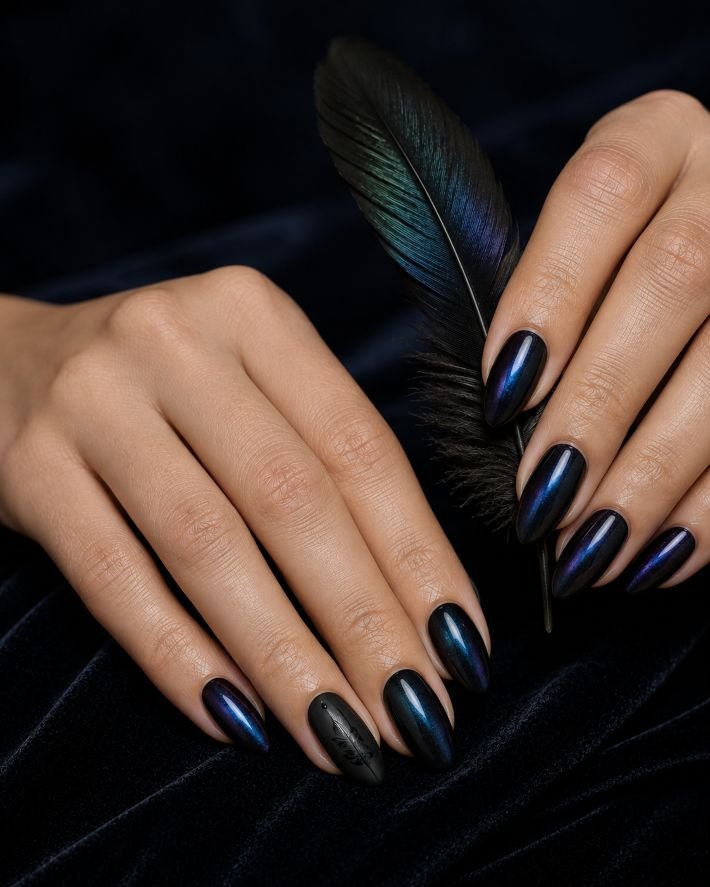
Medium almond nails are covered in black polish containing extremely fine blue, violet, and petrol-green shimmer. The color appears almost solid indoors, then shifts like a raven feather when it catches directional light. One accent nail has a faint feather-barb pattern painted in black satin over the reflective base, visible only when the surface moves through the highlight.
These black gothic nails create depth without using chunky glitter, obvious character art, or raised charms. The tapered almond shape reinforces the feather-like direction of the reflection while remaining softer than a stiletto. A multichrome topper over black is the simplest home method. Use only one thin layer and finish the remaining nails smoothly; too many reflective particles will turn the controlled shift into a dense rainbow sparkle.
How to Apply
- Apply two thin coats of opaque black polish to medium almond nails.
- Add one even layer of fine blue-violet-green multichrome shimmer, keeping the particles sparse.
- Paint a subtle black satin feather-barb pattern on one accent nail, following the nail’s length.
- Seal the set with a glossy top coat while leaving the accent pattern slightly less reflective.
5. Black-and-Ivory Mini Marble Nails
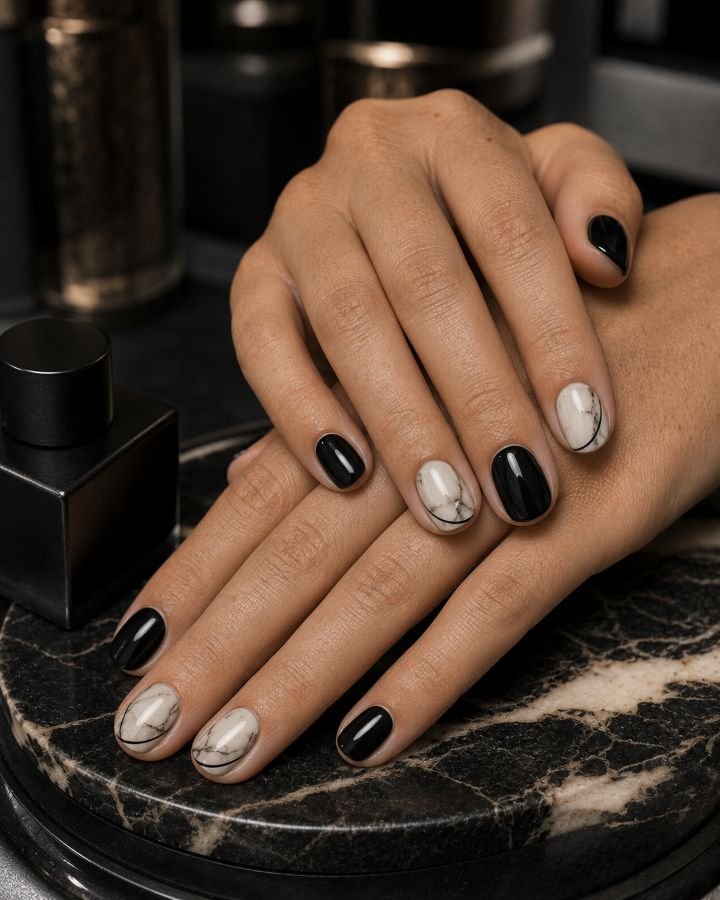
Short round nails are painted glossy black, with two ivory accent nails carrying restrained charcoal marbling. The veins are thin, broken, and irregular, with several smoky gray areas diffused beneath the surface. One hairline black curve enters from a sidewall on each accent, visually connecting the pale nails to the solid black set.
This is one of the more achievable easy gothic nail designs because the marble does not need identical placement. The black-and-ivory palette feels darker and more graphic than conventional white marble but still works on short natural nails. A fine liner brush and a small amount of diluted gray polish are enough for a lacquer version. Stop while broad ivory areas remain visible; adding more veins usually makes the surface look dirty rather than convincingly stone-like.
How to Apply
- Paint three short round nails glossy black and two accent nails warm ivory.
- Add sparse broken charcoal lines to the ivory nails, then soften selected sections with a small brush and translucent gray.
- Draw one clean hairline black curve from a different sidewall on each accent.
- Cover every nail with a leveling glossy top coat to create a smooth stone finish.
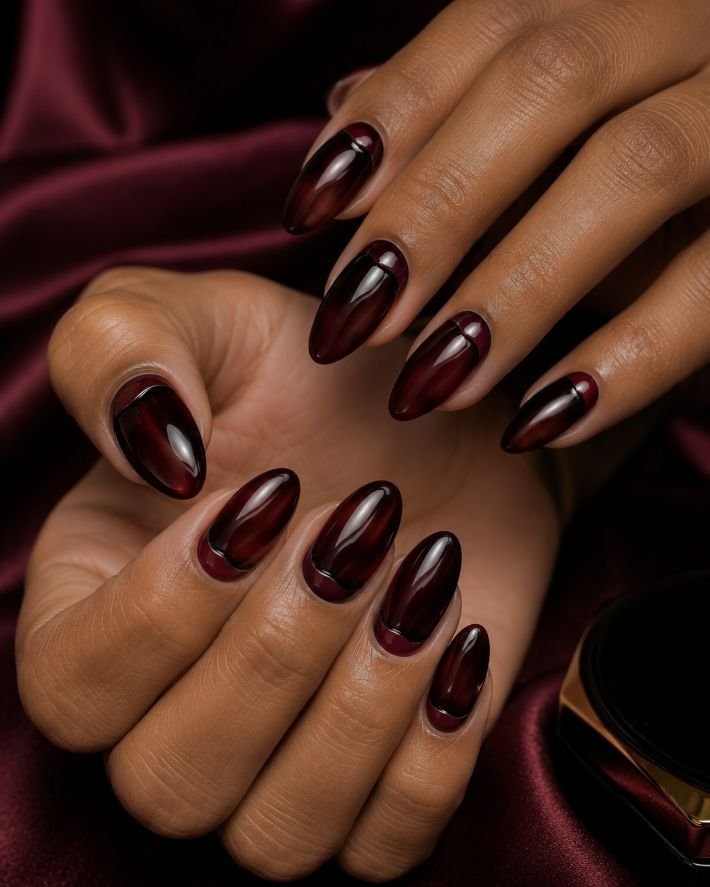
6. Oxblood Reverse-French Almond Nails
Medium almond nails use a translucent black-cherry base framed by slim oxblood crescents at the cuticles. A pin-thin black line follows the upper edge of each half-moon, leaving the tips uninterrupted and glassy. The color is darkest around the base of the nail and lighter through the center, creating a polished reverse-French effect rather than a conventional red manicure.
These black and red gothic nails feel dramatic without using drips, flames, or vampire illustrations. Positioning the darker color near the cuticle makes the almond shape appear longer, while the sheer center prevents burgundy from becoming a heavy block. Curved guides can produce a simplified lacquer version, but they should only be placed over polish that is fully dry. A translucent wine jelly is essential for maintaining the layered depth.
How to Apply
- Apply one or two thin coats of translucent black-cherry jelly polish to medium almond nails.
- Paint a shallow oxblood half-moon at each cuticle, keeping the curve centered and away from the skin.
- Trace the upper edge of every crescent with a pin-thin black line.
- Finish with a wet-look glossy top coat that preserves the transparency through the nail center.
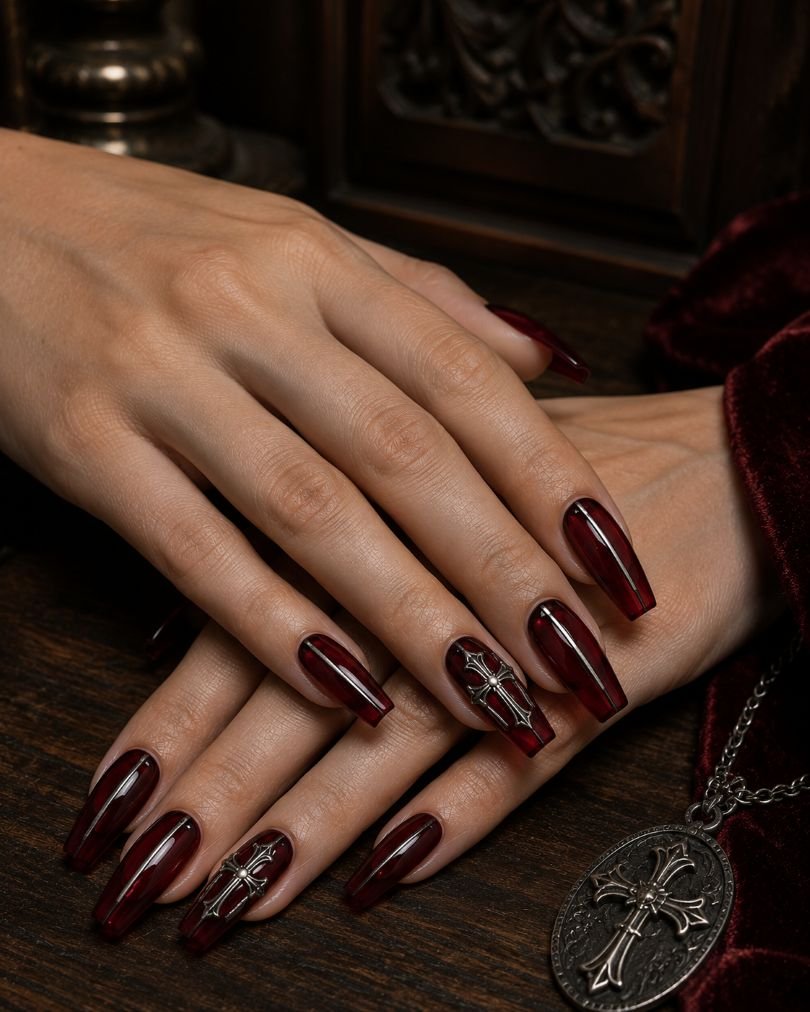
7. Crimson Jelly Cross Nails
Medium coffin nails glow beneath several thin layers of transparent crimson jelly. Two accent nails carry elongated antique-silver crosses placed over a faint smoky center, while the remaining nails have one narrow silver line running vertically from the cuticle. The metallic details remain flat and finely scaled, allowing the red glass effect to dominate.
This red gothic nail design combines a saturated color with one clear ornamental motif instead of distributing unrelated charms across every finger. Coffin nails provide straight sides and enough length for the elongated crosses, but a shorter tapered-square press-on could carry a reduced version. Metallic decals are practical at home; thick charms can distort the profile and should not be added unless the enhancement has enough structure to support them.
How to Apply
- Apply two or three thin coats of transparent crimson jelly polish to medium coffin nails.
- Blend a small amount of translucent smoke-gray into the centers of two accent nails.
- Position one elongated flat antique-silver cross on each smoky accent and paint slim silver lines on the remaining nails.
- Encapsulate the flat details with clear gel or a leveling glossy top coat and seal the free edges.
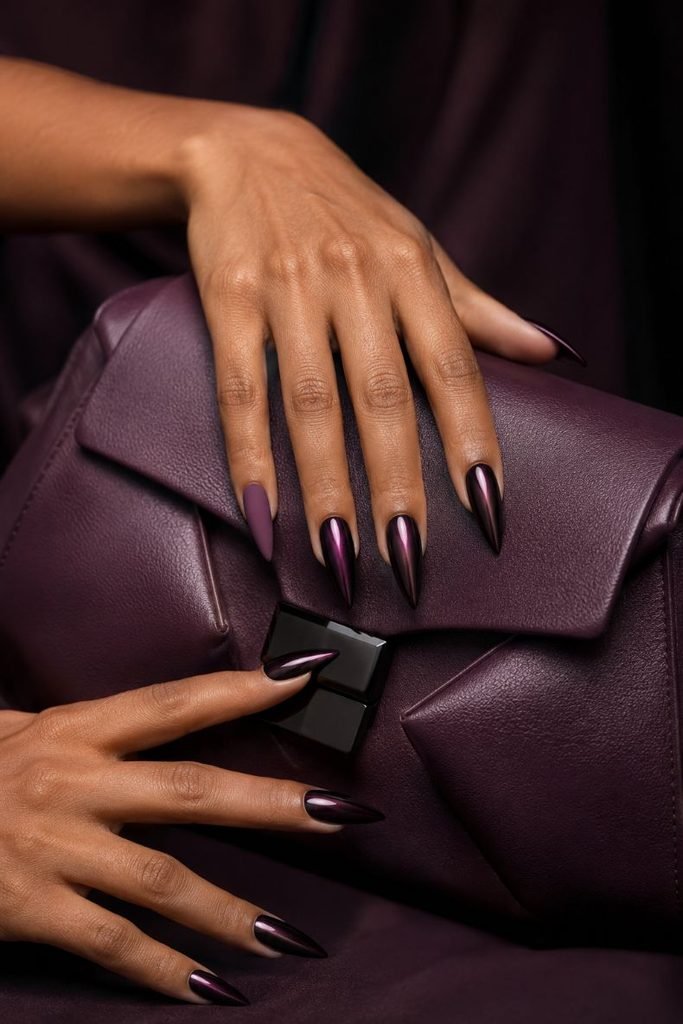
8. Deep-Plum Metallic Stiletto Nails
Long stiletto nails shift from almost-black aubergine at the sidewalls to a narrow metallic plum reflection through the center. The surface resembles polished lacquered metal rather than glitter, and each pointed tip finishes in a clean black edge. One nail remains satin plum, providing a quiet texture change within an otherwise reflective set.
These gothic stiletto nails rely on silhouette and color rather than miniature artwork. The severe point supplies the bold edge, while plum is softer against the skin than opaque black. A regular metallic lacquer can create the color, but balanced long stilettos require structurally sound extensions and careful shaping. If the length would interfere with work or daily tasks, use medium almond press-ons in the same finish instead of compromising the architecture of an extreme point.
How to Apply
- Build or fit balanced long stiletto extensions with even sidewalls and centered points.
- Apply an almost-black aubergine base and cure or dry it fully.
- Blend metallic plum down the center of each nail, keeping the sidewalls and final tip darker.
- Finish most nails with high gloss and cover one accent with a smooth satin top coat.
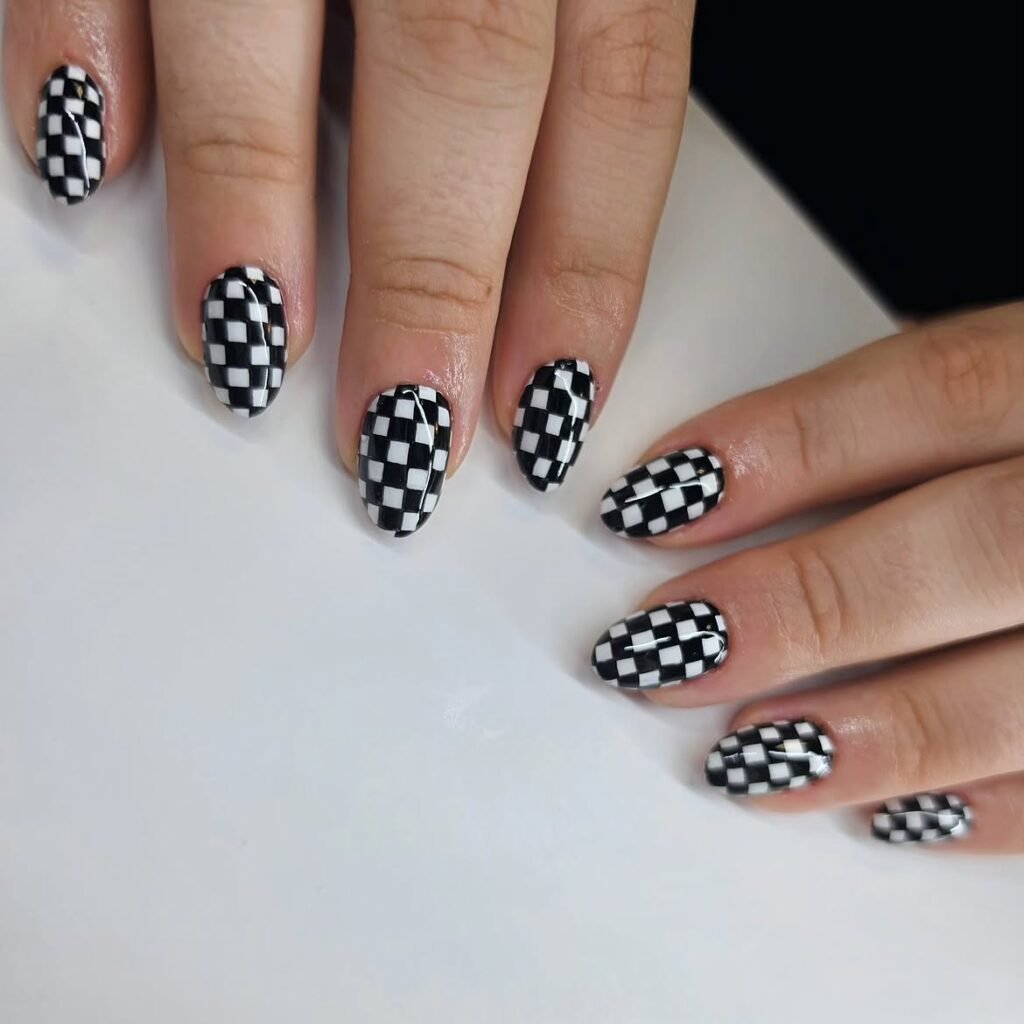
9. Black-and-White Checkerboard Nails
Medium square nails alternate solid satin black with two checkerboard accents in black and white. The checks are slightly elongated rather than perfectly square, following the length of the nail, and several cells are left translucent over a nude base. A glossy black border frames the pattern without covering the squared free edge.
This manicure draws from punk and old-school goth styling, making it a useful option for readers searching for alternative nail designs rather than romantic florals or ornate cathedral art. The square surface gives the grid clear structure, but leaving several transparent cells prevents the pattern from becoming visually flat. Stripping tape can help map the design; custom press-ons are more realistic if maintaining clean geometry on the non-dominant hand becomes frustrating.
How to Apply
- Paint three medium square nails satin black and cover two accents with a sheer neutral base.
- Map an elongated checkerboard grid on each accent using very fine striping tape or a detail brush.
- Fill alternating cells with whitenleaving several cells transparent, then add a slim glossy-black border.
- Seal the patterned accents with gloss while preserving the satin finish on the solid nails.
10. Silver Gothic Monogram Nails
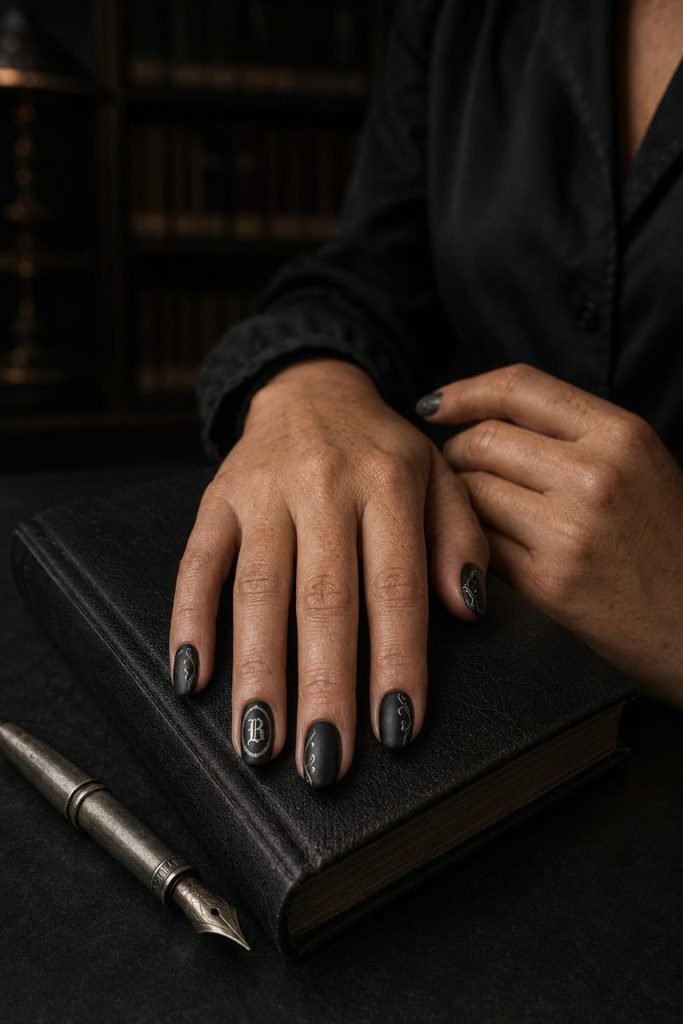
Medium oval nails are painted charcoal-black with a soft satin finish. Two accent nails display one ornate silver blackletter initially centered inside a narrow oval frame, while the remaining fingers carry only small calligraphic flourishes near alternating sidewalls. The lettering is crisp and isolated; there are no complete words or strings of unrelated numbers.
These gothic nail art details work best when personalized to one meaningful initial rather than treated as decorative filler. Oval nails soften the sharp strokes of the letterform, and the limited silver-on-charcoal palette keeps the design readable. Fine blackletter is difficult to reproduce with the non-dominant hand, so use a high-quality decal, stamping plate, or custom press-on set. Make sure both framed initials face the same direction when the hands rest naturally.
How to Apply
- Paint medium oval nails charcoal-black and finish the base with a smooth satin top coat.
- Place one clean silver black letter initial at the center of two accent nails.
- Frame each initial with a thin silver oval and add restrained calligraphic flourishes to the remaining sidewalls.
- Seal the silver art with a thin glossy layer, or use isolated gloss only over the metallic details for stronger contrast.
11. Victorian Mourning Cameo Nails
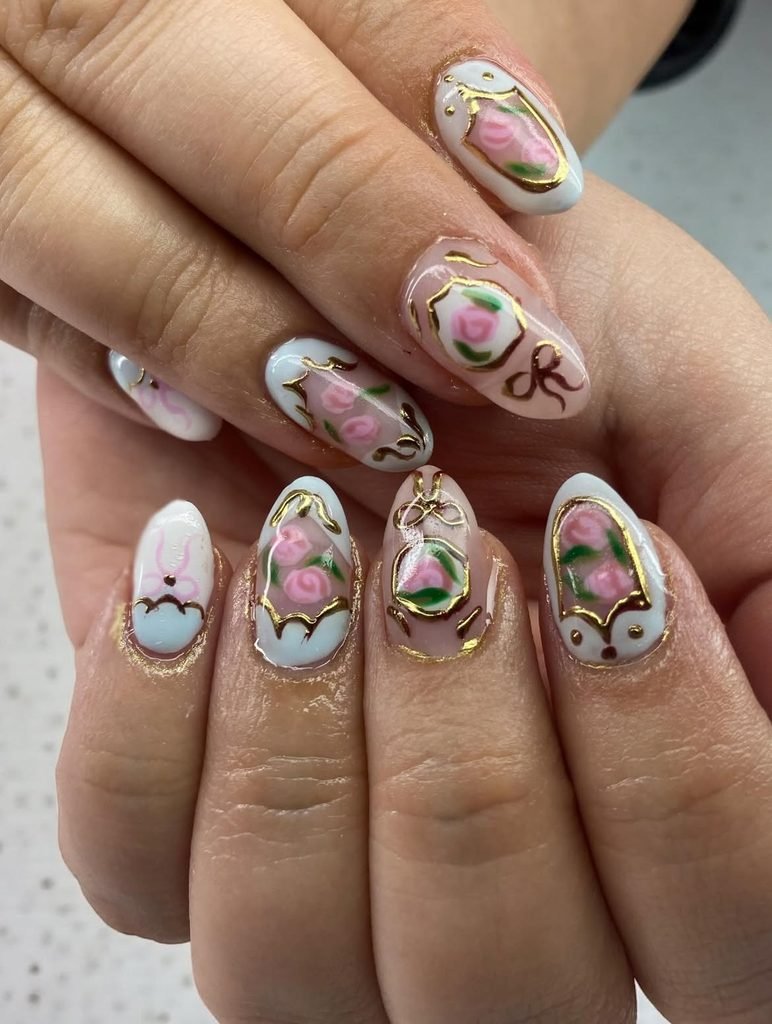
Medium almond nails combine matte black lacquer with two translucent taupe accents. Each accent holds a small black cameo silhouette inside an oval antique-silver frame, and fine black ribbon lines extend from the frame toward the cuticle. The remaining nails stay undecorated except for one tiny oval silver stud placed low on the ring finger.
These Victorian gothic nails reference mourning jewelry through shape, palette, and restrained portraiture rather than scattering generic vintage objects across the set. The almond outline gives the cameos enough vertical space while keeping the composition elegant. Flat cameo decals or miniature transfers are more convincing than attempting a detailed face freehand. Use a matte base around the framed accents so the simulated jewelry appears distinct from the nail surface.
How to Apply
- Paint three medium almond nails matte black and cover two accents with translucent cool taupe.
- Position a small black cameo silhouette in the center of each sheer accent.
- Draw a fine antique-silver oval frame around every cameo and add narrow black ribbon lines toward the cuticle.
- Add one tiny silver oval stud to a solid nail and seal the artwork without flattening the contrast between matte and metallic finishes.
12. Burgundy Corset-Laced Nails
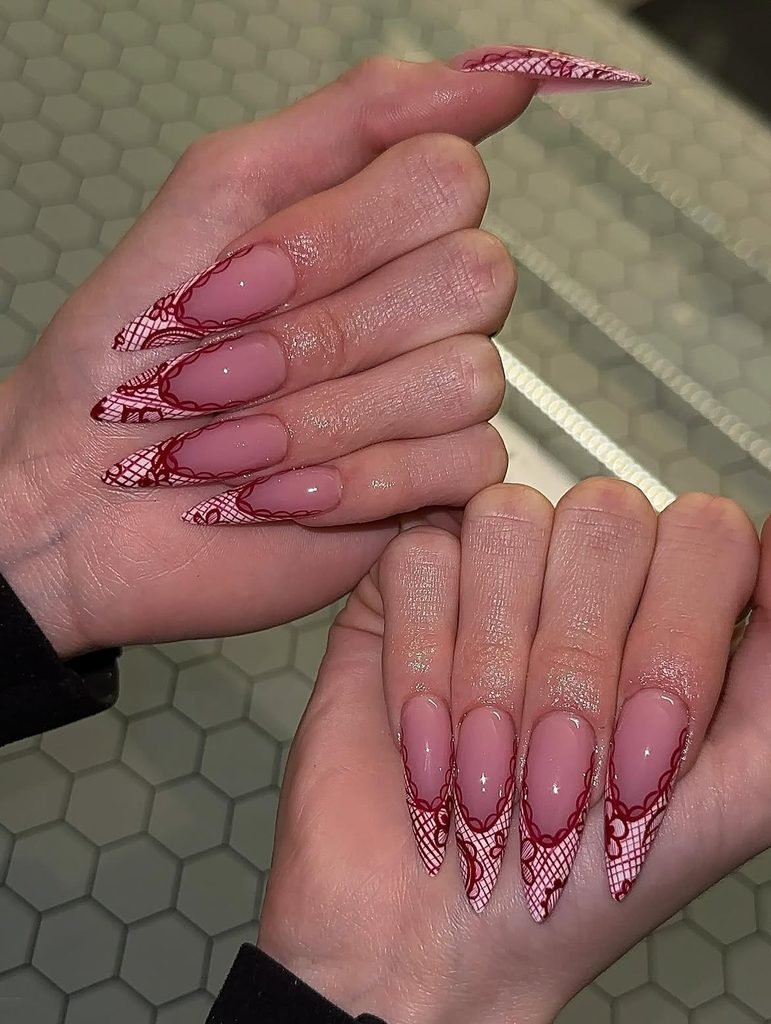
Medium tapered-square nails are painted deep burgundy with narrow matte-black panels running along both sidewalls. Two accent nails contain five pairs of miniature silver eyelets connected by a thin black crisscross line, leaving a slim strip of burgundy visible beneath the lacing. The other nails carry a single black seam down one side for continuity.
This design turns a recognizable fashion detail into romantic goth nails without adding bows, lace veils, or unrelated charms. The straight sides of a tapered square give the eyelets enough structure to remain evenly spaced, and the wine color keeps the set richer than a flat black manicure. Painted eyelets and laces are the most practical method. Real thread or raised cord can snag, collect product, and make the nail surface unnecessarily bulky.
How to Apply
- Paint medium tapered-square nails with two thin coats of deep burgundy.
- Add narrow matte-black panels along both sides of two accent nails.
- Paint five pairs of small silver eyelets and connect them with one fine black crisscross line, preserving burgundy through the center.
- Add a single black side seam to the remaining nails and seal the set with mixed satin and glossy finishes.
13. Matte Black Brocade Nails
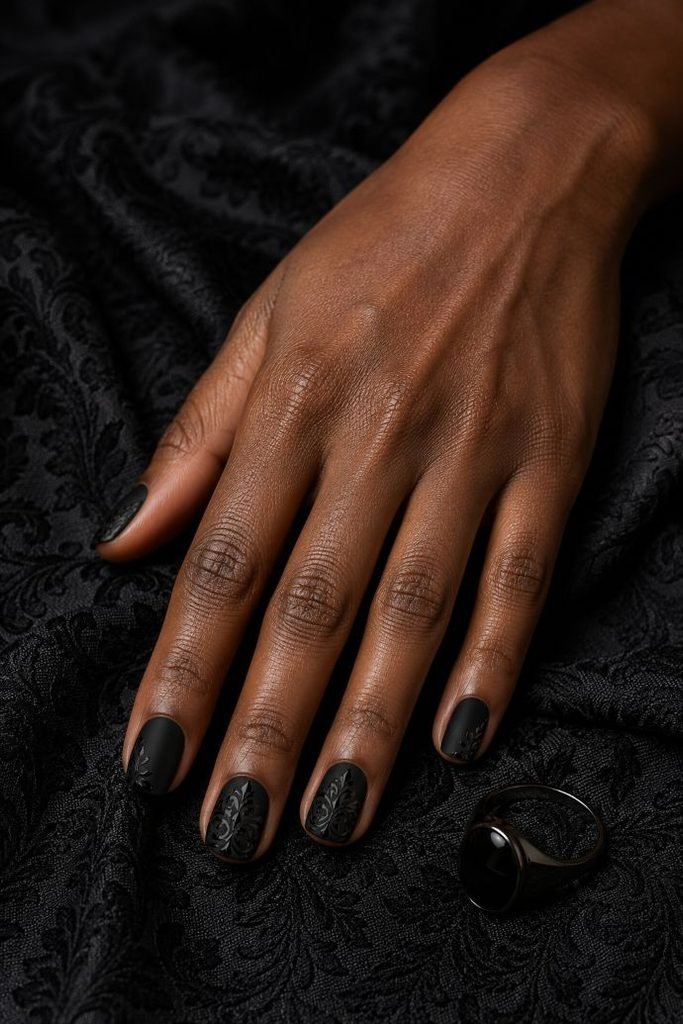
Short squoval nails are coated in velvet-matte black, then overlaid with a sparse glossy-black brocade pattern. Curved leaves, tapered petals, and small symmetrical scrolls appear only when they catch the light. Two nails carry the complete motif, while the others show cropped fragments entering from a sidewall or tip.
This understated gothic manicure uses texture rather than color contrast, making it suitable for short nails, formal clothing, and occasions where silver charms would feel excessive. A damask or brocade stamping plate produces finer repetition than most freehand attempts. The pattern must be glossy enough to separate from the matte base but not so thick that it becomes raised. Clean the plate carefully so tiny lines do not merge into black patches.
How to Apply
- Apply two even coats of opaque black polish to short squoval nails and finish with a matte top coat.
- Transfer a fine brocade pattern in clear glossy polish or black stamping lacquer onto two complete accent nails.
- Add cropped portions of the same motif at alternating sidewalls and tips on the remaining nails.
- Leave the contrast unsealed if the products are compatible, or apply isolated gloss over the stamped pattern only.
14. Onyx-and-Ivory Gothic Bridal Nails
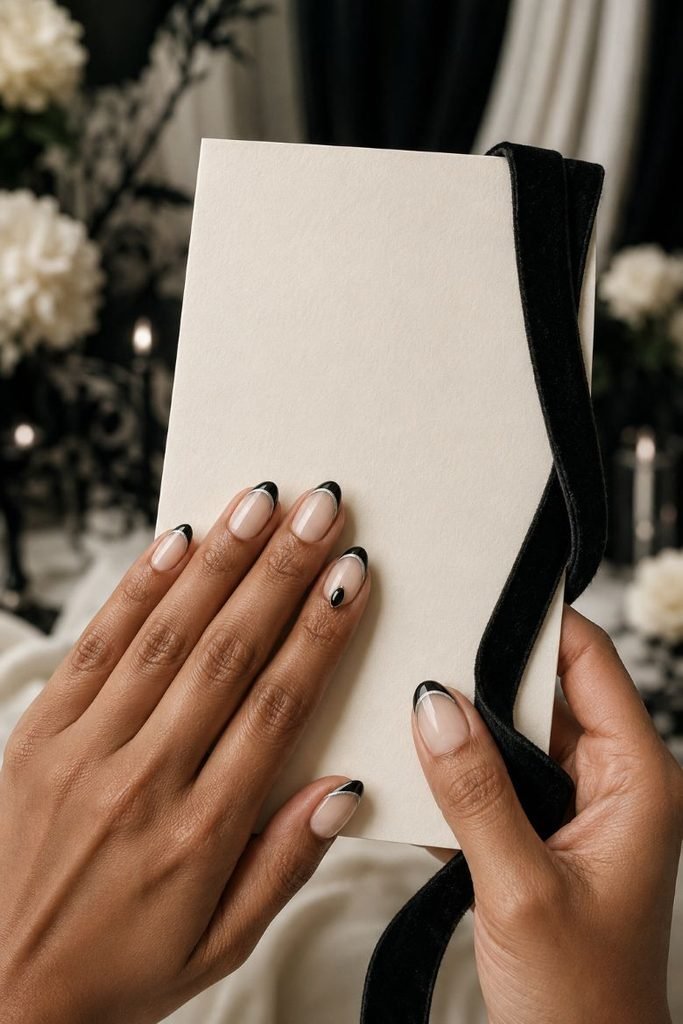
Medium oval nails use a translucent ivory base beneath pointed black French arches. Each tip rises slightly higher at the center, echoing a lancet window without becoming a sharp V, and a narrow antique-silver line follows the lower edge. One accent nail carries a low oval onyx-colored cabochon at the cuticle inside a delicate silver frame.
These gothic wedding nails feel formal and unmistakably dark without requiring a full black set. Ivory softens the contrast for a bride, guest, engagement dinner, or winter ceremony, while the repeated pointed arches make the design coherent from hand to hand. Flat decals can replace the framed cabochon for a lower-profile manicure. Keep the silver lines thin and the black tips equal in depth so the result reads as tailored rather than themed.
How to Apply
- Apply one or two thin coats of translucent ivory polish to medium oval nails.
- Paint a black French tip that rises into a restrained centered point on each nail.
- Trace the lower edge with a fine antique-silver line and secure one low oval black cabochon above an accent cuticle.
- Apply glossy top coat over the flat artwork and carefully around, rather than over, the cabochon.
15. Dark-Coquette Ribbon-and-Chain Nails
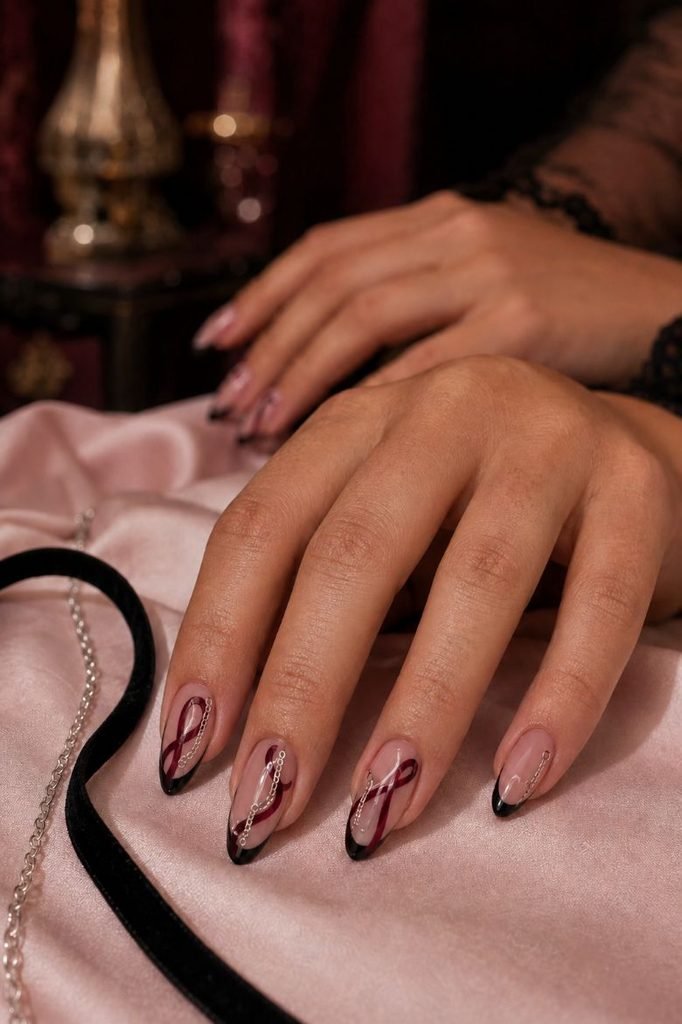
Long almond nails begin with a sheer smoky-pink base and narrow black tips. Deep-wine ribbons curve lengthwise across three nails, forming loose loops rather than identical bows, while hairline silver chains follow selected edges. The remaining nails carry one tiny painted wine knot or a short silver chain segment near the cuticle.
This interpretation combines dark romantic color with harder metallic detail, preventing gothic aesthetic nails from becoming overly sweet. The almond shape gives the ribbons room to move, and limiting the chain lines stops the set from looking crowded. Paint the chains as linked silver ovals for a completely flat version. If using a real chain, choose ultra-fine nail jewelry, cut every end cleanly, and secure it fully so no loose link extends beyond the nail perimeter.
How to Apply
- Apply a sheer smoky-pink base and narrow black French tips to long almond nails.
- Paint varied deep-wine ribbon curves across three nails, allowing the loops to travel mainly from cuticle to tip.
- Add fine painted silver chain links along selected curves and small wine knots or chain fragments to the remaining nails.
- Seal flat artwork with a leveling glossy top coat, checking that every edge remains smooth.
16. Ruby Cathedral Stained-Glass Nails
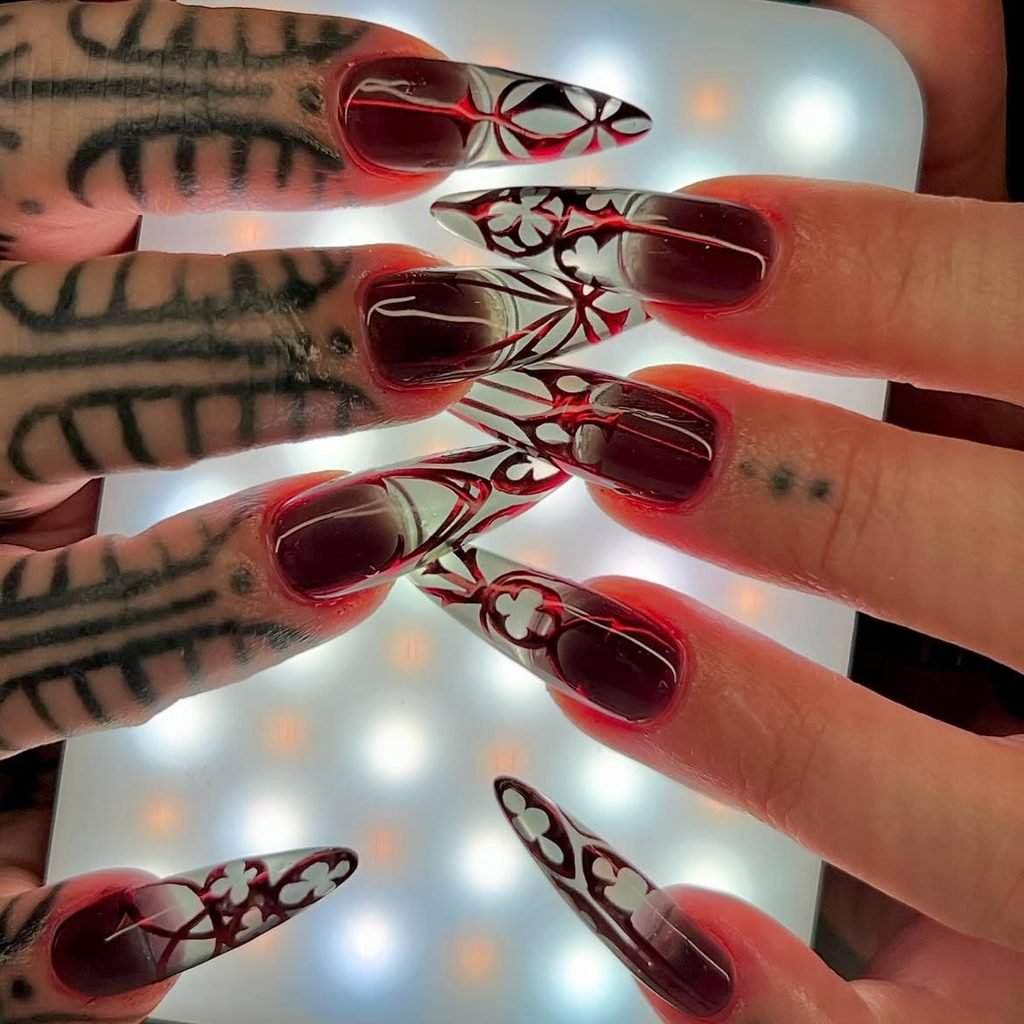
Long coffin nails have transparent smoky tips divided by fine black lines into irregular stained-glass panels. Ruby red dominates the composition, supported by smaller sections of wine purple, bottle green, and dark amber. The color stays translucent, and several clear panels remain visible so light can pass through the extension instead of turning the design into an opaque mosaic.
These cathedral window nails use one of the clearest connections between Gothic architecture and modern nail art. Coffin extensions provide enough rectangular space for tall panels and pointed internal shapes, while the transparent structure creates the luminous quality that defines stained glass. This is a salon design: the colors must be thin, the black divisions need consistent weight, and the artwork should be encapsulated so the surface remains completely smooth.
How to Apply
- Build or fit balanced clear coffin extensions and apply a sheer smoky layer near the nail beds.
- Map irregular vertical panels with fine black art gel, including several pointed sections and clear openings.
- Fill selected panels with translucent ruby, wine, bottle-green, and dark-amber jelly colors.
- Cure the artwork, encapsulate it with a clear builder product, refine the surface, and finish with crystal-clear gloss.
17. Silver Rose-Window Nails
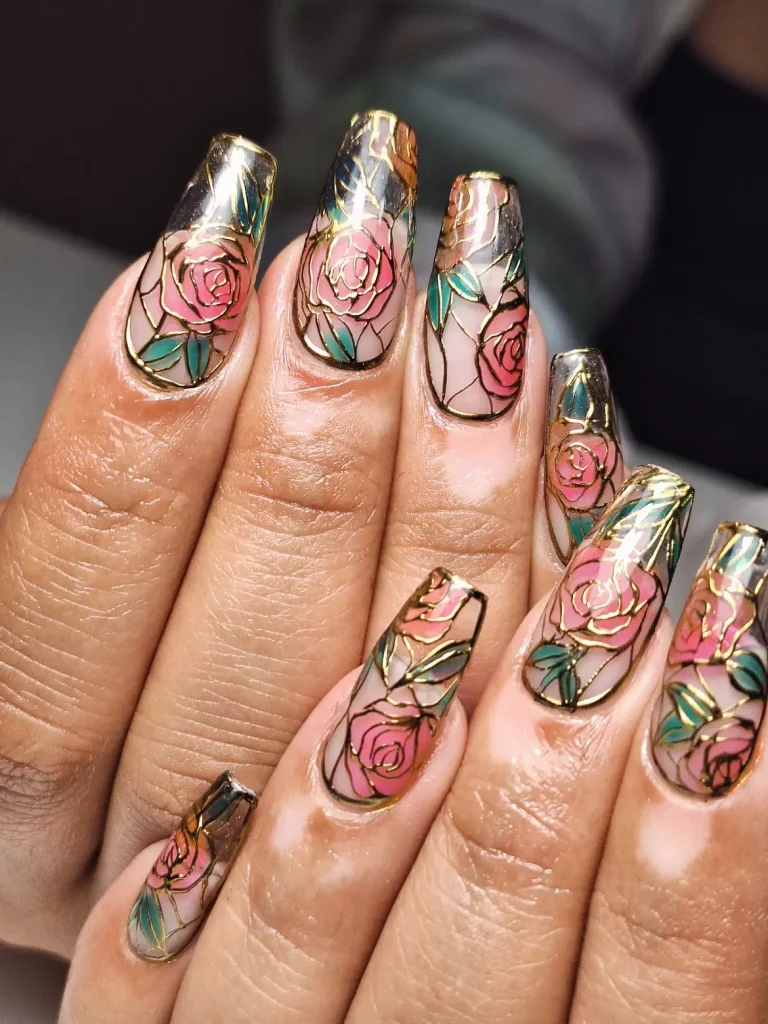
Medium coffin nails are painted deep chrome with two circular rose-window motifs centered on the middle fingers. Fine silver spokes radiate from a small black center into repeated pointed petals, and tiny ruby and amethyst dots sit inside selected sections. The surrounding nails carry only one cropped silver arc near a sidewall, giving the detailed medallions enough visual space.
This is a precise form of gothic nail art for readers who want architectural ornament without transparent extensions. The almond nail provides a tapered frame for the circular design, but the motif should remain small enough to preserve chrome around its edge. A detailed stamping plate or custom decal will give a cleaner home result than freehand symmetry. At a salon, isolated silver chrome can make the tracery more reflective without filling the colored insets.
How to Apply
- Paint medium coffin nails deep charcoal and allow the base to cure or dry completely.
- Center a fine circular rose-window pattern on the two middle nails using silver gel, stamping, or decals.
- Add tiny ruby and amethyst points inside selected sections and place one cropped silver arc on each remaining nail.
- Seal the complete design with glossy top coat, preserving a narrow chrome border around every window.
18. Pointed-Arch Tracery French Tips
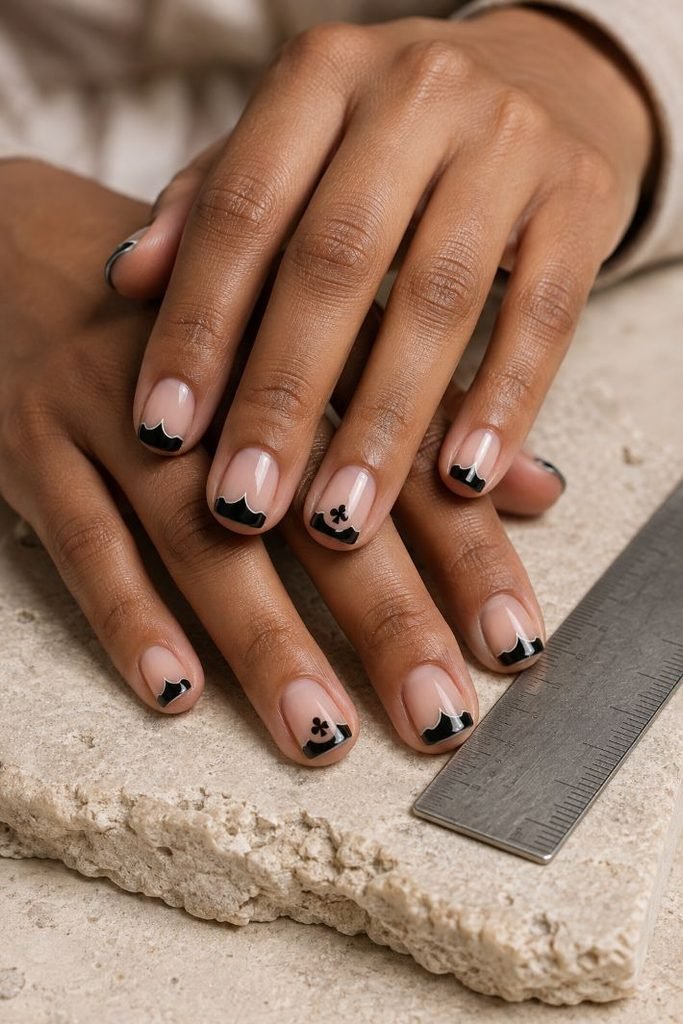
Short square nails begin with a transparent beige-pink base and finish in narrow black tips shaped like a row of small pointed arches. Hairline pewter divisions separate the arches, while one tiny trefoil sits just below the French line on two accent nails. Every architectural element remains confined to the free edge, leaving most of the natural nail uncovered.
These gothic nails for short nails prove that cathedral references do not require long acrylic canvases. The square edge supplies a straight baseline for the repeated arches, and the negative space keeps the detailed tip readable. This is also the most practical architectural design to recreate with decals or a stamping plate. Readers who want additional variations can explore other French tip nail designs, but the pointed rhythm and pewter linework are what keep this version specifically Gothic.
How to Apply
- Apply a transparent beige-pink base to short square nails and let it set completely.
- Paint a narrow black French tip, raising its lower edge into several evenly spaced pointed arches.
- Add hairline pewter divisions between the arches and one tiny trefoil below the tip on two accents.
- Apply a thin glossy top coat without allowing it to pool along the squared free edge.
19. Gargoyle-Gray Stone Nails
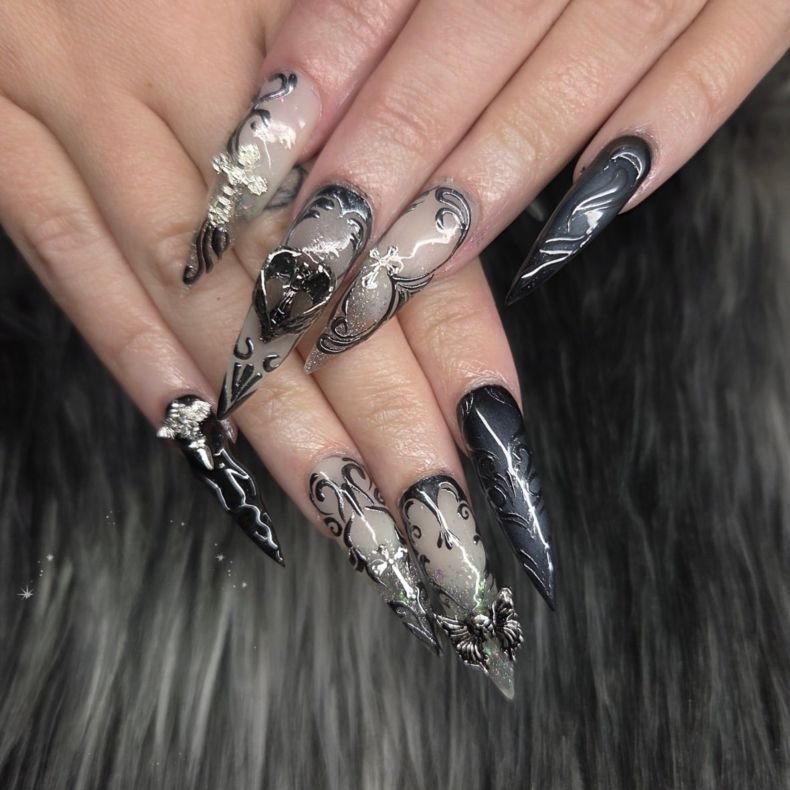
Medium oval nails are layered in slate, ash, and charcoal gray to resemble weathered carved stone. Fine cracks and darker shadowing appear near several sidewalls, while one accent carries a low stylized gargoyle profile sculpted close to the surface. A second accent features a small quatrefoil relief, and the remaining nails stay mostly plain beneath a dry satin finish.
This unusual set translates a Gothic architectural figure into a bold gothic nail design without becoming a full horror scene. The oval shape softens the stone palette, while the limited relief keeps the manicure more refined than a collection of large sculpted faces. Flat gray linework can create a simpler version, but the low gargoyle and quatrefoil require controlled 3D gel. Raised product must be fully cured according to its system and kept away from the cuticle and sidewalls.
How to Apply
- Apply a medium slate-gray base to oval nails and mottle it with thin ash and charcoal layers.
- Add sparse hairline cracks and soft shaded edges, keeping several nails nearly plain.
- Sculpt one low gargoyle profile and one shallow quatrefoil relief on separate accent nails using compatible 3D gel.
- Cure every raised section thoroughly and finish the stone surfaces with a smooth satin top coat.
20. Black-Chrome Spire Nails
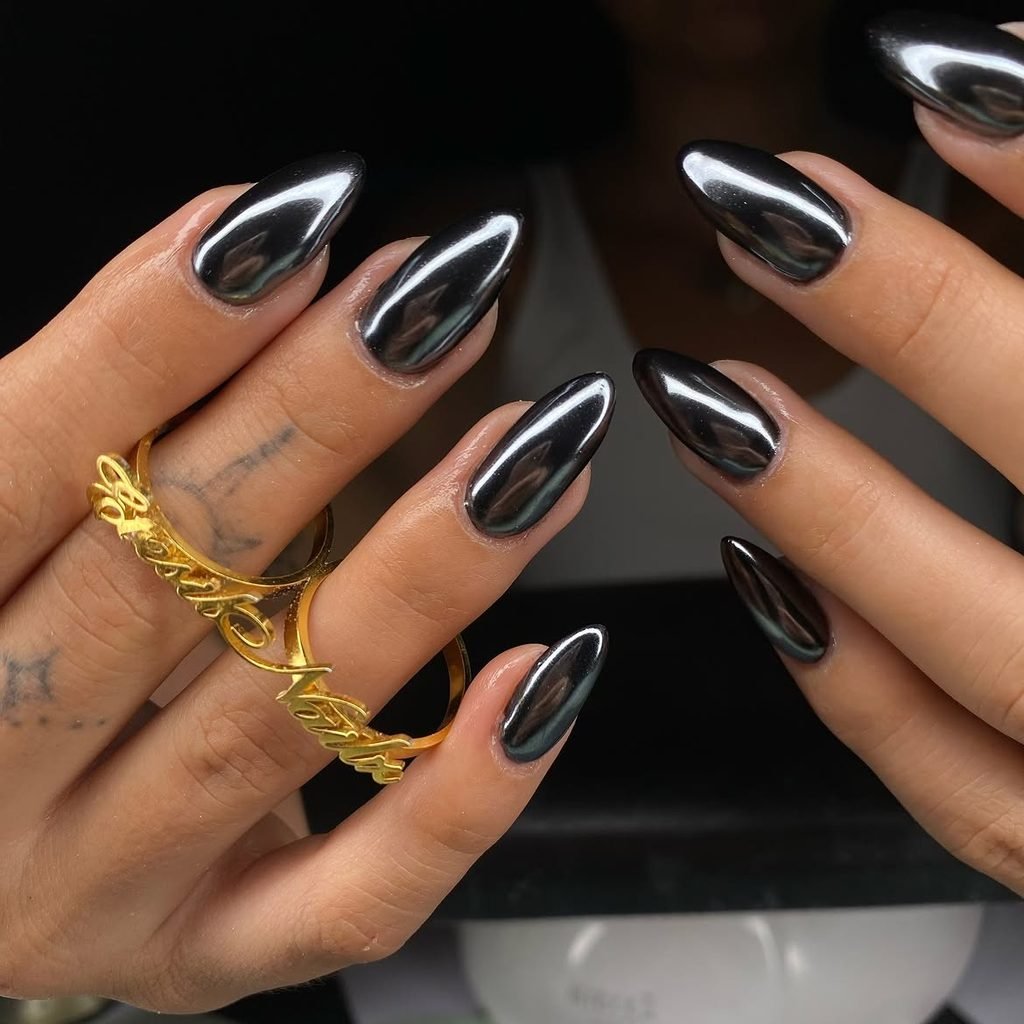
Long stiletto nails transition from translucent smoke near the cuticles into reflective black chrome at the pointed tips. Thin gunmetal lines rise vertically through the center like clustered spires, with shorter lines stepping down toward the sidewalls. One accent uses negative space between the spires, allowing a narrow strip of the sheer base to remain visible.
These gothic chrome nails connect the upward movement of cathedral silhouettes to the natural direction of a stiletto. The result feels architectural and futuristic at the same time, particularly when the gunmetal lines reflect separately from the black background. Chrome powder requires a compatible gel surface and careful sealing; on regular press-ons, metallic striping tape can create a flatter interpretation. The tip must remain clean and symmetrical because reflective finishes expose shape errors immediately.
How to Apply
- Build or fit balanced long stiletto extensions and apply a translucent smoky base.
- Blend black from the tips upward, stopping before the cuticles, then add compatible black chrome over the dark section.
- Paint thin gunmetal spire lines from the center outward, preserving a narrow negative-space channel on one accent.
- Seal the chrome and linework with a compatible glossy top coat and refine every pointed edge.
21. Studded-Leather Coffin Nails
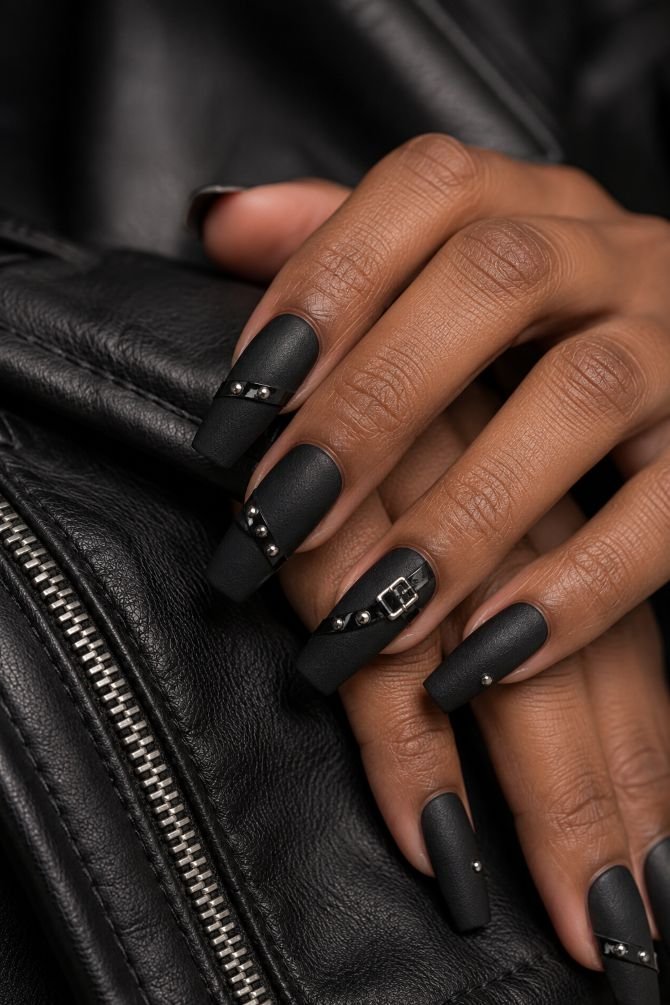
Medium coffin nails are finished in matte black with fine irregular grain that resembles smooth leather. A narrow glossy strap crosses two nails diagonally and is anchored by three low silver studs, while one accent features a small painted buckle close to the cuticle. The remaining nails stay matte with a single silver stud positioned near alternating sidewalls.
These gothic coffin nails draw from punk hardware without covering the hand in spikes and oversized chains. The coffin shape provides enough width for the strap and buckle while maintaining a strong squared end. Texture can be created with a thin speckled layer beneath the matte top coat, but it should remain smooth to the touch. Flat studs are more practical than pointed pieces, particularly on a medium length intended for regular wear. For more shape-specific inspiration, compare the proportions with these coffin nail designs.
How to Apply
- Paint medium coffin nails opaque black and add a subtle irregular grain beneath the matte top coat.
- Draw a narrow glossy-black diagonal strap across two accent nails.
- Secure three low silver studs along each strap and paint one small silver buckle near another cuticle.
- Add single sidewall studs to the remaining nails and make sure every embellishment edge is sealed and smooth.
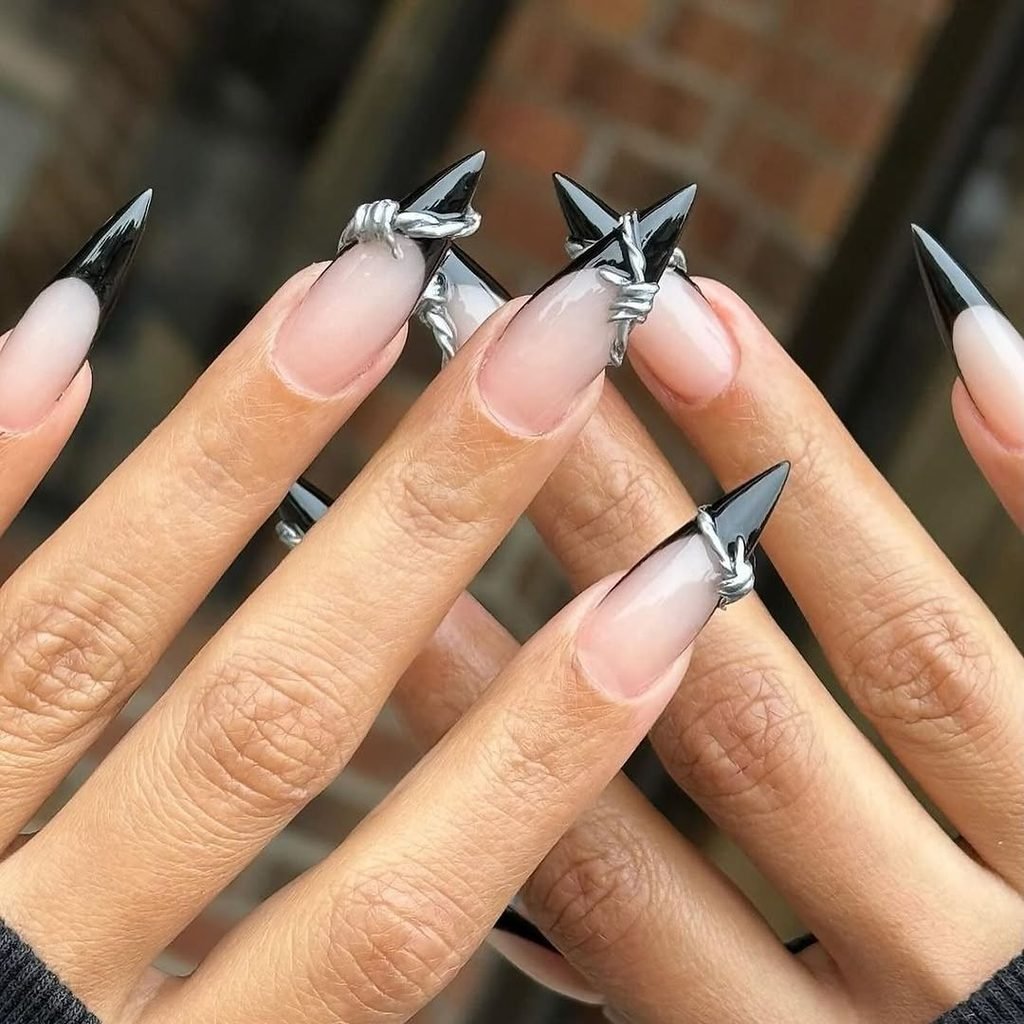
22. Barbed-Wire Negative-Space Nails
Short almond nails remain mostly bare beneath a translucent gray-nude base. Fine black-and-silver barbed-wire lines travel diagonally across three nails, with each barb reduced to two clean angled strokes. The other nails carry only one curved wire near a sidewall, and all of the artwork is painted flat beneath a glossy finish.
This edgy nail design delivers a punk reference on short natural nails without using actual wire, sharp components, or long extensions. The diagonal direction emphasizes the almond taper, while the open base keeps the black lines from visually shrinking the nail. A stamping plate or fine decal offers the cleanest home version. Avoid making every barb large or equally spaced; a little variation makes the wire feel continuous rather than like a row of repeated crosses.
How to Apply
- Apply a translucent gray-nude base to long pointed nails.
- Paint one fine curved black line diagonally across three nails and close to a sidewall on the remaining fingers.
- Add small paired barbs at irregular intervals and trace selected wire sections with hairline silver.
- Encapsulate all linework beneath a smooth glossy top coat so no physical sharp element remains.
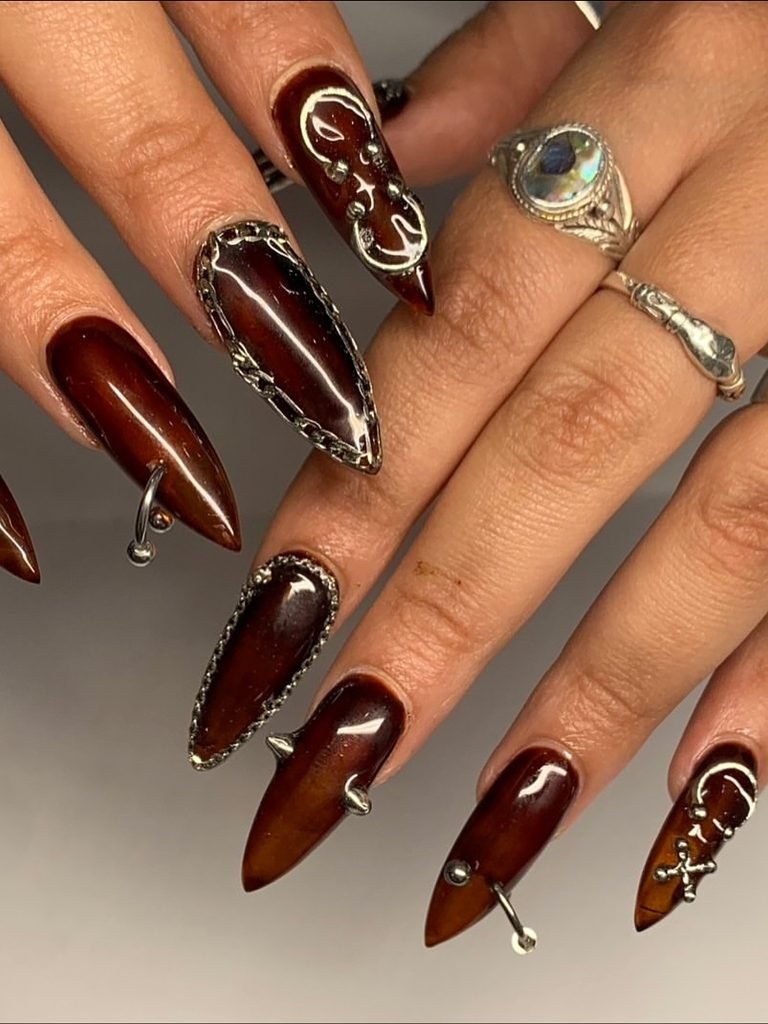
23. Chain-Pierced Stiletto Nails
Long glossy-black stiletto extensions have one tiny silver hoop passing through the free edge of two nails. An ultra-fine removable chain connects each hoop to a low silver anchor fixed farther up the same extension, while the other nails carry flat painted chain links. The hardware remains close to the nail and does not connect separate fingers, preserving normal hand movement.
These gothic acrylic nails are deliberately editorial and require more caution than painted art. Nail piercings should be made only through a properly built artificial free edge, never drilled through the natural nail plate, and every hole must stay away from stress points. Choose smooth purpose-made jewelry and remove it if it catches, loosens, or interferes with daily tasks. Custom press-ons with preinstalled hoops offer a temporary alternative for photographs or an event.
How to Apply
- Build balanced long stiletto extensions with enough artificial free edge to support purpose-made nail jewelry.
- Paint the extensions glossy black and have a trained professional create small holes through two artificial tips only.
- Install smooth silver hoops and short removable chains that anchor on the same nail, then paint flat chain links on the remaining fingers.
- Inspect every closure and edge before wear; remove the jewelry rather than continuing to use a loose or snagging component.
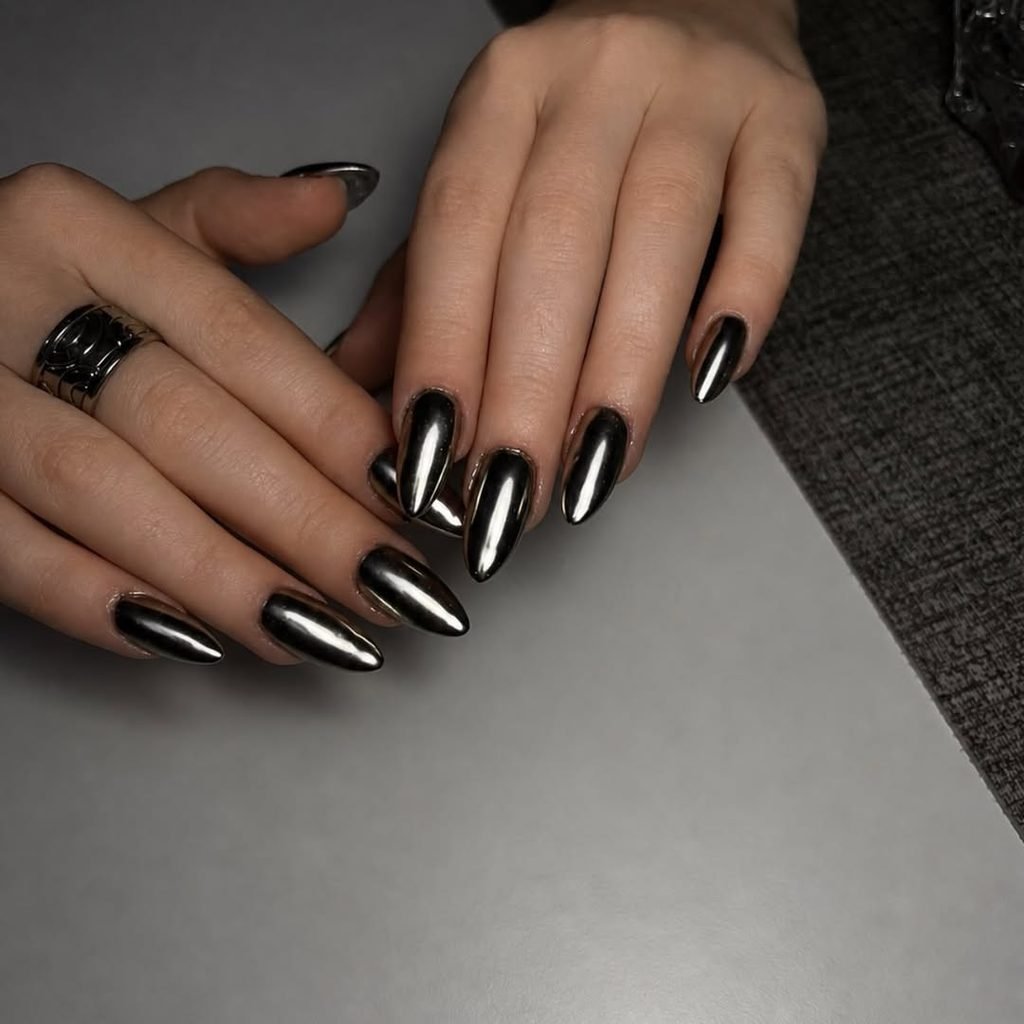
24. Gunmetal Armor Chrome Nails
Long coffin nails are divided into overlapping gunmetal panels with narrow black gaps between them. The plates rise only slightly near the center ridge, creating the impression of articulated armor, and selective edges are rubbed with bright silver chrome. One nail carries a small shield-shaped panel, while the others maintain lengthwise sections that reinforce the coffin silhouette.
This maximalist gothic chrome nail design is strongest when the structure remains controlled. The metallic panels should look engineered rather than lumpy, and the slight relief must not disturb the apex or make the tips unnecessarily heavy. It is a salon-level builder-gel design that requires complete curing between thin layers. A flat version can be recreated on press-ons with gunmetal polish, black outlines, and silver edge highlights.
How to Apply
- Build balanced long almond extensions and cover them with a smooth black base.
- Form thin overlapping armor panels with gunmetal art gel, keeping the highest point close to the center line.
- Define the gaps in black and apply isolated silver chrome to selected plate edges and one small shield-shaped accent.
- Cure every layer according to the product system and seal the panels without flooding their narrow separations.
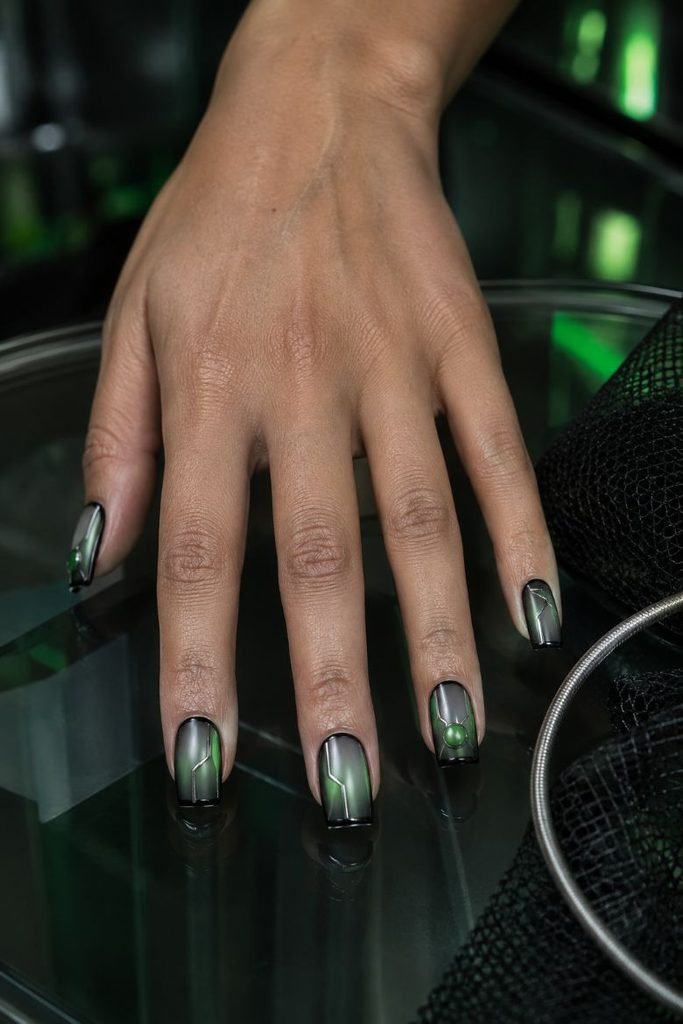
25. Acid-Green Cyber-Goth Nails
Medium square nails combine transparent smoke-gray bases with airbrushed acid-green centers. Glossy black frames sharpen the perimeter, while narrow silver chrome lines divide several nails into asymmetrical industrial panels. Two accents contain small translucent green domes kept low against the surface, and the remaining nails stay flat so the neon color has room to glow.
These cyber-goth nails close the collection with a style that is futuristic rather than Victorian. Black structure, industrial silver, artificial neon, and transparent layers create the connection without introducing computer logos or random circuitry. An airbrush gives the cleanest green fade, while a small sponge can produce a simpler version. Low domes require compatible clear gel and full curing; omit them if you want the set to remain practical for regular wear.
How to Apply
- Apply a transparent smoke-gray base to medium square nails.
- Airbrush or sponge acid green into the centers, leaving a smoky border around every nail.
- Paint slim glossy-black perimeter frames and add asymmetrical silver chrome divisions to selected nails.
- Create two low translucent green gel domes if desired, cure thoroughly, and finish the remaining surfaces with high gloss.
What Makes Gothic Nail Designs Look Intentional?
Gothic nails require an apparent visual reference. Architecture provides pointed arches, tracery, rose windows, stonework, and spires reaching heavenward. Victorian fashions and mourning accessories add black cloth, cameos, brocade, corseting, and conservative metal work. The punk and industrial look provides leather, studs, chains, piercings, hardware, and tough surfaces. The modern gothic nail coating proves that gel relief, dark gradients, marble effects, letters, and metal accents can convey the style without relying on a concrete seasonal reference.
Choose one of those design languages and let it control the set. Cathedral tracery does not need to sit beside barbed wire, cyber-green domes, roses, chains, and five unrelated charms. A repeated color, line weight, finish, or metal is enough to connect different nails. Matte black with glossy brocade works because the texture is consistent; ruby stained glass works because the palette and black divisions repeat across the hand.
Goth nails too, are not always Witch or Halloween nails. Anyone searching for lunar, occult, mystical symbols (can search these specific names too) will uncover the inspiration from a collection of witchcraft-inspired nail ideas; whereas ghosts, pumpkins, bats, graveyards and specifically themed nail art will fit Halloween nail ideas.
Choosing Gothic Nails by Length and Shape
Short, round, oval, squoval, and square nails can handle controlled contrast well. Patent black and micro French tip, tone on tone brocade, marbling, a small fleur-de-lis or single barbed wire on the diagonal will look finished and not section a short nail off too much. Negative space can be especially important for black art because with too much paint over a short nail that close you won’t be able to see that small detail.
Medium almond and oval shapes suit cameos, reverse-French crescents, rose-window motifs, ribbons, lettering, and color shifts. Among gothic almond nails, the strongest compositions follow the taper instead of placing a wide horizontal motif across it. Medium gothic square nails offer a straighter canvas for corset lacing, checkerboards, cyber panels, and repeated arches.
Long coffin and stiletto extensions make sense when the design genuinely needs structure or uninterrupted length. Transparent stained glass, articulated armor, chrome spires, piercings, and large vertical ornaments cannot be reduced indefinitely without losing their defining feature. Length should serve the artwork rather than act as a substitute for it. If a long extension will interfere with typing, work, or dressing, choose a shorter press-on interpretation instead of ignoring the practical cost.
Gothic Nail Colors Beyond Black
Black still works for strong, defined outlines and sheer contrast, however-it is just not the only hue that can pull off a dark romantic polish. Oxblood, black cherry, burgundy, wine, aubergine, and deep plum nail the mood but add definition to sheer, jelly, metallic, or satin finishes. Bottle and petrol green and best with silver and gunmetal, but charcoal, slate and smoke gray offer a more minimalist architectural feel.
Light colors can support gothic details when their role is deliberate. Translucent ivory gives black pointed arches a formal bridal setting, and a sheer gray-nude base keeps barbed-wire artwork wearable on short nails. Metallics should be equally controlled: pewter and antique silver feel colder and more industrial, gunmetal supports armor and hardware, and a small amount of aged gold can suit brocade or Victorian references. Mixing every metal on one hand weakens the design unless the deliberate subject is mismatched jewelry.
Conclusion:
The strongest gothic nail ideas do more than place a dark symbol on black polish. Patent shine can reference leather, tone-on-tone brocade can suggest fabric, silver tracery can turn a French tip into an architectural detail, and a controlled row of studs can introduce punk hardware without overwhelming the hand. The visual source should remain understandable even when the manicure is viewed from a normal distance.
So, First choose your length, then determine whether you want something feminine, architectural, minimalist, or punky, industrial or even cyber-goth. Then make decisions on color, material and finishes. Short nails can feel as perfectly gothic as stiletto long ones when on the right scale. The best set is not the one with most of whatever; it is the one in which color, finish, form, and details are always going in the same direction.