Trending · The nail edit
19 Fall Pumpkin Nail Designs for a Cozy Autumn Manicure
A tiny pumpkin, smaller than a freckle, brings an entirely different feeling to the sheer manicure than the copper magnetic coating or the sculptured ribbed...
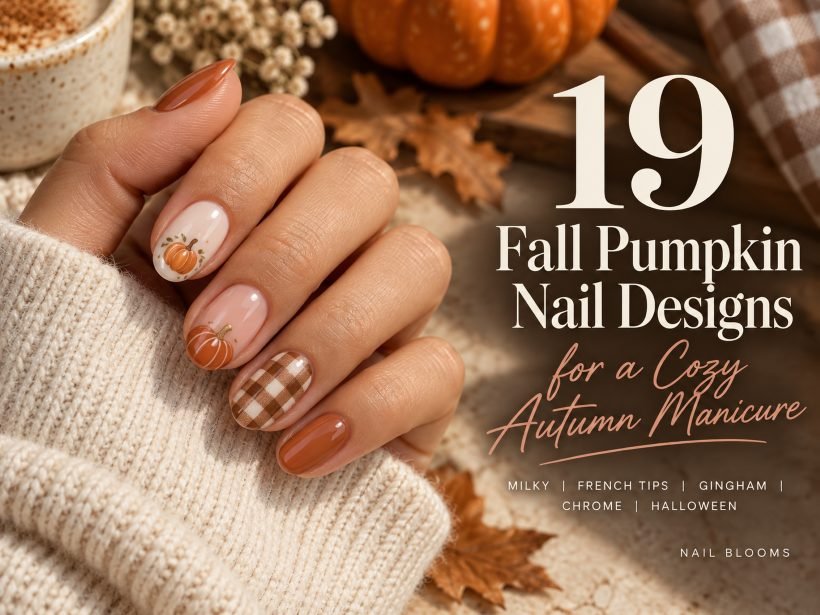
A tiny pumpkin, smaller than a freckle, brings an entirely different feeling to the sheer manicure than the copper magnetic coating or the sculptured ribbed accent. This is the charm of fall pumpkin nail art – you get to pick how much of the fall season you want to wear, be it a subtle element on short natural nails or a complete collection of autumn artwork.
In this collection, the pumpkin design remains the star, with enough space for gingham, tortoiseshell, pastel gradients, and one Halloween design. These curated references vary in shape, composition and technique. For a simpler version, choose regular polish or a suitable decal; detailed art and raised accents may call for custom press-ons or a nail artist. Start by selecting how detailed you like your nails; the color will come after.
1. Tiny Pumpkin Accents on Short Milky Nails
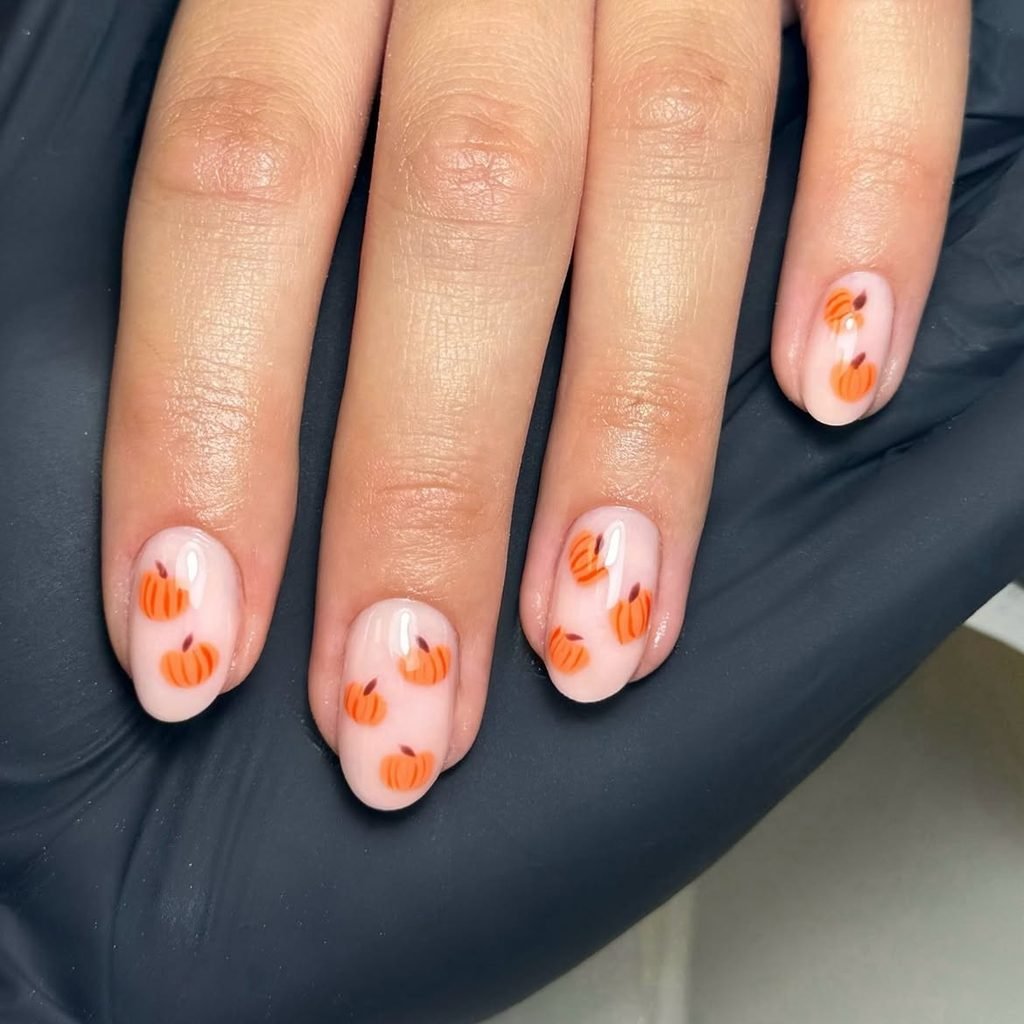
A single little pumpkin will do just fine here. The short oval nails have a somewhat milky beige coating which allows the free edge to be visible and soft. The tiny burnt orange pumpkin placed a bit off-center on the ring finger has two thin cinnamon-colored lines and a barely noticeable green stem. The remaining nails remain plain under a glossy coat. By placing the design below the half of the nail plate, there will be plenty of room left around it.
This is an easy way to incorporate pumpkin designs into your nails, particularly for those who tend to stick to neutral colors. Get a decal with a clear backing since the white border will interfere with the sheer color of the polish. Measure it up by comparing the actual nail with the picture. If you have very small nails, it is better to choose a simple shape rather than a mini design.
How to Apply
- File short nails into soft rounds, apply base coat, then add thin layers of milky beige lacquer.
- Let the color dry before placing one small transparent-backed pumpkin decal below the ring nail’s midpoint.
- Smooth the decal flat, keeping its edges away from the skin and sidewalls.
- Seal with a compatible glossy top coat, covering the entire decal without repeatedly brushing over it.
2. Pumpkin-Shaped French Tips on Almond Nails
Forget about putting pumpkins on top of a French manicure, because these pumpkins will be the tips themselves. Almond nails start with a sheer peach-beige base. At the free edge of each nail, three rounded rust-orange lobes create the upper part of a cropped pumpkin, with a small cocoa stem directed towards the cuticle. Darker lines mimic the ribs. The pumpkin occupies the tip but leaves the nail bed mostly uncovered, all under the clear gloss.
The rounded design adds a softness to an almond point, which is especially helpful when you want a pointed nail without a harsh appearance. Ask your technician to customize the pumpkin width for each nail; using one stencil for all of the nails may look too cramped on the pinkie. The warm nude base will give more space to the orange color. For a non-literal next design, here are other options of French tip nail designs.

How to Apply
- Apply a sheer peach-beige base to medium almond nails and let the lacquer dry.
- With a detail brush, paint three connected orange lobes at each tip, following the tapered free edge.
- Add slender cocoa stems toward the nail beds and two curved rust-brown rib lines within each pumpkin.
- Allow the artwork to set before floating a glossy top coat over the tips and nail beds.
3. Scattered Mini Pumpkins on Amber Jelly Nails
Light goes through this manicure instead of being reflected by the opaque cream. Amber jelly nail polish is used for medium-sized oval nails, and the line of natural nails can be seen through the honey-like shade of the polish. Small ochre and rusty-orange pumpkins are scattered on the index, middle, and ring fingers at various heights. There is a small black stem on each pumpkin, while the pinkies and thumbs are left empty. The top coat provides gloss and gives the finish a glassy appearance.
This repeated design seems more fun than one accent nail, but transparency makes it difficult to use this pattern as a busy fall design. Leave some space between pumpkins, so that amber becomes visible. If your selected jelly becomes too opaque after many layers, do not continue until you get the same color as in the bottle. It will be easier to create such small elements with the help of miniature decals and thin brush instead of using regular glitter.

How to Apply
- Apply a clear base and thin coats of amber jelly lacquer to medium oval nails, preserving translucency.
- Let the jelly layers dry, then place two or three small pumpkin decals on each of the three central fingers.
- Vary their positions and orientations while leaving the thumb and little finger undecorated.
- Press every decal edge flat and finish with a clear glossy top coat.
4. Brown Gingham Nails with Pumpkin Accents
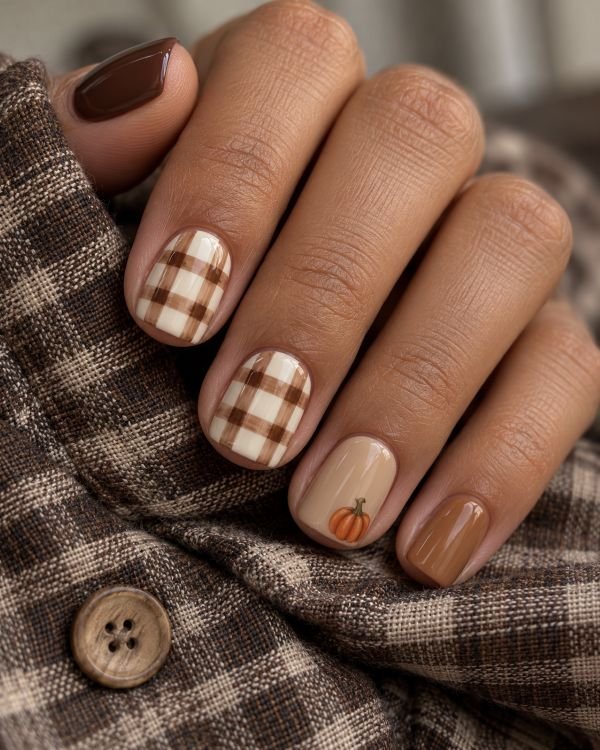
Cream and cocoa checker prints provide structure for this manicure that uses short square nails. The index and middle fingers sport delicate nail art in gingham form. There are transparent brown stripes over an ivory-colored base, forming dark squares wherever they intersect. There is one orange-colored pumpkin on the beige ring finger, toward the lower corner. There is a solid chocolate nail on the thumb, while a caramel-colored nail finishes off the manicure on the little finger. All these are glossy nails with rounded corners.
The scale is more important than covering every nail with a print. Some clear checks are more elegant than trying to fit in a small grid on the short nail beds. This nail art style also distinguishes gingham from plaid by having evenly spaced stripes with the same widths, as opposed to many different lines with varied widths. You may try using a gingham nail wrap for the gingham design and a pumpkin decal for the accent.
How to Apply
- Paint the index and middle nails ivory, the ring nail beige, the thumb chocolate, and the little finger caramel.
- Once dry, brush evenly spaced translucent cocoa stripes across the ivory nails in one direction.
- Let those stripes dry, cross them with perpendicular stripes, and add a small pumpkin decal to the beige nail.
- Seal the checks and accent with glossy top coat after the artwork has set.
You can use our Virtual Nail Try-on tool to apply nail designs on your hand without visiting salon!
Use our AI Nail Generator5. Matte Terracotta Nails with Glossy Pumpkin Silhouettes
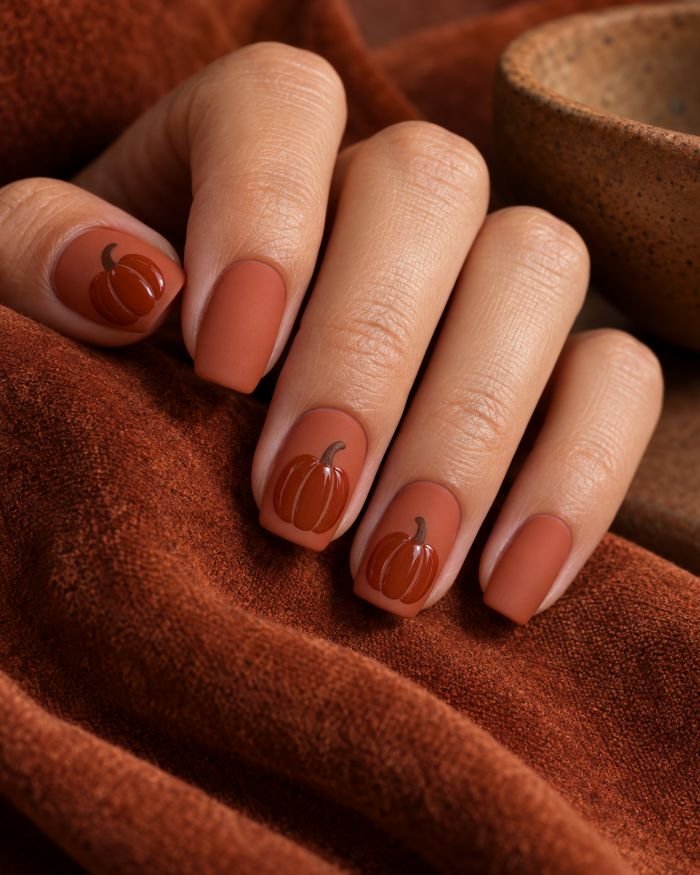
The difference is evident when you move your hand. Squoval nails feature a subdued terracotta base with a matte surface. Darker cinnamon pumpkins rest on the thumbs, middle, and ring fingers, but only have a glossy finish within the silhouette. Their short brown stems lack any lines, leaves, and glitter. The index and pinky fingers remain simple, allowing the changing reflections to show off the painting rather than contrasting colors.
Request matte and glossy nail art because this one needs to be applied through a precise top coat application and not through raised designs. It is ideal for someone who wants to have a pumpkin nail art that is only noticeable when viewed closely. Do not go beyond the silhouette of the pumpkin nail art with glossy finishes because a halo will spoil the entire look. The matte finish is dependent on the wear and care of your nails, thus choose it as the finish.
How to Apply
- Apply muted terracotta lacquer to medium squoval nails and let the color dry.
- Add a compatible matte top coat across the entire set and allow it to set.
- Paint flat cinnamon pumpkin silhouettes on three selected nails, add short brown stems, and let them dry.
- Use a small detail brush to coat only the pumpkins with compatible clear gloss, preserving the surrounding matte surface.
6. Fine Copper Pumpkin Outlines on a Sheer Nude Base
There are no orange fills in this design. The short oval nails feature a clear nude base. The open pumpkin on the middle finger and a slightly offset one on the ring finger have their outlines made of a thin copper line. Both the pumpkins have only two ribs each and a small hook-shaped stem. A copper dash on the index nail sidewall completes the design. It features a shiny finish.
A blank interior in this design will help you if the complex nail art designs usually confuse you. The copper must look like a thin line rather than a metallic outline. A metallic nail-art polish will be enough to get the desired result; chrome powder is not necessary for such thin lines. You should support your working hand on the table and turn the finger to paint all the curves.

How to Apply
- Apply a thin rosy-nude lacquer base to short oval nails and let it dry completely.
- Draw two offset pumpkin outlines with a fine liner brush and copper metallic nail-art polish.
- Add two internal rib curves per pumpkin, short hooked stems, and one small index-sidewall dash.
- Let the metallic lines set before sealing with clear gloss, keeping the pumpkin interiors unpainted.
7. Olive and Cream Nails with a Miniature Pumpkin Patch
Two illustrated nails hold the miniature landscape. On almond-shaped nails, the middle and ring fingers feature ivory-colored bases with small pumpkins gathered on the lower thirds of the nails. One pumpkin is rust-colored, another – pale ochre, while the third one is cream-colored, complemented by modestly illustrated sage vines and a cocoa-colored ground line. The thumb, index, and little fingers are solid muted olive. Gloss seals the painting without applying glitter or texture.
The olive color of the nails serves as a background for the painting, thus making the pumpkin field easy to understand even when looking at all the nails together. Do not attempt to paint a leaf in each available space – the ivory area above the painting is a part of the illustration. It is a great option for a salon-reference design if you like illustrations but do not want more than two fingers to be decorated. A custom press-on artist will create the illustration according to your desired length.

How to Apply
- Paint the thumb, index, and little finger muted olive, and the middle and ring fingers ivory; dry or cure each product as directed.
- On the ivory nails, sketch a thin cocoa ground line across the lower third and paint three differently sized pumpkins.
- Add restrained sage vines and fine rib details, setting each layer before neighboring colors touch it.
- Seal with a compatible glossy top coat while keeping the upper ivory areas undecorated.
8. Burgundy Half-Moon Nails with a Pumpkin Accent
The short squoval nails have a deep burgundy color, except for the thin, sheer beige crescent on each nail tip. On the ring finger, there is an ivory pumpkin slightly above the half-moon design, outlined in warm brown and decorated with a miniature olive stem. Other fingers have the same curved opening. The shiny coating makes the deep wine red look more vibrant, whereas the light pumpkin is visually connected with the crescent design.
Use the curve around your cuticles to place the half-moon design. However, the half-moons do not have to be exactly the same size as your anatomical lunula. Instead, try to make the visual width of each half-moon about the same on all fingers. Otherwise, the overly large opening will divide a short nail into two halves of the same size. Also, you can use the ivory design if you do not like the orange one against burgundy.

How to Apply
- Apply a sheer beige base to short squoval nails and let it dry fully before using guides.
- Position curved guides near the cuticles, paint the exposed areas burgundy, then remove the guides while the color is still workable.
- Once dry, paint a small ivory pumpkin above the ring finger’s crescent; add thin brown ribs and an olive stem.
- Allow the accent to set, then apply a glossy top coat across the entire set.
9. Tortoiseshell Nails with Ivory Pumpkin Details
Honey amber, caramel, and espresso color in irregular translucent spots on medium almond nails. The tortoiseshell pattern is most pronounced on the thumb, index, and little fingers, and only caramel remains on the middle and ring fingers, with some dark clusters close to the edges. Every lighter accent nail features one ivory pumpkin with cocoa ribs. Glossy finish makes the brown pattern look deeper but keeps the light illustrations sharp on top.
The background accents are important because an ivory pumpkin may blend into the busiest part of the tortoiseshell pattern. Requesting amber spaces will help you avoid an almost solid brown outcome. You can experiment with various base depths on these chocolate brown nails prior to selecting your colors. In order to recreate this manicure at home, a tortoiseshell wrap combined with ivory decals is easier than applying several layers of wet gel; just make sure about top-coat compatibility.

How to Apply
- Apply amber jelly lacquer to medium almond nails and allow it to dry.
- Layer irregular translucent caramel and espresso patches, drying between layers; leave two nails, mainly caramel.
- Add ivory pumpkin decals to those quieter accent nails, away from their darkest patches.
- Smooth and seal with a compatible glossy top coat, preserving the visible amber spaces.
10. Copper Velvet Cat-Eye Nails with a Pumpkin Accent
Copper shimmers on short-to-medium oval nails like light on velvet. Four fingers are dressed up in the warm bronze-brown magnetic cat-eye effect, applied in a broad glow form, not in a narrow line. The ring nail is painted in an opaque cream color with a russet pumpkin, dark ribs, and an olive vine curled around. Glossy nails are physically smooth; their velvet texture is achieved through the changing of pigment colors, not by using a velvet-like coating.
At the salon, ask for a comparison between diffused velvet effect and sharp cat-eye line. The magnet is applied while the magnetic gel is not cured yet, then the effect is fixed in the lamp according to the specific product system. An accent of a plain cream provides stability to the illustration, which allows keeping it readable despite the changes of the neighbor nails under the influence of light.

How to Apply
- Have a technician apply and cure a compatible gel base, bronze-brown color on four nails, and cream on the ring nail.
- Apply copper magnetic gel to one bronze nail at a time, shape a broad glow with the appropriate magnet, and cure as directed.
- Paint the ring pumpkin in russet with dark ribs and a short olive vine, curing the detail layers as specified.
- Apply a compatible glossy gel top coat and complete the manufacturer’s full cure with the matching lamp.
11. Chocolate Brown Nails with Bronze Chrome Pumpkin Art
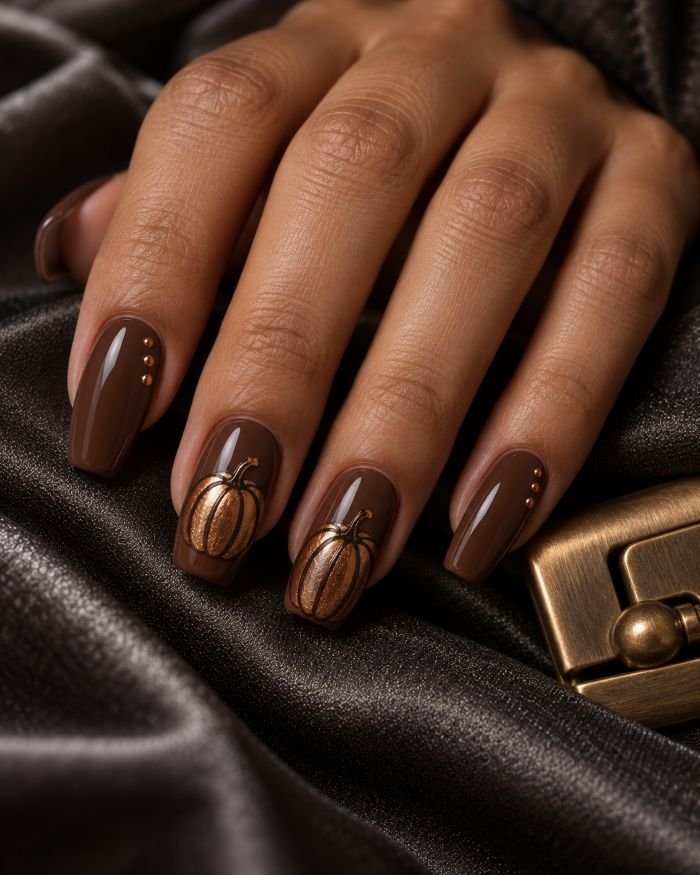
Metallic pumpkins are depicted as small metallic embellishments against the glossy cocoa color on the medium coffin nails. The middle and ring fingers have both pumpkins which are filled, polished, and have thin dark-brown rib lines and a small stem. Two tiny metallic dots on two adjacent sidewalls are made of the same material; other surfaces are left plain. The conical shape of the sides and pointed tips add an architectural element to the round motifs instead of the soft oval shapes used previously.
This is a real chrome nail design, so instead of a metallic paint, another substitute will result in a different reflection. The powder will need a surface that is cured and sealed by the artist using the pigment system’s directions. If you desire the surface to be unobtrusive, request thin motifs. Cocoa changes the effect of the bronze color; the near black background looks more dramatic, and the milk chocolate one looks softer.
How to Apply
- Have a technician prepare medium coffin nails with cocoa gel color and a suitable surface for isolated chrome artwork.
- Paint pumpkin shapes and small sidewall dots with compatible no-wipe art gel, then cure according to its instructions.
- Rub bronze chrome pigment onto the prepared motifs and gently remove excess powder from the surrounding cocoa.
- Add fine dark-brown ribs and stems, then seal and cure with the compatible gel system, protecting every chrome edge.
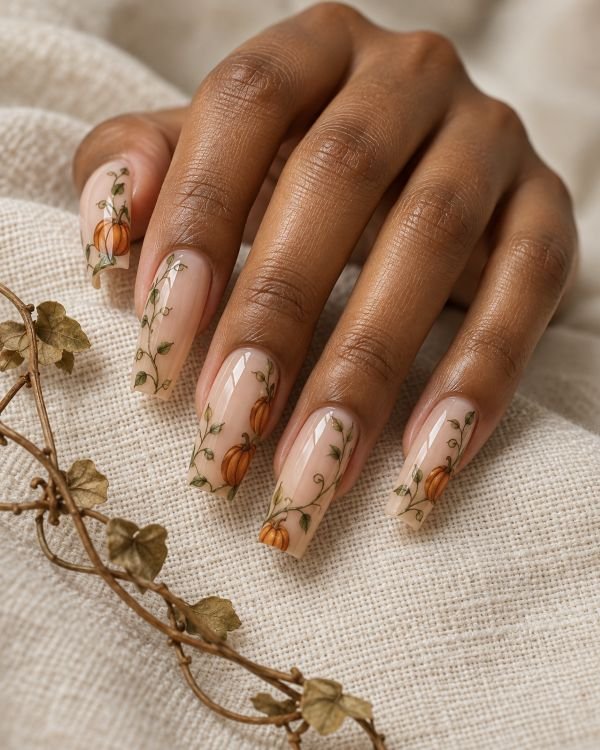
12. Pumpkin and Vine Side Borders on Long Square Nails
This design sticks to the contours of long square nails rather than being placed in the center. A translucent beige base is left largely bare with cropped burnt-orange pumpkins peeking out from the side border of the thumb, middle, and little finger. Olive vines grow vertically beside them, dotted with small sage leaves. There is just one slim vine on the index and ring nails. The set is glossed without any glitter, charms, or background painting.
Longer nails are justified in this case since the side borders require some space to work. In case you have a shorter design, decrease the number of leaves rather than trying to squeeze the entire vine in the same area. Request an alteration in the direction of the border in order for your whole hand to look even. Almond nails can serve as a good example of how tapering will affect the design; square sidewalls make this specific composition possible.
How to Apply
- Apply translucent warm-beige color to professionally prepared long square nails, drying or curing according to the chosen system.
- Paint cropped orange pumpkins along selected sidewalls, keeping their centers partly outside the visible border.
- Extend thin olive vines upward and add a few sage leaves; leave the central nail areas clear.
- Set the fine artwork completely, then seal with compatible gloss without adding bulk to the sidewalls.
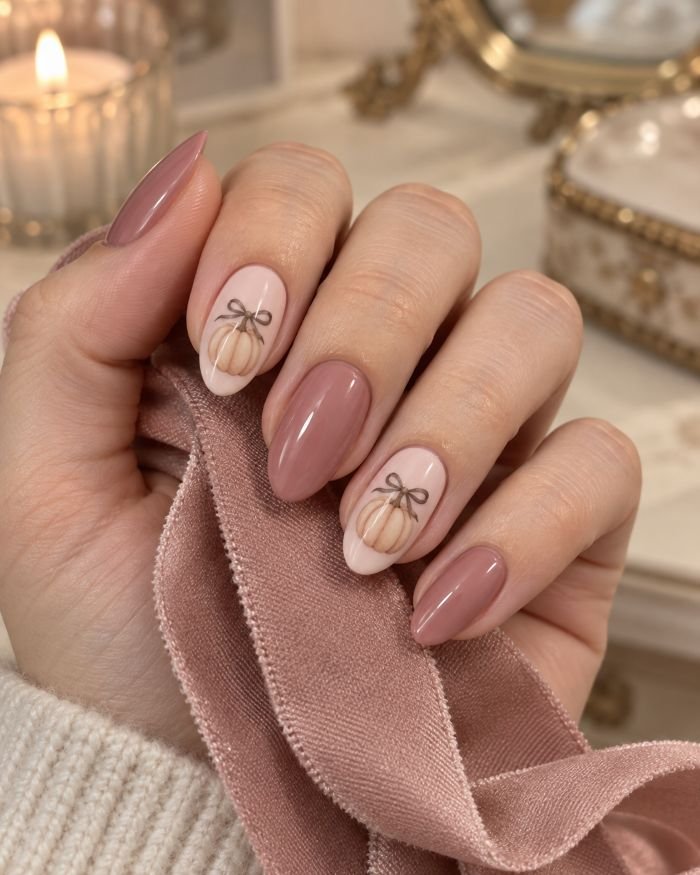
13. Dusty Rose Nails with Mini Pumpkins and Ribbon Bows
The soft rose color scheme makes the seasonal element appear softer. Almond-shaped nails feature medium almond nails with alternating creamy dusty rose and two soft blush nail polishes. Small peach beige pumpkins on the index and ring nails sit underneath fine espresso bow ribbons, which have short tails tilted to form a bow shape near the stem. The other nails are plain rose. The design is flat and glossy, as bows are painted lines, while pumpkins have only two soft taupe ribbons each.
The bow should be of moderate size, as it competes with the pumpkin underneath. Together, the two elements require more space than just one of them; thus, the design is best for medium-length nails rather than short. Press-on nails may come already decorated with the illustration. Dusty rose makes the design more suitable for wearing it with pink outfits without adding a bright orange accent; use brown outlines sparingly, as an abundance of it would make bows appear like cartoons.
How to Apply
- Paint medium almond nails dusty rose, reserving pale blush for the index and ring fingers; allow the base to dry.
- Add small peach-beige pumpkins to the lower-middle portions of the blush accents, followed by two light taupe ribs.
- Draw fine espresso bows just above the stems, with narrow loops and short curved tails.
- Let the linework set and seal with a glossy top coat, keeping the artwork completely flat.
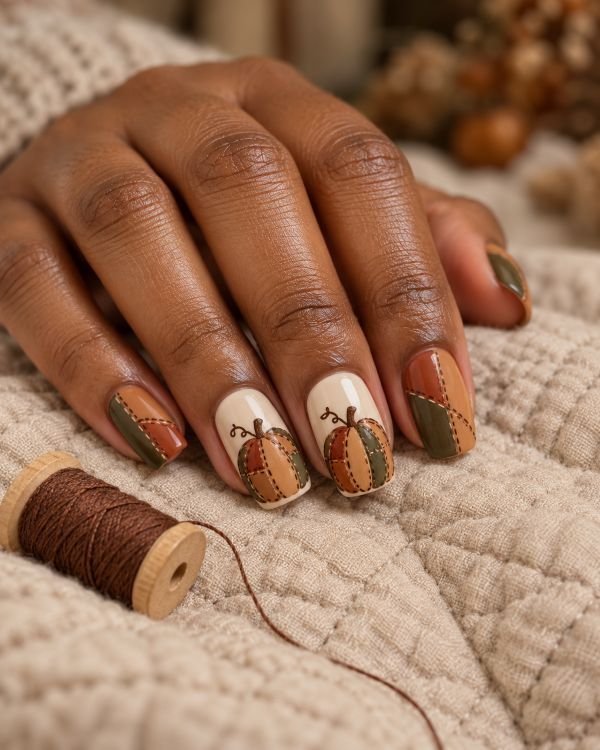
14. Patchwork Pumpkin Nail Art with Fine Stitched Borders
This medium square nail art takes inspiration from sewn fabric. The middle and ring fingers feature ivory bases with large pumpkin designs broken into random patches of terracotta, caramel, and dusty-olive shades. Fine espresso lines delineate the seams like stitches, with small brown stems above. The other nails get solid blocks of the same colors, with just one dashed seam each. Satin coating gives the graphic nail art a soft look while keeping the surface totally smooth.
Unlike the gingham pattern, this patchwork design does not have an even grid to repeat. Make sure the patches remain irregular and the stitching slightly spaced or else the nail will be a collection of little dark dots. This nail art is quite intricate, especially where patches come together, so it would be best to either go to a nail salon or use nail wraps. Decide which nails will have the pumpkins and which the fabric patches; having both on all fingers takes away the visual break in the design.
How to Apply
- Prepare medium square nails with ivory bases on two accents and terracotta, caramel, or olive on the remaining fingers.
- Outline large pumpkin shapes on the ivory nails and fill them with three irregular, clearly separated color patches.
- Add fine espresso stitch dashes at the joins, small brown stems, and one simple seam on each companion nail.
- Dry or cure the layers as directed, then finish with a compatible satin top coat rather than textured decoration.
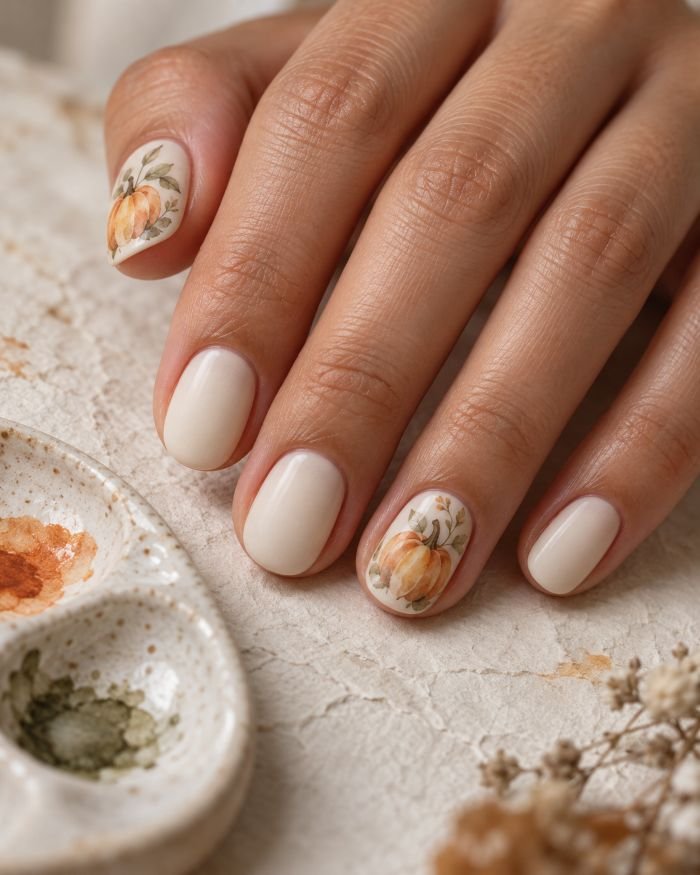
15. Soft Watercolor-Effect Pumpkins on Ivory Nails
Soft color is used to outline the short oval nails. Creamy ivory color of the base has a satin effect. Watercolor pumpkins in light ochre and washed burnt orange are painted on the thumb and ring finger. The edges of these colors are transparent and vary in transparency. Grey-sage leaf is painted near each pumpkin. Other nails are left plain. No black lines or metal elements are used. Inconvenient as it is, the only defining feature is the transparent watercolor effect.
An easier way to achieve this manicure would be to use watercolor nail decals. Do not expect regular nail polish to work like paint on paper. It is necessary to use a water transfer decal. Translucent edges can be recreated easily with this type of decal. Excess backing should be cut off and some ivory should remain visible near each motif. This manicure is suitable for people who like botanical illustrations but dislike sharp graphics.
How to Apply
- Apply ivory lacquer to short oval nails and let the base dry before handling decals.
- Select two watercolor-effect pumpkin water decals in ochre and washed orange, sized for the thumb and ring nail.
- Soak and transfer according to the decal instructions, smooth gently, and blot away water before sealing.
- Let the decals dry thoroughly, then apply a compatible satin top coat over the entire nail.
16. Pumpkin Pie Accent Nails with Cinnamon Swirls
A tiny piece of pie converts this short square nail art design into a fall baking nail inspiration. The ring nail has a cream base with a triangular pumpkin-orange pie filling, a thin tan crust, and a single ivory cream dollop. There is a small whole pumpkin placed close to the lower part of the middle finger. Cinnamon-orange and cream ribbons wind around the thumb and index fingers while the pinkie remains cocoa brown. Gloss connects the flat drawings and swirls.
Add an edge to the crust and make sure that the cream marking is not too large that it hides the pumpkin-orange pie. This is a fun Thanksgiving nail art idea for those who like their desserts illustrated more than the entire harvest theme. If smoothness is the key to your daily nails, then you may avoid adding raised cream to your nails. A pie decal can be applied to one cream nail while the cinnamon swirls are drawn at home.

How to Apply
- Paint short square nails cream, reserving cocoa brown for the little finger, and let the bases dry.
- Draw broad cinnamon-orange ribbons on the thumb and index with a liner brush, retaining cream gaps between curves.
- Add the ring finger’s orange pie triangle, tan crust, and ivory dollop, then a small pumpkin on the middle nail.
- Wait for all details to set before applying a smooth glossy top coat.
17. Burnt-Orange Ombré with Tiny Pumpkin Cuticle Art
A gradient from cream to burnt orange is seen from the cuticle to the tip of the medium almond nails. The gradient runs vertically and leaves a lighter bottom part and a darker free edge. Two little brown pumpkins with stems and two curved ribs are drawn on the middle and ring fingers inside the light part, but comfortably above the skin.
It is necessary to place the drawings on cream nails so that they have sufficient contrast and do not interfere with the darker tips. It is important to keep the light part the same for all nails; otherwise, the pumpkin will seem detached from the rest of the nail. This nail art technique is different from the aura manicure because in the latter case, the color spreads out around the glow spot.

How to Apply
- Paint medium almond nails creamy ivory and let the base dry.
- Dab cream and burnt-orange lacquer with a cosmetic sponge, keeping cream near the cuticles and orange at the tips.
- Build the fade in thin, dried layers, then add small brown pumpkin-outline decals to the pale areas on two nails.
- Apply a compatible glossy top coat to smooth the sponge texture and seal the artwork.
18. Raised Pumpkin Nail Art with a Cable-Knit Accent
It is the low relief that makes this square set interesting to touch. The ring finger features a cinnamon-orange pumpkin with slightly raised ribs and a brown stem on matte oatmeal. Next to it, the middle nail has a cream-colored cable-knit design created out of thin raised lines. The thumb and little finger have an oatmeal background, while the index finger has a matte cinnamon finish. The pumpkin is limited to the nail’s border and does not feature any charms.
This is 3D nail art for a professional nail technician or custom press-on nails. The type of gel used and the curing process differ for each product, and there is no standard top coat sequence for dimensional gels. Order shallow ribs if you regularly work with knitted clothes and think about replacing the raised cable with a painted one. Look at the set from the side – it should have a shallow relief.

How to Apply
- Have a technician prepare medium square nails with oatmeal, cream, and cinnamon gel bases, curing each layer with the correct system.
- Finish the plain areas matte, then create a pumpkin footprint on the oatmeal ring nail and a cable layout on the cream middle nail.
- Build shallow pumpkin ribs and narrow cable lines with suitable dimensional art gel, curing between layers as its instructions require.
- Complete the prescribed cure and product-specific sealing sequence, checking that no raised edge overhangs the nail.
19. Simple Jack-o’-Lantern Accent Nails for Halloween
The only additional feature needed to make this manicure suitable for Halloween is the face. Squoval nails have a glossy, milky-beige background with an orange pumpkin with rounded edges on the ring finger. There are two small black triangle-shaped eyes and a short smile that give the pumpkin the appearance of a jack-o’-lantern. There is a small black four-pointed star near the index finger tip. All other nails have nothing else except the milky-beige background color. The pumpkin has a brown stalk but there are no spiders, webs, or ghosts around it.
Placing the face on one nail helps to easily change the season. In this case, large teeth or ridges may turn into a dark spot, so you should rely on the eyes and smile. Decals are helpful if you need clean facial features on your non-dominant hand. If you think that you would prefer to create a full Halloween manicure set, here are some Halloween nail ideas.

How to Apply
- Apply milky-beige lacquer to short squoval nails and let the base dry.
- Paint one rounded orange pumpkin on the ring finger and allow it to set before adding the face.
- Use a micro-detail brush for two black triangular eyes, a short uneven smile, and one small index-tip star; add a brown stem.
- Once the black details have dried, float a glossy top coat over the art without dragging the brush across it.
Which Colors Pair Well with Pumpkin Nail Art?
Start with the pumpkin itself. A bright orange pattern will be clearly visible against the plain beige, ivory, and white, whereas light orange looks best against burgundy, olive, and chocolate backgrounds. If both the base and the design are warm orange-brown, you should either opt for a darker outline or play with matte and glossy finishes in order to emphasize the distinction between the shapes.
Undertone is a good option to go for, not a restriction on the colors that you should wear. Look at the swatches of the yellow-orange, the rusty red, and the terracotta near your hand. While one of them will suit your skin tone, another one will create the perfect contrast. Here you will find more orange nail ideas for a pumpkin Halloween theme.
For a mixed collection, select one background color family and one metal accent. It is possible to combine cream, caramel, olive, and copper, but adding silver, burgundy, pink, and black would give the pumpkin theme no focus.
How Can You Adapt Pumpkin Designs to Short Natural Nails?
Start by reducing the whole image before going ahead and reducing each element of it. One pumpkin with a stem will still be identifiable even when painted on a small nail, but three pumpkins, vines, leaves, and a border might end up too crowded when shrunk down to fit onto the nail. Leave some base color showing behind the design and use the largest nail for the most detailed accent.
For off-center designs, narrow half-moon images, decals, and gingham stripes, short round, squoval, and oval nails work well. For pumpkin French tips, keep the colored part of the design shallow so that you don’t cover up the nail bed with an orange half nail.
You don’t have to get extensions just so that you can wear seasonal designs. Take a photo of your plain nails and use it as well as the reference image when booking an appointment at the salon.
Which Pumpkin Nail Designs Can You Recreate at Home?
Milky accent, amber jelly, watercolor decals, and jack-o’-lantern designs are good options to start with lacquer. They rely on the prepared surface and separate motifs. Decals will take care of the intricate illustration, and you will focus on proper positioning, clean lines, and finishing touches. Reread the instructions since there are certain differences between adhesive stickers and water transfer decals.
Gingham pattern, outlined pumpkins, and ombré design will require some additional skills with controlling the brush or sponge. Try the design on a trial nail tip if it is necessary to paint it with your non-dominant hand. The design may be easy, but it takes patience.
To achieve the isolated chrome, magnetic gel, extensions, or pumpkin ribs, make an appointment with the specialist who can help you with it. Bring the reference and explain which element is important for you: magnetic shine, bronze design, or slight relief. Custom press-ons are a good option for those who want the final result without painting their nails.
How Do You Keep Fine Pumpkin Nail Art from Smudging?
With regular polish, allow time for the base to set before adding stems or ridges, and then allow time for these to set before applying the top coat. Use enough top coat to spread over the surface without pushing the brush into the paint. Several strokes can draw a dark line through a light pumpkin, even if the base color feels dry.
Even touch-dry polish can be vulnerable under the surface. According to Essie’s nail-polish instructions, there is a difference between the first dry feeling and the true dryness, so do not plan any intricate lacquer designs just before activities that will push against the nails. The process of drying depends on the formulation and thickness of the layer applied; a shiny surface does not mean all layers are dried.
For gel nail art, apply the recommended thickness of the layer, proper lamp, and curing process. If a line shifts during curing, fix it before it is too late. With decals, take out any water pockets or folds before sealing the design with the top coat.
Final Thoughts
The best way to pick out your fall pumpkin nail art is to figure out what you would like to see first. If you are looking for a subtle hint of season, go with a milky base with just one small pumpkin. For the pattern, think about gingham or tortoiseshell and an accent nail with something less aggressive. If the reflection is what catches your eye, compare copper velvet to bronze chrome under different lightings.
Next, see how the manicure looks with your real nail length and lifestyle in mind. Long vine borders require some space, while short nails look better with fewer and clearer designs. Pumpkin ribs can be raised for texture or the pumpkin can be flat and painted. Decals and custom press-ons will help save your work of art in case you do not want to paint it freehand.
Make sure to keep a photo of your manicure that includes both the full hand view and the close-up of the individual pumpkin. You might love the pumpkin itself, but it is all about the balance of plain nails, design, and finish.
Ready to bring cozy autumn vibes to your nails? From tiny pumpkin accents to warm fall colors and creative patterns, find a design that suits your style. Save your favorite and preview how it looks on your hands before your next DIY manicure or salon visit.
Use our AI Nail Generator
Bloomie
Bloomie (I) is the founder and author of Nail Blooms, a nail inspiration website dedicated to manicure ideas, nail art, colors, shapes, and emerging beauty trends. My interest in nails began with a simple habit of collecting beautiful manicure ideas and exploring different styles, from timeless nude shades and French tips to creative nail art and seasonal looks. What started as a personal interest gradually grew into Nail Blooms, a space created to make discovering nail inspiration easier and more enjoyable. At Nail Blooms, My goal is to help readers give new ideas, find different possibilities, and feel inspired when choosing their next manicure.
About the editor ↗