Trending · The nail edit
23 Burgundy Nail Designs with Timeless Elegance
Burgundy can look almost black across a room, then reveal a red-wine glow when you pick up your coffee. That change is half its appeal....
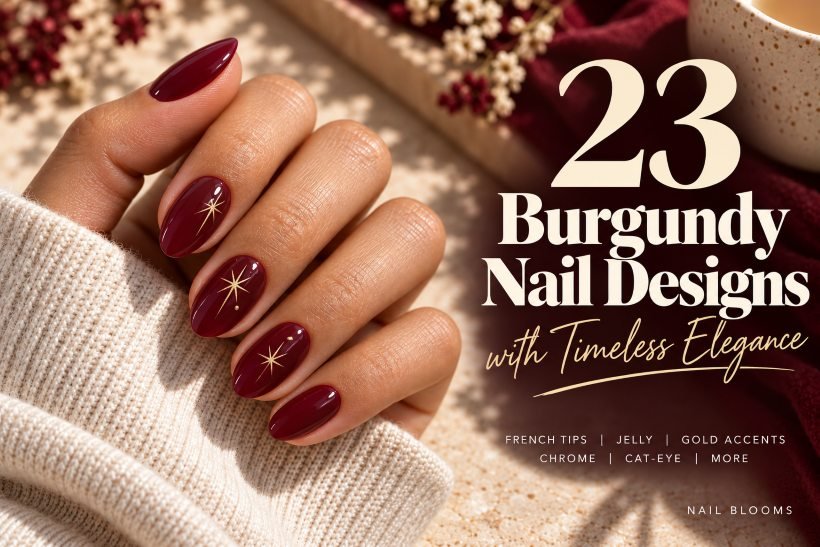
Burgundy can look almost black across a room, then reveal a red-wine glow when you pick up your coffee. That change is half its appeal. The other half is how differently it behaves as a tiny French edge, a translucent jelly, or a soft magnetic shimmer. You can wear the same color family without getting the same manicure twice.
These 23 burgundy nail designs range from short, glossy squovals to longer almond and coffin shapes, with restrained details alongside more intricate artwork. Look at the placement as much as the pattern: a bare crescent, a narrow stripe, or one patterned accent can make a dark manicure feel considerably lighter. Each idea includes a practical recreation route, including simpler alternatives where the detailed version belongs in a technician’s hands.
1. Short Glossy Burgundy Squoval Nails
A solid red-burgundy can make short squoval nails the focus without any added art. Keep the tips nearly straight with softened corners, apply the color evenly across the set, and finish with gloss for a clear reflection. Without a pattern, uneven coverage is more noticeable, so compare the opacity of each nail before adding top coat.
It can serve as a guide to a solid-color look without extending your nails. At the salon, ask for softened squoval corners rather than a fully oval tip. At home, leave a clean margin at each sidewall and remove any polish that touches the surrounding skin before it dries.

How to Apply
- File the free edges into short squovals and apply a regular-polish base coat to clean, dry nails.
- Brush on a thin layer of opaque burgundy, leaving a narrow, even margin around the cuticles.
- Add the second thin coat after the first has set; tidy stray color with a small cleanup brush and polish remover.
- Apply a glossy lacquer top coat, lightly covering any accessible free edge, and allow the manicure to dry fully.
2. Burgundy Micro-French Tips on a Sheer Pink Base
The burgundy only amounts to a faint line, yet it is noticeable enough. Short oval nails have a sheer pink foundation with thin wine lines running alongside the free edge of the nail. There is no opaque white at the tips of the nails because that would make them look bigger and alter the color. A gloss finish leaves the nail beds visible, just like the light finish on the thumbs and shorter nails.
If one does not have much confidence with an entirely dark manicure, then the burgundy French tips are good for a beginner level look. One will notice that the base looks relatively understated as the nails grow. The challenge is to achieve the right proportions and not use too many colors; it is quite hard to replicate a dark almond French tip on a short nail as the latter becomes shorter.

How to Apply
- Apply a lacquer base coat and one or two sheer pink coats to short oval nails; let the pink set.
- Load a fine liner brush with burgundy polish and trace a narrow arc at each free edge.
- Refine the corners with a cleanup brush, keeping the thumb’s tip visually as fine as the others.
- Once the lines are dry enough not to drag, seal with a clear glossy top coat.
3. Burgundy Half-Moon Nails with Bare Crescents
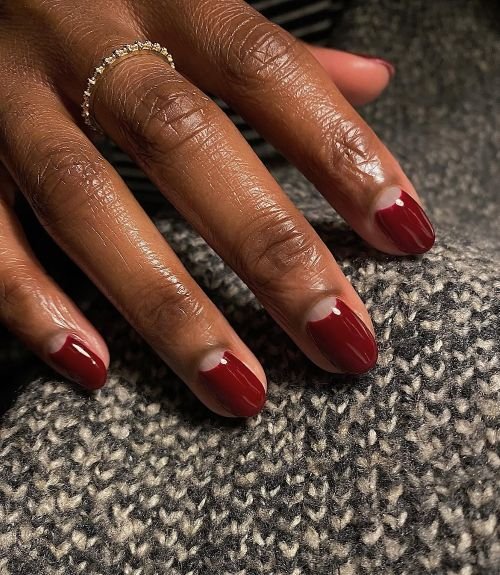
Not painting a small crescent shape at the base makes a difference in the balance of a burgundy manicure. On short, round nails, the shiny wine tone takes up most of the plate, and a sheer half-moon that looks natural continues the line from the cuticle. The crescent should fit nicely on the nail bed without touching the skin. Do not outline the rest of the shade; otherwise, it will become another type of design.
As opposed to a French manicure, this technique places the contrasting shape near the base, and not near the tip of the nails. This manicure becomes a great choice if you do not have enough space on your tips to draw a French line properly. Look at the size of the crescents with the nails together before applying the last coat of polish; the relative size of the shape is what counts, and not its exact measurement.
How to Apply
- Cover short rounded nails with base coat and a sheer neutral-pink lacquer; let it dry completely.
- Position curved nail guides to reserve a shallow half-moon at the base of each nail.
- Paint the exposed area burgundy in thin coats and remove the guides as directed before the border becomes difficult to release cleanly.
- Correct the crescent edges with a fine brush and finish the whole nail with glossy top coat.
4. Sheer Burgundy Jelly Almond Nails
Translucency of the nails with burgundy jelly coating is intentional. Almond-shaped nails have a translucent wine stain that is darker where the layers overlap; it is applied in a clear gloss. Solid cream-colored spots and metals are not included in the design; the thin tips and translucency create a glass-like effect without any additional raised decorations.
Pick this style when you feel like an opaque black manicure is too heavy for you. Jelly coating is still going to show the differences in the nail color underneath it; it will have a very visible white free edge, and the second layer will make it darker, yet less translucent. It is better to ask the technician to show you the shade in two layers before applying it. Another alternative is an almond-shaped press-on set with a translucent coating.

How to Apply
- Start with medium almond nails or correctly fitted almond press-ons, using the preparation appropriate to that system.
- For a lacquer version, apply base coat followed by one thin layer of purpose-made burgundy jelly polish.
- Let the layer set, then add a second only if needed for an even translucent tint; avoid building opaque coverage at the tips.
- Finish with clear glossy lacquer top coat and let all layers dry thoroughly.
5. Matte Burgundy Nails with Glossy French Tips
This time the color is steady while the surface is changing. Oval shaped nails feature a quiet burgundy base and a thin glossy strip at their ends. In dim lighting, the matte surface seems to resemble suede; tilting the hand shows the glossy strip. No glitter, texture, or black tips are present in this manicure; the only contrast comes from the place where light falls on the top coat.
This is an elegant way to replace a two-colored French manicure if you are wearing textured or patterned clothes. Also, it reveals any irregularities in the nail shape more gently than contrasting tips against a dark background. Remember that in this case two different surfaces should be cared for separately; applying the glossy top coat all over the nail will ruin the contrast. In case the matte surface gets shiny with time, you may renew your regular-polish manicure selectively.

How to Apply
- Apply base coat and two thin coats of burgundy lacquer to short oval nails.
- Let the color set, then apply a compatible matte top coat across each nail and allow it to dry.
- Use a small liner brush and glossy lacquer top coat to paint a narrow French curve along each tip.
- Leave the glossy curves to dry without applying another full-coverage top coat.
6. Burgundy Nails with Delicate Gold Foil Accents
Flakes of gold tear through the darkness of this manicure, but don’t cover it up entirely. Square burgundy nails with glossy finishes get sheer blush accents, and foil flakes scatter across both of them haphazardly near the sidewalls and cuticles. These flakes have jagged edges, aren’t evenly sized, and are separated by spaces, preventing this design from forming an orderly line of gold foil along each edge.
This allows you some flexibility and forgiveness with foil application. Make sure you cut the flakes to appropriate sizes so they’ll lay down flatly; you won’t want to lift a flap of foil once everything else looks great. Blush accents serve a second purpose in this design, breaking up the monotony of wine-colored nails on the entire hand. When wearing heavier gold rings, take advantage of them as a way to conserve foil.

How to Apply
- Apply base coat, paint the thumb, index and pinky burgundy, and use sheer blush lacquer on the middle and ring nails.
- When the color is dry, brush a thin layer of clear lacquer onto the intended foil areas.
- Use tweezers to place tiny nail-art foil flakes into the tacky clear layer, pressing every corner flat and leaving gaps.
- Seal the accents and solid nails with a compatible clear top coat once the decoration is secure.
7. Burgundy Velvet Cat-Eye Nails
The shimmery effect appears to shift underneath the polish depending on how you rotate your fingers. The medium oval nails feature a wine burgundy magnetic finish with a large and softly-edged accent instead of a fine line. In addition, the polish stays relatively darker along portions of the edge. Even though it’s called velvet, the current option has a slicked-on surface instead of any fluffy fibers.
Salon visitors should pay attention to this difference. Request a diffused velvet finish, followed by checking whether the result appears acceptable after trying out the magnetized polish on one nail first. OPI offers guidance about magnetic polish techniques, which reveal that playing around with the magnets impacts the finished look. Here are additional cat eye nail options worth considering. A magnetic polish finish pairs especially well with minimalistic nail art since it provides enough visual interest without requiring further decoration.

How to Apply
- Have a technician prepare medium oval nails and apply the magnetic gel system’s specified base, curing as directed.
- Apply the burgundy magnetic gel in the manufacturer’s recommended layers; use an undercolor only if that formula requires one.
- While the effect layer is uncured, position the magnet to create a broad velvet glow, then fully cure each nail using the specified lamp and timing.
- Seal with the system’s glossy top coat and complete its prescribed cure.
8. Deep Burgundy Chrome Almond Nails
Chromes highlight the deeper tones in burgundy, giving it a shiny appearance without lightening the color. For a set of medium almond nails, apply a layer of reflective powder above wine polish, creating a metallic finish on all ten nails. While the underlying color remains burgundy, too much silver powder can cover up your nail base. Both quantity and type of powder are as important as the base color choice when creating burgundy chrome nails.
Bring swatches of both your selected base and powder to the salon. Without showing swatches, you’ll only know whether they accept red chrome. However, certain combinations may result in pinks, copper shades, or even violets under the last topcoat application. Chrome nail designs require trial and error, especially if they coordinate with a dress choice. In addition, your powder must match its application surface.

How to Apply
- Ask a technician to test the burgundy base and chosen chrome powder together on a spare almond tip.
- Prepare the nails and apply the compatible gel base and burgundy color, curing each layer as specified.
- Apply the system’s chrome-receptive layer and cure exactly as directed before buffing on a small amount of powder and brushing away excess.
- Seal the surface and edges with the recommended top coat and complete the full final cure.
9. Burgundy-to-Black Ombré Coffin Nails
A wine red shade starts close to the skin and fades out into black toward the tips of these coffin nails. There is no defined line between these two colors; they fade gradually. Applying a shiny sealant layer highlights the burgundy nails with dark black edges. Always keep the gradient facing the same way on each nail for cohesive coordination rather than separate accent nails.
Long nails offer extra space to accommodate both colors comfortably. If you were to shorten these nails significantly, the black would overwhelm the burgundy, and you wouldn’t have either nail color. Request that your manicurist stop applying black near the middle point of the nail so that the proportions will appear even. Press-on nails provide a convenient temporary option to test drive this silhouette.

How to Apply
- Fit long coffin press-ons and decorate them on stands; apply a compatible base and two thin coats of burgundy lacquer.
- On a small cosmetic sponge, place adjacent burgundy and black bands, overlapping slightly where they meet.
- Dab lightly over the free edge, keeping black at the tip; let each thin pass set before repeating to soften the transition.
- Apply a glossy top coat, allow the decorated tips to dry completely, then attach according to the press-on system’s instructions.
10. Burgundy Aura Nails with Soft Rose Centers
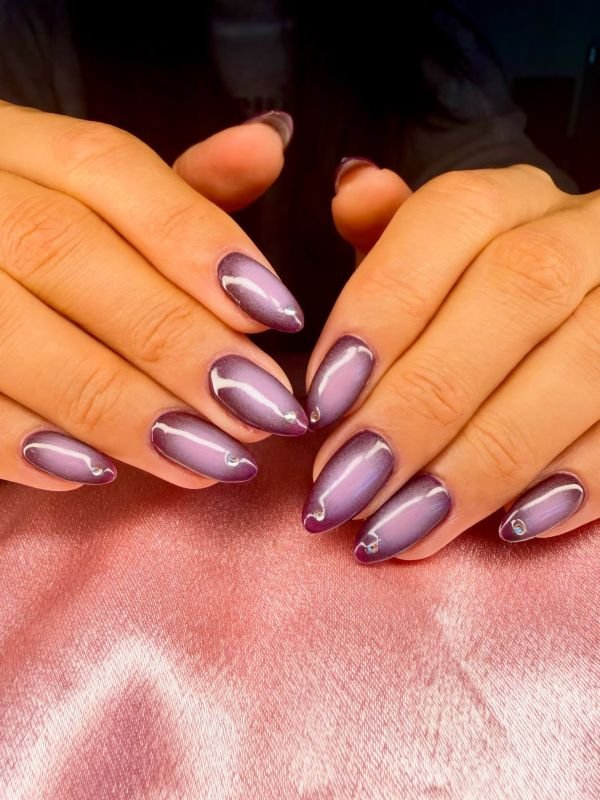
Each nail features an oval of misty pink suspended against a dark wine background. Medium almond-shaped nails provide sufficient space around the edges to highlight the blur. Glossy finish creates smooth edges without showing brush marks, glitters, or hard lines. Ombré effects transition gradually across the whole nail length from roots to tips, whereas aura nails feature a high concentration of contrast in the middle part.
The diameter of this soft center determines the final outcome completely. Small rose spots look sophisticated, whereas pink clouds significantly lighten the entire design. Inform your nail artist what impression you expect to receive, and observe the finished product on one finger from a regular observing point. Airbrush machines produce an elegant haze easily, although hand-painted versions can offer even more delicate effects. It may be challenging to create perfect harmony manually, although thicker layers will ruin the natural appearance entirely.
How to Apply
- For a simplified lacquer version, paint medium almond nails deep burgundy over base coat and let the color dry.
- Pick up a little dusty-rose polish with a small sponge, then dab off excess before touching the nail.
- Stipple a small oval in the center, building coverage gradually and keeping the perimeter burgundy; use less pressure toward the cloud’s edges.
- Let the stippled color dry sufficiently, then float on a glossy top coat without repeatedly brushing over the center.
11. Burgundy Nails with Tortoiseshell Accents
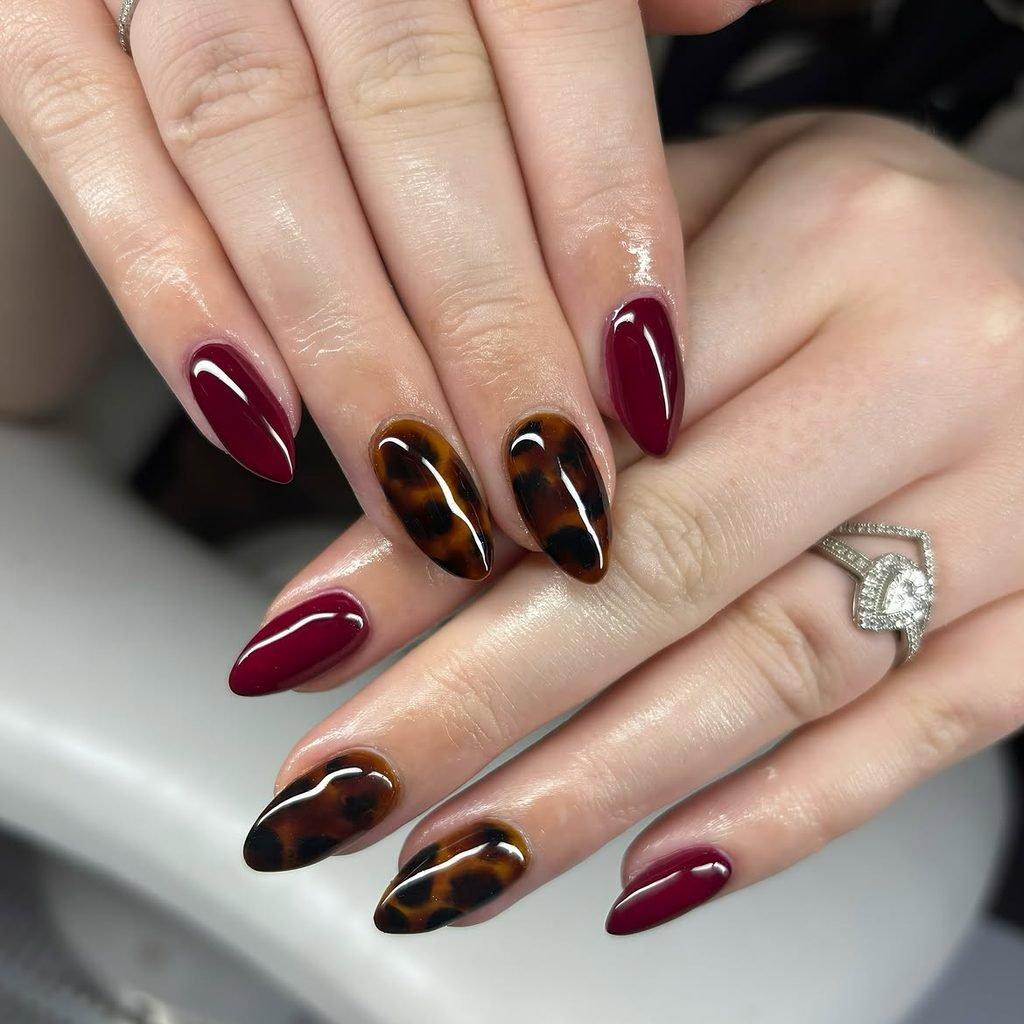
Medium almond accent nails are broken up by amber and nearly black mottling across a burgundy wine base. The thumb, index finger, and pinky finger maintain solid burgundy coverage, whereas the middle and ring fingers feature translucent caramel patches splashed with random dark splotches. Glossy finish deepens the effect of patterned nails above a plain brown graphic. Do not cover each space with markings since completely filled designs would muddy them down to dark nails.
Burgundy tortoiseshell nail art works best for individuals who prefer patterned accessories but desire limited use of colors. Tortoiseshell manicures rely on asymmetrical application techniques, yet lack of symmetry does not entail additional layers until the pattern has sufficient contrast to recognize from afar. At-home nail artists will find premade tortoiseshell wraps easier than creating individual layers of sheer polish gel for an exact replica. Pair warm wraps with burgundy prior to adding all five nails.
How to Apply
- Choose tortoiseshell nail wraps sized for the middle and ring fingers, and prepare those nails as their manufacturer directs.
- Paint the remaining nails opaque burgundy with a compatible base and glossy lacquer top coat.
- Apply the wraps smoothly, pressing out any air and trimming or filing the excess according to their instructions.
- Seal the patterned nails only if the wrap system recommends a top coat; keep every edge smooth and fully adhered.
12. Burgundy Swirls Across a Sheer Nude Base
Swirling panels of burgundy polish cover sheer nude nails but never fully cover the exposed base. On medium-length almond nails, the curves of each individual panel originate from different angles, creating gaps in the center or along one edge of the nail. Slender ivory lines accentuate the swirls. This is a shiny manicure with changing patterns across the fingers, but the same two colors and amount of exposed base on each nail.
These gaps between swirls serve a purpose: they prevent the design from appearing too heavy by keeping the overall nail light. Do not apply an exact replica of swirls on each nail; the illusion of stamps will show despite good painting skills. Draw out the five different designs on paper ahead of time or request your tech to change their orientation. Shorter nails require fewer swirls; one large swirl and small accent line are sufficient.

How to Apply
- Apply base coat and a sheer nude lacquer suited to your preferred level of coverage; let it set.
- Use a detail brush to paint one burgundy curved panel on each nail, varying which side it enters from.
- Once the panels have set, add a slender ivory line beside selected curves, leaving visible nude space between elements.
- Allow the linework to dry before sealing with glossy top coat, using light brush pressure to avoid dragging it.
13. Burgundy Nails with Tiny Ivory Polka Dots
Small ivory dots create a graphic design effect against a shiny burgundy base. The nails should remain short with slightly curved tips. You must ensure the dots do not crowd together into a tight grid pattern; rather, they should maintain some distance between each other. Your thumbs may include an additional dot or two, but the smaller nails require far fewer. You must keep the dots tiny enough to allow the wine base to cover most of the nails’ surface area once they’re viewed together.
Dotting is one of the easier techniques within this collection, assuming you restrain yourself from enlarging each dot in order to fix any mistake. Test out the dotting brush’s appropriate load size using a scrap tip, since even minor variations will become highly noticeable. Ivory creates a gentler contrast compared to stark white, while maintaining visibility against the deep background. This design will not experience significant alterations between oval and squoval nail shapes.

How to Apply
- Paint short rounded nails burgundy over a lacquer base coat and allow the color to set.
- Place a small drop of ivory polish on a palette and lightly load a fine dotting tool.
- Add three to six tiny dots per nail, adjusting the number to the nail’s width and keeping them away from the skin.
- Let the dots dry before floating a glossy top coat over the surface without repeatedly brushing the same spot.
14. Burgundy and Blush Pinstripe Nails
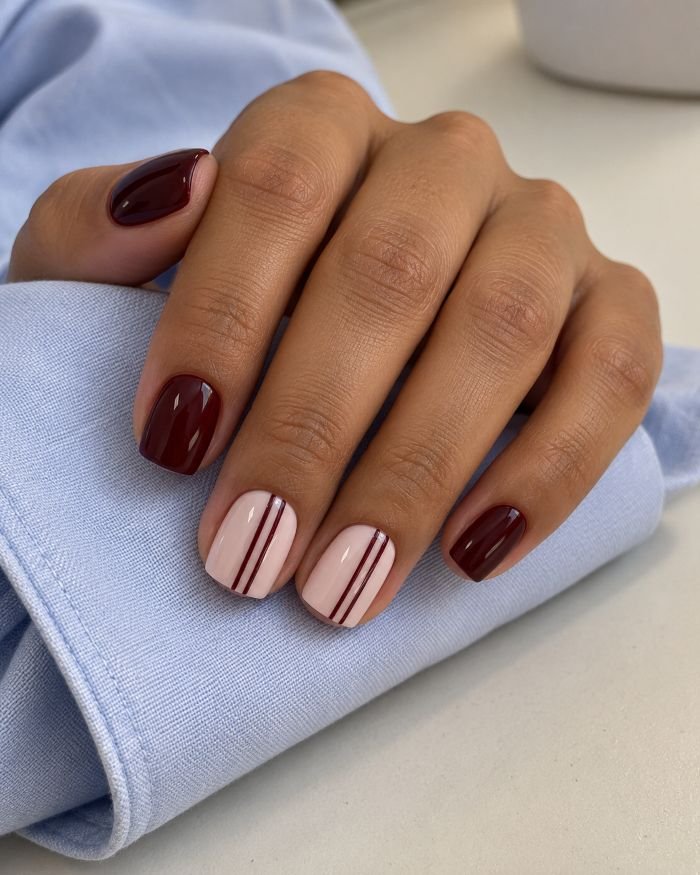
Two nails sport pairs of slim red stripes starting at the base and extending up to the tips. Five short square nails receive full coats of wine red polish. Vertical lines bordering the other two nails create defined contrast frames. This design calls for a high shine across all nails. Space the lines to one side and allow plenty of room in the pink nail bed area for maximum contrast effect. Focus on stripe length, not width.
Vertical line work provides attractive nail art for people who enjoy neat-looking manicures but find too much patterning overwhelming. It highlights irregular edges better than dot patterns, making it trickier to execute correctly at home. Nail stickers provide an efficient alternative to tedious touch-ups for freehand applications. Remember to compare the sticker’s hue with your solid coat beforehand – there may be a significant difference in how they appear next to each other, especially between vivid cherry red stripes and darker burgundy tones.
How to Apply
- Apply base coat, then paint the middle and ring nails opaque blush and the other nails burgundy.
- Once the blush is fully dry, use a long liner brush to draw two narrow burgundy lines slightly to one side of each accent nail’s center.
- Alternatively, apply matching burgundy stripe decals according to their instructions, trimming the ends within the nail perimeter.
- Allow painted lines to set, then finish all nails with glossy top coat, sealing decal edges where the system permits.
15. Burgundy Plaid Accents on Cream Nails
Cream creates a pale ground for burgundy plaid on the middle and ring fingers, while the other medium oval nails stay solid wine red. The pattern uses broad, translucent-looking burgundy bands crossed by finer charcoal lines, leaving small cream rectangles visible. A smooth glossy finish keeps the surface flat. This is a woven-looking check rather than a checkerboard of equal, filled squares.
Varying the line widths gives the plaid its character; making every stripe equally heavy loses that sense of overlapping threads. It is a useful autumn choice alongside plain knitwear, where the small pattern has room to be noticed. If you’re wearing a plaid coat, choose one shared color instead of trying to reproduce the entire fabric on your nails. Two accent fingers provide enough space for the pattern without requiring ten miniature copies of the same complicated grid.

How to Apply
- Paint the middle and ring nails cream and the remaining oval nails burgundy, using a lacquer base coat underneath.
- On the dry cream accents, paint one lengthwise and one crosswise band using a sheer burgundy nail-art polish; let them set.
- Add fine charcoal lines beside selected bands with a liner brush, keeping some cream rectangles open.
- Once all intersecting lines have dried, seal with glossy top coat; use plaid decals for a simpler home version.
16. Burgundy and Ivory Marble Nails
Milky ivory swirls through burgundy on two medium almond accent nails, creating uneven, stone-like veining. The surrounding fingers wear solid glossy wine polish. Keep the accent bases slightly translucent, with a hint of blush beneath the ivory and a few darker burgundy branches. The lines should vary in width and direction; matching zigzags would look more like a repeated pattern than marble.
A restrained accent layout lets you see the veining without losing the depth of the main color. Ask to keep at least one quiet, pale area on each marbled nail, because overmixing can turn the whole surface pink. The salon version may use a dedicated spreading medium, but that is different from floating polish on water. For DIY, marble decals or wraps are a sensible shortcut, especially when your first attempts keep blending into one flat shade.

How to Apply
- Choose ivory-and-burgundy marble wraps for the middle and ring fingers, checking their size and translucency against your nails.
- Paint the other almond nails glossy burgundy with a compatible lacquer base and top coat.
- Prepare and apply the marble wraps according to their instructions, smoothing them from the center outward and trimming excess neatly.
- Use a compatible sealer only when recommended for those wraps; for hand-painted gel veining, book a technician and show the intended pale-to-dark balance.
17. Burgundy Nails with Fine Floral Accent Art
Small burgundy flowers sit on sheer blush accent nails, surrounded by solid wine-red almond nails. Keep the length medium and the finish glossy, with fine petals, slender stems, and plenty of visible blush between the blossoms. The middle and ring fingers carry the artwork; the others provide quiet blocks of color. A few ivory touches can separate overlapping petals without turning the flowers into bright white daisies.
The appeal is in the scale. Tiny, spaced flowers feel closer to a printed silk scarf than a large tropical motif, so there is no need to add several different leaf colors. This is a useful option for a dress with small floral details, when you want to borrow one color rather than copy the entire print. Hand-painted petals need a fine brush. Small floral decals are equally valid if their scale and burgundy tone suit the rest of the set.

How to Apply
- Paint the middle and ring nails sheer blush and the remaining almond nails burgundy over a lacquer base coat.
- On the dry blush accents, apply small burgundy floral decals, leaving visible space around each blossom.
- If painting instead, use a fine detail brush for small petals and stems, adding only a few ivory highlights after the burgundy sets.
- Finish with a compatible glossy top coat, sealing decal edges or floating the brush gently over dried artwork.
18. Burgundy Nails with Black Lace Details
Black scallops and fine mesh cover two translucent burgundy accent nails, while the remaining medium almond nails stay opaque wine red. The lace sits flat beneath a glossy finish, with tiny curved floral shapes interrupting the netting. Leave the accent base lighter than the solid nails; black detail disappears against an almost-black background. A little visible space between the loops makes the pattern easier to read.
Before booking, ask whether the lace will be painted, stamped, or applied as a decal. Those methods can give a similar visual result, but they do not require the same appointment time or skill. For more placement options, these lace nail ideas show how the motif can frame a tip or cover an accent. Keep jewelry relatively simple if the mesh is intricate. The manicure already has a fine ornamental detail, and it is easy to lose that detail beside several textured rings.

How to Apply
- Apply opaque burgundy lacquer to the thumb, index and pinky, and a lighter sheer burgundy to the middle and ring, over base coat.
- Let the color dry fully, then apply black lace nail decals sized to the two accent nails.
- Position the scalloped edges and mesh so the lighter burgundy remains visible through the open pattern; trim any excess within the nail boundary.
- Seal according to the decal instructions with a compatible glossy top coat, keeping the surface smooth.
19. Tiny Burgundy Hearts on Milky Pink Nails
A tiny burgundy heart near the side of each ring nail supplies the focal point on this short, rounded set. The base is milky pink, with a very fine burgundy French edge carried across the hand. The hearts sit below the tips, leaving a clear patch of pink between the two details. Everything is glossy and flat, without raised charms, glitter, or an opaque dark accent nail.
The restrained placement keeps the motif from looking crowded. It also makes the manicure easy to adapt: omit the French edge if your nails are too short to hold both details comfortably. Valentine’s Day is an obvious occasion, but the little heart does not depend on a seasonal color scheme. For home painting, make the motif slightly smaller than you initially think necessary. Two oversized dots joined together tend to become a rounded blob rather than a recognizably pointed heart.

How to Apply
- Apply base coat and a milky pink lacquer to short rounded nails; allow the base color to set.
- Paint a very fine burgundy French edge with a liner brush, keeping the width consistent across the hand.
- On each ring nail, place two tiny burgundy dots side by side and use a detail brush to draw them down into one short point.
- Let the hearts and tips dry before applying glossy top coat without dragging the small motifs.
20. Burgundy Nails with Single-Pearl Accents
One small ivory pearl sits near the base of each ring nail, set against glossy, opaque burgundy. The medium oval nails otherwise remain plain, including the thumbs. Choose flat-backed nail-art pearls with a low profile rather than large round beads, and leave a visible gap between the embellishment and the skin. The creamy accent looks distinct against the deep red without needing a metallic border.
The detail is small, but it changes how the manicure wears. Raised decoration needs secure attachment and may catch on fine knits or hair, so position it thoughtfully if you handle delicate fabric often. A single pearl per hand is easier to accommodate than a complete row. These pearl nail ideas offer other arrangements if you prefer more ornament. For a one-evening look, predecorated press-ons let you choose the pearl placement before anything is attached to your natural nails.

How to Apply
- Paint medium oval nails or fitted press-ons burgundy, finishing the color with glossy top coat and allowing lacquer layers to dry fully.
- Select one small, flat-backed ivory nail-art pearl for each ring nail and test its position away from the cuticle.
- Attach with an adhesive intended for nail embellishments, following its instructions; use a technician for a gel-mounted version.
- Secure the pearl’s base as the chosen system directs, keeping the domed surface clear and following the system’s removal instructions later.
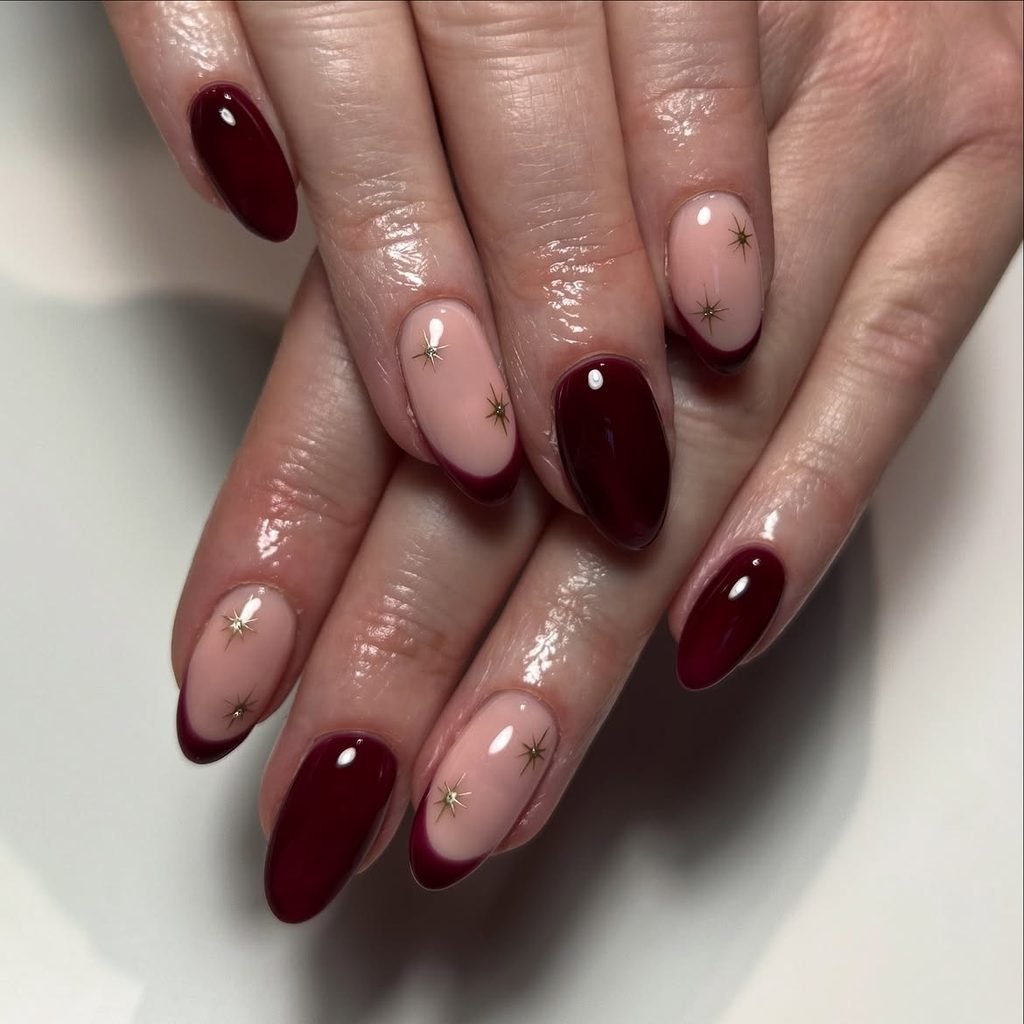
21. Burgundy Nails with Delicate Gold Stars
Fine gold starbursts punctuate a glossy burgundy base on medium almond nails. Keep one small star on the middle finger and another on the ring, with the remaining nails left solid. Each star has slender, uneven-length rays rather than a thick filled silhouette. A couple of tiny gold dots can sit nearby, but most of the wine background should remain untouched.
Spacing makes this celestial design feel deliberate. Placing both stars at exactly the same height can look stiff; move one toward the upper sidewall and the other closer to the center. The gold detail is well suited to evening light, where it catches briefly without the continuous sparkle of an all-over glitter. If you want it for a winter party, there is no need to add snowflakes or holiday colors. The two small metallic accents already give the manicure a dressier finish.
How to Apply
- Paint medium almond nails opaque burgundy over a lacquer base coat and let the color dry.
- Apply small gold starburst nail stickers to the middle and ring nails at different heights, pressing their rays flat.
- Add one or two tiny gold polish dots beside each star if desired, keeping the rest of the nail open.
- Once the dots have set, seal with the sticker manufacturer’s recommended clear top coat, checking that no ray lifts at the edge.
22. Burgundy Nails with a Fine Glitter Fade
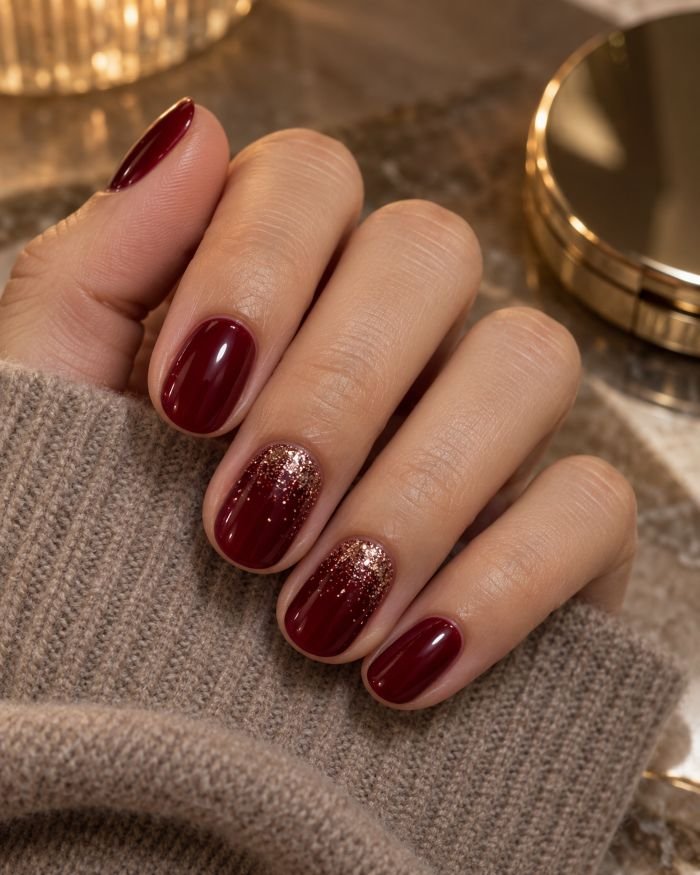
Rose-gold glitter clusters near the base of two smooth burgundy nails, fading out as it reaches towards the tips. The nails are rounded oval shapes, and the remaining three nails are left solid in wine red coloring. No big sequins or chunks of glitter appear here. The slow spacing allows some burgundy space between glitter clusters to keep everything in harmony with the rest of the dark manicure.
Shifting the beginning point closer to the cuticle creates a difference between this effect and a glitter French tip look: the shiniest part lies next to the nail bed, while the tip remains neat-looking. Make sure to maintain a slim border near the skin for an even better result. This nail art project is ideal for experimenting with glitter nail polish that you already have in your collection, provided the glitter particles are sufficiently small.
How to Apply
- Apply base coat and two thin coats of burgundy lacquer to short oval nails, allowing the color to set.
- On the middle and ring fingers, dab fine rose-gold glitter lacquer near the nail base, leaving a small skin-free margin.
- With very little product on the brush, pull a few particles toward the middle and stop before the tip; repeat only at the base if more density is needed.
- Let the glitter layer set, then apply compatible glossy top coat to smooth and seal the surface.
23. Tonal Burgundy Crocodile-Print Nails
A single crocodile-patterned ring nail interrupts this otherwise solid burgundy almond set. The medium-length accent uses a lighter berry base with darker wine-colored cells, leaving narrow pale channels between the irregular shapes. A glossy top coat keeps the surface smooth. The pattern is visual rather than a raised, sculpted texture, with smaller cells toward the edges and slightly larger ones down the center.
Keeping the colors close makes the animal print less graphic than a black-and-white version. It also allows the ring nail to sit beside plain burgundy without demanding extra gold hardware or contrasting tips. The technique needs a controlled amount of spread: The GelBottle’s blooming-gel instructions describe placing color into an uncured spreading layer before curing. That is different from painting a rigid grid onto a dry base. Ask your technician for visible channels between cells, or choose a printed wrap for a simpler recreation.

How to Apply
- Have a technician prepare medium almond nails and apply the gel system’s base, followed by burgundy on four fingers and lighter berry on the ring nail, curing as directed.
- Brush a thin layer of compatible blooming gel over the cured berry accent and leave that spreading layer uncured.
- Place spaced burgundy shapes into it, allowing them to expand into irregular cells while preserving pale channels; cure according to the system before the gaps disappear.
- Finish all nails with the compatible glossy top coat and complete its full prescribed cure.
How to Choose Between Burgundy, Maroon, and Oxblood Polish
Treat the shade name as a starting point, then look at the actual swatch. Nail polish labels do not give these colors a single dependable boundary. One brand’s burgundy may look noticeably purple, while another’s appears closer to dark red-brown. A bottle also makes a color look deeper than one thin layer on a nail.
Compare your favorites beside each other in daylight. Look for the red, violet, or brown you see between the highlights, then check the same tips in the lighting where you’ll usually wear the manicure. If you want a recognizable wine color indoors, reject a swatch that already looks almost black in the salon.
Opacity matters just as much as undertone. A sheer burgundy jelly and an opaque cream can share a color family while looking quite different on the hand. Ask to see the intended number of coats with the final top coat before choosing.
Which Colors Pair Well with Burgundy Nails?
Start by deciding what the second color should do. Ivory and blush pink lighten the manicure, making dots, flowers, and negative-space details easier to see. Black deepens it, but fine black artwork needs a lighter burgundy beneath it to remain visible. Amber introduces warmth, which is why a tortoiseshell accent feels connected to a wine-colored base even though the patterns differ.
Gold and silver change the mood through their finish as well as their color. Small gold foil fragments give irregular flashes; a clean silver line creates a sharper edge. Neither needs to cover much of the nail to register beside burgundy.
For clothing, choose a relationship rather than an exact match. A cream sleeve echoes ivory nail art; a blush accessory picks up a pale accent base. If your outfit already combines several prints or reflective details, the plain glossy set may give the color more room than another intricate pattern would.
Which Burgundy Designs Work Best on Short Nails?
Start with the amount of space the artwork needs. Glossy burgundy, tiny dots, a shallow half-moon, and one small heart can all remain readable on a short nail. A long gradient, several marble branches, or an intricate lace panel requires more room; simplify those designs instead of shrinking every detail until it blurs.
Shape changes where the pattern fits. A squoval offers a relatively straight edge for a fine French line, while a softly rounded tip suits a curved border. If you prefer a more elongated outline, these oval nail ideas provide references to discuss with your technician. Your available free edge still determines how much shaping is possible.
Use the smallest nail as your planning guide. If the motif fits only on the thumb, reserve it for an accent rather than forcing it onto every finger. Open space is useful design space: leaving some base visible often makes a compact manicure easier to read.
Final Thoughts
Start by deciding what aspect of the look appeals to you. Do you love the wine tone? Then choose a high-shine short length polish or sheer jelly. Does the lighting effect intrigue you? Try comparing the differences between the velvet shimmer and chrome effects side by side on sample pieces. Do you like the embellishment? Consider using a simple floral, pearl, or crocodile print accent on your nails.
When preparing for your appointment, select one design that you really love and one small tweak to make before going to the salon. Specify how long you would like your nails and whether or not you would prefer to apply your chosen finishing touches yourself at home.
Burgundy nail designs will benefit the most when the styles are wearable enough to be suitable for both your daily routine and specific events. Go with your preferred nail shape, and don’t overcrowd your nails with decorations that don’t complement the bold hue.
Which burgundy look feels most like you: a rich wine manicure, subtle French tips, or delicate gold accents? Upload a design you love and preview it on your own hands to help you choose your next set.
Preview Your Burgundy Manicure
Bloomie
Bloomie (I) is the founder and author of Nail Blooms, a nail inspiration website dedicated to manicure ideas, nail art, colors, shapes, and emerging beauty trends. My interest in nails began with a simple habit of collecting beautiful manicure ideas and exploring different styles, from timeless nude shades and French tips to creative nail art and seasonal looks. What started as a personal interest gradually grew into Nail Blooms, a space created to make discovering nail inspiration easier and more enjoyable. At Nail Blooms, My goal is to help readers give new ideas, find different possibilities, and feel inspired when choosing their next manicure.
About the editor ↗