Nail Designs · The nail edit
22 Disney Nail Ideas Full of Magic and Fun
Just three dots can transform a naked manicure into one that looks like Mickey Mouse. Just a yellow dot and a red rose can allude...
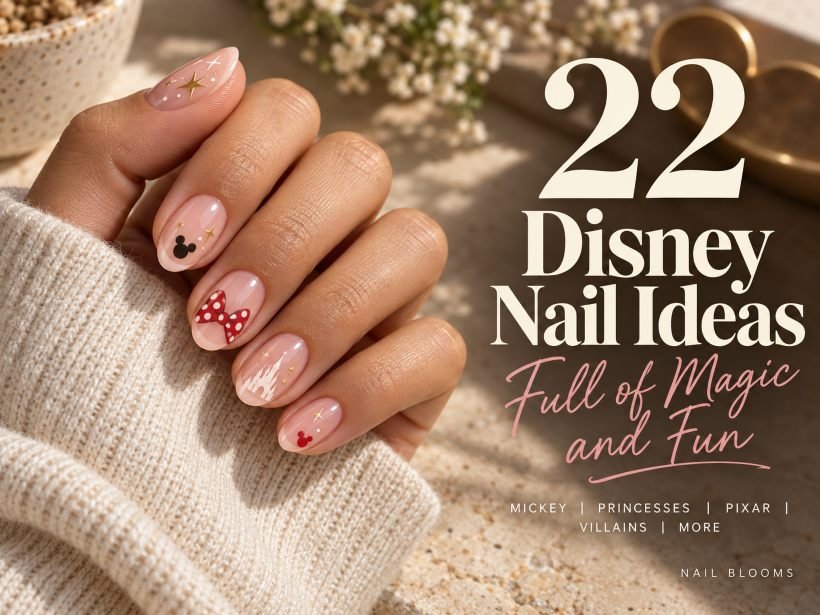
Just three dots can transform a naked manicure into one that looks like Mickey Mouse. Just a yellow dot and a red rose can allude to Belle even without drawing her features. The best Disney nail design ideas focus on the feature you remember instantly about each Disney character, such as his or her silhouette, costume color or small piece of scenery from the movie.
These twenty-two nail designs include simple Mickey designs on short nails, princess nails, fun Pixar nail art, and even dark villain designs. Some silhouettes and dot motifs can be simplified for home painting or decals; character faces, castles and raised details take more time or a nail artist’s help. You may choose how intricate your nails will look and which Disney character you want to use for it.
1. Tiny Mickey Silhouettes on Short Nude Nails
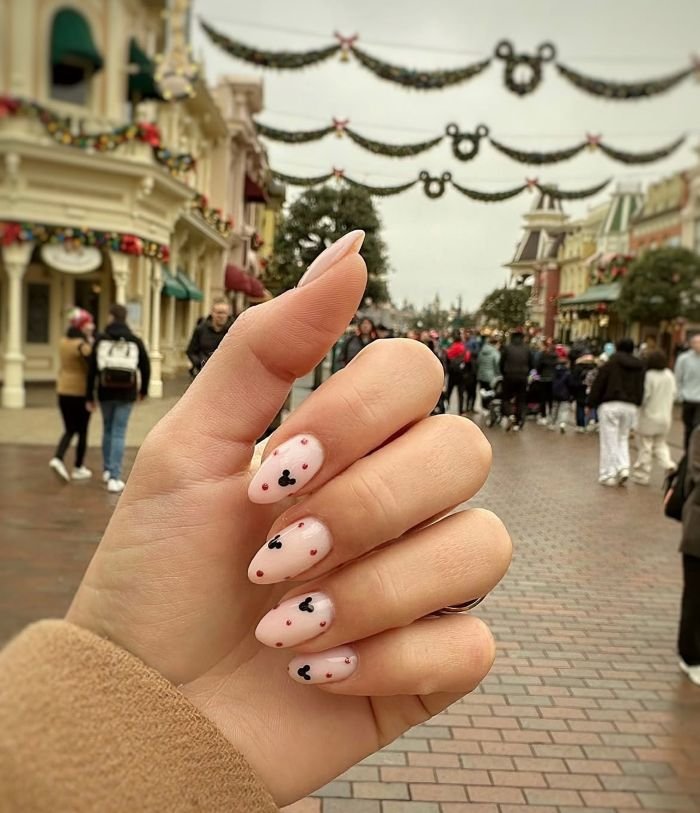
Even a small black Mickey head is so charming that it brings enough character to this manicure. Begin with short nails having rounded shape and apply either beige or pink nude base according to your skin tone. Put one of the small heads close to the ring nail edge and the other on the tip of the thumb nail. The rest of your nails remain simple and shiny leaving enough space for these black heads.
It can be a good option if you would like to get Disney manicure but feel free wearing it even to your regular clothes. It’s essential that the scale will be correct – too big ears, touching sidewalls, will make the whole accent too bulky. Prefer a slightly tapered shape? Our short almond nail designs offer useful proportions for a compact version.
How to Apply
- Shape the nails, apply base coat, and paint one or two thin coats of sheer nude regular polish. Let the surface dry.
- Use a dotting tool to place a black circle on the ring nail and thumb. Add two smaller circles touching its upper edges.
- Allow the black details to dry thoroughly, then float a glossy top coat over the artwork without repeatedly dragging the brush across it.
2. Minnie Mouse Polka Dots with a Bow Accent
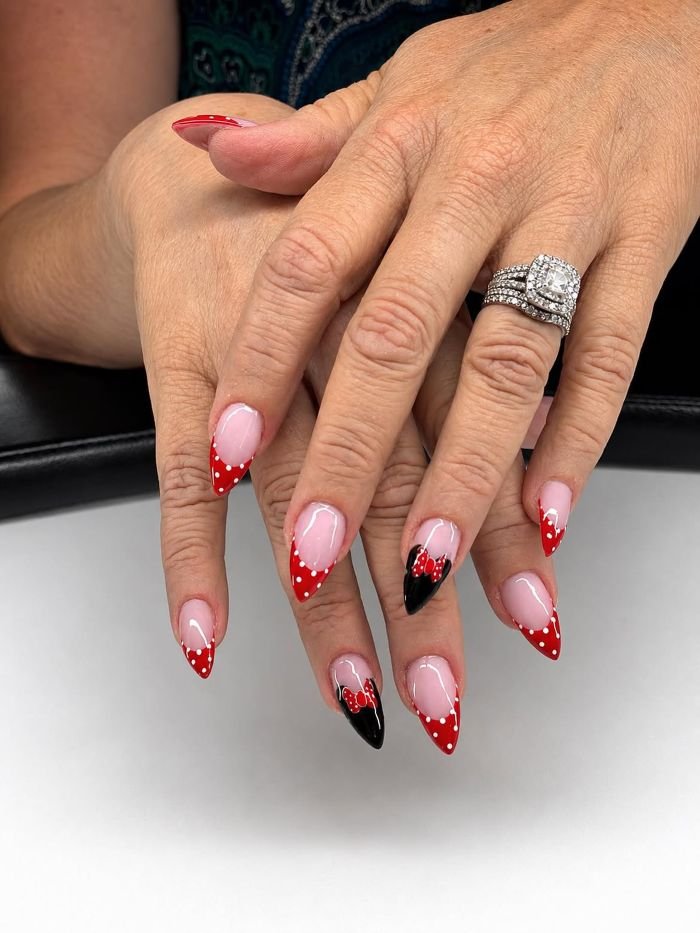
The color of Minnie Mouse nails is achieved using cherry red, small white dots, and a small bow. The manicure uses squoval shaped nails where the red color is painted on the thumb, index finger, middle finger, and pinkie fingers. The ring finger nail should be creamy white with the black silhouette of the mouse head with the flat red bow. Small white dots are to be scattered on the red nails without being very structured.
The bow should get the most attention of all other elements of this nail art design. The addition of a raised charm will make changes both to the appearance and to the feeling of wearing such nails, so the painted bow loops should be used if you need to touch clothes or brush your hair often. Another soft version can be created using dusty rose instead of cherry red.
How to Apply
- Apply base coat, then red regular polish to four nails and opaque cream to the ring nail. Let both colors dry.
- Dot white polish over the red nails with a small dotting tool, leaving visible red space between the dots.
- Paint the black silhouette on the ring nail. Once dry, add two red bow loops and a central knot above the head.
- Let all the artwork dry before applying a clear glossy top coat.
3. Pastel Mickey Balloon French Tips
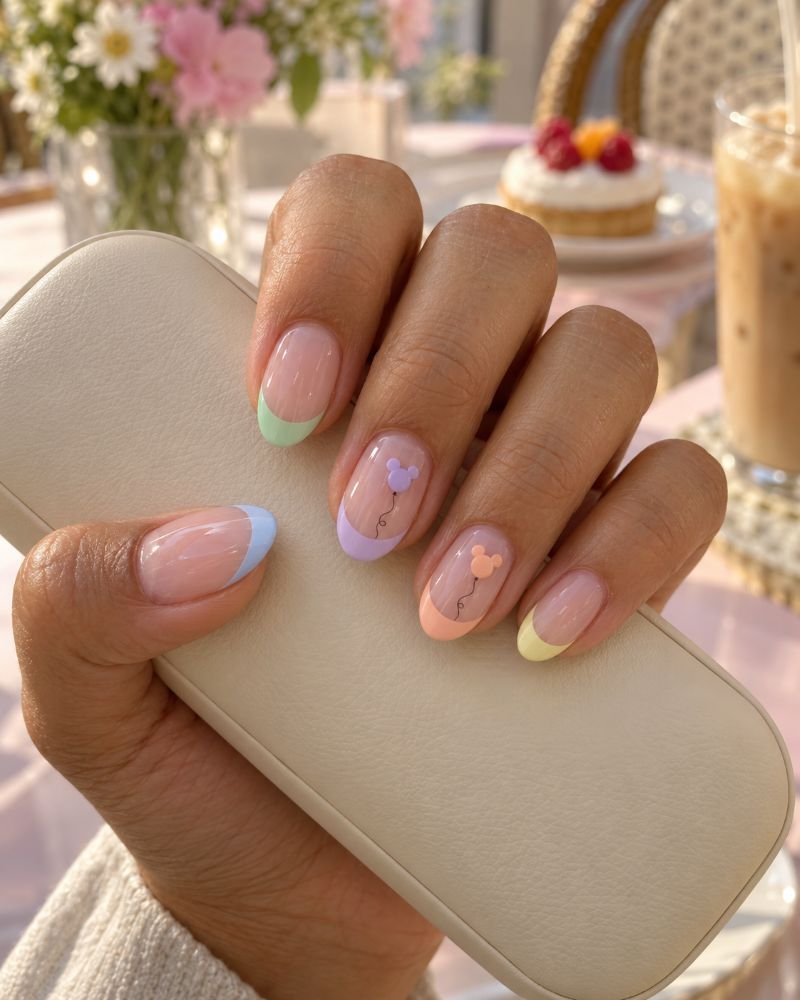
Pastel French tips transform into a miniature balloon image as Mickey shaped tips appear just under the smile line. Pick medium oval nails with a transparent base color in a soft pink and then paint lavender, butter yellow, mint, peach, and powder blue on the tips. In case of the middle and ring nails, put one pastel Mickey balloon along with a thin charcoal string that curls toward the cuticle. The other nails stay without decoration, leaving enough place for the balloon images.
The difference from the previous nail style is that the design leaves the majority of the nails looking transparent. This feature will give your colorful tips a feeling of lightness, and you can use a bit muted pastels rather than neon shades. Also, you should not try to fill the free space with additional elements – for instance, with stars – because strings already bring some movement to the nail.
How to Apply
- Paint a sheer pink base over the base coat and allow it to dry. Add a different pastel French tip to each nail with a small detail brush.
- Below the middle and ring tips, create small Mickey-shaped balloons with one larger dot and two smaller ears, or use suitably sized decals.
- Draw a fine curved charcoal string beneath each balloon. Let the artwork dry, then seal with a glossy top coat.
4. Disney Castle Nails with Firework Accents
This midnight blue will provide the much-needed contrast for a white castle silhouette. The design should be created on medium almond nails, whereby the castle should be placed lower on the ring nail with its highest spire facing upwards towards the tip. There should be fine lilac and light gold firework bursts on the middle nail and the thumb nail. Keep the index and pinkie nails in deep blue with a few small silver stars. The polish should be glossy and imply the night sky without the artwork being lost under chunky glitter.
The uniform sizes of all the castle spires make it look like an undefined white structure. The size variation of the spires is more important than any window creation in this particular design. It is one of those designs that can be ordered as custom press-ons in case of a very special event because of the scenery that it creates.

How to Apply
- Apply a base coat and two thin coats of midnight blue polish, allowing each layer to dry.
- Place a white castle decal low on the ring nail, following its instructions, or have a nail artist paint a simplified silhouette with varied tower heights.
- With a liner brush, paint separated lilac and pale gold strokes radiating from small centers on the middle nail and thumb. Add sparse silver dots elsewhere.
- Let painted details and any decals dry fully before sealing with a compatible glossy top coat.
5. Sorcerer Mickey Nails with Silver Moons and Stars
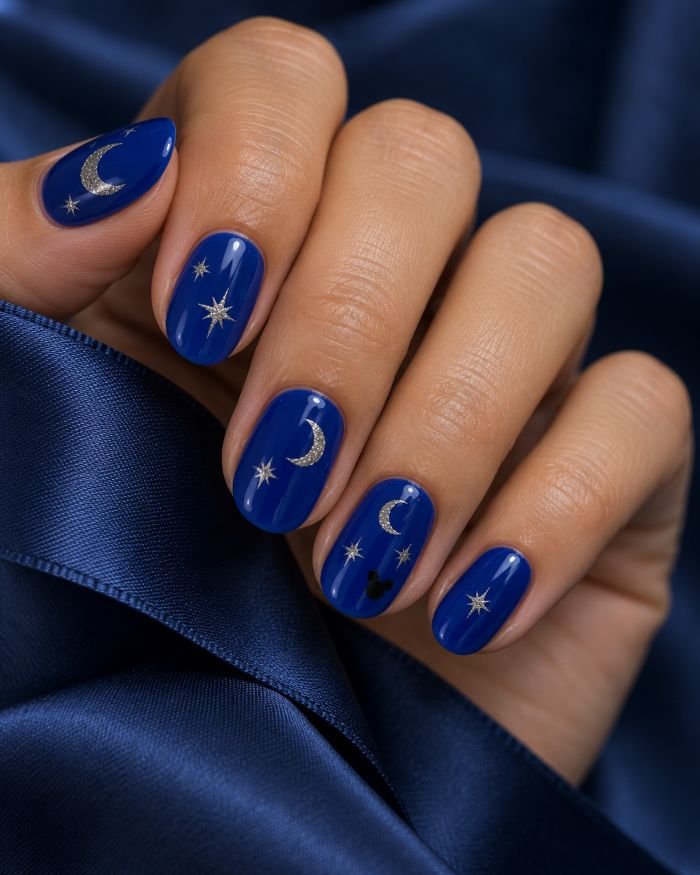
The blue sorcerer’s hat will serve as your color palette: beautiful blue, silver crescents, and stars. Shape the free edges of short nails into a rounded outline. Apply the opaque blue color to the nail plates, leaving a small clean margin around the cuticles. Add a larger crescent to your thumb, place smaller crescents on your middle and ring nails, and add some silver stars to your other nails. You can create a smaller black Mickey figure on your ring nail to make your idea clearer.
Decals created out of a foil give you a more accurate metallic shape compared to using a brush with loose glitter polish. However, if you opt for painting your design, just use a silver nail art polish and get a softer shine from it. The trick is in your spacing: a couple of isolated shapes will create the image of Sorcerer Mickey’s hat, but lots of sparkles will turn your design into a galaxy.
How to Apply
- Apply base coat and cobalt blue regular polish to all nails. Wait until the color is fully dry.
- Place small silver crescent and star nail stickers across the nails, pressing each flat according to its instructions.
- Add a miniature black Mickey silhouette on the ring nail with a dotting tool. Let it dry and seal everything with a compatible glossy top coat.
6. Cinderella Blue Chrome Nails with a Glass-Slipper Accent
The powder blue shade with a pearlescent chrome effect creates the glass-like shine on the Cinderella nails. Medium oval shape is needed, with four surfaces left clear to reflect light. On the ring finger, create a slim white silhouette of a high-heeled slipper with a little silver spark on the toe. The image should be centered, with plenty of blue around to make the shoe stand out among all the reflections.
The finish is more important than the extra décor here. An opaque mirror-silver chrome shade would ruin the delicate blue look, whereas the transparent pearl powder makes the color underneath visible. Request a swatch with your chosen shade from the nail technician beforehand. A painted slipper design is more practical than wearing a bulky shoe decoration on the nails. Here are some pearl nail designs to check if you like the finish.

How to Apply
- For a salon gel recreation, prepare medium oval nails and apply a compatible base and powder-blue gel color, curing each stage according to the system’s instructions.
- Apply translucent pearl chrome powder over the manufacturer’s specified chrome layer, then seal it as directed.
- Add a white slipper decal or finely painted slipper outline to the ring nail, with one silver sparkle beside it.
- Finish the accent with the compatible clear top coat and complete the required cure. Follow the decal and gel system’s compatibility guidance.
7. Belle’s Yellow French Tips with an Enchanted Rose
The yellow dress of Belle may be recreated in French tips painted over a see-through beige background. Pick medium almond nails and golden-yellow polish with sufficient saturation to prevent the effect of bright fluorescent hue. There will be one upright red rose on the ring finger nail that will be surrounded by a fine white outline of a glass dome. Small green leaves and the stem will create a difference in colors; other nails just require yellow tips and a clear coat.
Dome makes an ordinary flower manicure related to the movie “Beauty and the Beast.” Make the outline thin and leave a little space between the rose and the dome to prevent fusion of these two images into one chaotic decoration. The petals of the rose may be created with the help of decal, and a specialist will draw a dome in its surroundings. On narrow nails, put priority on the rose and dome rather than on the leaves.

How to Apply
- Apply base coat and sheer beige regular polish. Once dry, paint warm yellow French tips with a curved smile line.
- Place a small upright rose decal on the ring nail, or paint a red bloom with a fine green stem and two leaves.
- Outline a glass dome around the dry rose using a thin white liner, leaving space between the artwork and the outline.
- Allow the details to dry completely, then apply a glossy top coat.
8. Ariel-Inspired Mermaid Scales and Lilac Seashells
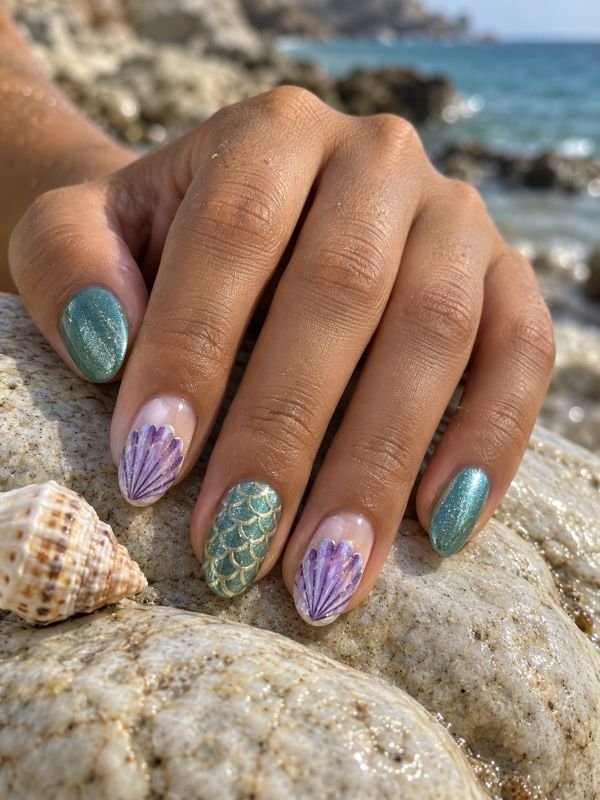
Glimmering sea greens and purple shells work in the spirit of Ariel without having to paint her. Start by making oval nails shine and apply sea green to the thumb, the middle finger, and the little finger. Create thin gold scales on the middle finger nail and use the index and ring finger for the purple shell nail art on a sheer base. Shells can be depicted as flat fans with a touch of darker purple radiating from their edges.
Using flat nails for shell nail art makes it easier to duplicate the design using nail polish only. Scales should be subtle enough to create the impression of texture and shouldn’t completely cover the sea green below them. Instead of doing nail art on three fingers, do it on just one to give eyes some rest. Round nail shape works well with shell fans and scales, and the following ideas show some other options with oval nails.
How to Apply
- Apply base coat, then sea-green shimmer polish to the thumb, middle, and pinkie; use sheer nude on the index and ring. Let it dry.
- Stamp or paint overlapping pale-gold semicircles on the middle nail, using nail stamping products if choosing that method.
- Paint lilac shell fans on the nude nails. Add thin deeper-purple radiating lines after the lilac dries.
- Allow the art to dry and apply a glossy top coat without disturbing the fine scale lines.
9. Rapunzel Nails with Golden Suns and Floating Lanterns
Warm tones such as lantern gold go well with dusty violet shades. Here are the nails for the Tangled-style manicure: you will need medium almond-shaped nails in lilac on the index finger and pinkie and dark purple on the rest of the fingers. Put a sun decal on the ring finger. Small amber-colored lanterns decorate the dark nails, and small lanterns at the ends of the nails give the feeling of depth. Make sure the nails stay shiny and keep the design flat, as if you were painting a picture.
The lantern is a simple shape, so all it needs is the squared shape, brightened center, and a short darker edge in order to be recognized. The sun is not so forgiving because even one irregular ray can blur its shape. Give this symbol the largest possible place on the nail plate; if needed, use a decal. Fewer lanterns will help you to create the movie atmosphere on short nails.

How to Apply
- Apply base coat and the lilac-and-plum color layout in regular polish. Let the layers dry.
- Place a small gold sun decal centrally on the ring nail, following its application instructions.
- Paint a few amber lantern shapes on the thumb and middle nail. Add pale-yellow centers and a fine darker edge after the first shapes dry.
- Allow the artwork and decal to dry thoroughly before applying a glossy top coat.
10. Sleeping Beauty Pink-and-Blue Split Nails
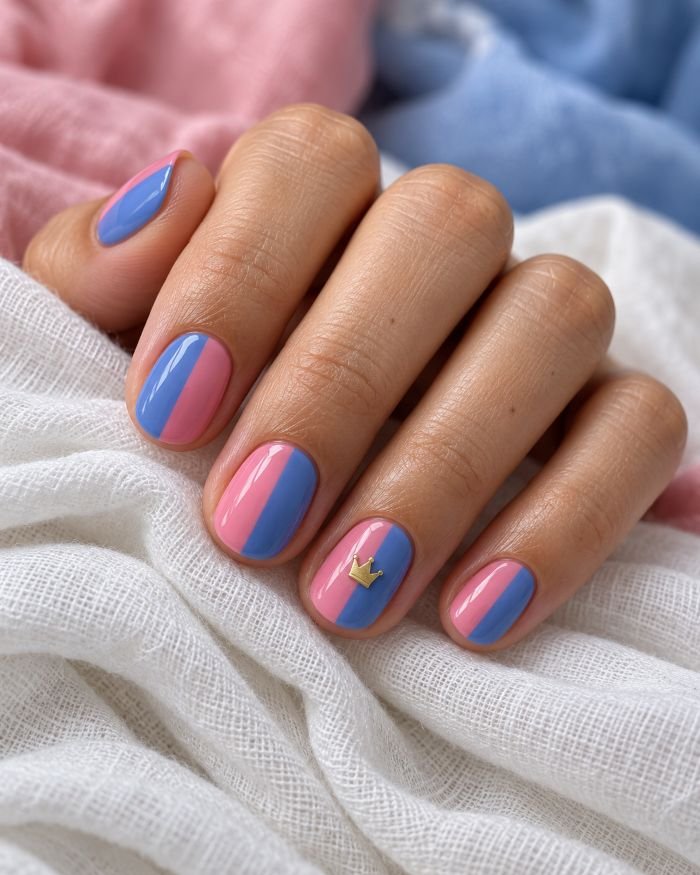
Aurora’s pink vs. blue question turns into an elegant color-block design when both colors are applied to each nail at once. Create the manicure by painting the nails that have short oval shape in two equal vertical stripes: cool rose pink and cornflower blue. Alternate the order of colors between the fingers to make the manicure dynamic. One little golden crown is put on the middle finger nail to create a touch of royalty.
The colors used in this manicure need to have similar tone. If you paint very light pink and very dark cobalt, then the darker part will dominate and the split will look not symmetrical even when it actually is. The tones need to be equally opaque too. It wouldn’t be appropriate to paint a full figure as it will distract from the split design. This is one of the most realistic princess designs for short nails.
How to Apply
- Apply a base coat and two thin coats of rose-pink regular polish. Let the base become fully dry before using a guide.
- Mask one vertical half with a nail-art guide and paint the exposed half cornflower blue. Remove the guide while the blue is still wet; reverse sides on alternating nails.
- Once dry, add a tiny gold crown sticker to the ring nail and seal with a compatible glossy top coat.
11. Frozen Snowflake Nails with an Icy Ombré
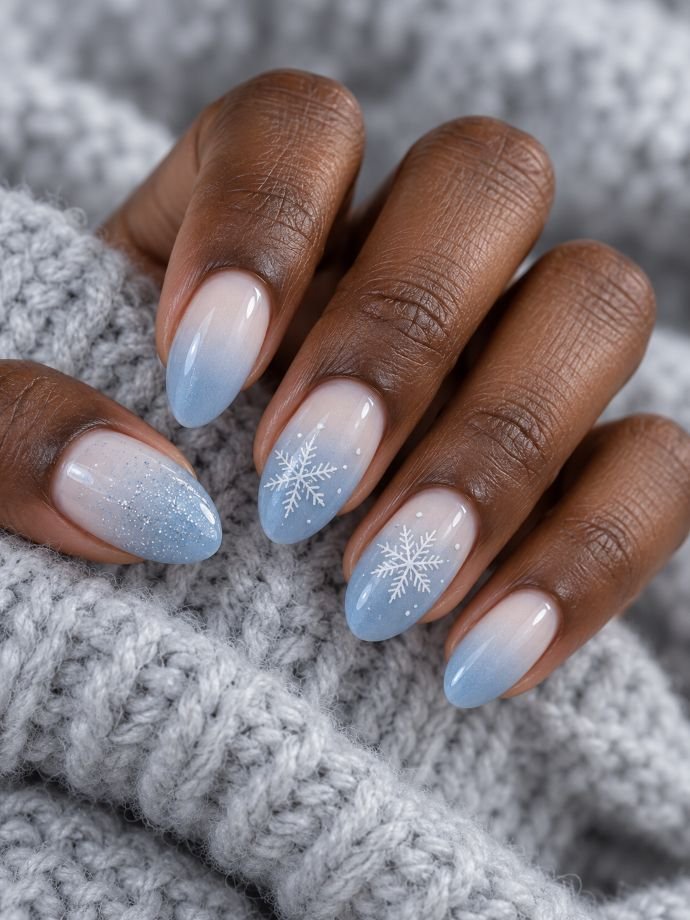
A fade from translucent milky white to glacial blue gives snowflakes a little depth to float over. Use medium almond nails and concentrate the blue toward the tips, leaving a softer area near the cuticles. Fine white snowflakes belong on the middle and ring nails, with a sparse veil of silver microshimmer across the thumb. Keep the remaining two nails free of artwork so the gradient stays visible beneath the glossy finish.
The snowflakes need contrast, which means placing their white centers over the blue portion rather than the palest part of the fade. Thin branches will remain clearer than thick, crowded spokes. If your nails are short, one partial snowflake entering from the side can look more deliberate than a full motif compressed into the center. Browse our ombré nail ideas if you want to compare a softly blended tip with a stronger gradient.
How to Apply
- Apply base coat and a milky-white regular polish base. Let it dry.
- Lightly sponge glacial-blue polish onto the tips, building the fade in thin passes and allowing each pass to dry.
- Paint fine white snowflakes over the bluer parts of the middle and ring nails, or use small decals. Add a little silver microshimmer to the thumb.
- Wait until the details are dry, then smooth the manicure with glossy top coat.
12. Tiana-Inspired Green Nails with Water-Lily Art
The colors pale pistachio, leafy green, and ivory contribute to making this manicure as soft as Tiana’s petal-shaped dress. Select medium rounded nails and paint the thumbs and pinkies leafy green and the other three nails pistachio. Paint a tiny ivory water lily on the top of a darker lily pad on the ring finger and add a gold arc next to the middle nail. The manicure will be glossy with flat painted petals instead of thick sculpted flowers.
This flower should have a few pointed petals that are spread out from a pale-yellow center. When there are too many strokes concentrated in this flower, it looks like a white daisy or a star. Show the darker pad under one part of this flower to make it look like a water lily. This design is perfect for those who like botanical nail art and need a more subtle princess design.

How to Apply
- Apply base coat, then leafy-green regular polish to the thumb and pinkie and pistachio to the remaining nails. Allow to dry.
- Paint a small dark-green lily pad on the ring nail, including a narrow notch. After it dries, add a few pointed ivory petals and a pale-yellow center.
- Draw a thin gold arc near the middle nail’s cuticle, leaving a clean gap from the skin. Dry the artwork and seal with glossy top coat.
13. Stitch and Hibiscus Nails in Tropical Blue
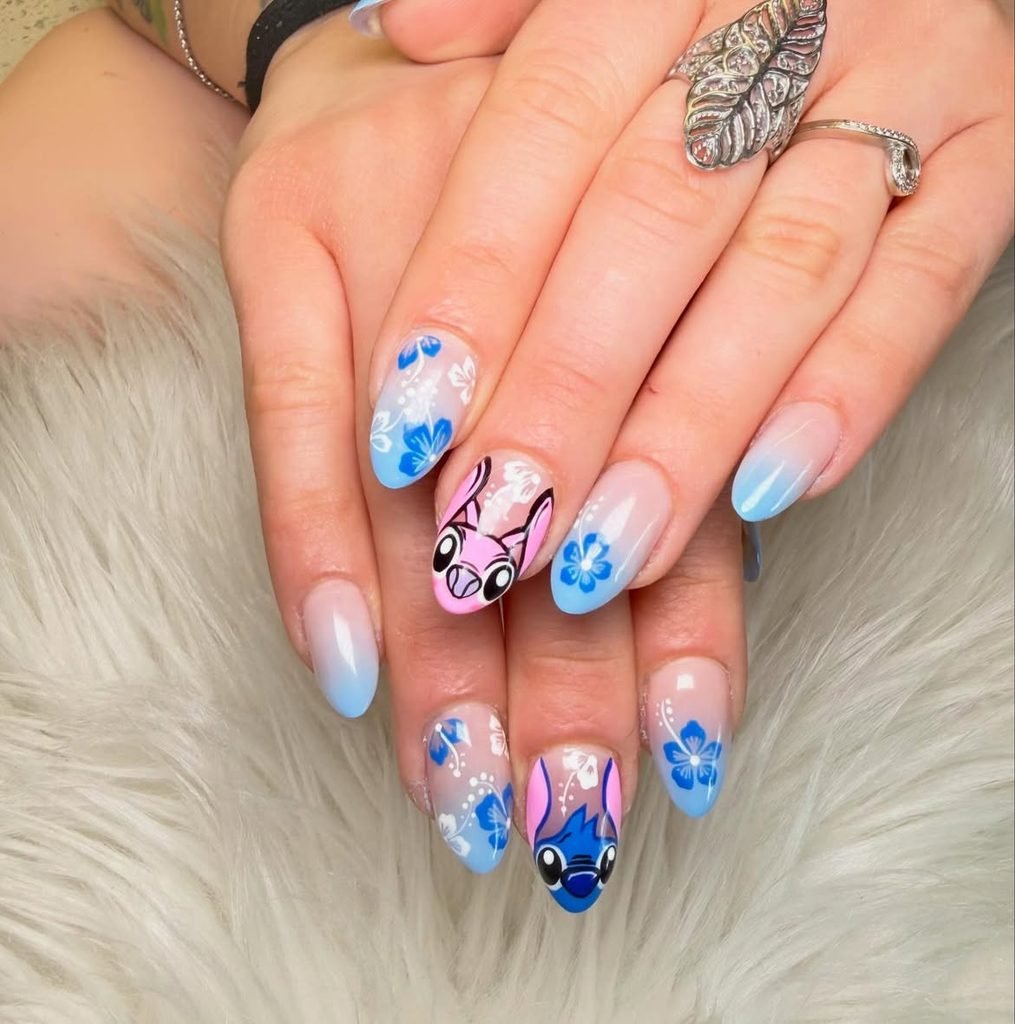
The blue face and coral hibiscus flowers clearly make the tropical theme evident in this design. Sky blue should be used to paint the thumb and pinkie nails, nude for the index and middle nails which will have flowers, and pale blue for the ring nail where Stitch’s face will be pasted. The darker blue nose and huge ears will help define him more. Glossy polish ensures the flowers stand out, and the nude separation prevents the five nails from appearing as one blue nail.
A sufficient width should be allowed on the nails for his two ears, and the larger portrait will push them to the sides and reduce his facial expression. For an at-home manicure design, a stitch decal combined with five-petal flowers will do. The detailed eyes and facial features would be done by a professional artist with character portraits. Just one face is enough since the flowers create the setting already.
How to Apply
- Apply base coat and the sky-blue, nude, and pale-blue regular polish layout. Let all surfaces dry.
- Add a correctly sized Stitch decal to the ring nail according to its instructions, or have a nail artist paint the portrait.
- Create coral hibiscus flowers on the index and middle nails using five petal strokes. Add a fine pale stamen and tiny dots at its end once the petals dry.
- Allow the artwork and decal to dry, then finish with compatible glossy top coat.
14. Winnie the Pooh Nails with Honey-Drip Details
Honey yellow feels warmer when it sits beside creamy beige instead of bright white. Give short rounded nails a beige base, then paint amber-yellow drips descending from the tips of the thumb, index, and pinkie. A small Pooh face occupies the ring nail, with a narrow red band beneath it suggesting his shirt. Keep the middle nail plain honey yellow. The glossy finish makes the painted drips look syrupy without adding any raised texture.
Uneven drip lengths are part of the appeal. If every drop ends at the same point, the border starts to resemble scalloped French tips. Leave some beige visible between the longer drops, and keep the Pooh face simple enough to recognize without shading. This is a cheerful option for compact nails, especially if you prefer warm colors. A decal offers a cleaner character accent when the eye and nose details feel too small to paint.

How to Apply
- Apply base coat and creamy-beige regular polish, leaving the middle nail honey yellow. Allow to dry.
- Place amber dots at different heights below the thumb, index, and pinkie tips, then connect them upward with a detailed brush to form flat drips.
- Add a Pooh face decal to the ring nail and paint a short red shirt band beneath it, leaving the character unobscured.
- Dry the details and decal fully before sealing with a compatible glossy top coat.
15. Alice in Wonderland Playing-Card Nails
The playing-card designs create an illustrative look for Alice in Wonderland nails. Apply medium soft-square nails with white nails for the thumb, middle, and ring, blue for the index finger, and red for the little finger. Design a little red heart playing card on the ring nail and a black spade on the thumb. The little white teacup on the blue index nail is where the Alice in Wonderland detail comes in, whereas the middle nail will be clean except for a thin black border.
There is no need for miniature writing for the design to be clear. The neat rectangular design and single suit design will be more noticeable than numbers squeezed into the design. Retaining the blue color will distinguish this manicure from a simple casino manicure. For a more sophisticated look, opt for sheer white instead of porcelain and the black borders will only go on one accent nail. The teacup must remain simple and the handle must be distinguished from the body.

How to Apply
- Apply base coat and the white, powder-blue, and red regular polish layout. Let the colors dry.
- Paint thin rectangular card borders and add a red heart to the ring nail and a black spade to the thumb, or use playing-card decals.
- Add a simple white teacup and handle on the blue index nail. Give the middle nail a fine black frame.
- Let the artwork dry thoroughly and finish with glossy top coat.
16. Cheshire Cat Stripes with a Grinning Accent
Curved pink stripes over a plum-purple base echo the Cheshire Cat’s coat without turning every nail into a face. Choose medium almond nails, with stripes on the thumb, index, and pinkie. Let the middle nail remain solid purple. On the ring nail, a wide white grin sits below two small yellow-green eyes, with the surrounding purple left visible. The glossy surface gives the colors depth and helps the white smile stand out.
The stripes should bend around the nail rather than run across it like a ruler. Vary their widths slightly, but keep the grin nail quieter so the expression remains the focus. Teeth are the most fiddly detail: a few fine black divisions work better than a dense grid. If you prefer the softer animated palette, choose raspberry pink and muted violet; bright magenta and electric purple make the same arrangement feel much louder.

How to Apply
- Apply base coat and plum-purple regular polish to all nails. Let the base dry.
- Use a curved liner motion to paint raspberry-pink stripes across the thumb, index, and pinkie, leaving the middle nail plain.
- Paint a white crescent-shaped grin and two yellow-green eyes on the ring nail, or use a character decal. Add fine black tooth divisions after the white dries.
- Allow the art to dry fully, then apply glossy top coat.
17. 101 Dalmatians Nails with Spots and Red Details
Black spots of irregular size against warm white form the Dalmatian design, while red will add a collar-type decorative touch. Ensure that the nails remain short and squoval. Paint the nails except for the ring and the pinkie: the thumb, the index, and the middle in warm white with black spots on the nails, and the ring in white with a thin red strip near the edge. Also paint a small gold dot next to the strip to mimic a tag.
The size of the spots makes all the difference in how this manicure looks. Big spots can make the design more similar to a cow print, so combine smaller and slightly bigger spots of rounded shape with lots of white spaces. The pinkie is already painted in red, which means that there will be enough color without a dog on the nails. This is an excellent design if you prefer graphic nail art but not detailed drawings.

How to Apply
- Apply base coat, warm-white regular polish to four nails, and red to the pinkie. Let dry.
- Use the tip of a detail brush to add irregular black spots to the thumb, index, and middle. Vary their size and leave white gaps.
- Paint a narrow red band near the ring tip and add one tiny gold dot beside it. Let all details dry, then seal with glossy top coat.
18. Toy Story Nails with Clouds and Cow Print
Andy’s blue-sky wallpaper and Woody’s cow-print vest make a recognizable pairing even without character portraits. Give short rounded-square nails a glossy finish, using sky blue with fluffy white clouds on the thumb and middle. The ring nail carries bold black cow patches on white, while the index is warm yellow with a fine red windowpane pattern. A plain blue pinkie keeps the mix from becoming too crowded.
Each pattern needs a different scale. The cow patches should be larger and more open than Dalmatian spots, while the yellow nail’s red lines should stay fine enough to suggest a shirt rather than a checkerboard. Because there are several motifs, limit the clouds to two or three per nail. This set suits short nails especially well when you want obvious Pixar references but would rather skip tiny eyes, lettering, or full character illustrations.
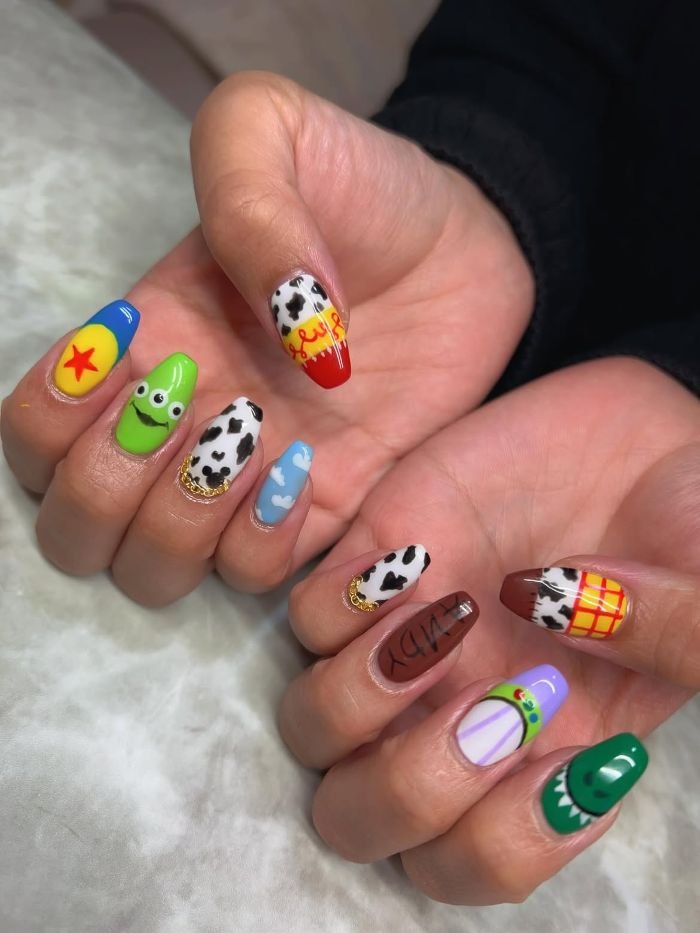
How to Apply
- Apply base coat. Paint the thumb, middle, and pinkie sky blue, the ring white, and the index warm yellow in regular polish; let dry.
- Build a few white cloud clusters on the thumb and middle using adjacent dots joined along a flatter lower edge.
- Paint large irregular black patches on the ring nail and fine red crossing lines on the yellow index.
- Let every pattern dry before applying glossy top coat.
19. Monsters, Inc. Nails Featuring Mike and Sulley
Mike’s single eye and Sulley’s turquoise-and-purple coloring offer two very different focal points. Use medium squoval nails, with lime green on the ring, turquoise on the thumb and index, and pale pink on the middle and pinkie. Paint Mike’s large white eye and small smile on the ring nail. The thumb carries a simplified Sulley face, while purple patches cover the turquoise index. Leave the pink nails plain for contrast.
Plan the eyes before adding outlines. Mike’s iris needs enough white around it to stay readable, and Sulley’s face requires more room than a narrow little fingernail can comfortably provide. That is why the thumb gets the second portrait. Custom decals or artist-painted press-ons can deliver the character detail while keeping your preferred length. There is no need to add the company logo or Boo’s door as well; the two faces already establish the theme.

How to Apply
- Apply base coat and the lime, turquoise, and pale-pink regular polish layout. Allow to dry.
- Add a Mike face decal to the ring nail and a suitably sized Sulley decal to the thumb, following the decal instructions. Detailed freehand versions are best planned with a character nail artist.
- Paint irregular purple patches over the turquoise index. Leave the pale-pink nails plain, let everything dry fully, and seal with a compatible glossy top coat.
20. Red Race Car Nails with Checkerboard Accents
Bright racing red, bold checkerboard patterns, and a playful race car accent give this manicure a sporty, energetic look. Keep the nails short and rounded-square, with glossy red polish on the thumb, middle, and pinkie. Paint the index white with crisp black checkerboard squares, while the ring features a miniature red racing car decal against an opaque white base. Finish the middle nail with a single yellow lightning bolt for a pop of contrast.
The checkerboard looks especially clean when the squares are large enough to remain distinct on shorter nails. A few evenly spaced rows create a sharper finish than tiny, crowded details. For the ring finger, choose a simple red race car illustration with black wheels and subtle yellow accents. A nail decal makes the design easier to recreate at home without requiring advanced painting skills.
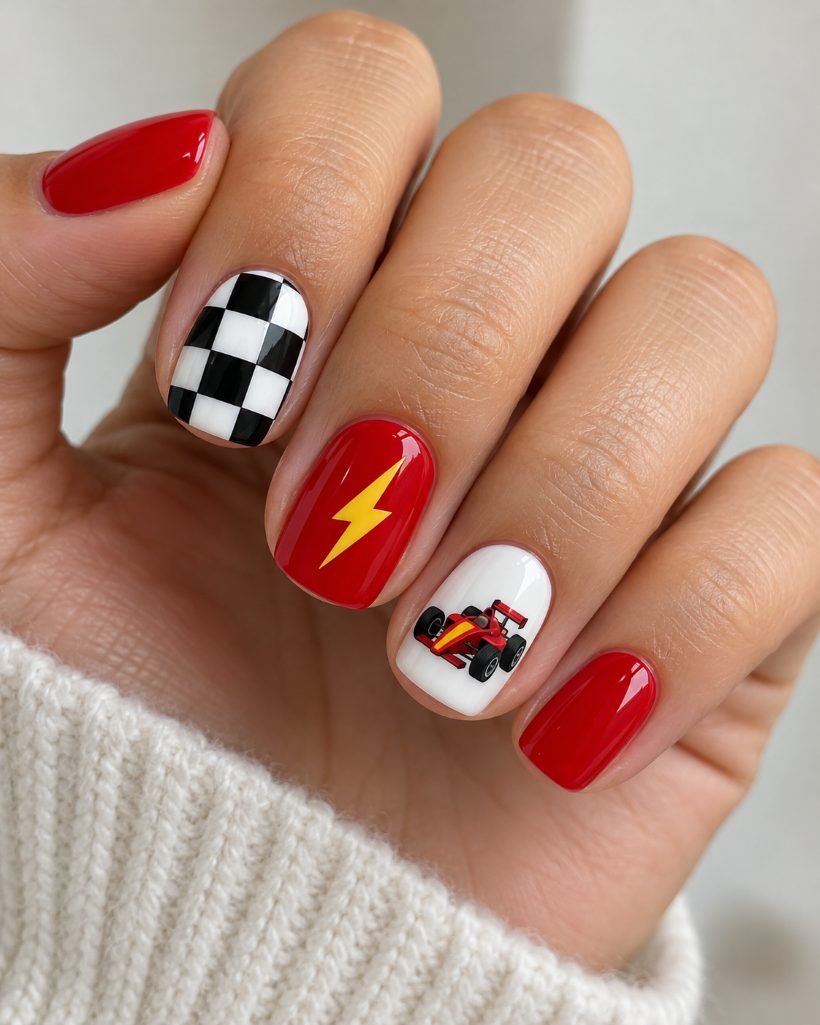
How to Apply
- Apply a base coat, then paint the thumb, middle, and pinkie with glossy racing-red regular polish. Use opaque white polish on the index and ring nails. Allow the polish to dry.
- Lightly outline a grid on the index nail using a fine nail art brush. Fill alternating squares with black polish to create a checkerboard pattern, or use a checkerboard nail decal.
- Place a miniature red race car decal on the ring nail, keeping the design centered against the white background. Paint one clean yellow lightning bolt on the middle nail.
- Allow the artwork and decals to dry completely, then seal the manicure with a compatible glossy top coat for a smooth, polished finish.
21. Maleficent Nails with Black Horns and Green Flames
Acid-green flames against glossy black give Maleficent nails a sharper mood than the pastel princess sets. Choose medium almond nails, painting the thumb, index, middle, and pinkie black. A muted violet ring nail holds a flat black horned-head silhouette. Let green flames climb from the tips of the index and middle nails, leaving the other black nails plain. The violet accent creates enough contrast to show the horns clearly.
The horn shape needs height, but it does not require an extreme stiletto length. Two clean upward curves communicate the character better than several cramped spikes. Keep the flames narrow at their ends so they look fluid rather than like green stripes. For regular polish, an opaque green nail-art color is easier to control than a translucent neon that disappears over black. This is a strong Halloween option, though the restrained number of accents also suits darker everyday styling.
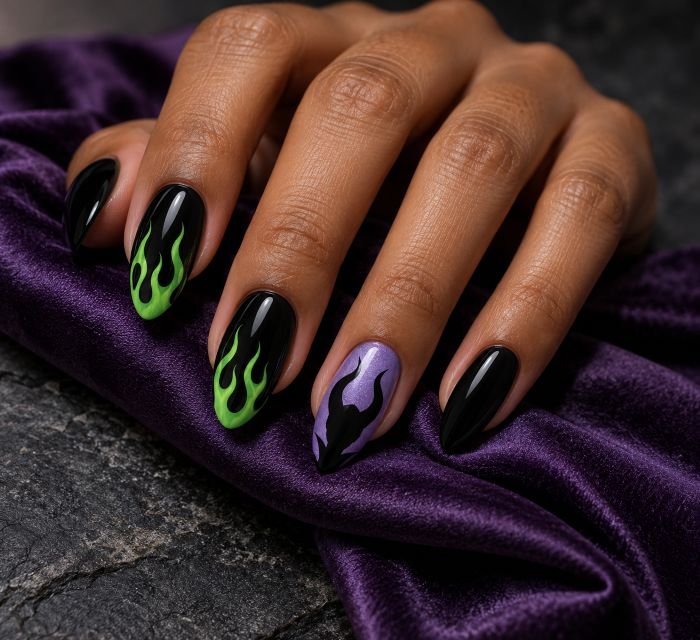
How to Apply
- Apply base coat, glossy black regular polish to four nails, and muted violet to the ring. Let dry.
- Paint a black horned-head silhouette on the violet nail, or apply a flat decal sized to keep both horns visible.
- Draw tapered flames from the index and middle tips with opaque acid-green nail-art polish. If the green needs it, use a fine white underpainting, let it dry, then cover it in green.
- Allow all layers to dry before applying a glossy top coat.
22. Jack Skellington Nails with Sally’s Patchwork Accents
Jack’s black-and-white face gives Sally’s colorful patchwork a clean focal point. Use medium soft-square nails, with a white ring nail for Jack’s oval eyes and stitched smile. Paint the thumb and pinkie black, give the index thin black stripes over white, and divide the middle nail into dusty teal, mauve, and mustard patches. Fine black seams and short stitch marks connect the colored sections. A glossy finish keeps the whole set visually consistent.
The patchwork needs uneven shapes to resemble fabric scraps. A tidy grid can look more like a quilt than Sally’s dress, so use angled borders and vary the size of each color block. Keep the black seams thin enough that the colors remain visible. On shorter nails, three patches are sufficient. This design also translates well to press-ons, where the face and stitching can be painted before the nails are applied.
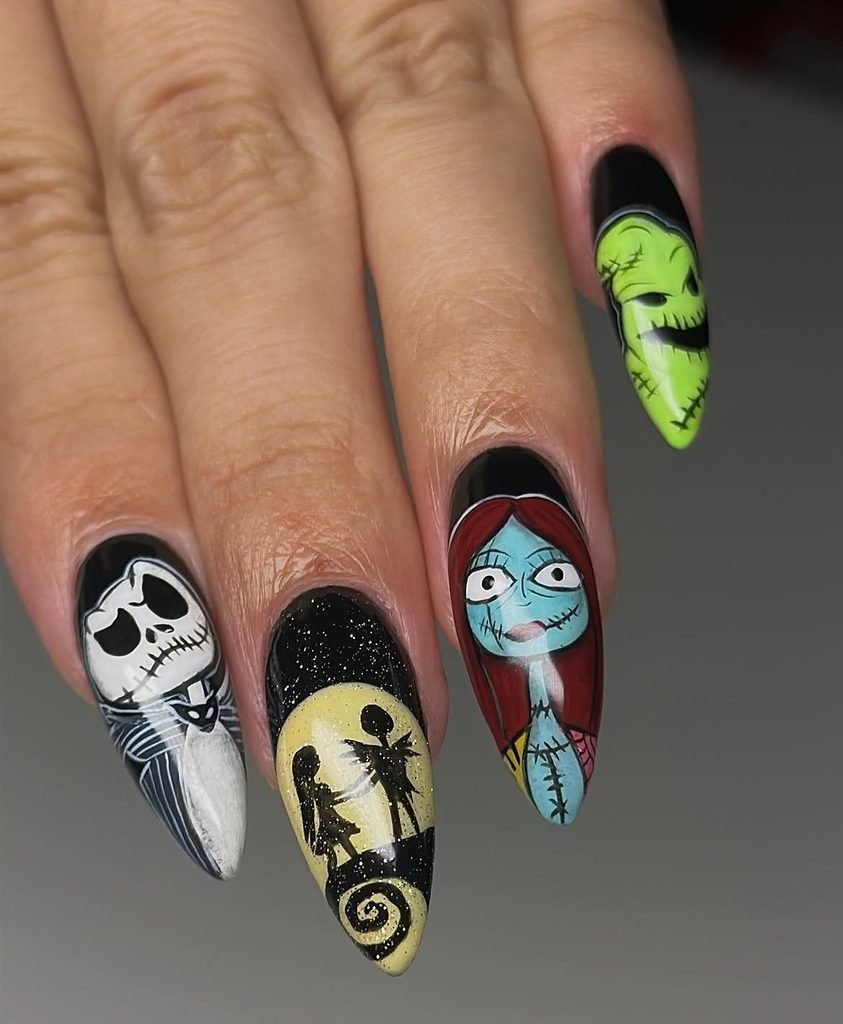
How to Apply
- On prepared nails or fitted press-ons, apply base coat and the white-and-black regular polish layout. Paint the middle nail in three irregular dusty teal, mauve, and mustard sections.
- Once dry, outline the patch boundaries with a fine black liner and add short stitches crossing the seams. Paint thin black stripes on the white index.
- Add Jack’s black eye shapes, tiny nostrils, and stitched smile to the white ring nail, or use a face decal.
- Let all details dry completely, then seal with a compatible glossy top coat. Apply finished press-ons according to their adhesive instructions if using them.
How to Paint Clean Mickey Mouse Silhouettes with a Dotting Tool
Mickey Mouse must have three circles well distinguished from each other to make an easily recognizable silhouette. The official nail art tutorial from Disney uses one big spot for the head of Mickey Mouse and two spots for the ears that are smaller and need less polish on the tool to apply them.
First, practice creating the whole silhouette on the nail tip prior to applying it on the nails. Begin from drawing the circle of the head of Mickey, and then place the ears symmetrically at its upper edges but not in the middle of the circle. There must be enough space between the ears to recognize the silhouette of Mickey. Do it on the dry base of the regular polish and add polish very moderately to the tool. Wipe the tool between attempts. If the silhouette is too big for the corner chosen for it, try to cut away the extra part of the nail, rather than make corrections using dots.
How to Apply Disney Nail Decals Without Wrinkles or Dull Colors
Make sure you are not dealing with an adhesive decal or a waterslide decal; they have different application processes. When applying transparent printed decal, the color of the polish applied underneath is added to the final color palette. Seventy7 Nails suggests using white polish when working with its waterslide decals because the dark polish will cover the artwork. Adhere to instructions of your preferred brand, particularly if it involves gels.
Cut the design to match the nail, taking into account such details as Stitch’s ears or the princess’ crown. Remove the decal from the backing and remove the extra water; place the decal carefully onto the nail. Press down the decal without constantly moving it around the nail. According to Seventy7 Nails, the reasons for wrinkling may be extra water, too much movement, and premature sealing. Make sure that the decal is totally dry before applying the sealing coats and keep its edges on the nail. If the picture on the nail appears to be faded before the top coat, you need to rethink the choice of base color.
How to Adapt a Disney Nail Reference Photo to Your Own Nails
Consider the artwork apart from the length of the nails of the model. For example, a castle captured on an extended nail may require fewer towers on your nail since scaling down everything can result in a blurry image. First, determine what elements have to be clear: Mickey’s ears, Mike’s eye, Belle’s rose, or the Cheshire Cat’s smile.
According to the character nail art guide by Scratch, artists advise planning the design using a reference and taking into account the curvy nature of the nail, with some details getting hidden on the sides. Essential details should stay in the center. Additional elements, like lanterns, flowers, or stars, should be relocated on adjacent nails. Prior to the nail session in the salon, provide the artist with a reference along with a picture of your nails to indicate which parts you need preserved.
Final Thoughts
Identify the detail from Disney which stands out on its own without the other manicure details. In the case of Mickey it is three little circles, in the case of Belle it is a rose under a glass dome, and in Toy Story case clouds alongside with the cow print. It will be easier to start with such details, since you have the center of your design and it will help you to choose the other details to add.
Think about the effort you are willing to invest in creating such a nail set. Polka dots, two-colored design, or silhouette require some amount of painting skills. Detailed faces require decal, experienced nail artist or press-ons. Maintain your favorite nail length and design around it. Even a tiny detail on nails is able to show your love towards the character. Choose the idea of Disney manicure which corresponds to your style, write down the colors and position you like and use this information while designing your next manicure.
Ready to bring a little Disney magic to your next manicure? From tiny Mickey silhouettes and princess-inspired colors to playful Pixar details and bold villain designs, find a look that matches your style. Save your favorite idea and use the colors, patterns, and character details as inspiration for your next DIY manicure or salon visit.
Use our AI Nail Generator

Bloomie
Bloomie (I) is the founder and author of Nail Blooms, a nail inspiration website dedicated to manicure ideas, nail art, colors, shapes, and emerging beauty trends. My interest in nails began with a simple habit of collecting beautiful manicure ideas and exploring different styles, from timeless nude shades and French tips to creative nail art and seasonal looks. What started as a personal interest gradually grew into Nail Blooms, a space created to make discovering nail inspiration easier and more enjoyable. At Nail Blooms, My goal is to help readers give new ideas, find different possibilities, and feel inspired when choosing their next manicure.
About the editor ↗