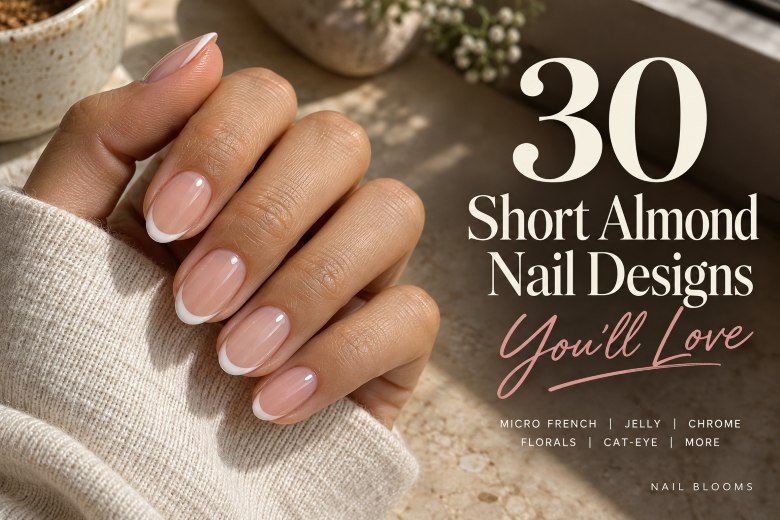
30 Short Almond Nail Designs You’ll Love
Short almond nails have a particular kind of balance: the tapered sides make the fingers look polished, but the compact length still lets you type, work, travel, and get through the day without constantly protecting your manicure. That small canvas also makes color and placement matter more than they do on long extensions.
These short almond nail designs move from barely-there polish and clean French tips to jelly color, chrome, cat-eye, florals, tortoiseshell, animal print, and textured salon art. Each idea includes the finish, placement, technique, and a realistic way to recreate it on natural nails, gel overlays, or short press-ons.
1. Barely-There Pink Short Almonds
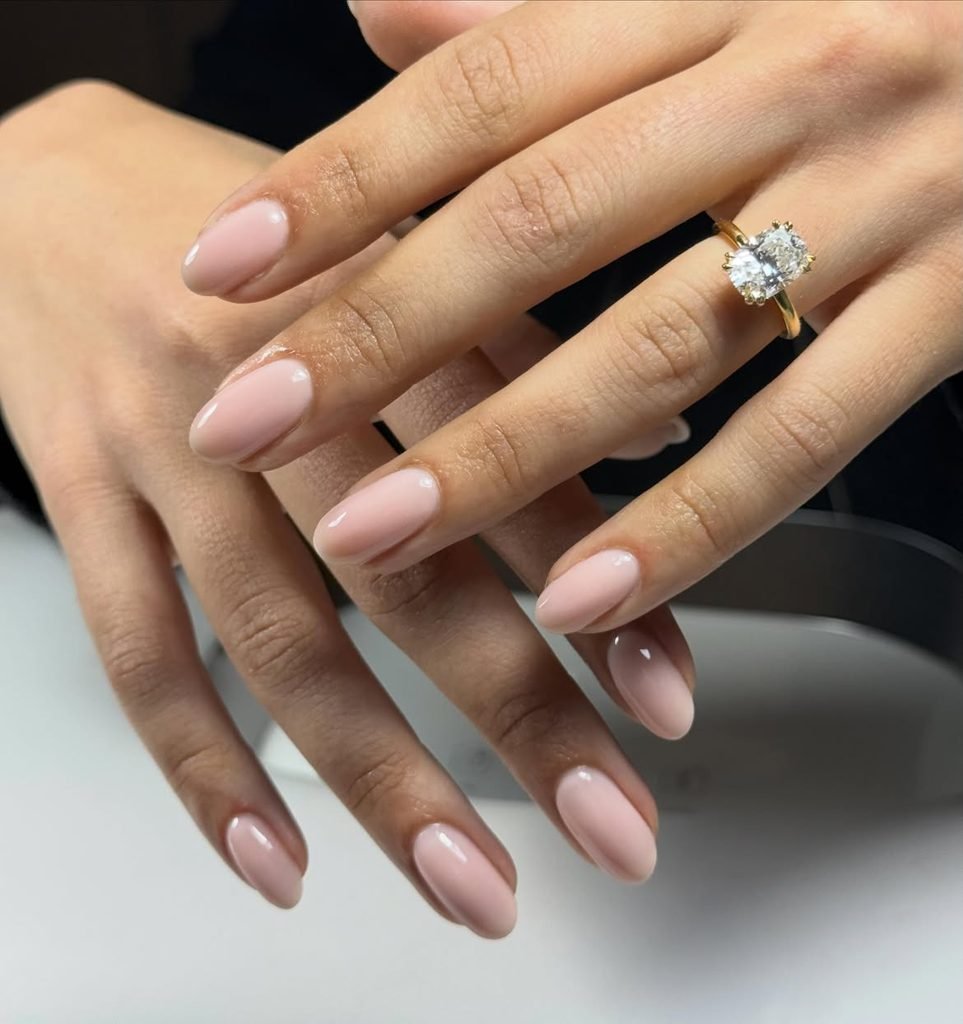
A sheer ballerina-pink wash gives these short almond nails a groomed, almost bare appearance. The color is translucent enough for the natural nail line to remain visible, while two thin coats add a soft healthy-looking blush. Keep the surface glassy and free of shimmer, artwork, or visible thickness around the cuticle.
This is the easiest starting point if you are new to the shape or want something that will not fight with your wardrobe. The faint pink is forgiving as the nails grow, and the short taper looks neat with workwear, denim, or delicate jewelry. Use a tinted strengthening base if your nails have uneven color, but do not build the polish so thickly that the free edge loses its slim outline. A glossy press-on set can create the same effect when your natural nails are different lengths.
How to Apply
- File the nails into a short almond with a softly rounded point.
- Apply a ridge-smoothing base coat or sheer pink builder base.
- Add one or two thin coats of translucent ballerina-pink polish.
- Seal with a glossy top coat, keeping the cuticle line clean.
2. Almond-Milk Cream Gloss
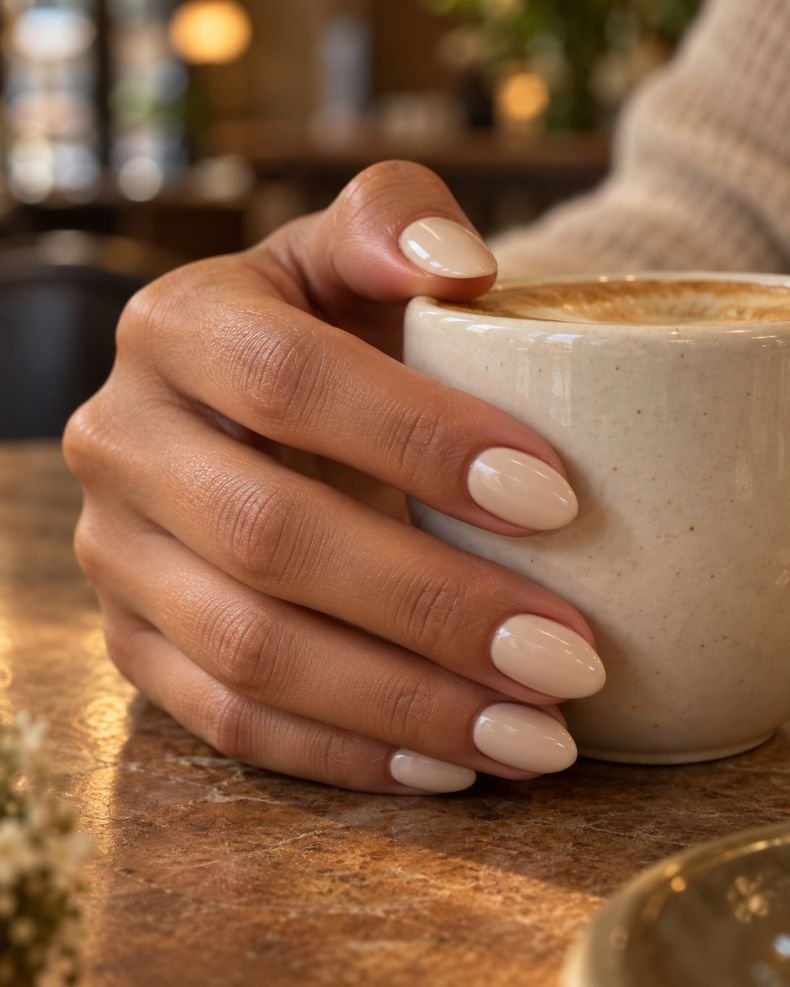
Instead of a transparent pink, this version uses a creamy almond-milk shade with a beige undertone. Short almond nails are covered in two even coats, leaving the finish opaque enough to look intentional but still soft around the edges. The color should sit between warm ivory and pale nude, never chalky white.
Almond-milk polish is useful when you like neutral nails but want more coverage than a “your nails but better” tint. It makes the tapered tip look clean and highlights the shape without adding any visual noise. The warm base flatters gold jewelry, tan leather, chocolate clothing, and soft autumn colors. If your nail beds are very short, stop the color just before the sidewalls rather than flooding them; a tidy perimeter will do more for the illusion of length than an extra coat.
How to Apply
- Shape the nails into a short almond and lightly buff away surface shine.
- Apply a thin beige-toned base coat.
- Paint two even coats of almond-milk cream polish, allowing each to dry.
- Finish with a smooth glossy top coat and cap the tips.
3. White Micro-French Tips
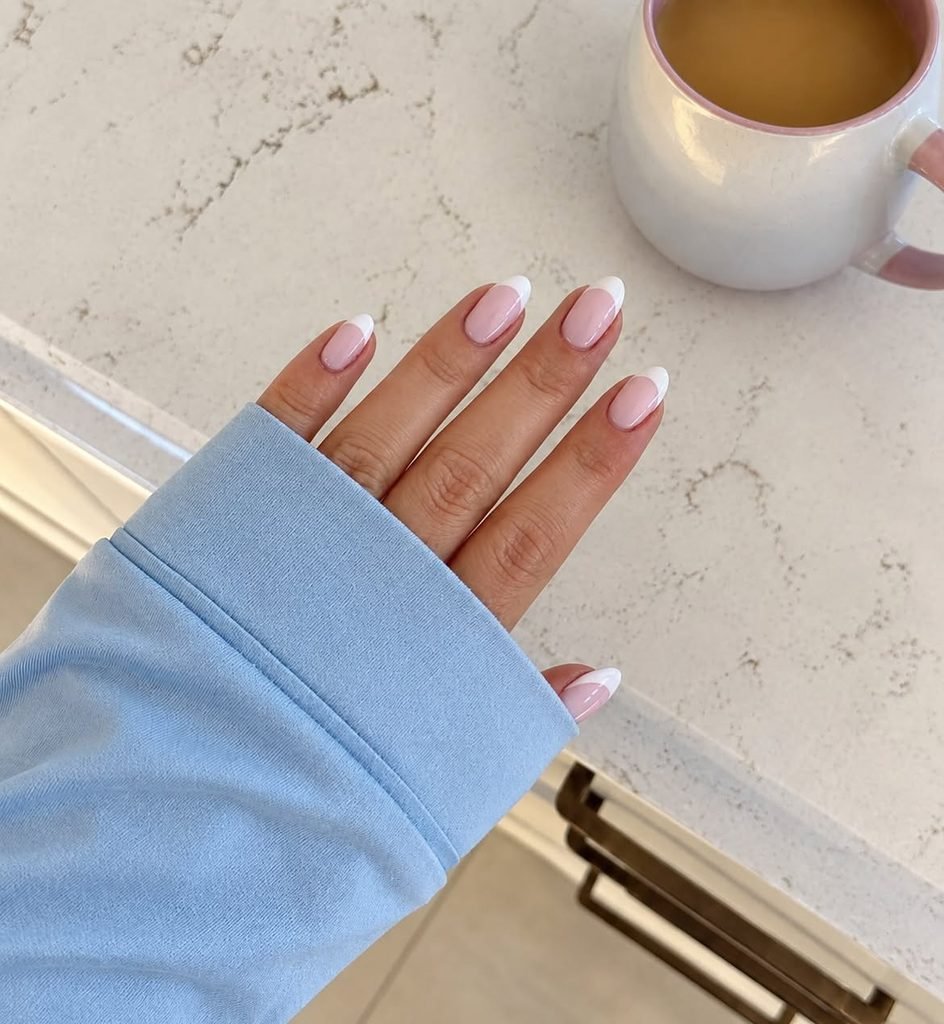
The base is a transparent rosy nude, but the free edge receives only a hairline of soft white. On short almond nails, the micro-French should follow the tapered curve rather than creating a deep smile line. The result is crisp from close range and almost invisible from across the room.
A narrow tip keeps the nail from looking shorter, which is why this version is more successful on compact almond nails than a broad French band. It also gives you a clean reference manicure for comparing other colors later. Use a long liner brush if you have steady hands; guide stickers may be too wide for the smallest nails. A technician can make the lines identical, but slight variation is not a problem here—it keeps the manicure from looking stamped on.
How to Apply
- Apply one coat of sheer rosy-nude polish to short almond nails.
- Mark the free edge with a fine detail brush or narrow French guide.
- Paint an ultra-thin soft-white line across each tip.
- Let the tips dry or cure fully before applying glossy top coat.
4. Chocolate Brown Micro-French
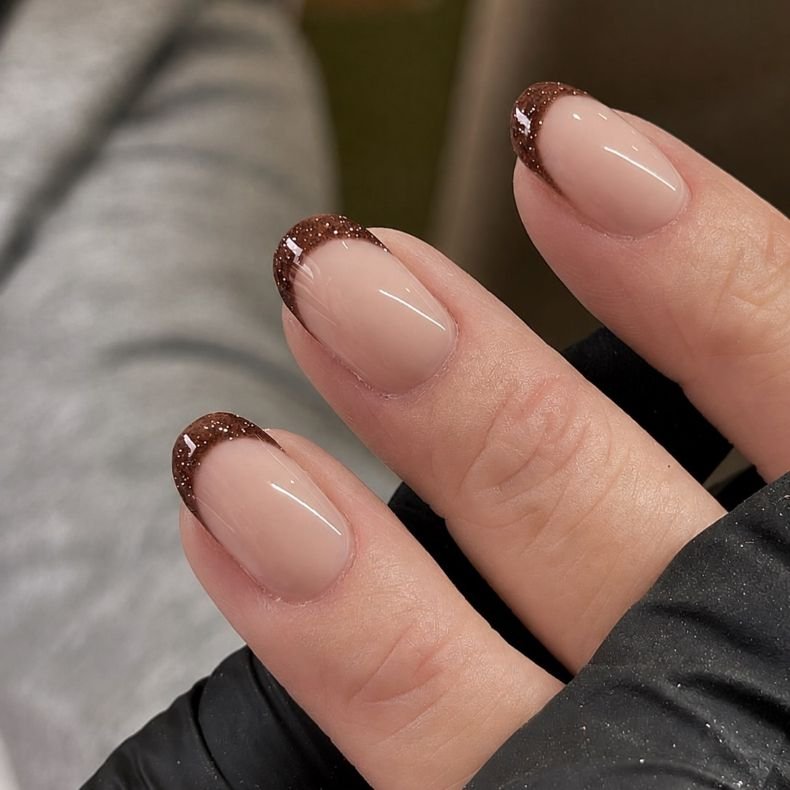
A sheer peach-beige base supports narrow espresso-brown tips that follow the almond edge. The brown is glossy and concentrated only at the free edge, with no second outline or glitter. On two nails, let the line rise slightly higher along one sidewall so the set has a small change in rhythm without becoming mismatched.
Chocolate tips give the classic French manicure a warmer, less expected direction. They look especially good with denim, camel, cream, and gold accessories, and the darker pigment makes a very thin line visible even on a short nail. Choose a milk-chocolate brown for a softer everyday version or a nearly-black espresso for more contrast. Because dark polish exposes wobbly edges, use a clean-up brush dipped in remover before the top coat sets.
How to Apply
- Apply a sheer peach-beige base to short almond nails.
- Paint slim espresso-brown tips, following the natural taper.
- Raise the side curve slightly on two nails for subtle variation.
- Clean the sidewalls and finish with a glossy top coat.
5. Blush French Fade
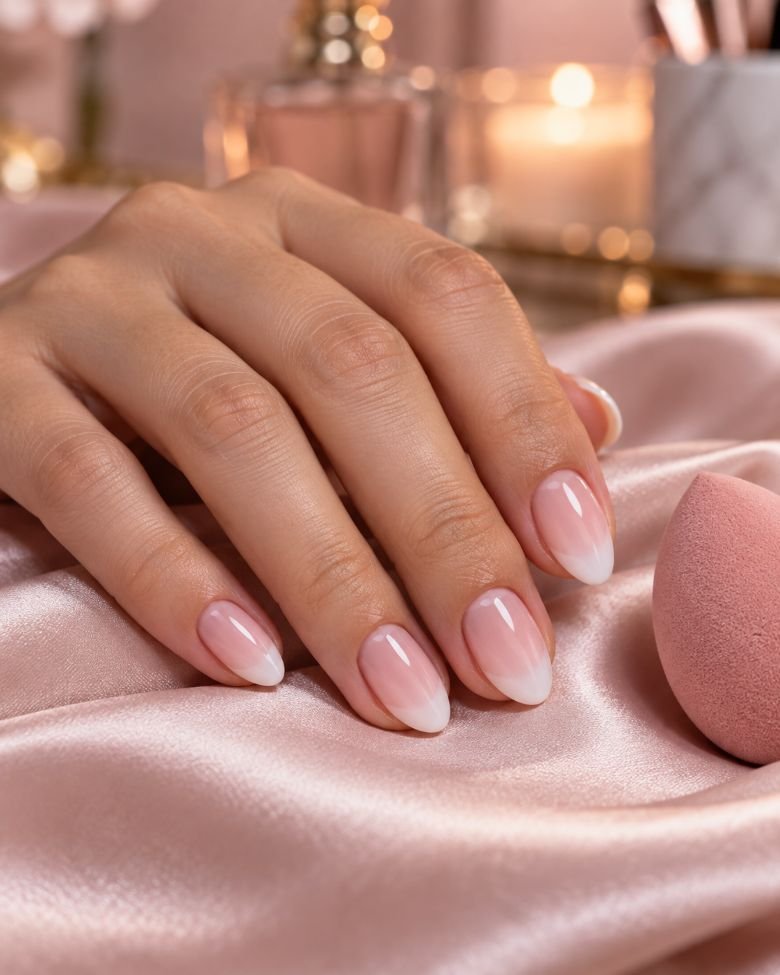
This design replaces the painted white smile line with a gradual fade from warm blush at the cuticle to milky white near the tip. Short almond nails need a restrained gradient: the white should occupy only the upper third, leaving enough pink visible to keep the nail bed visually long. A glossy finish makes the transition look softer.
The French fade is a strong choice for anyone who likes bridal or clean-girl manicures but finds conventional French tips too outlined. It works with both warm and cool wardrobes because the blush can be adjusted toward peach or mauve. A sponge is enough for a casual home version; airbrushing creates a more seamless result at the salon. On very short nails, concentrate the white at the point rather than brushing it broadly across the entire tip.
How to Apply
- Cover the nails with one thin coat of warm blush polish.
- Dab milky white onto the upper third with a small makeup sponge.
- Blend the boundary with a clean sponge edge until no hard line remains.
- Repeat in thin layers and finish with glossy top coat.
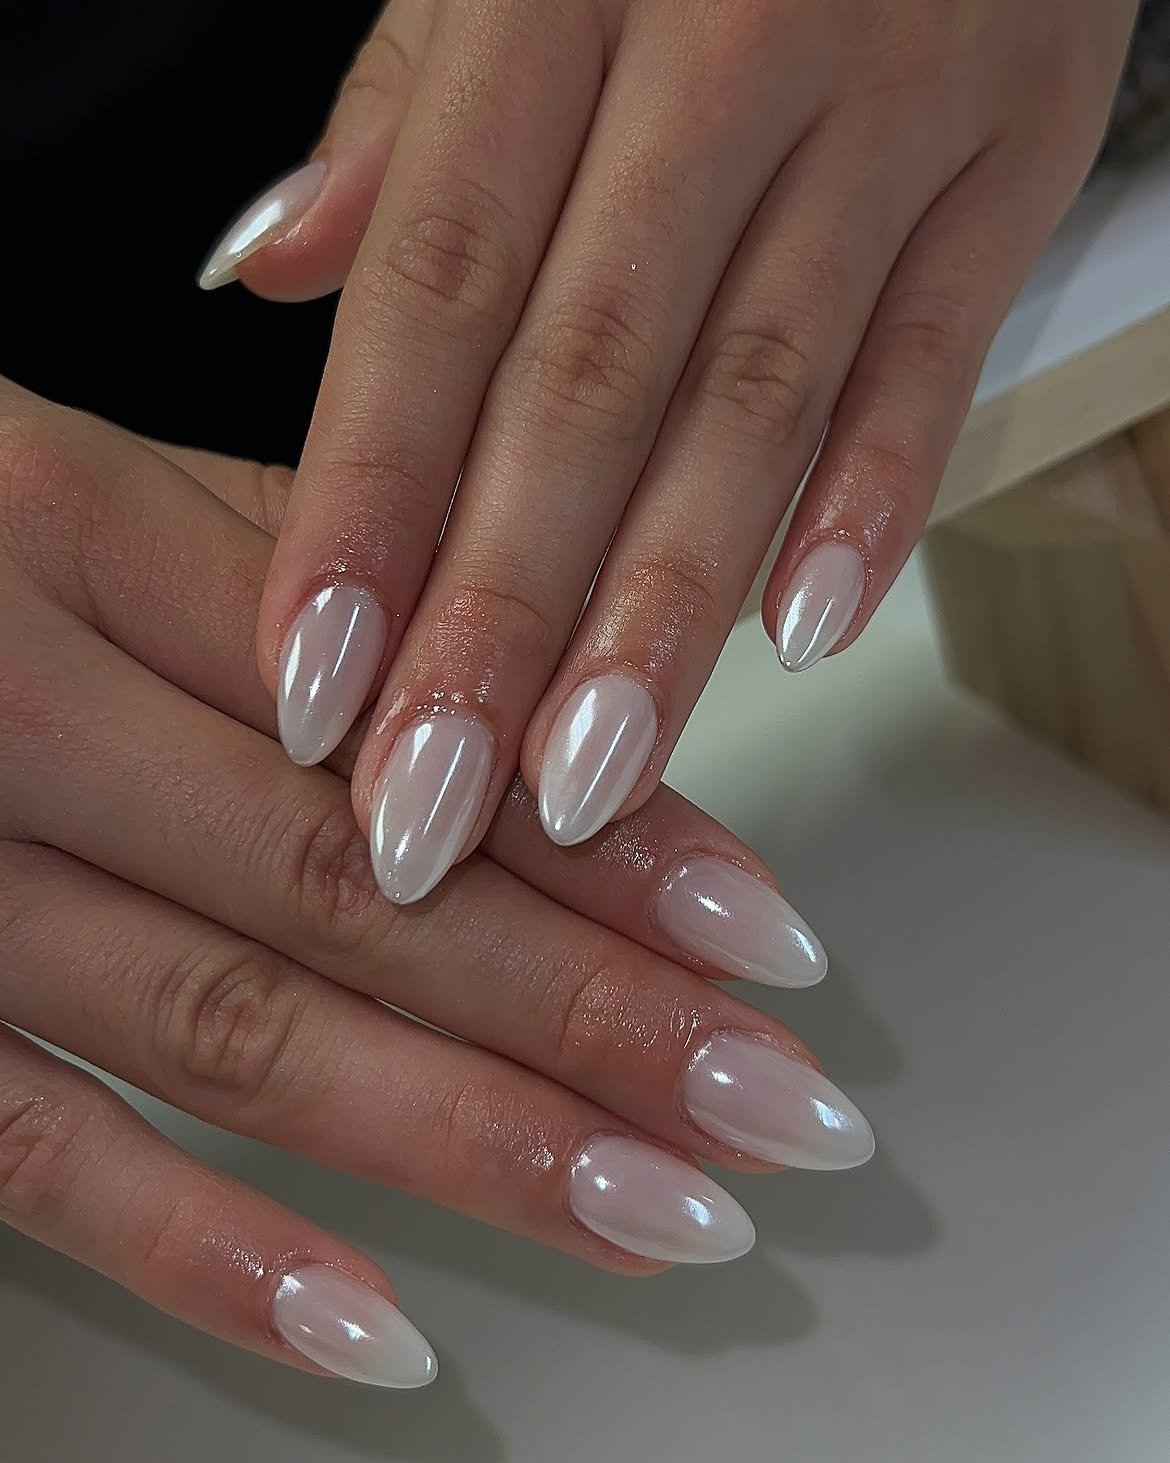
6. Pearl Chrome Short Almonds
Short almond nails begin with a translucent milky pink base, then receive a fine pearl-chrome layer that shifts between ivory, blush, and a faint silver glow. The reflective powder should be delicate rather than mirror-bright, allowing the shape to remain visible through the finish. Leave the surface completely smooth, with no crystals or raised pieces.
This is the manicure for someone who wants light-catching nails without obvious glitter. It pairs with white shirts, satin, soft gray, silver rings, and pearl earrings, but the short length keeps the effect usable for everyday wear. Chrome powder requires a compatible cured surface and careful sealing; ordinary shimmer polish will create a different, flatter result. For related finishes, explore these pearl nail ideas, especially if you are comparing pearl polish with chrome powder.
How to Apply
- Apply two thin coats of translucent milky pink gel and cure.
- Rub fine pearl-chrome powder over the cured surface.
- Brush away loose pigment from the cuticles and sidewalls.
- Seal with a compatible glossy top coat, capping each edge.
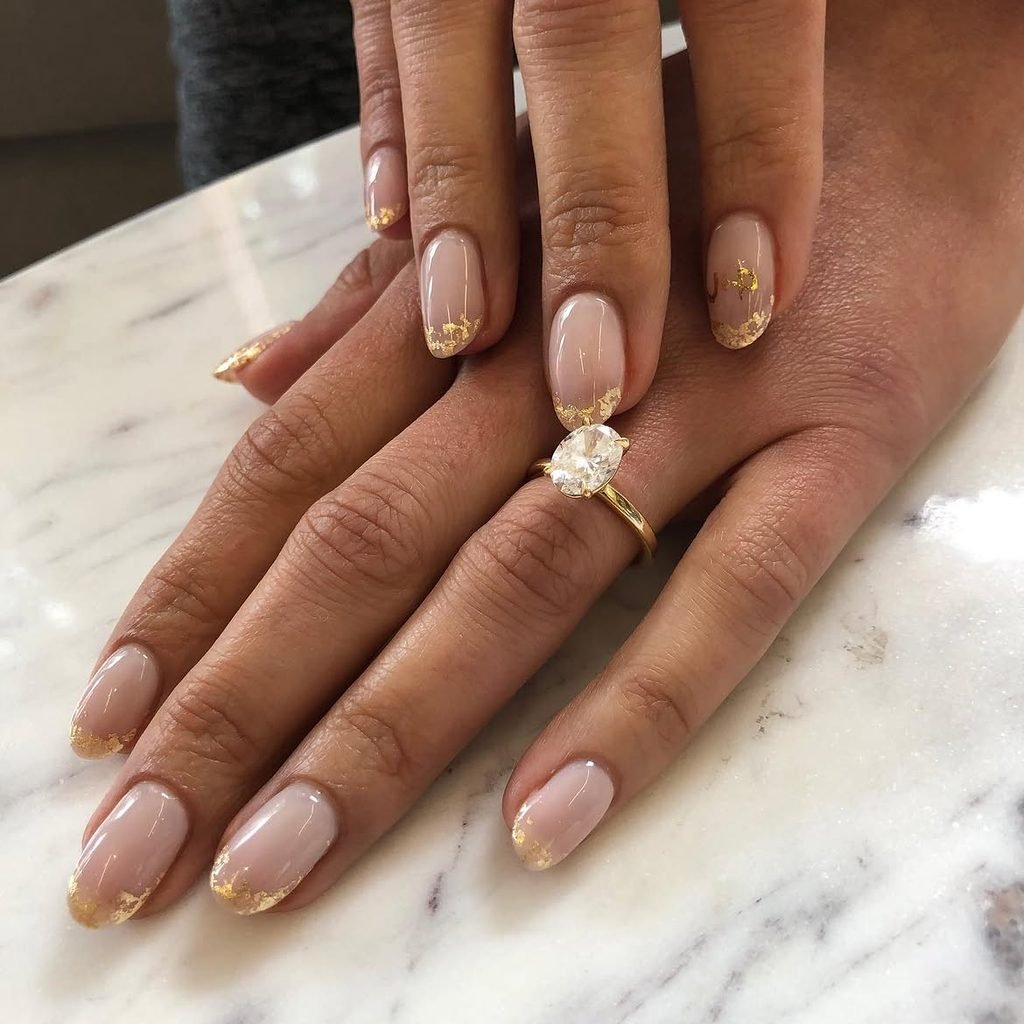
7. Gold Foil French Tips
Rather than painting a solid metallic tip, use irregular pieces of warm gold foil inside a shallow French shape. The base remains sheer beige-pink, while the foil is densest at the free edge and breaks into smaller fragments toward the smile line. Keep the pieces flat so the compact almond tips do not become bulky.
The scattered foil catches light in a more interesting way than a single opaque gold stripe. It looks good with yellow-gold jewelry, warm neutrals, and evening outfits, but it is still restrained enough for an office or dinner. Foil can wrinkle if the base is too wet, so let the color set before pressing the pieces into place. For consistent placement across both hands, pre-decorated short almond press-ons are easier than trying to recreate each fragment individually.
How to Apply
- Apply a sheer beige-pink base to short almond nails and let it dry or cure.
- Paint a shallow clear or tacky French area at each free edge.
- Press small warm-gold foil pieces into the tips, with fewer fragments near the smile line.
- Smooth the surface under a glossy top coat.
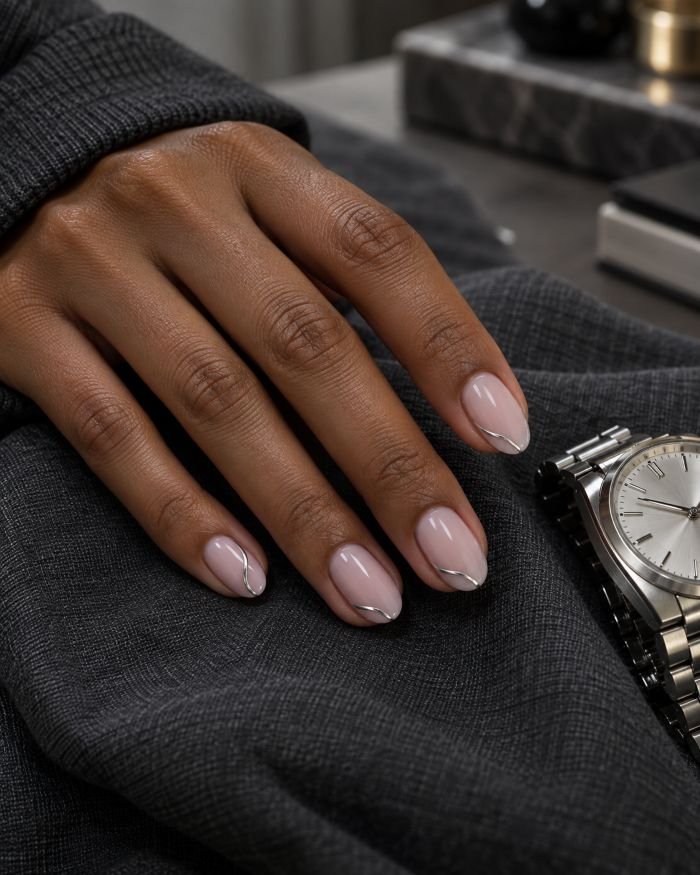
8. Silver Outline Side Tips
A translucent cool-pink base keeps these short almond nails light, while a fine silver line traces one side of each tip instead of crossing the entire free edge. On alternating nails, the line switches sides, creating movement that follows the taper. The finish is glossy, and the silver should look like a narrow wire rather than glitter.
The side placement is useful when a full French line feels too predictable or visually heavy. It leaves most of the nail uncovered, which helps short almond nails appear longer and gives the design a clean, modern feel. Silver works naturally with denim, black, icy pastels, and white gold jewelry. Use a striping brush for gel or narrow metallic tape for regular polish. Keep the line close to the edge; placing it too far inward can make the nail look divided.
How to Apply
- Apply a sheer cool-pink base and allow it to dry or cure.
- Draw a thin silver line along one side of each almond tip.
- Alternate the side placement from finger to finger.
- Seal with a glossy top coat without covering the line unevenly.
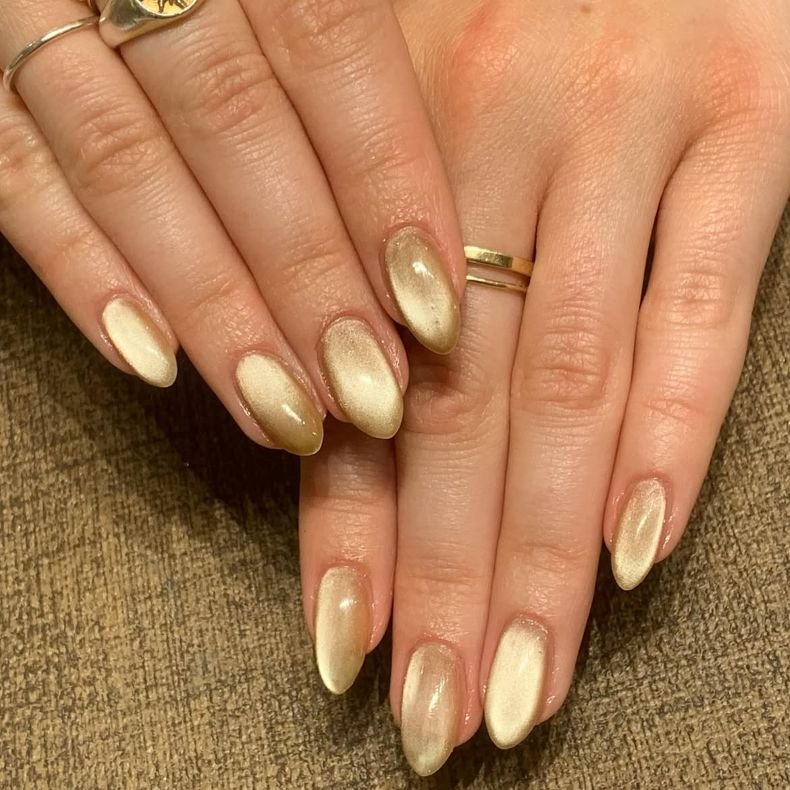
9. Champagne Velvet Cat-Eye
A translucent beige base is topped with champagne magnetic gel, but the reflective pigment is pulled into a narrow diagonal beam across each short almond nail. The highlight begins near one side of the cuticle and moves toward the opposite tip, creating a velvet effect that shifts when the hand turns. Keep the surrounding color sheer enough for the nail shape to remain visible.
Magnetic polish brings depth to a compact nail without requiring artwork or added length. It suits evening plans, neutral outfits, and anyone who likes a manicure that changes under different lighting. The magnet must be held close to uncured gel and the nail should be cured immediately to preserve the beam. Ordinary metallic polish cannot reproduce the suspended reflection, so this is a better salon or experienced-gel-DIY project than a beginner lacquer manicure. More magnetic ideas are collected in these cat-eye nail designs.
How to Apply
- Apply a thin translucent beige gel base and cure.
- Add one coat of champagne magnetic gel to a single nail.
- Hold the magnet diagonally over the wet gel until the beam forms, then cure immediately.
- Repeat nail by nail and seal with a glossy gel top coat.
10. Rose Aura Center Nails
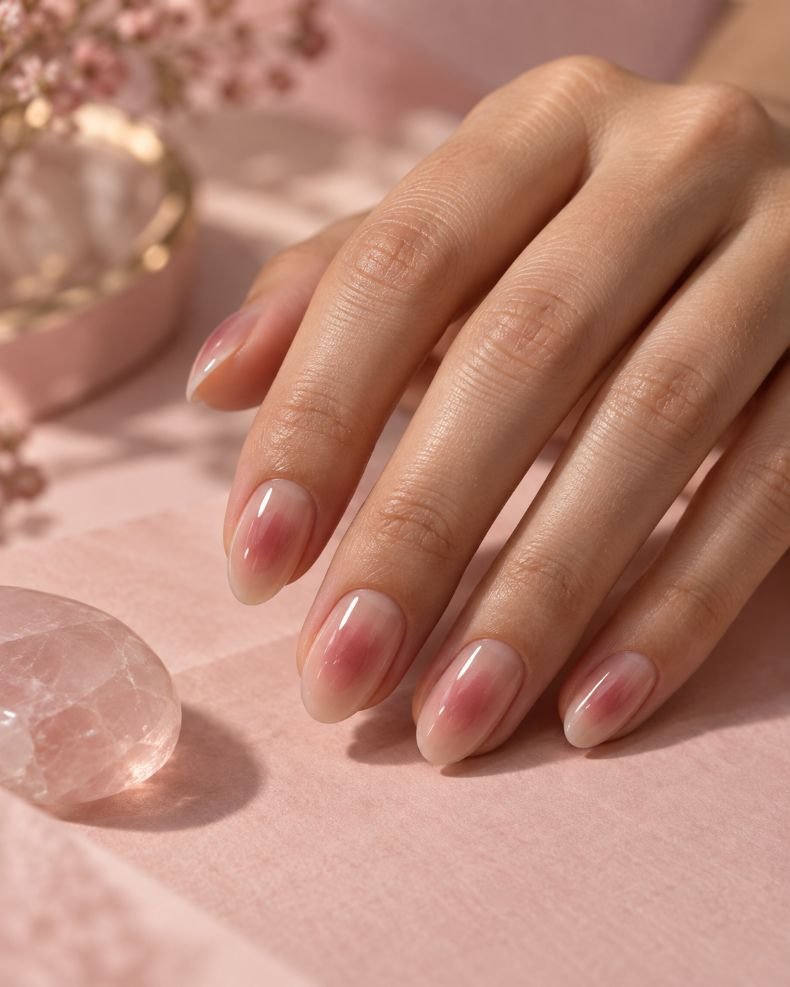
The center of each short almond nail glows with a diffused dusty-rose aura, fading into a transparent peach-nude base at the cuticles and edges. The color is strongest just below the midpoint, not at the tips, so the shape remains open and airy. A glossy finish makes the blurred halo look softly lit from within.
Aura placement gives short almond nails a different visual rhythm from French tips. Instead of drawing a line across the free edge, it places the eye in the middle of the nail and creates gentle fullness without hiding the taper. Dusty rose works with cream, denim, brown, and soft gray, making this a practical everyday design rather than a one-outfit manicure. A sponge can create the halo at home; airbrush work will look more even. Keep the aura small—an oversized circle can swallow the nail.
How to Apply
- Apply a clear peach-nude base to short almond nails.
- Tap dusty-rose polish into the center of each nail with a small sponge.
- Blend the outer edge until it fades gradually into the base.
- Add a glossy top coat after the aura is fully dry or cured.
11. Blueberry Jelly Tips
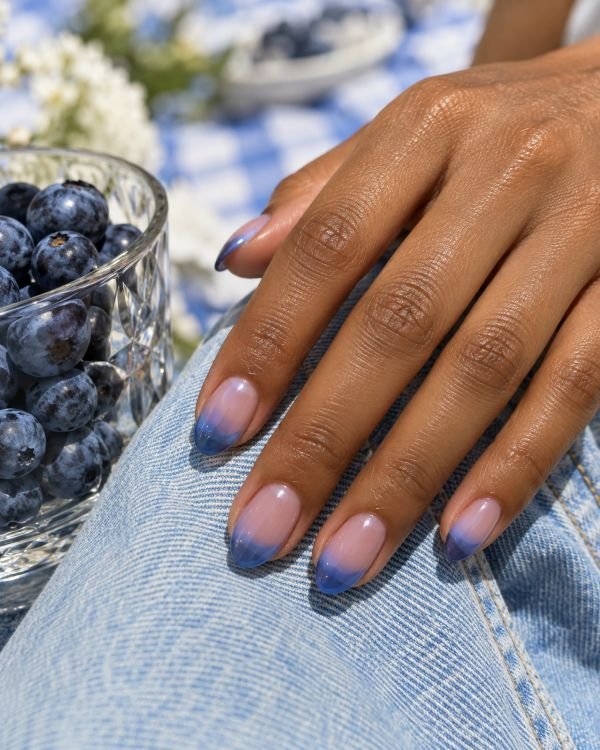
Short almond nails use a clear pink base with translucent blueberry-blue jelly concentrated at the tips. The blue is layered unevenly enough to look glassy, with some nails carrying a slightly darker edge and others remaining lighter. A clear glossy top coat preserves the see-through quality instead of turning the design opaque.
Jelly tips give you color without the visual weight of a full dark manicure. The cool blue looks fresh with white clothing, silver jewelry, denim, and summer accessories, while the short almond point keeps the design neat rather than playful in a childish way. Use a true jelly formula or dilute a transparent blue gel; ordinary opaque polish will not create the depth. If you are painting at home, build the color slowly so the tips do not become a thick, uneven block.
How to Apply
- Apply a translucent pink or clear base to short almond nails.
- Brush one thin layer of blueberry-blue jelly over each tip.
- Add a second, slightly narrower layer near the free edge for depth.
- Smooth the color with clear glossy top coat.
12. Cherry-Red Jelly Almonds
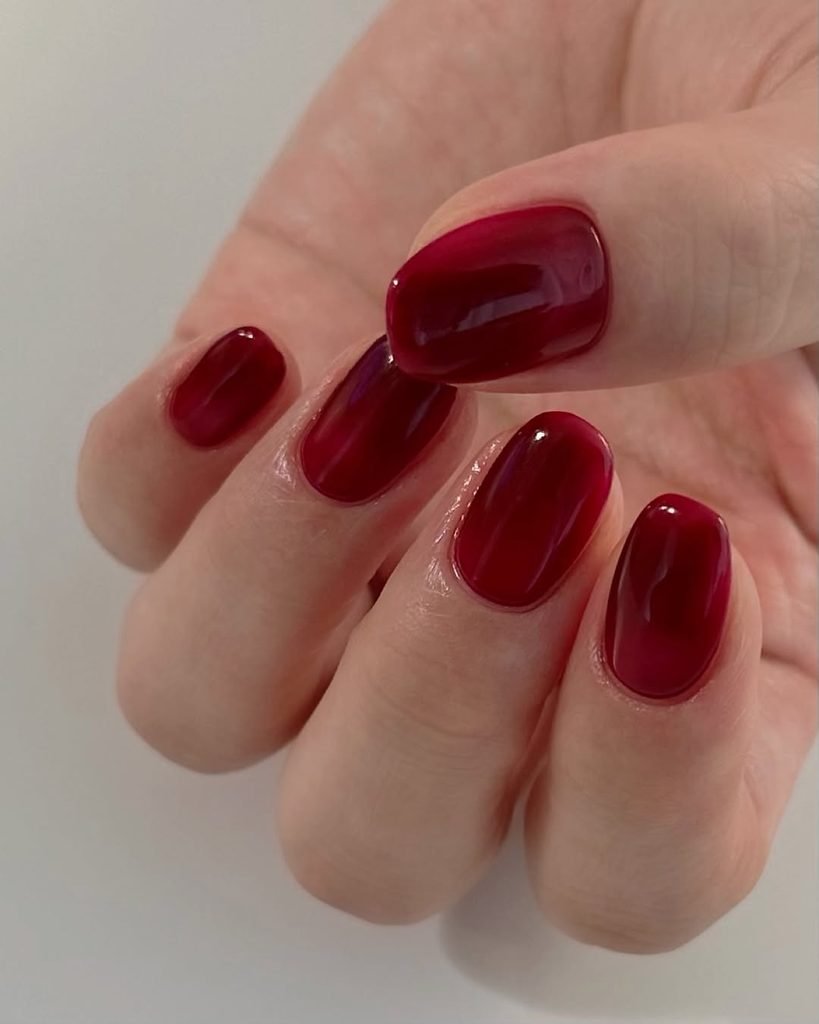
A translucent cherry-red jelly covers the entire short almond nail, allowing a small amount of natural dimension to show through. The color is deepest toward the center and free edge after two or three thin layers, while the cuticles remain carefully outlined. The finish should look like polished glass, not glitter or metallic foil.
Jelly red has more depth than a flat cream and less visual heaviness than an opaque burgundy. It suits short almond nails because the tapered tips concentrate the color elegantly, making the manicure feel intentional even at a practical length. Wear it with black tailoring, cream sweaters, denim, or a red lip. The key is thin coats; applying one thick layer can create bald patches near the sidewalls and an uneven, swollen-looking tip.
How to Apply
- Apply a clear base coat to clean short almond nails.
- Brush on one thin layer of cherry-red jelly polish.
- Add one or two narrower layers, concentrating the final coat toward the tips.
- Finish with a wet-look glossy top coat.
13. Espresso Brown Gloss
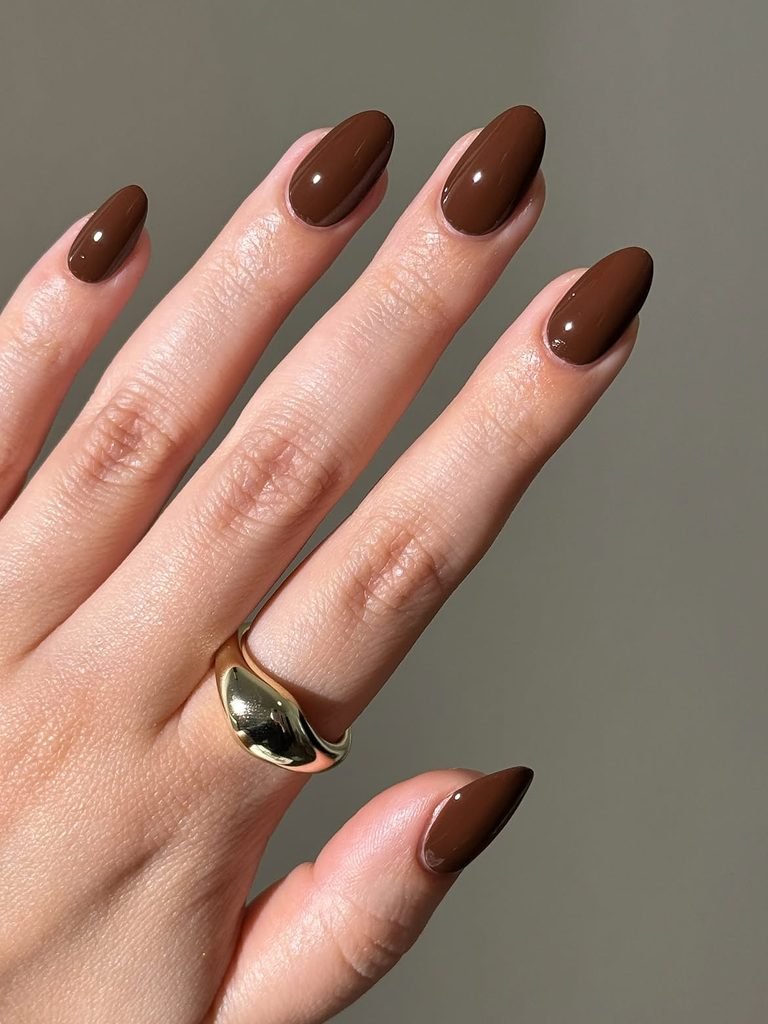
Every nail is painted in a deep espresso-brown cream with a high-gloss finish. The shade should have a neutral-to-warm undertone rather than reading black, and the short almond tip should remain visibly shaped beneath the dark color. Leave the cuticle border razor-clean because dark cream polish exposes uneven application immediately.
A solid deep color can look more refined than complicated artwork, especially on short nails. Espresso works through autumn and winter, but it also looks sharp with white shirts, gold jewelry, and pale pink clothing. If your nail beds are very short, choose a slightly lighter cocoa brown so the color does not visually swallow the taper. For more brown-toned inspiration, compare these chocolate brown nail ideas. Use two thin coats instead of one heavy coat to keep the surface smooth.
How to Apply
- Shape the nails into a short almond and apply a smoothing base coat.
- Paint one thin coat of neutral-warm espresso-brown cream polish.
- Add a second coat after the first has set, correcting the sidewalls with a clean-up brush.
- Seal with a high-gloss top coat.
14. Oxblood Reverse French
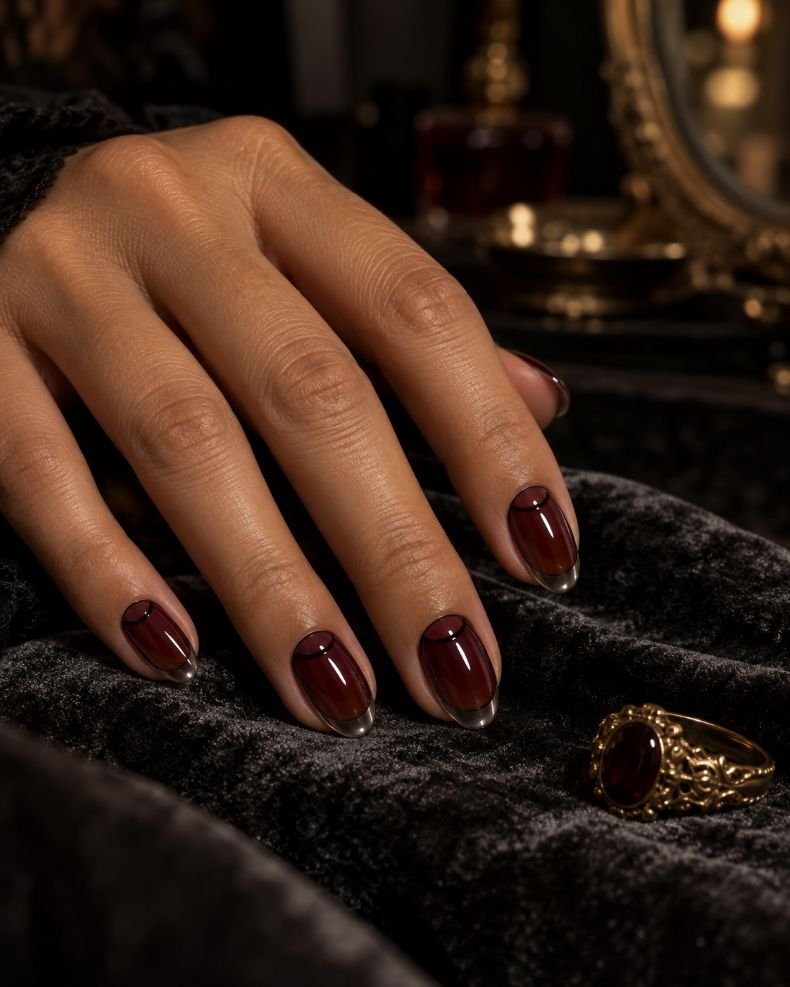
The nail beds remain translucent black-cherry jelly while deep oxblood half-moons sit close to the cuticles. A pin-thin black line traces the upper curve of each half-moon, leaving the tips clear and glossy. The darker color is concentrated at the base, giving the manicure a layered reverse-French appearance without turning every nail fully opaque.
This placement is especially flattering on short almond nails because the empty tip creates visual breathing room and keeps the pointed shape apparent. It feels moody with leather, charcoal, cream, and antique gold, making it useful for autumn dinners or evening events. Curved guides can help with the half-moons, but the underlying jelly must be completely dry first. If the oxblood becomes too wide, it can make the nail look shorter; keep the crescent shallow and centered.
How to Apply
- Apply one or two thin coats of translucent black-cherry jelly polish.
- Paint shallow oxblood half-moons near each cuticle.
- Trace the upper edge of every crescent with a fine black liner.
- Finish with a glossy top coat that preserves the clear tips.
15. Sage Green Diagonal Tips
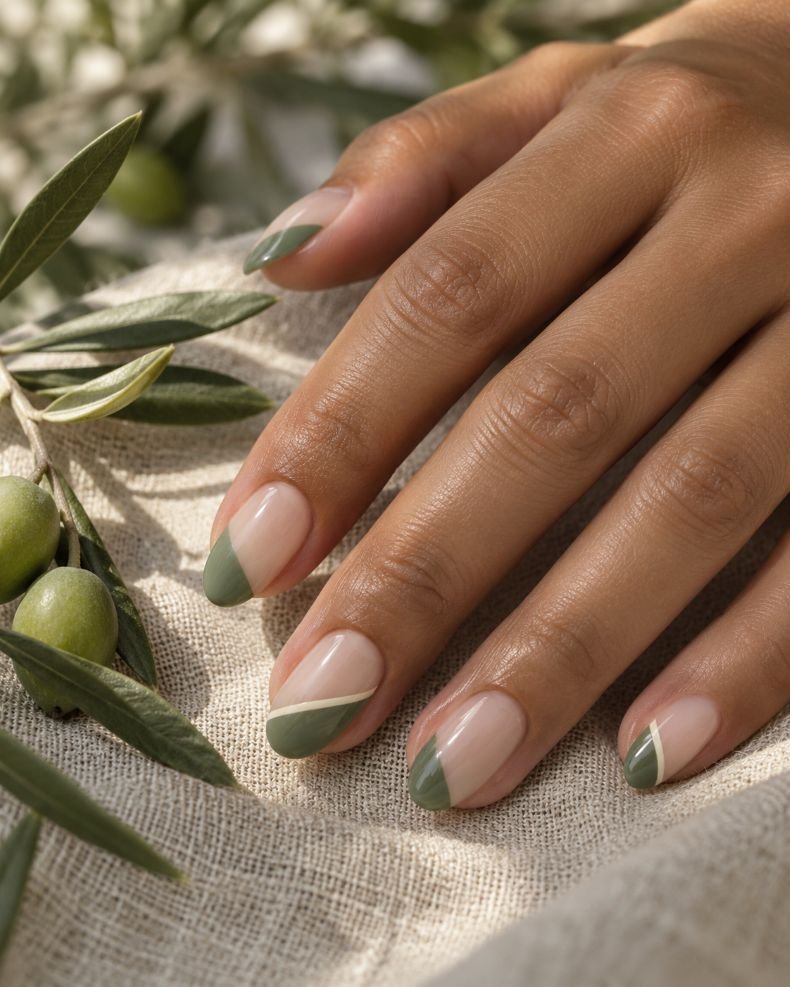
A sheer creamy nude base keeps the nail beds light while muted sage green sweeps diagonally from one sidewall to the opposite edge. The line is not a traditional French curve; it cuts across the tip at a gentle angle and changes direction on alternating nails. A thin cream border follows two of the green edges, adding definition without creating a double French.
The diagonal placement is useful on short almond nails because it follows the taper and disguises small differences in free-edge length. Sage feels softer than emerald but more distinctive than another nude, pairing well with linen, denim, cream, and botanical prints. Use striping tape for the cleanest home boundary, removing it while the green is still workable. If the design feels too colorful across ten fingers, place the diagonal tips on four nails and leave the thumbs and ring fingers sheer.
How to Apply
- Apply a sheer creamy-nude base to short almond nails.
- Paint muted sage-green diagonal tips, alternating the direction by finger.
- Add a thin cream border to two selected green edges.
- Seal with a glossy top coat after the lines have dried or cured.
16. Lilac Negative-Space Petals
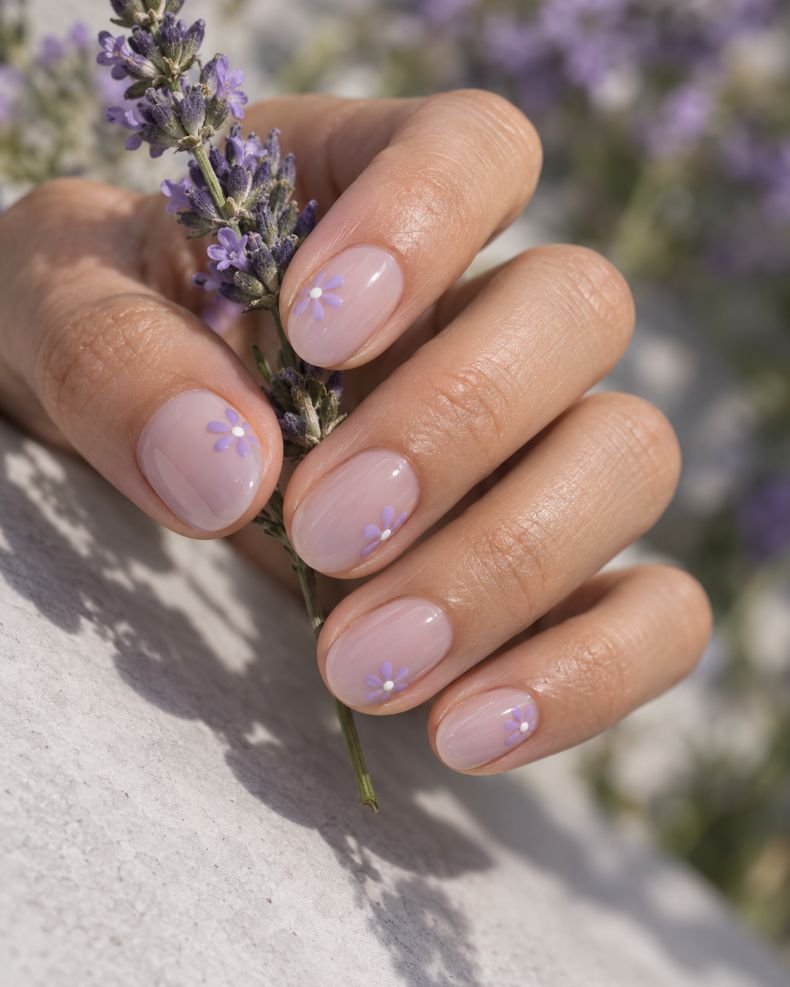
Short almond nails carry a translucent lavender-beige base with small lilac petals placed near the sidewalls, leaving the centers and tips mostly bare. Each flower is made from four or five rounded dots rather than detailed painted petals, and a tiny white point sits in the middle. The uneven placement prevents the set from looking like identical stickers.
The negative space helps a pastel floral manicure stay light on a compact nail. Lilac is especially pretty in spring, but the muted undertone also works with gray sweaters, silver jewelry, and soft purple accessories. A dotting tool makes the petals easier than a brush, and decals can replace the flowers if your hands are not steady. Keep the motifs small and use them on selected nails rather than filling every available space; the almond outline should remain visible.
How to Apply
- Apply a translucent lavender-beige base and let it dry or cure.
- Use a dotting tool to place four or five lilac dots near selected sidewalls.
- Add one tiny white dot at the center of each flower.
- Finish with a glossy top coat, leaving the negative-space areas clear.
17. Caramel Tortoiseshell Tips
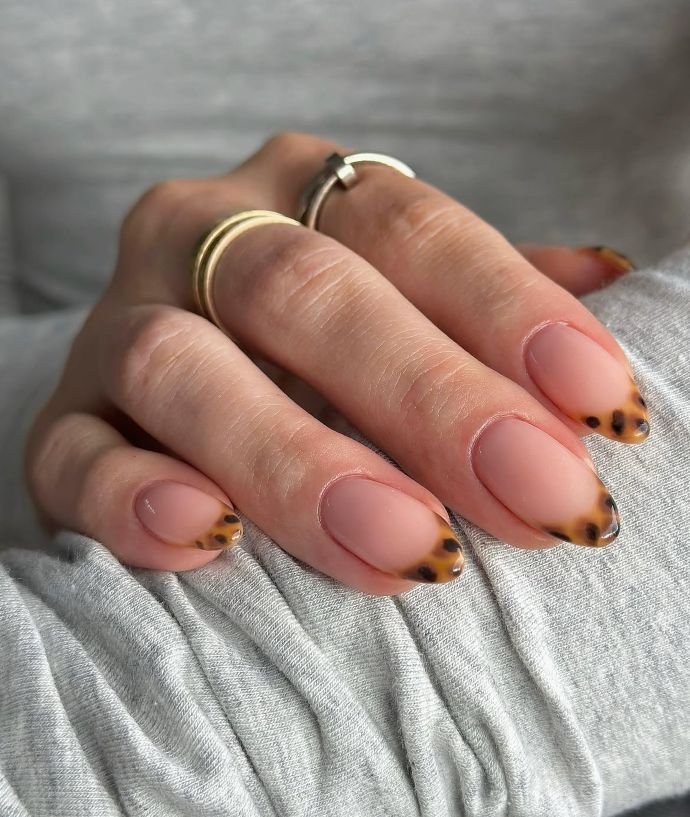
Short almond nails are painted with a transparent honey-beige base, while the free edges contain layered caramel, amber, and dark-brown tortoiseshell patches. The pattern remains inside a shallow French shape, with several translucent areas between the darker fragments. A glossy top coat makes the colors look like polished acetate.
Tortoiseshell tips give you pattern without covering the whole nail, so the short almond shape remains easy to see. They look particularly good with camel coats, cream knitwear, chocolate bags, and warm gold jewelry. This is more forgiving than full-nail tortoiseshell because the irregular patches do not need to match across every finger. Use a small detail brush or a nail-art stamping plate; a press-on set is the simplest way to achieve the same repeated tip density.
How to Apply
- Apply a translucent honey-beige base to short almond nails.
- Block in shallow French tips with caramel and amber polish.
- Add irregular dark-brown patches and a few clear gaps inside each tip.
- Smooth the pattern with a glossy top coat.
18. Leopard Accent Almonds
The base is a glossy warm nude, and only the ring and index nails carry small leopard spots in espresso brown with muted tan centers. The spots are deliberately cropped at the sidewalls and tip so they feel like an accent pattern rather than miniature animal illustrations. Every other nail stays plain, with the almond point kept visible.
Animal print can overwhelm a short nail when it is repeated densely across all ten fingers. Restricting it to two nails makes the manicure wearable with black, denim, camel, or red clothing and gives the pattern a clear role. Use a dotting tool for the tan centers and a thin brush for the broken brown outlines. A gel technician can vary the spot size naturally; stickers work well if you want sharper repetition or need a quick press-on set.
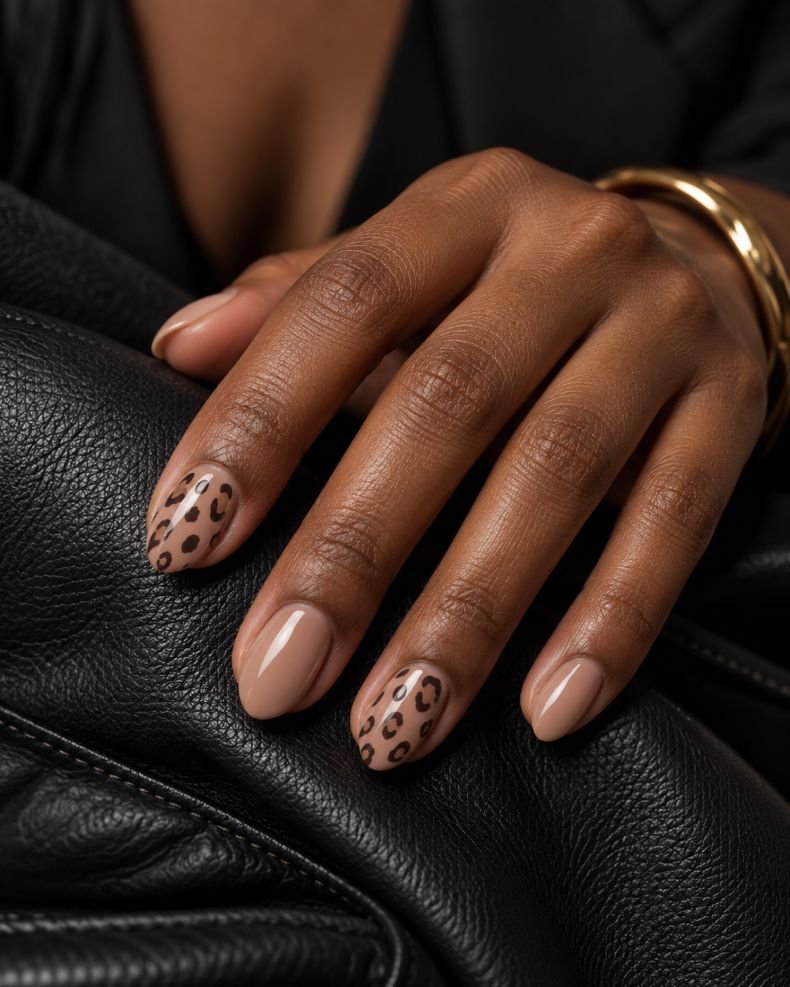
How to Apply
- Apply two coats of glossy warm nude polish to short almond nails.
- Place irregular muted-tan dots on the ring and index nails.
- Surround the dots with broken espresso-brown curves, cropping some at the edges.
- Finish the full set with glossy top coat.
19. Mini Daisy French
Instead of a white line, the tips are filled with tiny daisies. Short almond nails receive a clear pink base, then small white petals and butter-yellow centers are placed along the free edge. The flowers overlap slightly at the tip but become more widely spaced toward the sidewalls, allowing the almond taper to remain visible.
This is a cheerful alternative to a pastel French manicure and works especially well for spring, summer, garden parties, and casual weekends. Because the flowers stay inside the tip area, the design does not require a long nail to read clearly. A dotting tool creates the petals quickly, while decals can give you consistent flowers on both hands. Keep the base sheer and the petals small; large daisies will make the short tips look wider than they are.
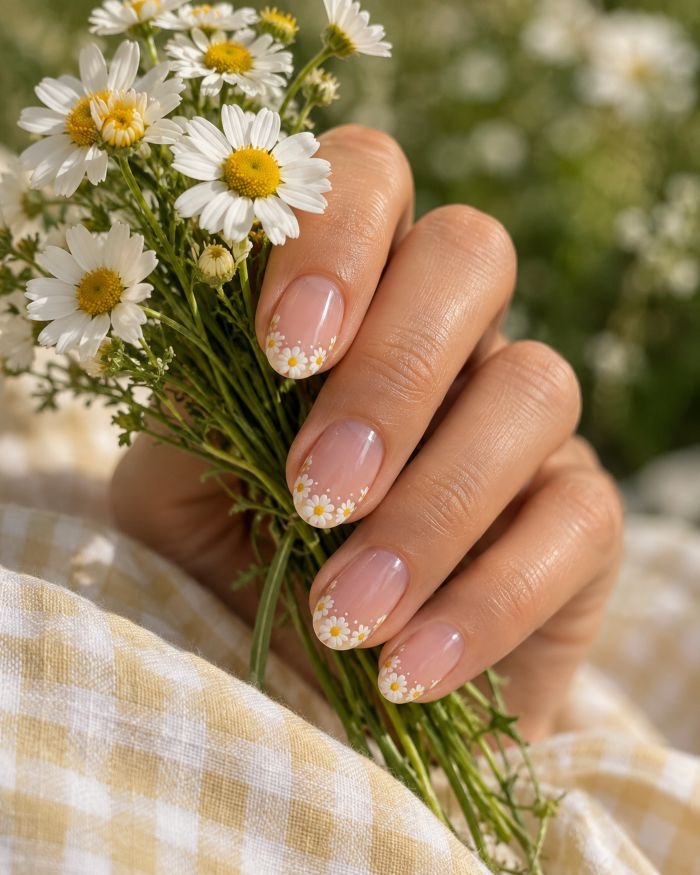
How to Apply
- Apply a sheer pink or clear base to short almond nails.
- Create small white daisy petals along each free edge with a dotting tool.
- Add butter-yellow centers and leave wider gaps near the sidewalls.
- Seal the floral tips with a glossy top coat.
20. Sculpted White Flower Accents
These short almond nails use a glossy milky-pink base, with one small raised white flower on each ring finger. The petals are rounded and slightly domed, with a tiny pearl or painted dot in the center. The remaining nails stay completely plain, so the texture feels like a deliberate accent rather than a full 3D set.
Keeping the flowers to two nails makes sculpted artwork more realistic for a short length and reduces the chance of snagging on hair or clothing. It is a good compromise for someone who loves salon texture but still wants an everyday manicure. This technique requires 3D gel or acrylic and is best left to a nail technician; flat flower decals are the practical DIY substitute. For more dimensional inspiration, browse Nail Blooms’ 3D floral nail designs.
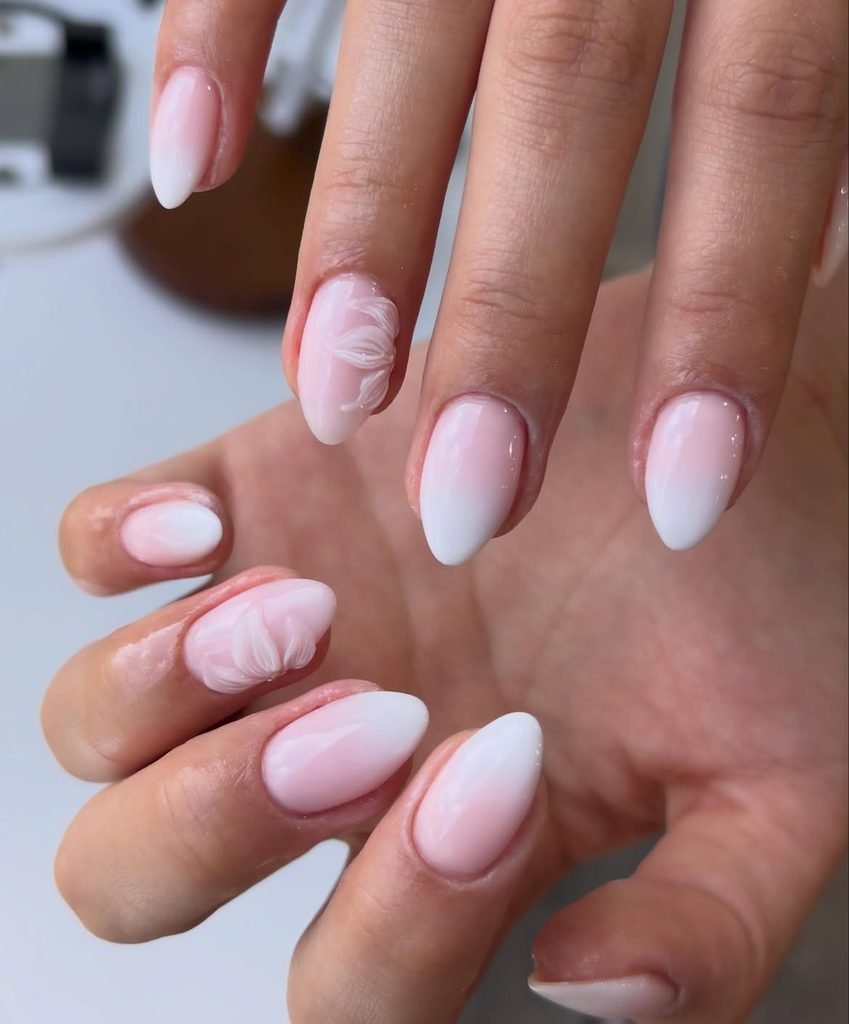
How to Apply
- Apply two thin coats of glossy milky-pink gel and cure.
- Sculpt one small white flower on each ring finger using 3D gel or acrylic.
- Add a tiny pearl or yellow-white dot to each flower center.
- Cure completely and apply top coat only around the raised petals.
21. Fine Botanical Line Art
A translucent beige-pink base keeps these short almond nails almost bare, while fine sage-green stems and tiny white buds travel vertically from the cuticle toward the tip. Place the botanical artwork on three nails, varying the height and direction so the stems look hand-drawn. Two nails can carry only a single curved leaf.
The vertical movement helps the short almond shape look longer without using a French tip. It is also a more grown-up alternative to full floral artwork, pairing well with linen, neutral tailoring, soft green clothing, and delicate jewelry. A liner brush is essential for the stems, and the polish should be slightly thick enough to leave a clean line without flooding the cuticle. If you are a beginner, use botanical decals on two nails and paint only the simplest leaves yourself.
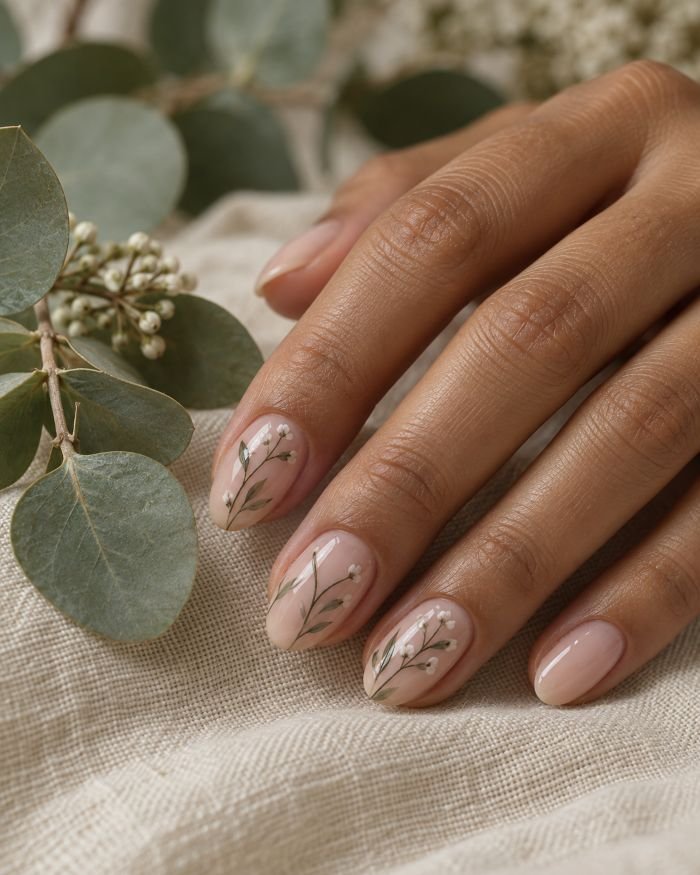
How to Apply
- Apply a translucent beige-pink base to short almond nails.
- Draw fine sage-green stems from selected cuticles toward the tips.
- Add tiny white buds and one or two narrow leaves, keeping the art sparse.
- Let the line work set fully before applying glossy top coat.
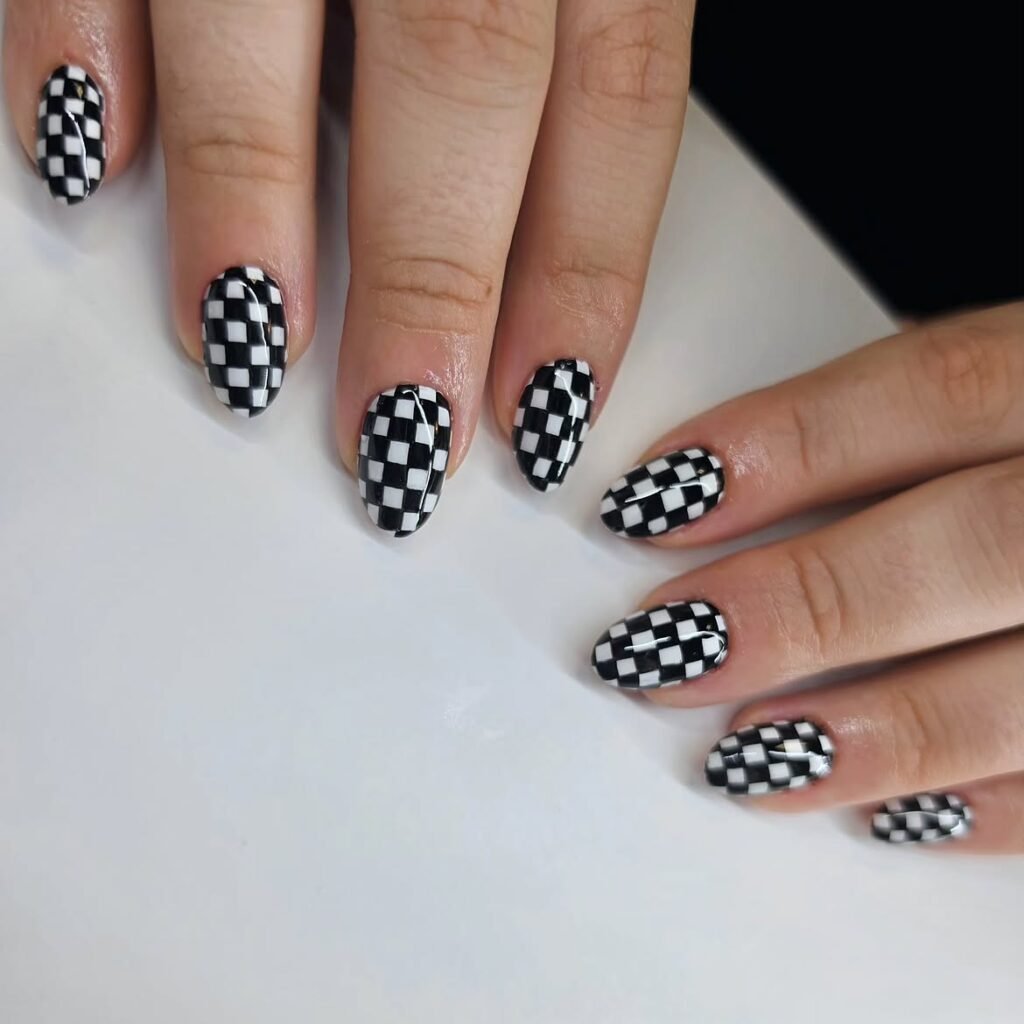
22. Cream-and-Black Checkerboard
Short almond nails alternate between large cream and soft-black blocks, with the checkerboard kept deliberately oversized so the pattern does not turn into tiny noisy squares. Some nails carry two columns, while others use a single diagonal checker section over a nude base. Finish everything in glossy top coat so the contrast looks graphic rather than chalky.
The trick is scale. A dense checkerboard can make short almond nails look crowded, but larger blocks follow the taper and leave enough negative space around the point. This design suits black-and-white outfits, loafers, leather, or a modern art-inspired wardrobe. Use striping tape to establish the lines or choose pre-designed press-ons if you want every square aligned. A soft cream is gentler than bright white and gives the black pattern a more polished, wearable finish.
How to Apply
- Apply a soft cream base to short almond nails and let it dry completely.
- Use thin striping tape to map large checkerboard blocks on selected nails.
- Fill alternating sections with soft-black polish, keeping the shapes oversized.
- Remove the tape carefully and seal with glossy top coat.
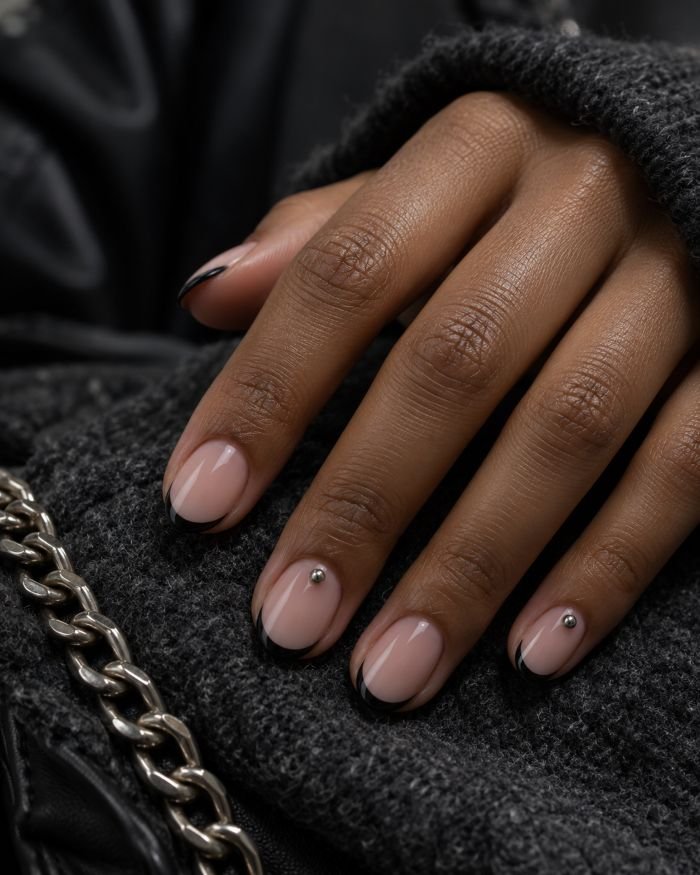
23. Black Micro-French With Pewter Studs
The base is transparent cool pink, and each short almond nail receives a very narrow glossy black tip. Two accent nails carry one small low-profile pewter stud just above the smile line. The stud should sit inside the nail surface rather than close to the sidewall, keeping the design sharp without adding bulky hardware.
Black French tips can look surprisingly refined on a short almond shape when the line is kept thin. The soft pink underneath prevents the contrast from feeling harsh, while pewter gives the set a cooler, more understated edge than bright silver. Pair it with black tailoring, gray knitwear, or mixed-metal jewelry. Flat metallic decals are easier for home use; raised studs need compatible adhesive or gem gel and should be sealed carefully to avoid catching on fabric.
How to Apply
- Apply one or two thin coats of transparent cool-pink polish.
- Paint a narrow glossy black French tip following the almond edge.
- Secure one small pewter stud above the smile line on two accent nails.
- Seal around the studs with glossy top coat without covering their faces.
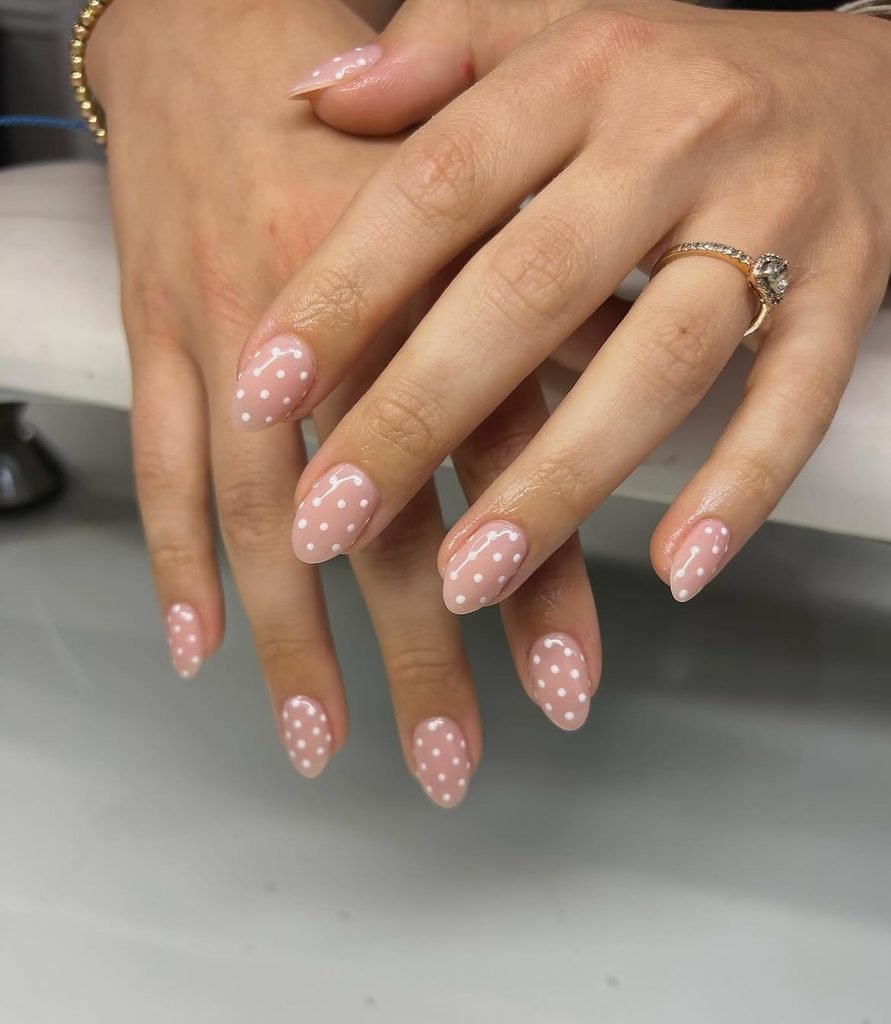
24. Matte Ivory With Glossy Dots
Short almond nails are painted in soft ivory and finished matte, then decorated with a few glossy raised dots. Place one small dot near the cuticle of each nail and add two slightly larger dots to the middle and ring fingers. From a distance the manicure appears velvety and plain; up close, the wet shine of the dots creates the contrast.
This is a practical design for someone who wants texture but does not enjoy glitter, chrome, or crystals. The matte background makes the short almond silhouette look modern, while the glossy details keep the surface from feeling flat. It pairs well with cream sweaters, silver jewelry, and clean minimal outfits. Matte polish can show fingerprints, so allow hand cream to absorb before touching the nails. A dotting tool makes the raised details easy to scale consistently.
How to Apply
- Apply two coats of soft ivory polish to short almond nails.
- Add a satin-matte top coat and let it dry or cure completely.
- Place tiny glossy dots near the cuticles and two larger dots on accent nails.
- Cure the dots separately if using gel, then leave the matte base uncovered.
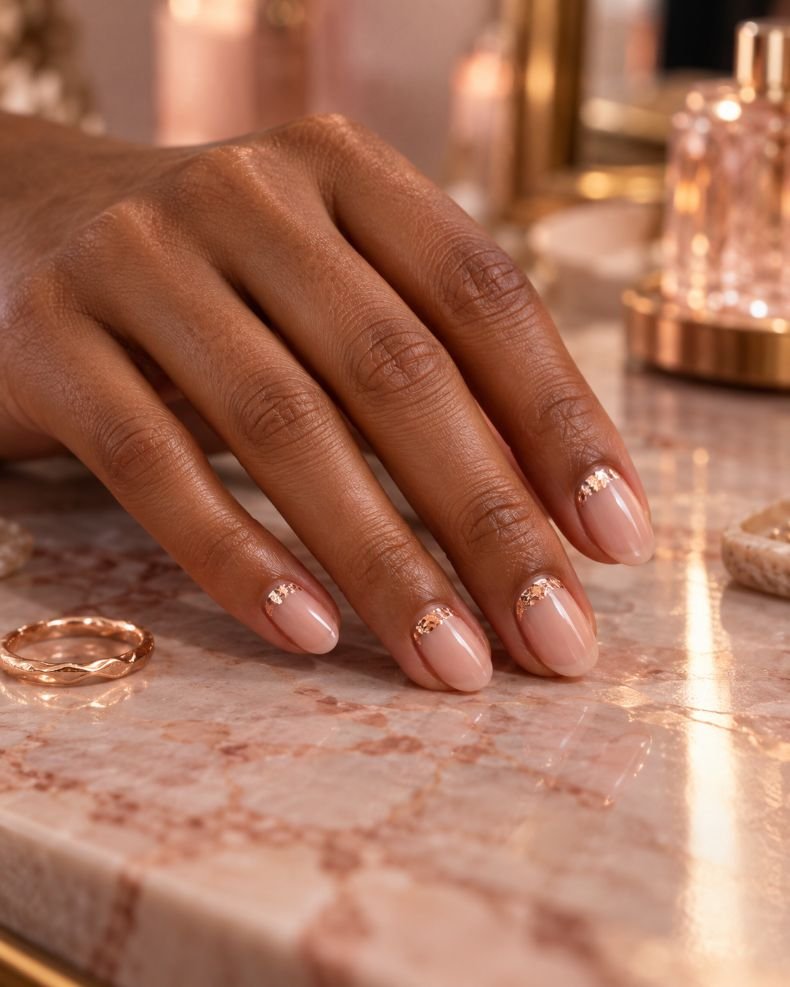
25. Rose-Gold Cuticle Foil
A translucent peach-nude base leaves most of the nail exposed, while small rose-gold foil fragments sit close to the cuticle in irregular crescent shapes. The foil should not form a perfect half-moon; allow tiny gaps and different widths so the result resembles brushed metal rather than a sticker border. Keep the almond tip completely bare.
This placement gives the eye a small point of shine without shortening the nail with a heavy tip. It looks especially good with blush, cream, rose-gold jewelry, and satin, but the low-profile design is still easy to wear with everyday clothes. Foil can lift if the surface is oily or uneven, so work on a clean, fully set base and seal the perimeter carefully. If matching both hands is difficult, decorate the nails on stands before applying custom press-ons.
How to Apply
- Apply a translucent peach-nude base to short almond nails.
- Press small rose-gold foil fragments around the lower third near each cuticle.
- Leave narrow gaps and vary the crescent width from nail to nail.
- Encapsulate the foil with a smooth glossy top coat.
26. Champagne Glitter Cuticle Fade
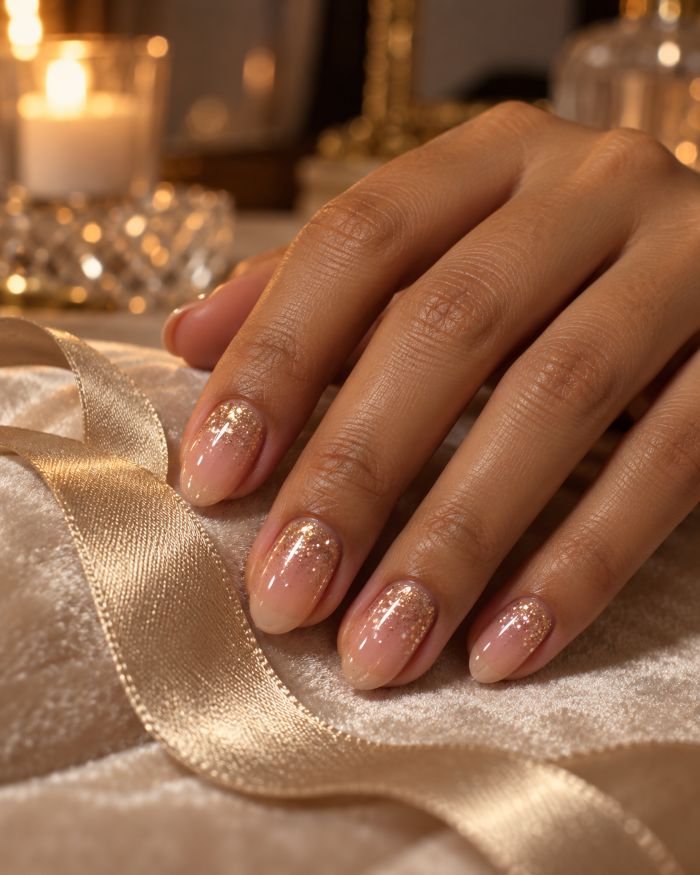
The base is a sheer warm pink, while fine champagne glitter begins at the cuticle and fades upward through the lower half of each short almond nail. The glitter is most concentrated around the base, with isolated particles thinning toward the midpoint. Keep the tips clear and glossy so the almond point remains visible.
A cuticle fade is a useful alternative to glitter French tips because it directs attention downward and can make the nail bed appear longer. The warm champagne color looks polished with gold jewelry, beige clothing, and soft brown accessories. Fine particles are easier to smooth than chunky glitter and less likely to catch on fabric once sealed. Use a small sponge for controlled density; brushing glitter from the bottle can leave an abrupt line.
How to Apply
- Apply one or two coats of sheer warm-pink polish.
- Sponge fine champagne glitter around each cuticle.
- Tap a lighter amount toward the middle of the nail to create the fade.
- Finish with a leveling glossy top coat.
27. Confetti Jelly French Tips
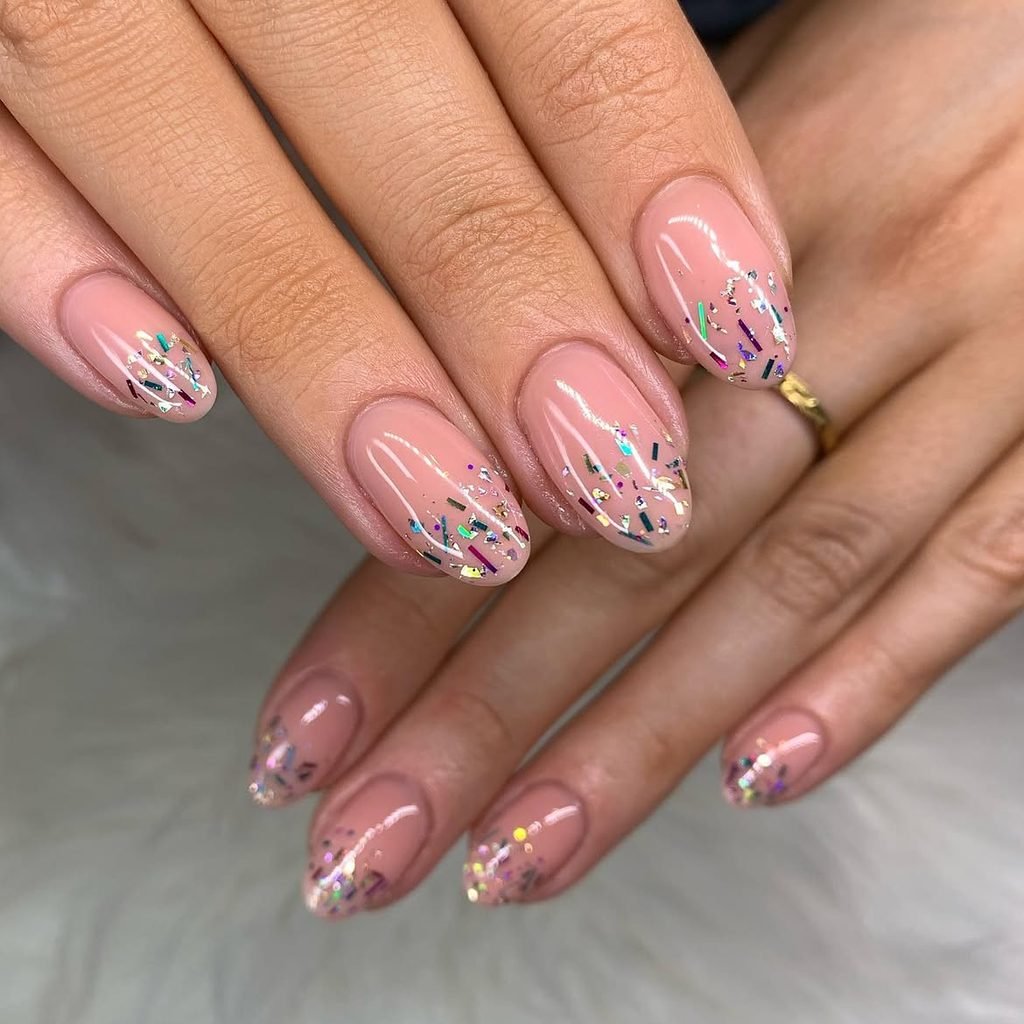
A transparent blush base supports tiny pieces of pink, coral, pale blue, and gold confetti arranged only inside the French-tip area. The pieces are sparse enough for the base to show through, and the density changes from nail to nail. A clear glossy layer sits over the confetti, giving the short almond tips a glassy party finish.
This is a playful choice for birthdays, vacations, bridal showers, or anyone who wants color without a full bright manicure. The structured tip keeps the confetti from becoming chaotic, and the short almond shape stops the design from feeling overly long or costume-like. Flat foil dots are easier to seal than thick craft glitter. If the tiny pieces are difficult to position, a pre-designed press-on set will give you more even spacing and a smoother surface.
How to Apply
- Apply a translucent blush base to short almond nails.
- Place tiny pink, coral, pale-blue, and gold confetti pieces inside a shallow French shape.
- Vary the density while keeping the tips lighter near the smile line.
- Encapsulate the pieces beneath clear glossy top coat.
28. Tiny Red Heart Side Accents
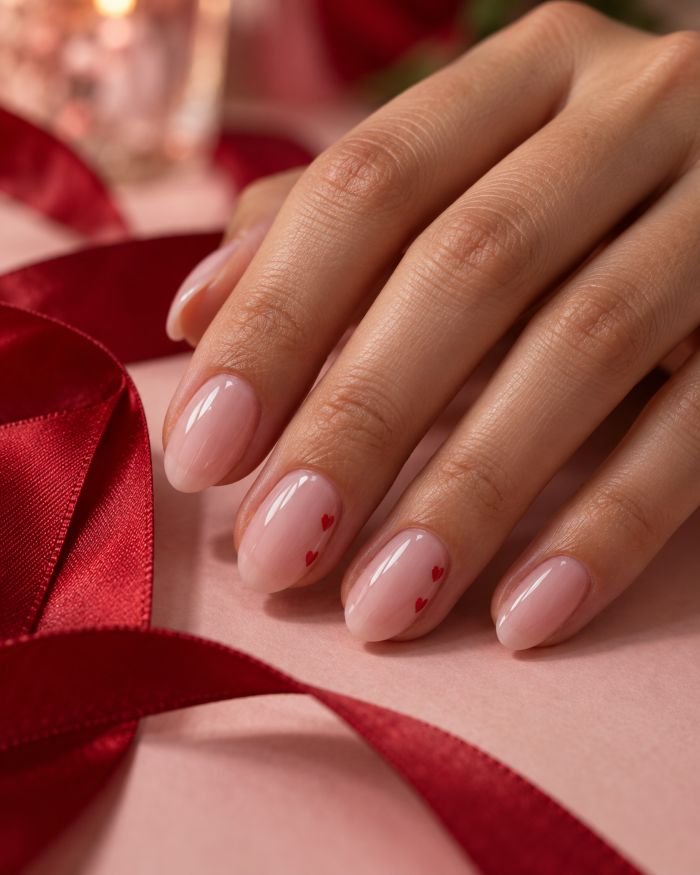
Short almond nails are covered in a translucent milky-pink base, with one tiny red heart placed along the outer sidewall of each ring and middle finger. The hearts are intentionally small and slightly different in angle, while the remaining nails stay plain. A glossy finish keeps the design soft rather than cartoon-like.
The side placement makes this romantic without cutting across the nail or shortening the visible tip. It works for Valentine’s Day, date nights, engagements, or anyone who likes a sentimental detail that can be hidden from a distance. Choose a true cherry red for contrast or a muted berry if you prefer a quieter look. Use a tiny dotting tool to build each heart from two dots, then pull the bottom into a point with a liner brush.
How to Apply
- Apply two thin coats of translucent milky pink polish.
- Place two tiny cherry-red dots side by side on the outer sidewall of the ring and middle nails.
- Pull each pair downward into a small heart point.
- Finish with glossy top coat after the hearts are fully dry.
29. Midnight Navy Celestial Nails
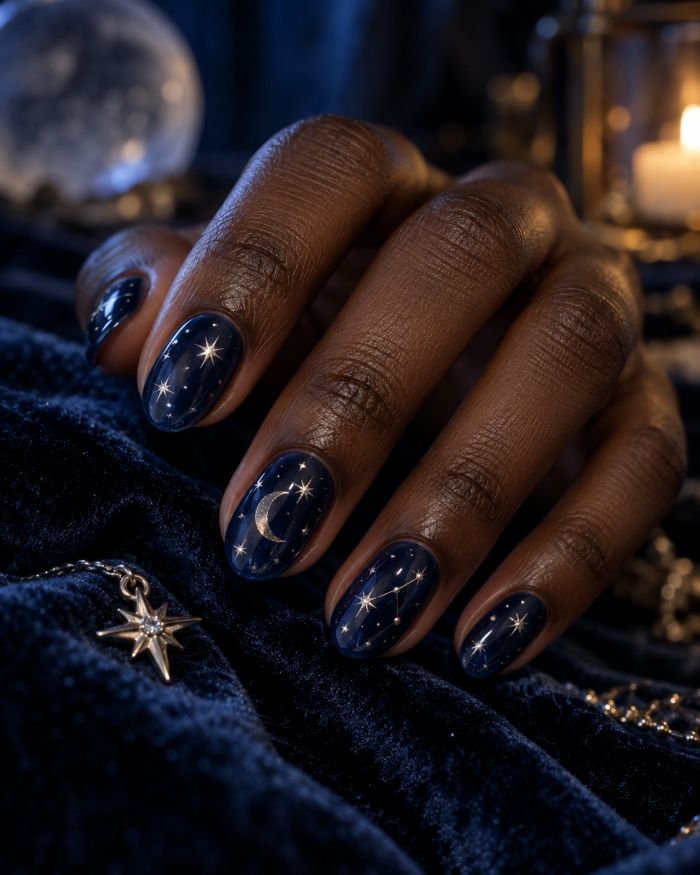
A translucent navy jelly covers the short almond nails, leaving enough depth for the natural nail line to show faintly underneath. Tiny silver stars and one small crescent moon appear on selected fingers, with fine dots connecting two stars into a minimal constellation. The artwork is sparse, and the glossy top coat makes the navy look like glass.
Short almond nails keep this celestial manicure wearable even when the color is dark. It suits evening events, winter outfits, black tailoring, and anyone who prefers navy to black. The silver details should be small enough to remain legible on the compact nail; large moons or crowded star fields will lose definition. You can find more dark-blue finish inspiration in these dark blue nail ideas. Decals are a sensible alternative to hand-painting the constellation.
How to Apply
- Apply one thin black base followed by translucent navy jelly polish.
- Cure or dry each layer before adding the next.
- Place tiny silver stars, one crescent moon, and a few connecting dots on selected nails.
- Seal the design with a glassy glossy top coat.
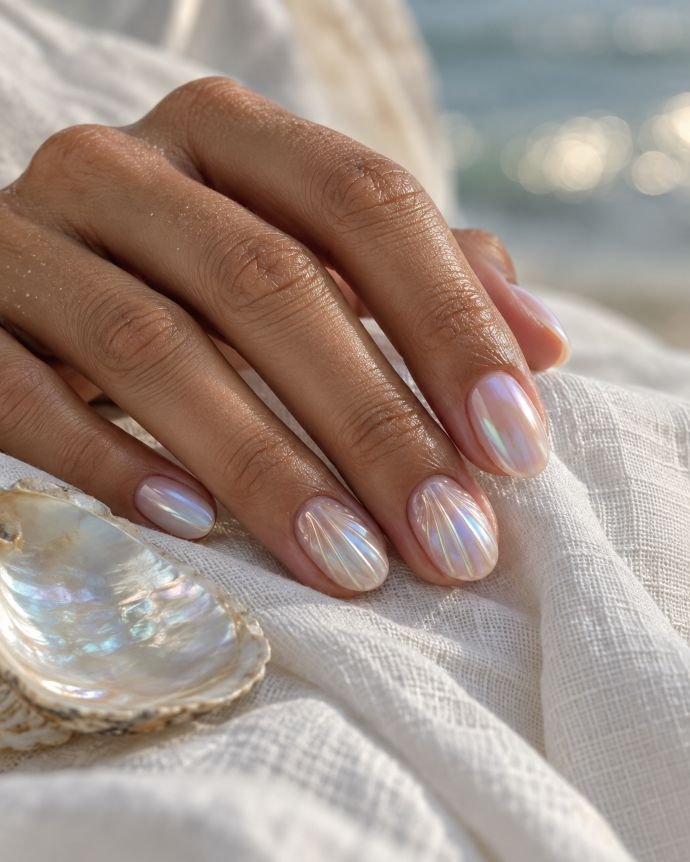
30. Opal Shell Ribbed Nails
Short almond nails use a sheer pink-beige base topped with an opal finish that flashes pale blue, lilac, and pearl under the light. On two accent nails, thin raised lines curve from the cuticle toward the tip, suggesting the ridges of a seashell without forming a full sculpted spiral. The remaining nails stay smooth and reflective.
The combination of soft color and selective texture makes this more interesting than a standard pearl chrome manicure. It works with white linen, silver jewelry, beach weddings, summer dresses, and cool-toned accessories. The raised shell lines require clear structured gel and are best created by a technician; a pearlescent polish with flat white curves is a simpler home interpretation. Keep the ridges narrow and spaced apart so the short almond shape does not disappear beneath the texture.
How to Apply
- Apply a sheer pink-beige base to short almond nails and cure or dry fully.
- Add a translucent opal or pearl-shimmer layer over the full set.
- Build thin curved shell ridges on two accent nails with clear structured gel.
- Cure the texture and seal the smooth nails with glossy top coat.
Can You Get a True Almond Shape on Very Short Natural Nails?
Yes, but there is a practical limit. An almond shape needs the sidewalls to taper toward a centered, rounded point, so a nail that ends exactly at the fingertip may not have enough free edge to create a clear silhouette. In that case, the result may look more like a slightly pointed oval. Nail-shape guidance distinguishes almond from oval by this sharper taper, while short-nail advice recommends choosing a shape that follows the natural nail instead of filing aggressively.
If your nails have a small amount of free edge, ask for a soft short almond rather than a dramatic point. A structured overlay or short full-cover tip can add the little extra length needed without forcing the natural nail into an unstable shape. Very short nails may look better in a round, squoval, or oval shape while they grow. The goal is a balanced taper with enough strength at the sidewalls—not the narrowest point possible.
How Do You File Short Almond Nails Without Losing the Soft Taper?
- Start with your existing length. Mentally mark the center of the free edge before filing.
- File evenly on both sides. Work from one sidewall toward the center, then repeat on the other using light strokes.
- Check the shape frequently. Look at the nail from above after every few passes to keep the taper balanced.
- Keep the sides gently tapered. They should narrow gradually without becoming deeply pinched near the tip.
- Finish with a rounded point. Aim for a soft almond tip rather than a sharp peak.
- Use a fine-grit file. It offers more control than aggressive clipping when you have only a few millimeters of free edge.
- Compare both hands. Small differences in filing angle can make one nail look oval and another overly pointed.
- Avoid filing deeply into the sidewalls. If the nail is too short to hold the taper—or the shape disappears after polish—consider a softer oval or a short extension.
Which Colors and Finishes Make Short Almond Nails Look Longer?
Sheer pinks, milky nudes, translucent beige, and soft ombré finishes allow the eye to travel across the nail without stopping at a heavy horizontal edge. A micro-French can work beautifully when the tip is narrow, while a deep French line or thick glitter band may visually cut across the free edge. Vertical details, side lines, center auras, and reverse-French placement can also emphasize the length of the taper.
Dark shades are not off-limits. Espresso, cherry, navy, and oxblood look refined on short almond nails when the cuticle line is clean and the shape is even. Jelly formulas are useful because they add color without creating a dense block. Chrome, cat-eye, and pearl finishes reflect light across the point, but they need a smooth surface to look intentional. When choosing a design, prioritize scale and placement before chasing a particular color.
Which Short Almond Nail Designs Are DIY-Friendly, and Which Need a Salon or Press-Ons?
Solid color, sheer polish, micro-dots, tiny hearts, simple aura blending, and a few easy French variations are realistic at home if you have a fine file, detail brush, clean-up brush, and good lighting. Stickers and decals can simplify florals, stars, lace, and thin metallic lines. Work in thin coats and allow each layer to dry fully; rushing is what usually makes a short nail look bulky around the tip.
Chrome powder, magnetic cat-eye, structured shell ridges, 3D flowers, encapsulated foil, and dense crystal placement need more control. A salon is the sensible choice when the design depends on curing, sculpting, or correcting the structure of an overlay. Custom press-ons are not a lesser option: they allow detailed artwork to be completed on a stand, then sized and applied to the natural nail. Keep a spare nail and compatible adhesive for important events.
Final Thoughts
Short almond nails do not need long-extension drama to look finished. Their strength is proportion: a small taper, a clean sidewall, and a design that respects the available space. Sheer pink can make the shape feel almost invisible, while dark jelly, tortoiseshell, chrome, or a tiny graphic accent can give the same silhouette a completely different personality.
When choosing among these short almond nail designs, decide what matters most to you first. Do you want the lowest-maintenance manicure, a color that works with everything, artwork you can paint yourself, or a salon finish that becomes the focus of your look? Save full-hand references, not just close-ups, and show your nail technician the length you can realistically live with. The best design is the one that still looks balanced when your hand is moving, holding a coffee cup, typing, or simply resting at your side.
Short almond nails can feel different on every hand. Upload a favorite design and preview the soft taper on yours.
Try It On Virtually