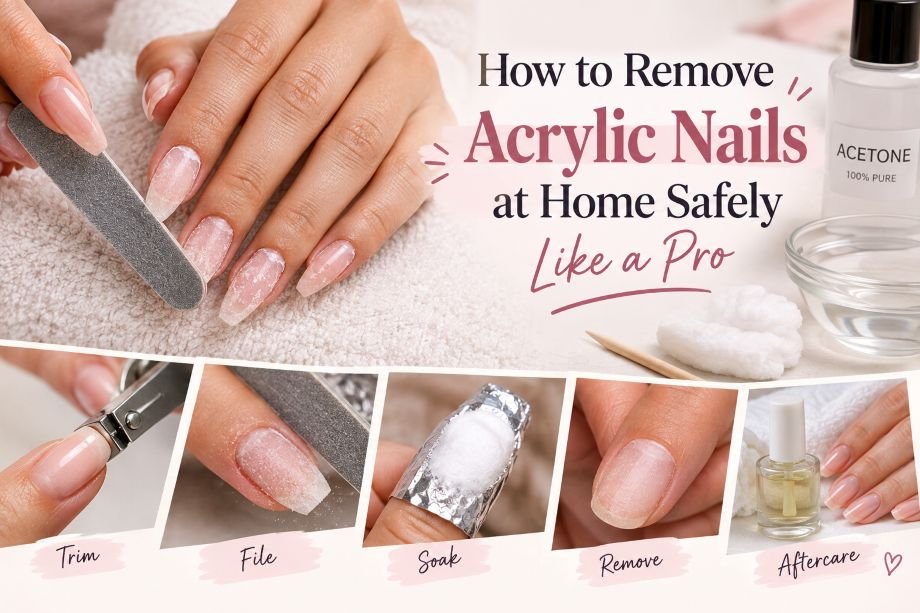
How to Remove Acrylic Nails at Home Safely Like a Pro
The professional part of acrylic removal is not speed—it is reaching the natural nail without peeling away its surface. A lifted corner may make the whole enhancement look ready to pop off, but acrylic can remain firmly bonded elsewhere. Pulling it from that point can remove layers of the natural nail along with the product.
If you want to understand how to take your acrylic nails off like a professional, you will have to utilize the very same process a cautious nail technician uses: thin out the substance, apply acetone to soften it, and never force the acrylic material that does not give way. Always leave yourself enough time for a proper procedure, otherwise you can end up with an irreversible mess.
Quick answer: Trim down the longer extension, remove the top layer of varnish along with some acrylic material, and apply petroleum jelly around the skin area to protect it, then cover each nail with cotton soaked in 100% acetone. After 20 to 30 minutes, peel off only the acrylic that becomes soft.
First, Make Sure You Actually Have Acrylic Nails
Not every thick or extended manicure is acrylic, and using the wrong removal method can waste time or damage the nail underneath. Traditional acrylic enhancements are formed from liquid monomer and polymer powder and harden in the air. They generally soften after the surface has been filed and exposed to acetone.
Press-ons are preformed nails attached with glue, while soft-gel extensions and Gel-X-style tips use a gel adhesive that is cured with a lamp. Dip powder is resin-and-powder based, and hard gel is a file-off enhancement that may not dissolve in acetone. If you are uncertain what was applied, ask the original salon before starting.
| Manicure type | Typical removal clue | Should you follow this acrylic guide? |
| Traditional acrylic | Thick, rigid overlay or sculpted extension; softens with acetone after filing | Yes |
| Glued press-on | Preformed full-cover nail attached with nail glue | No; the adhesive needs a different removal process |
| Soft-gel extension | Clear or decorated full-cover gel tip cured under a lamp | Only if the manufacturer confirms it is soak-off |
| Hard gel | Structured gel that stays hard during an acetone test | No; professional filing is usually required |
| Dip powder | Layered powder manicure sealed with activator and top coat | Similar soak-off principle, but follow dip-specific instructions |
When You Should Not Remove Acrylics at Home
Get a professional removal if your natural nail is broken, bleeding, torn partially, badly lifted, or hurts under the enhancement. The symptoms like redness, heat, swelling, draining, a smell that won’t go away, and any color like green, brown, or black might mean there is something going on that shouldn’t be put underneath another manicure. A dermatologist or another medical expert would be better if the problems include the skin or natural nail, and not just the enhancement itself.
Home removal is not a good idea if you don’t know what kind of enhancement you have, your acrylic is extensively decorated, or the product is still rock-hard even after filing and acetone wraps. It could be hard gel or some other file-off system. Similarly, let a professional do electric-file removal, since an e-file goes right through the enhancement and quickly thins the natural nail.
The American Academy of Dermatology notes that artificial-nail application and removal can leave natural nails thin, brittle, and dry. Its guidance also warns that covering already damaged nails can worsen existing problems.
What You Need for a Salon-Style Acrylic Removal
Gather everything before opening the acetone. Once one hand is wrapped, searching through drawers becomes unnecessarily difficult.
- 100% acetone, not ordinary acetone-free polish remover
- A manual nail file intended for enhancement removal
- A finer buffer for minimal finishing
- Nail or acrylic-tip clippers, used only when the extension can be shortened safely
- Ten small pieces of cotton, cut close to nail size
- Ten foil squares or reusable remover clips
- Petroleum jelly to protect the surrounding skin
- An orangewood stick, used only for acrylic that is already soft and detached
- Cuticle oil and fragrance-free hand cream
- A glass or ceramic dish for holding a small amount of acetone
- A washable, acetone-resistant surface covering
Select a room that has good airflow and ensure that acetone does not come into contact with candles, cigarettes, gas cookers, space heaters, hair dryers, and any other sources of heat or fire. Poison Control warns that it is important to use nail polish remover in a ventilated place and not near anything that is burning or hot, since acetone causes skin irritation and is highly flammable.
How to Remove Acrylic Nails at Home Step by Step
1. Prepare the Workspace Before Touching the Nails
Open a window or increase ventilation in the room, protect the work area, and cut the pieces of cotton and aluminum foil. Don’t open the container with acetone until it’s needed. It should be done one hand at a time to keep one hand free for adjustments.
Remove rings and bracelets and wash and dry your hands. Inspect all nails for cracks, bleeding, discoloration, or painful separation. If anything is wrong, don’t cover it up; stop right there.
2. Shorten Only the Artificial Free Edge
If the acrylic extends well beyond the fingertip, reducing the length makes filing and soaking easier. Clip only the clearly artificial portion, leaving a generous margin above the natural nail. Thick acrylic can crack when squeezed by an ordinary nail clipper, so remove small sections rather than attempting one dramatic cut.
If you cannot see where the natural nail ends, the extension is cracked, or clipping makes the product flex painfully, shorten it with a hand file instead. Never snap, bend, or twist the acrylic to remove length.
3. File Off the Shine and Reduce the Bulk
Use a manual file to remove the glossy top coat, gel color, glitter seal, and some of the acrylic’s thickness. Keep the file moving and concentrate on the enhancement, not the skin or cuticle. The surface should become evenly matte, allowing acetone to penetrate more efficiently.
You do not need to file all the way to the natural nail. Leave a thin, visible layer of acrylic as a safety buffer. Slow down immediately if you feel heat, tenderness, or increasing flexibility; those signs can mean you are approaching the natural nail plate. Do not use an electric drill unless you have been professionally trained to control its speed, pressure, angle, and bit.
4. Protect the Skin Around Each Nail
Apply a thin ring of petroleum jelly to the cuticles, sidewalls, and fingertip skin. Keep it off the acrylic surface because an oily barrier can prevent acetone from reaching the product. If the skin is cut, inflamed, blistered, or affected by eczema, postpone the home soak and seek professional advice.
Acetone removes oils from the skin and can cause dryness, redness, burning, peeling, or irritation. Targeting the product rather than soaking the whole fingertip reduces unnecessary contact.
5. Saturate and Wrap Each Nail
Pour only the amount of acetone you need into a glass or ceramic dish. Saturate one nail-sized piece of cotton, place it directly over the filed acrylic, and wrap the fingertip securely with foil. The cotton must stay in full contact with the entire nail, but the wrap should not feel tight enough to cause throbbing, numbness, or color change.
Repeat across one hand, then close the acetone bottle. Remover clips can replace foil if they hold the cotton evenly. Using nail-sized cotton instead of oversized balls limits contact with the surrounding skin and uses less solvent.
6. Let the Acetone Work for 20–30 Minutes
Leave the wraps undisturbed and begin checking at approximately 20 minutes. Thick enhancements, multiple fills, dense glitter, or acrylic left relatively bulky may require longer. Do not speed the process with a microwave, stove, hair dryer, heating pad, candle, or bowl of directly heated acetone.
The CDC’s NIOSH guide classifies acetone as a flammable liquid and lists the eyes, skin, and respiratory system among its exposure targets. Room-temperature acetone and patience are enough for a home removal.
7. Test One Nail Before Unwrapping the Rest
Remove one wrap and press the cotton gently against the nail as you slide it off. Properly softened acrylic looks swollen, gummy, flaky, or crumbly. It should move with very little pressure. Use the flat side of an orangewood stick only to guide already-loose product toward the free edge; it should never function as a scraper against the natural nail.
If the acrylic remains hard, glossy underneath, or firmly attached, replace the saturated cotton and foil for another 10–15 minutes. Test again. Work nail by nail so softened acrylic does not dry and harden while you deal with the rest of the hand.
8. Rewrap Resistance Instead of Forcing It
A professional-looking removal often takes two soak cycles. That is normal. If any patch requires pressure, leave it alone, apply fresh acetone, and rewrap it. Do not dig beneath an edge, lever the acrylic upward, or pinch softened product with tweezers.
The safest endpoint is not necessarily a perfectly bare-looking nail. A paper-thin shadow of the product is less harmful than repeatedly scraping or filing the natural plate to erase every trace.
9. Finish With Minimal Buffing and Thorough Aftercare
When all easily softened acrylic has been removed, use a fine buffer with a few light passes to smooth only obvious residue. Stop if the nail feels warm, sore, bendy, or sensitive. Wash your hands with gentle soap and lukewarm water, dry them carefully, and apply cuticle oil followed by hand cream.
Repeat the entire process on the second hand using fresh cotton and acetone. Close and store the remover immediately afterward, out of reach of children and pets, and follow the product label for handling used materials.
Foil Wraps or an Acetone Bowl: Which Method Is Better?
Both methods can soften genuine acrylic, but foil wraps are usually the more controlled home option.
| Method | Advantages | Limitations |
| Cotton and foil or remover clips | Targets the acrylic, limits skin immersion, uses less acetone | Takes preparation and can be awkward on the second hand |
| Fingertip soak in a glass bowl | Simple setup and full product contact | Exposes more skin, uses more acetone, creates more vapor, and may cause greater dryness |
| Professional removal | Technician can identify the product, reduce bulk efficiently, and monitor the natural nail | Requires an appointment and service cost |
If you choose a bowl, use glass or ceramic, submerge only the nail area, maintain ventilation, and never heat the acetone directly. Stop if the skin begins to burn or becomes very irritated. Foil wraps are preferable for readers with dry skin because they keep most of the fingertip out of the solvent.
How Long Does Acrylic Nail Removal Take?
Reserve approximately 45–75 minutes, particularly for a first attempt. Filing and wrapping can take 15–25 minutes, while acetone softening commonly needs 20–30 minutes plus one or more shorter rewraps. Heavily built acrylic or encapsulated art may take longer.
Timing should be determined by the product’s texture, not a countdown alone. If the acrylic is still hard when the timer ends, it is not ready. Expert-informed guidance published by Allure likewise emphasizes that acrylics take longer to soak than gel polish and that resistant product should be soaked again rather than forced.
Very rapid removal is not automatically professional removal. A video that jumps from intact extensions to bare nails may omit filing and repeated soaking. Your natural nails cannot tell whether the process looked quick; they only respond to the pressure and abrasion used.
Can You Remove Acrylic Nails Without Acetone?
There is no reliable soak free from acetone that will dissolve acrylic gel nails as effectively as acetone. Warm water, soap, oil, and polish remover without acetone will soften nail glue or assist in removing the nail that is nearly detached, but they will not be effective enough in dissolving most of the actual acrylic. Removal of the product using these methods might lead to peeling off some layers of your natural nail.
If you have skin sensitivity issues, lack of proper ventilation conditions, pregnancy, personal preferences, or some other health problems, which prevent you from using acetone, file-down removal performed by a professional would be the proper choice. A professional will leave a thin layer of the product without damaging your nail plate.
The dental floss technique should be avoided even if some edge of your nail becomes detached. Using floss, a credit card, string, or any other instrument under your acrylic nail creates leverage between the product and natural nail. The sensation of acrylic “popping off” does not indicate safe release of the bond.
Acrylic Removal Mistakes That Damage Natural Nails
- Peeling or biting the acrylic: This can lift superficial layers of the nail plate and leave rough, thin patches.
- Using dental floss or a card: Both methods pry from underneath and place concentrated force on the natural nail.
- Filing until no product is visible: It is easy to continue into the nail plate once the acrylic becomes thin.
- Using an e-file without training: Speed and friction can create heat, grooves, and rapid thinning before you realize it.
- Scraping product that is still firm: Properly softened acrylic should move with minimal pressure; resistance means it needs more acetone.
- Heating acetone: Acetone vapor is flammable. Never microwave it or place it near electrical heating devices, cigarettes, candles, or flames.
- Skipping ventilation: Concentrated vapor can irritate the eyes, nose, and throat or cause headache and dizziness.
- Applying acetone to broken skin: Cuts and inflamed cuticles can sting intensely and become more irritated.
- Installing another set immediately over a problem: New product can conceal splitting, discoloration, moisture, or inflammation that deserves attention.
How to Care for Natural Nails After Acrylic Removal
The recently uncovered nails will be softer due to the lack of the protective layer and because of previous filing or solvents they could get too dry. Keep them short enough to avoid bending, the edge should be rounded properly, apply cuticle oil and moisturizer every day. Gloves are recommended for long-term use while doing the dishes or house cleaning and using the nails as tools should be avoided.
You shouldn’t remove all the ridges or white spots aggressively. The surface imperfections from filing need to grow out of the nail, filing will only make the plate thinner. A simple clear polish could cover up minor imperfections if the condition of the skin and nails becomes normal again, however, it’s better to go without any artificial treatments for the sore, peeling and thin nails at all.
In case you need a lower-maintenance nail treatment after they become healthy, the short squared nails could be an option. It will help to avoid regular filing, soaking and touch ups; according to the recommendations of the AAD, artificial nails should be worn only occasionally if there are concerns about nail damage.
When to See a Nail Technician or Dermatologist
Consult a nail technician when the type of enhancement is unclear, the acrylic does not become soft despite proper preparation, or the remaining material is too scanty to be identified from the natural nail. A nail technician needs to deal with embedded charms, very thick encapsulated artwork, cracked enhancements, or possibly split nails.
Consider seeking medical consultation if there is an increase in pain or swelling, the presence of pus or discharge, bleeding, a rash that persists, or discolored nails of green, brown, or black color. Avoid buffing off the discolored area and immediately covering it with polish or other enhancements. In case of eye contact with acetone, wash out with water and seek Poison Control in the U.S. (1-800-222-1222).
Final Thoughts
To remove acrylic nails professionally from the comfort of your own home, the key is focusing on three main aspects: file the enhancement alone, wait for long enough for the acetone to work, and carefully cover all resistant areas.
Acrylic nail removal is not supposed to be done fast. Once you feel that the procedure is not gentle anymore and cannot recognize what substance you are filing off, you should leave a thin layer and schedule a professional removal appointment. Natural nail protection matters more than completing the task in one session.