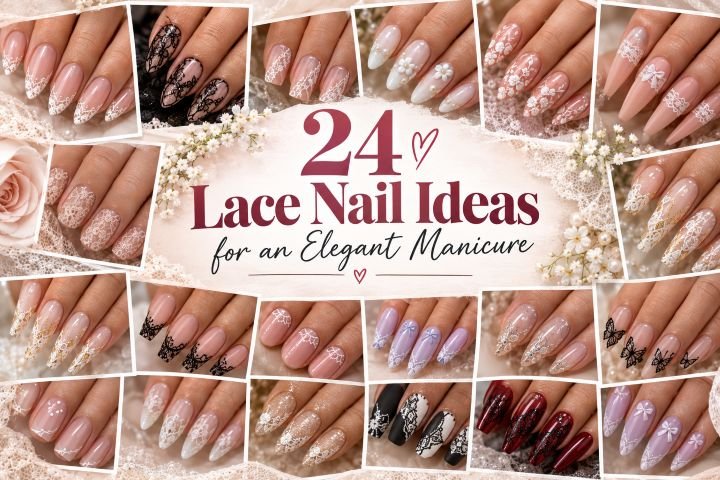
24 Lace Nail Ideas for an Elegant Manicure
Nail art with lace is beautiful because it works the same way in clothing; while the detail is delicate, the design can vary completely based on the color, scale, and finishing of the lace. lace nail ideas can range from sheer white French tips to black gothic overlays, pearls for the bridal look, chrome accents, jelly bases, and detailed salon artistry.
There are designs for weddings, everyday manicures, date night, seasonal events, or an evening out on the town as well as realistic choices that work for short nails, press-on nails, stencils, decals, and painted nail art. Each manicure comes with instructions on how to apply it for easy saving of the appropriate design for your manicurist or do-it-yourself inspiration.
1. Classic White Lace French Tips
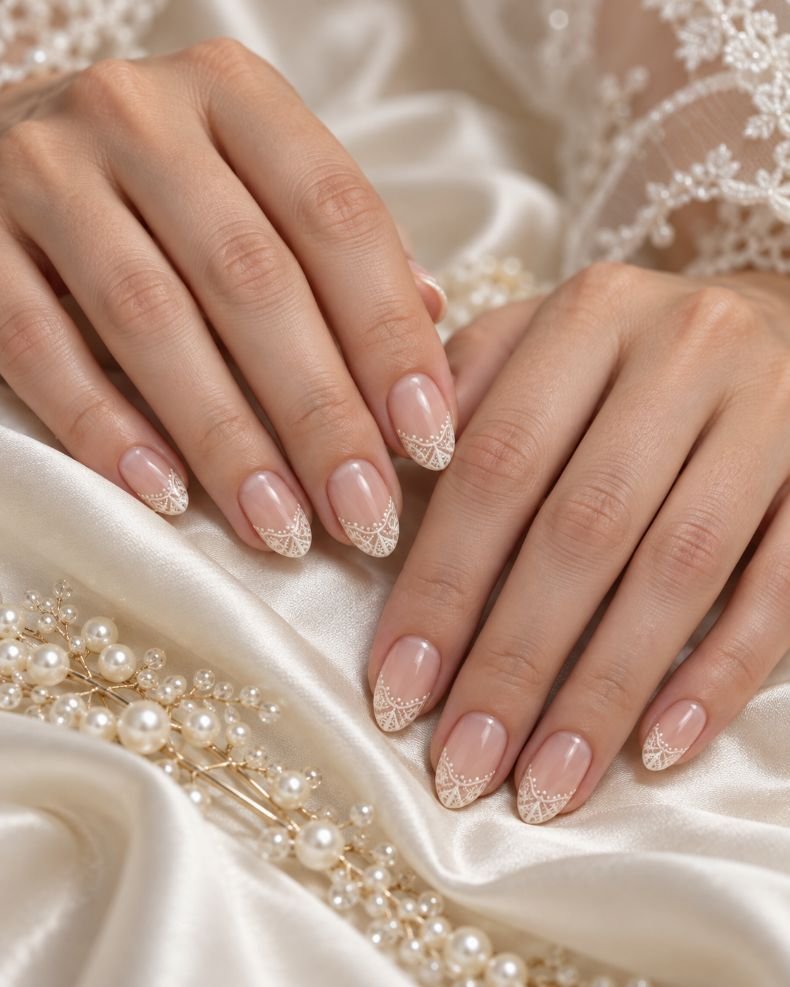
Almond nails with short lengths are started off by painting a sheer blush on the base and thin ivory lace design along the free edge of each nail. Instead of the usual white French smile line on the nail tips, a lace style French design features scallops, open curves, and two to three pinpricks to create an intricate border for the nails. Lace design should be kept thin and consistent with a glossy finish that highlights the blush under the design.
It is the best place to begin your journey into lace French tips for weddings, engagements, and even everyday occasions. Short almond nails offer the lace border design a curving shape without adding additional length to the tips of your fingers, and the subtle color scheme will look stunning next to your pearls and a satin sleeve. It is recommended to ask for a stamping nail art design or hand-painted border to avoid the tedious process of lacings.
How to Apply
- Create the perfect almond shape using your natural nails and apply a single layer of sheer blush base.
- Paint an ivory micro-French curve on each nail tip and add small scallop, loop, and dot designs using a fine liner brush.
- Clean the sidewalls before the lace application dries or cures, and keep the lace line shallow and straight.
- Add a top gloss coat, floating the brush over the lace to prevent dragging of the fine lines.
2. Black Lace Over Nude
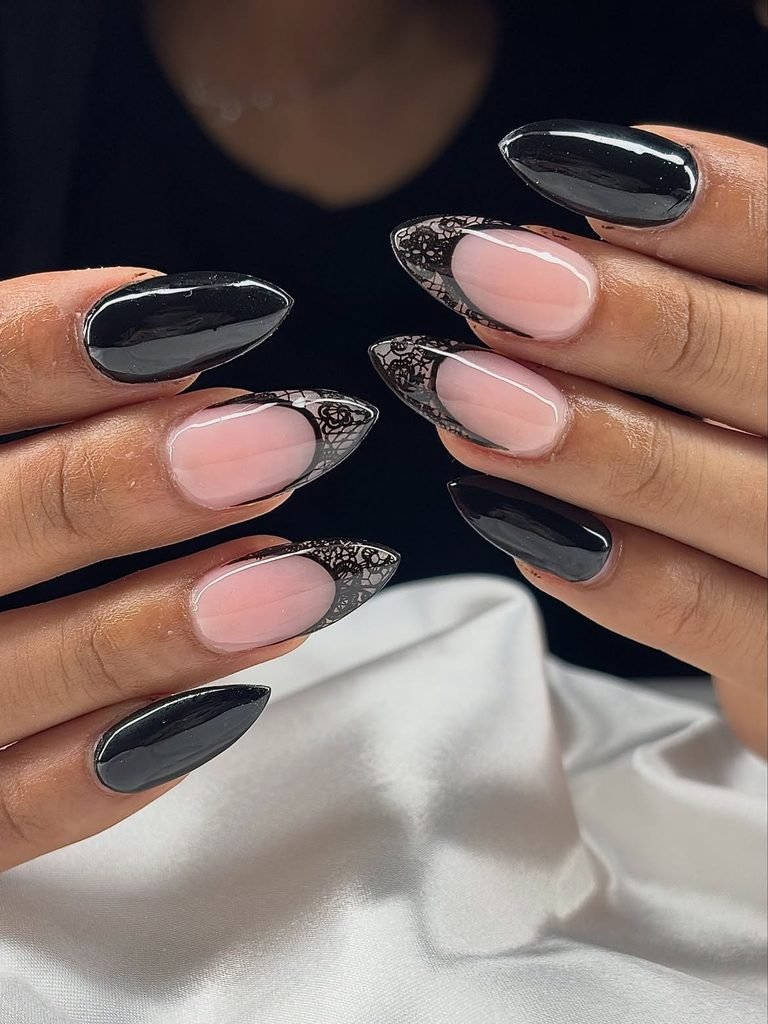
Medium oval-shaped nails have an opaque beige-nude background, on which there is a sheer layer of fine black lace that seems like a sheer glove. Do not cover all spaces with the mesh, making use of curved vines, small arches, and some darker connections near the center of each nail. A gloss top coat will help make the black lines look as if they were inked and the beige background will remain luminous.
This is the elegant gothic manicure – very expressive for the evening, but at the same time so subtle as to avoid looking too theatrical. The medium oval shape softens the combination, whereas the transparent background will work perfectly with the black satin dress, black charcoal tailoring and old silver jewelry. Use nail stamping for creating the repeating pattern, or ask your technician to paint two nails and keep the others nude.
How to Apply
- Manicure your fingers with medium ovals, and then paint two thin layers of translucent beige-nude polish and let the base polish dry.
- Stamp a delicate black lace pattern using a stamping plate or paint a pattern of open mesh stripes on each nail.
- Clean any excess polish that may have fallen on your skin before it dries.
- Top with a shiny top coat and cap the free edge without covering the cuticle.
3. Negative-Space Lace Panels
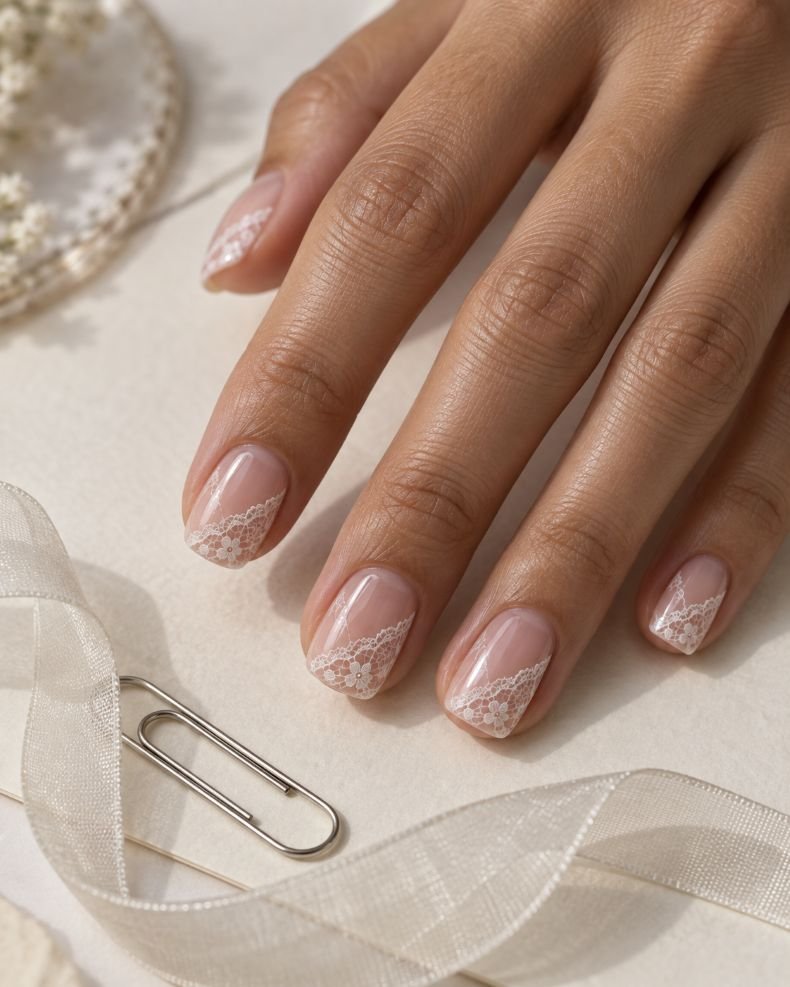
Short squoval nails use clear negative space as part of the design, with a slim white lace panel running diagonally from one sidewall toward the tip. Each panel contains only a few loops, dots, and crossed lines, leaving most of the natural nail visible. The finish is glossy, so the bare sections look intentional rather than unfinished.
This lighter take on lace nail art is ideal when you like detail but dislike a crowded manicure. The short squoval shape gives the diagonal panel a clean architectural edge, and the transparent areas help the nails appear longer. It works for the office, a daytime event, or a minimalist wedding outfit. A lace decal trimmed into strips is easier than freehand painting; use one accent panel on each hand if you want the most practical version.
How to Apply
- Shape short nails into a soft squoval and apply a clear or barely-there pink base coat.
- Place narrow white lace decals diagonally, or draw a curved guide line and add small loops and crossed threads with a detail brush.
- Trim the panel at the sidewalls so no design touches the skin, then allow the artwork to dry or cure fully.
- Seal with glossy top coat, smoothing from the center outward over the negative-space sections.
4. Milky Lace With Pearl Accents
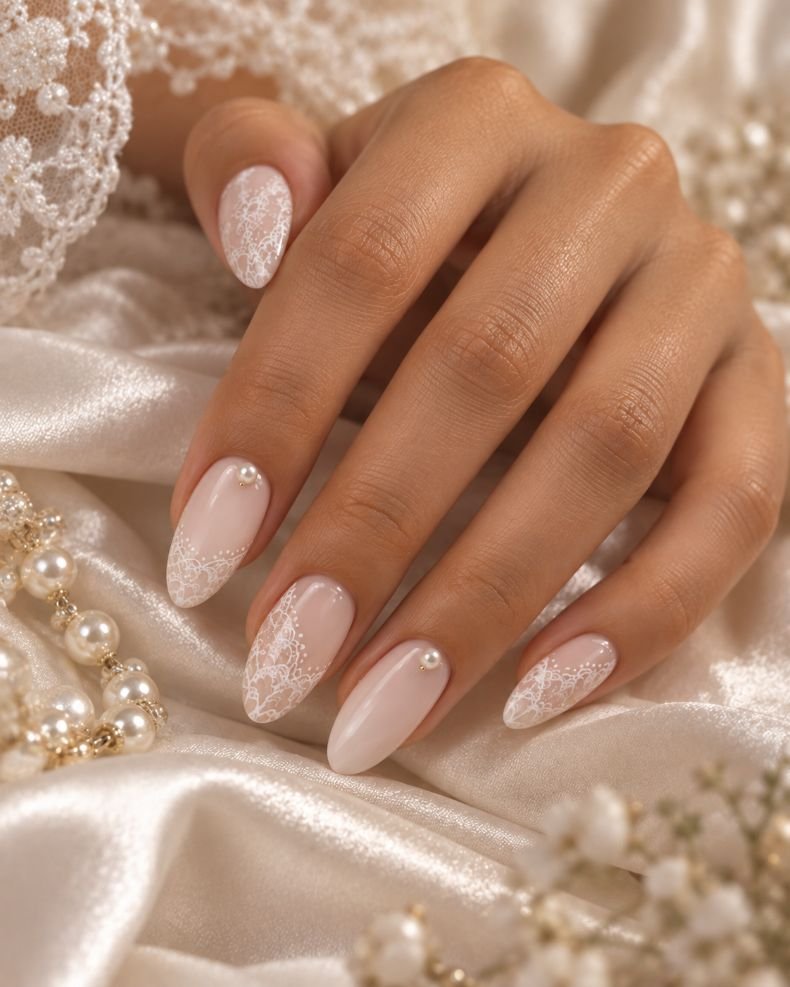
Medium almond nails are coated in a milky ivory wash, then decorated with delicate white lace on alternating nails. Two feature fingers receive one or two low-profile pearls placed near the cuticle, while the remaining nails keep the lace flat and airy. The finish is glossy but not mirror-like, allowing the pearl details to catch light without overpowering the pattern.
The combination feels bridal without looking like a traditional French manicure. It suits wedding portraits, rehearsal dinners, and soft white or champagne outfits, especially when your jewelry already .Medium almond nails are coated in a milky ivory wash, then decorated with delicate white lace on alternating nails. Two feature fingers receive one or two low-profile pearl nail ideas placed near the cuticle, while the remaining nails keep the lace flat and airy. The finish is glossy but not mirror-like, allowing the pearl details to catch light without overpowering the pattern.
How to Apply
- Apply two thin coats of milky ivory gel or lacquer to medium almond nails and let the surface become fully smooth.
- Add white lace decals or stamp a fine lace pattern onto four to six nails, keeping two accent nails slightly more open.
- Place one small flat-backed pearl above each accent cuticle with compatible nail adhesive.
- Seal the flat lace with glossy top coat and cure the adhesive fully, keeping top coat off the pearl faces.
5. Blush Botanical Lace
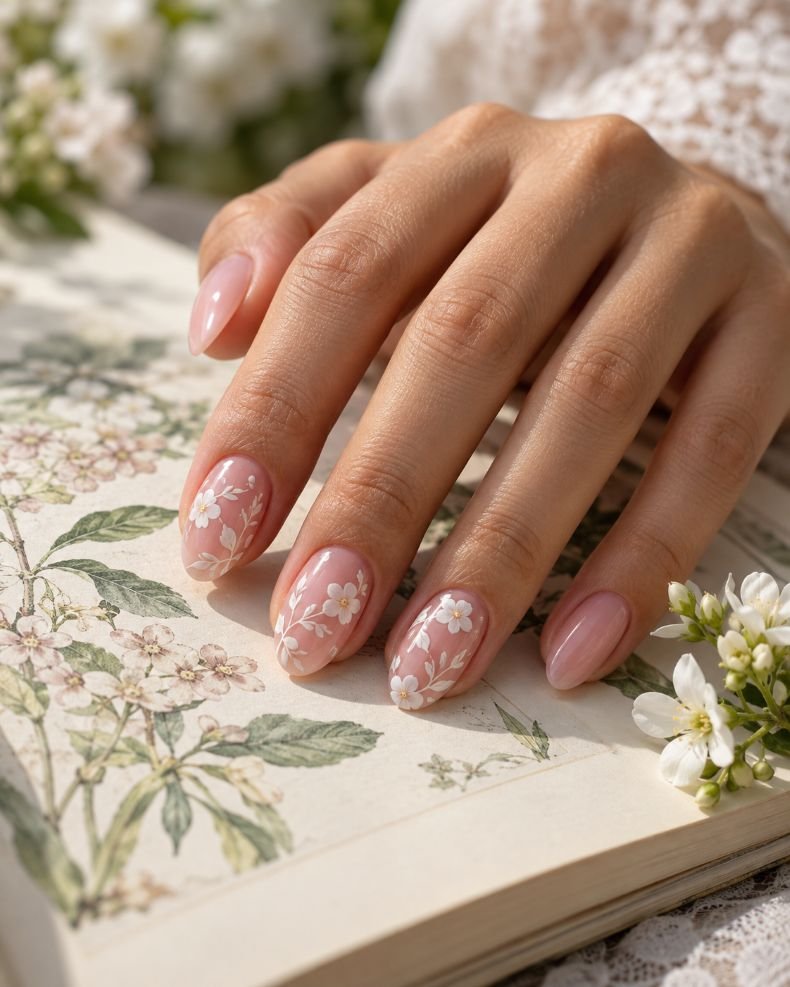
For medium oval nails, begin with a transparent blush-pink base and add white lace vines, which twist from the lower sidewall towards the tip. Five-petal flowers and stems should be added only to three nails, and the other nails will get a more delicate lace border, so there would be space around the manicure. A glossy top coat will help to keep the white painting sharp on a pink background.
The botanic design gives a contemporary feeling of lace, suitable for the spring events, garden wedding, and romantic brunch, rather than strictly old-fashioned. The oval shape is the perfect choice for the vines to flow, and the blush base matches jewelry of any shade. Since flowers are flat drawing work, the design is less difficult to ask than a sculpted one, although a detail brush is required for clean stems. Exclude the green color from the manicure if you need a softer palette for the bride.
How to Apply
- File your nails into medium oval shapes and then paint one or two coats of translucent blush-pink base polish, allowing each coat to dry or cure between applications.
- Using either painting or stamping technique, draw lace vine patterns going from one sidewall to the nail’s tip at various heights.
- Decorate three accent nails with small white flowers and fine stems while keeping other lace designs simpler.
- Apply a clear glossy finish once the designs have dried.
6. Bridal Garter Lace Bands
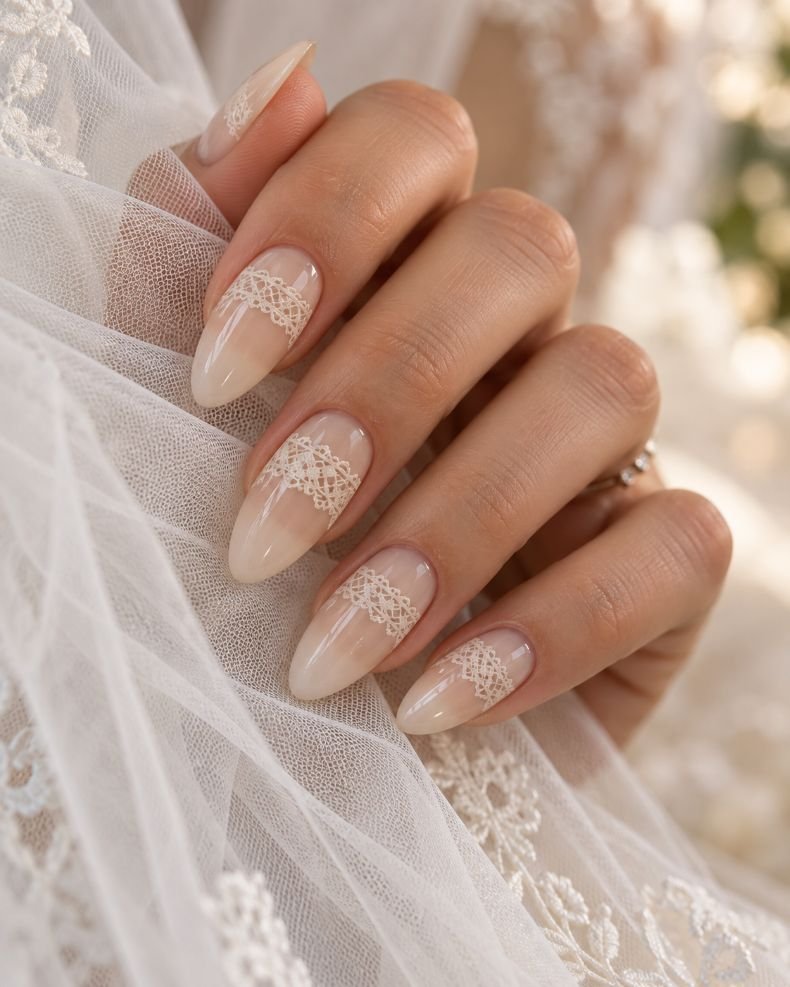
The long almond nails have a narrow band made from ivory lace that is wrapped over the top third section resembling a traditional bridal garter. You can leave your nails sheer and pink or warm ivory and make sure each band is slightly different with some scallop edges, tiny bow loop, open diamond, and a lace strip on the next nail.
It is not a traditional overlay pattern but rather a fashion statement for your wedding manicure that does not copy the style of the dress you wear. The almond nail shape will give you enough space to apply the narrow bands and will work well with the light color palette as it goes with lace, tulle, satin, and crepe materials. This manicure is better done by a professional nail specialist or a custom press-on artist who needs to carefully align the bands’ height on both hands.
How to Apply
- Start by applying almond extensions followed by a sheer pink or ivory color in thin layers.
- Make sure that you mark the upper third position on your nails and then apply an ivory lace garter band.
- Apply different motifs for each finger like scallop, diamond, loop or bow.
- The size of the band should be consistent for all nails.
- Finish off the design by applying topcoat.
7. Matte Ivory Lace Overlay
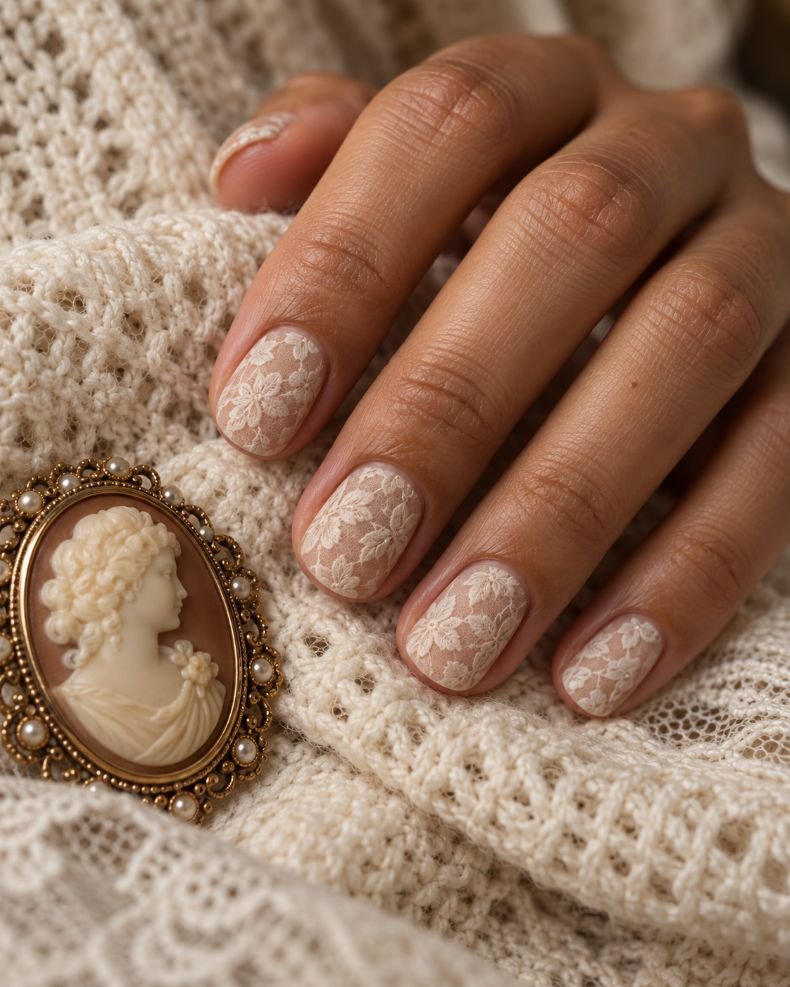
Rounded short nails have the warm nude base, decorated with the delicate layer of fine ivory lace, and then coated in the satined-matte varnish, instead of the gloss one. Lace design should resemble the fabric design – small flowers, linked loops, and slightly unsmooth edges that blend into the nude color of the base. You shouldn’t make the overlay opaque; the nude color of the base should be seen even around the cuticles and sidewalls of the nails.
Such texture of the design makes this lace look modern and stylish along with the cream-colored knit, beige tailored clothes or some vintage accessories. Rounded short nails make lace design more practical for everyday wear and typing. Warm color tones will help you to avoid the harshness of the matte white nails. The better option to create this design will be the lace transfer or thin decal, than trying to paint all threads by hand.
How to Apply
- File the short natural nails to a soft round shape and apply a thin layer of warm nude base, either cured or dried to perfection.
- Press an ivory lace transfer or cut-out decal on each nail, starting from the center to the sides.
- Seal the lace with a clear glossy top and let it cure/dry before adding the finishing touch.
- Apply one satin matte top coat while making sure the cuticle line is clean and the woven design is visible.
8. Gold-Thread White Lace
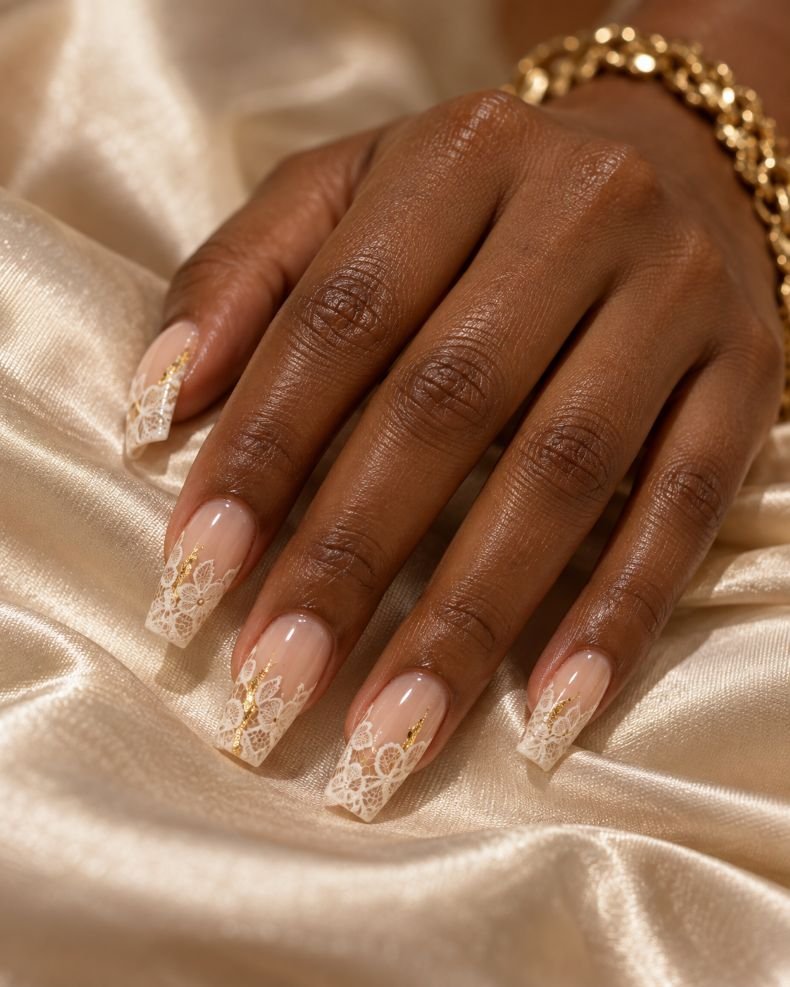
Medium coffin nails feature a combination of an ivory opaque nail with white lace designs, embellished with gold foil threads in between. The lace design is mainly found on the tips and the sidewalls, and the gold foil design is featured in short, sporadic lines, rather than an entire strip of metal. The finish needs to be glossy, so that the foil shines only when moving.
It is a more sophisticated look for white lace nails, which are meant to complement champagne dresses, Christmas dinner parties, and a night out without silvery sparkle. The coffin nail shape will add sophistication to the nail art, and the ivory background will soften the appearance of the gold foil. It is much easier to use foil on the nails than to paint lace with a metallic touch, yet the white design can be stamped or done by professionals only.
How to Apply
- Create coffin shaped nails that are of medium size and apply two layers of translucent ivory colored nail polish, ensuring you cure/dry each layer.
- Apply the white lace design or sidewall designs using either stamping or brush technique and leave open ivory spaces between designs.
- Embed the gold foil using irregularly cut small shapes into the selected lace designs before the adhesive dries.
9. Black Lace French Tips
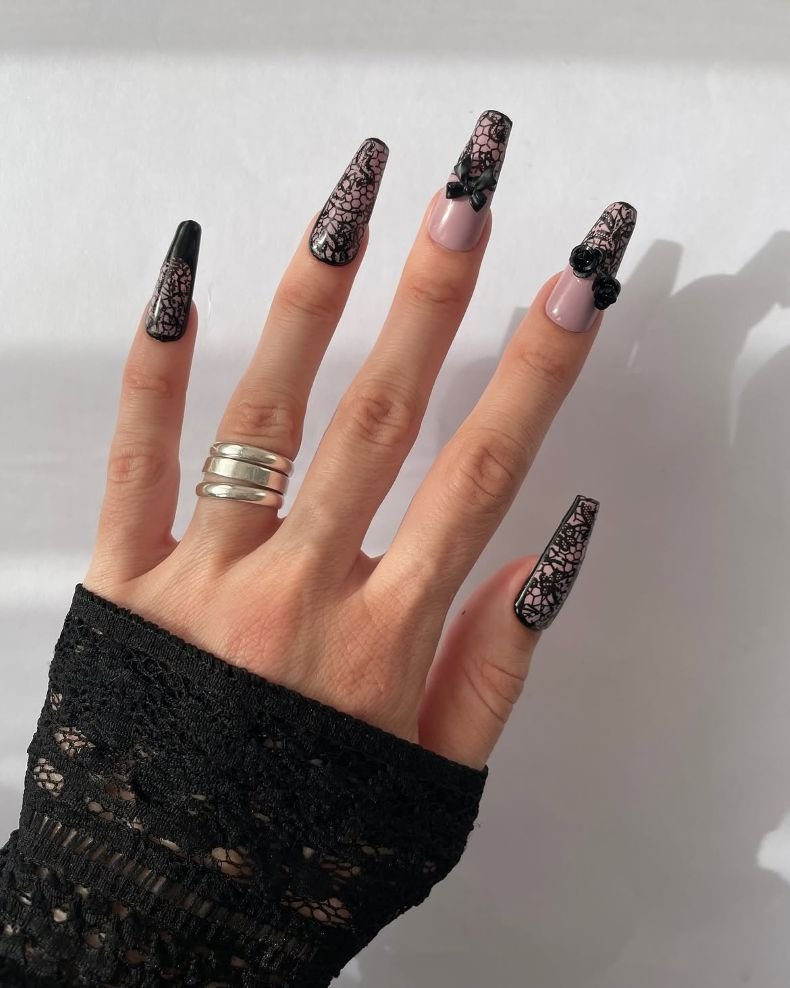
Sheer beige forms the base of these coffin nails with black lace trim along the free edge. In place of the usual black French tip, the design features arches of lace, small lace flowers, and net-like lace pattern which tapers gently towards the smile line. The rest of the nails remain glossy and nude, making the lacy edge appear neat but light.
These coffin nails provide an accessible version of gothic lace nails as the dark detail is located only on the tip. Short coffin nails make it more wearable, while the straight edges make it easy to position the lacy edge. It matches the outfit of any style, including black jeans or a leather jacket, and an evening gown. This design is easier to recreate by using nail stamping than hand-painting. Make sure you request a very shallow tip as the deep one will visually shorten the nails.
How to Apply
- File the nails to a compact coffin shape and then apply a thin beige nude base.
- Either stamp or paint the nails with a light black lace design on the free edges, making sure the side walls are symmetrical.
- Trim away any excess black polish that has gotten onto the skin before it dries or cures.
- Top with a glossy finish, making sure the black design does not smudge.
10. Lace Cuticle Cuffs
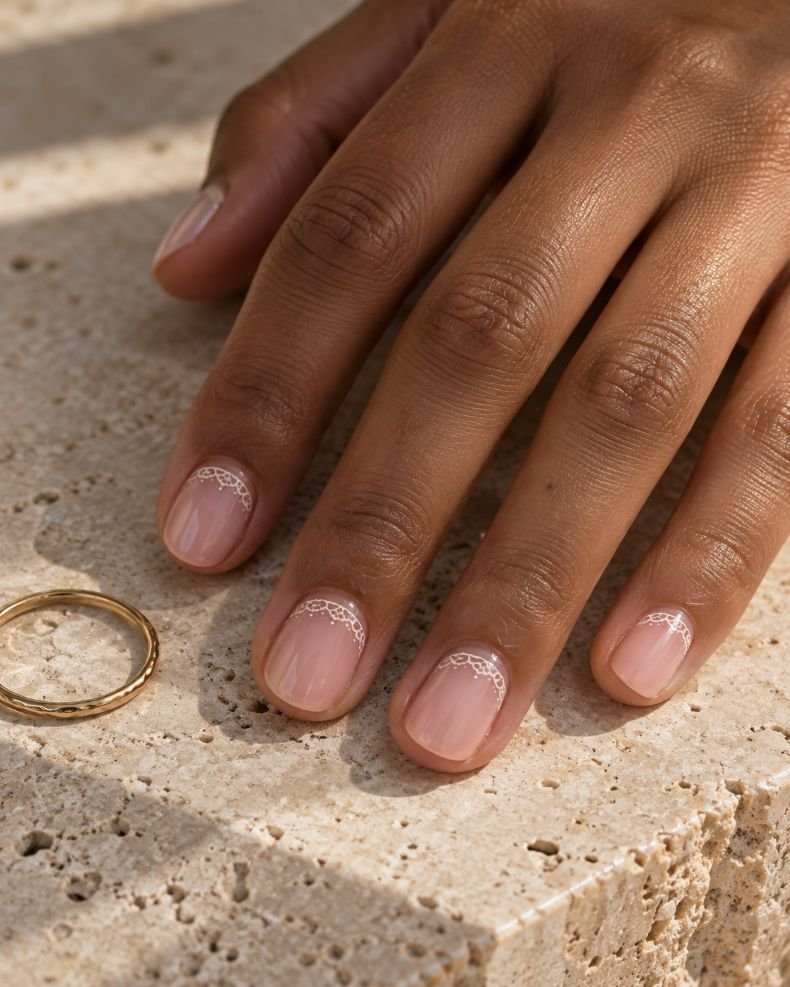
The short oval nails have a delicate lace cuff at their base instead of at their tips. Apply a sheer pink or nude base to your nails and place a narrow half-moon of lace pattern (white or espresso) slightly above the cuticle line, creating a tiny gap of negative space between the pattern and the skin. Don’t decorate the free edge of nails – keep it plain and shiny, as this manicure should look like a reverse one.
Putting a pattern at the cuticle level will add some length to the short nails and make the manicure unusual enough to look like not the traditional lace French. It will match an office outfit and jewelry; moreover, this manicure will be suitable for those cases when you need some details only noticeable up-close. The oval shape will soften the lace cuff, and the decal will look cleaner than the freehand drawing around the cuticle line.
How to Apply
- File your nails into an oval shape and put on a sheer pink or nude base polish while keeping the cuticle area clean.
- Attach a small lace half moon sticker on top of the cuticle, or draw a curved line and make little loops using a fine brush.
- Look for gaps between the negative space of each cuff and clean the bottom edge before the pattern hardens.
- Use a clear gloss polish to cover your nails, avoiding the cuticles and allowing the design to dry completely.
11. White Floral Lace Accent Nails
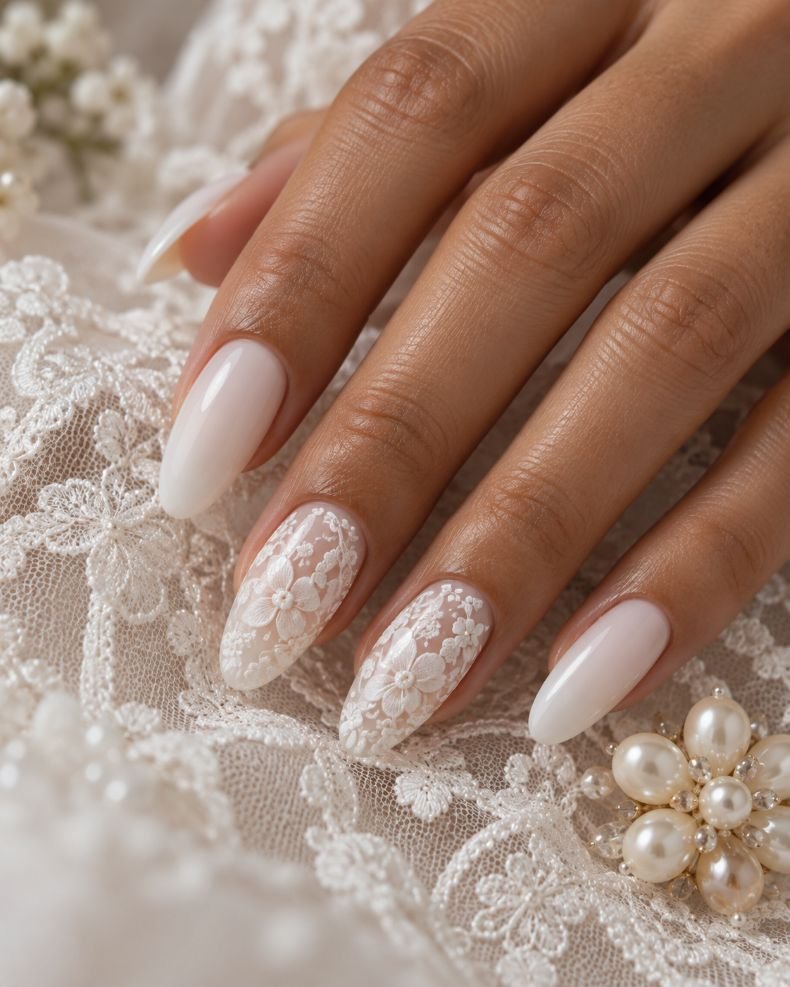
Long almond nails start with a smooth milky nail base, but only two nails have an intricate design of a heavy white floral lace. It includes open mesh, petals’ contours, and little leaves growing from one sidewall to the middle of the nail. The other nails look like a milky white or sheer blush nails, creating a neat gallery of unpatterned nails.
Such design suits those who adore lace nail designs but want a calm manicure at the same time. Long almond nails allow placing the flowers there, and the plain nails help to save on the maintenance. This design looks romantic for wedding photo shoot, garden party, or lace design of your clothing. A professional can paint the whole flat lace with one raised petal on one accent nail; if you don’t want anything three-dimensional, all flowers will be just painted without sculpture. Some ideas for 3D floral nail designs are shown here.
How to Apply
- Create almond-shaped nail art by applying two thin layers of milky white or sheer blush gel to all nails.
- The design of two accent nails should be done by leaving them free of gel and painting white lace mesh, petal contours, and tiny leaves from one sidewall to another.
- The rest eight nails should remain untouched while making corrections to flowers using a fine brush while the gel is still wet.
- Protect the lines from smudging using glossy top coat and add a raised petal if possible.
12. Lace and Crystal Accent Nails
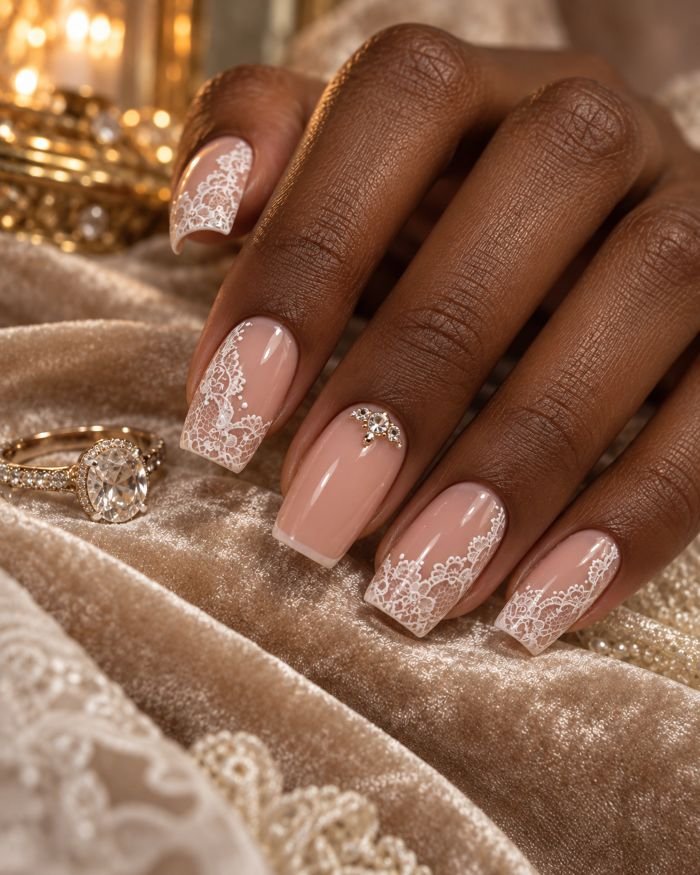
The medium length square nails combine the rosy nude polish with white lace decoration on three nails and one crystal cluster on an accent nail. Lace design is positioned as a side panel and a tip border, whereas the crystals are placed on the accent nail close to the cuticle in an elegant arc. Try to keep other nails shiny without any decorations in order to avoid too much sparkle.
Such nail set looks stylish due to the combination of delicate textile pattern with a simple geometric nail shape. Square nails create neat and clean boundaries for lace design, but medium nails length makes the crystals comfortable under sleeves gem nail designs. You can find more ideas about gem placements here. If your work includes hair styling or knitting, then it is better to ask for low-profile gems or order a special press-on nail set.
How to Apply
- Shape your nails into medium squares and apply two layers of rosy nude polish.
- Apply white lace side edges along with white tip edges on three fingers with the help of decals, stamping, or a liner brush.
- Attach small crescents of flat backed crystals just above the cuticles of your one accent nail by using proper adhesives.
- Glossy top coat should be applied over the lace and adhesive of crystals should be cured completely without covering the crystal faces.
13. Vintage Cream Lace
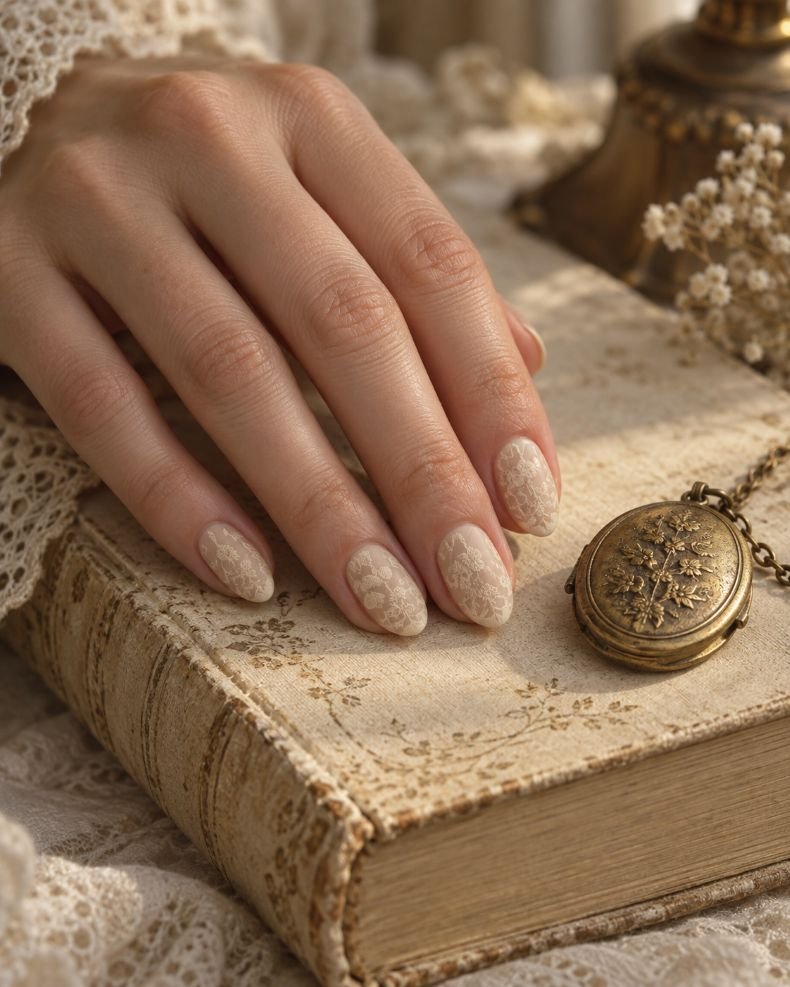
Creamy parchment is used as the base color, while lace is done in an antique cream shade that is a bit darker than the base. The lace design comprises arches, leaf patterns, as well as small negative space windows instead of just white lines. Add a satin finish to make it appear like old-fashioned stationary or fabric.
This soft and subtle combination can be worn during the day and goes well alongside brown leather, golden jewelry, and vintage-style dresses. Almond-shaped short nails help to avoid making the intricate design theatrical, while the lack of contrast conceals any inconsistencies in your brushwork. It makes for a great order at the salon when you want the lace to look unique but do not want it in black. When doing it yourself at home, choose an opaque polish and a stamping plate.
How to Apply
- Short almond-shaped nails are to be created by applying two thin coats of creamy parchment polish.
- The antique-cream colored lace design of arches, leaves, and little windows is to be painted on nails or stamped on, keeping the design slightly darker than the base color.
- The sidewalls need to be cleaned and softened wherever the pattern is too dense before it dries.
- A satin top coat is applied to achieve a fabric-like look.
14. Lace Ombré Fade
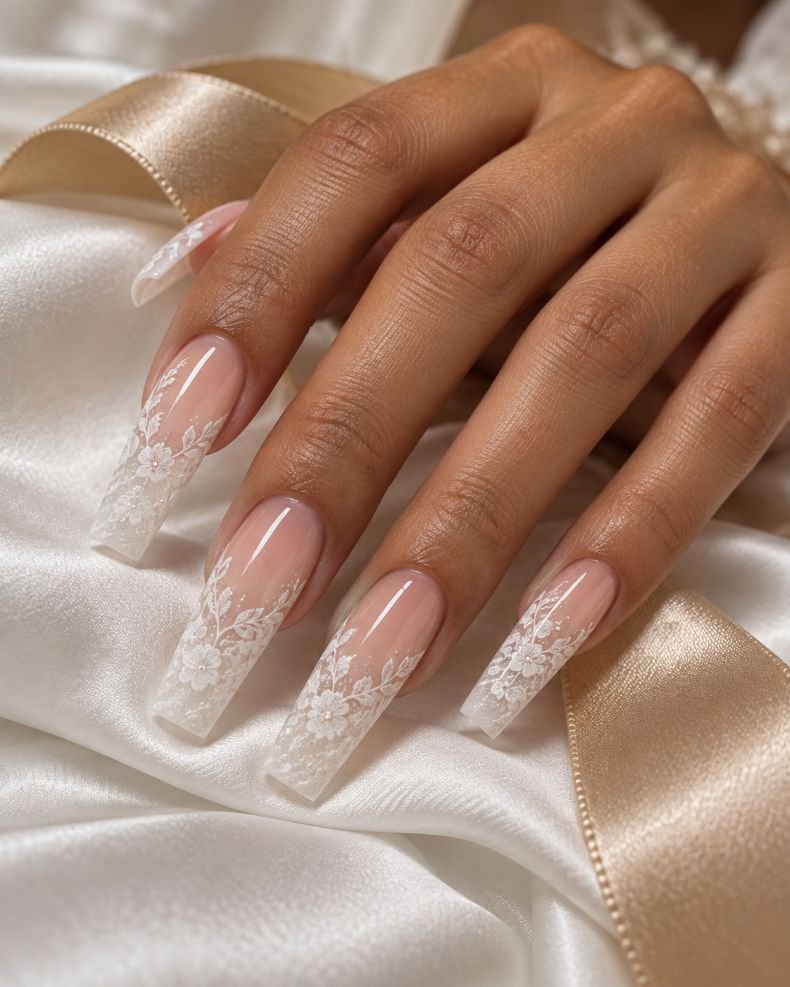
Coffin nail extensions start sheer nude at the base, then become milk white towards the tips, while the lace design becomes progressively busier in the same direction. Use less open lace design around the base of the nails, then add scallops and floral lace as you approach the free edges to make the lace seem like it blends with the gradient. The finished manicure is glossy and smooth.
This is a statement design for lace wedding nails that would work well for someone who wants something more elaborate than a French tip design but does not want bold colors. The coffin nails will make your nails look elongated in photos due to the vertical nature of both the gradient and the lace pattern. This is a design that requires layering with stamping or should be done by an experienced technician as the lace should remain delicate around the base.
How to Apply
- Start by preparing coffin nails with a sheer nude base and sponging on milky white up to the tips for a perfect gradient.
- The lace should be light around the cuticles while you increase the density of scallops, flowers, and mesh at the free edges.
- Remove any areas that appear thick using a detail brush and allow the design to cure or dry.
- Finish off with a gloss top coat on the tips.
15. Delicate Lace Hearts
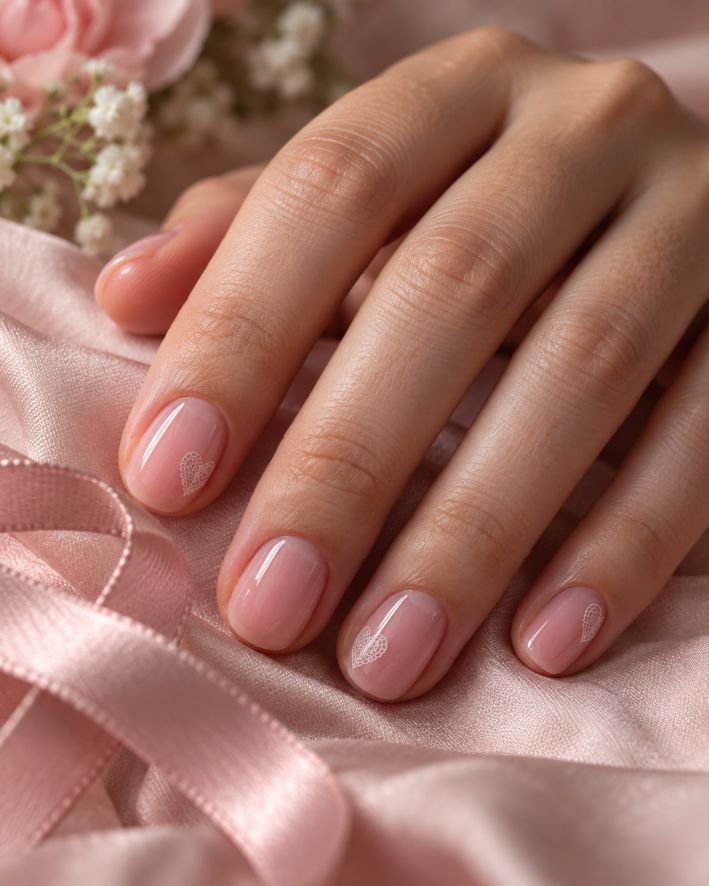
Small round nails feature delicate white lace hearts against a sheer pink background. A heart consists of an open scalloped pattern filled with several small dots and crossed strings inside; the designs are positioned close to the corner or sidewall of the nail, not covering its surface completely. Choose between one fully filled and one outlined heart to create a romantic look without being too thematic.
This design is a more delicate option for Valentine’s Day, wedding shower, anniversary or date night. Small round nails give the impression of a cute and cozy design, while open lace hearts leave some negative space to prevent the motif from covering the entire nail. Decals can be used for coordinating hearts on all nails, or you may order a unique hand-painted design by your technician.
How to Apply
- Shape your short nails into smooth round shapes, and paint a sheer pink nail polish on the nails.
- Place small decals of the white lace-hearts in alternate sides of the nails. Alternatively, use a small brush to trace a heart shape on the nail and add dots inside.
- Ensure that the heart shape is not too large and still leaves room around the cuticle and free edge.
16. Something Blue Lace
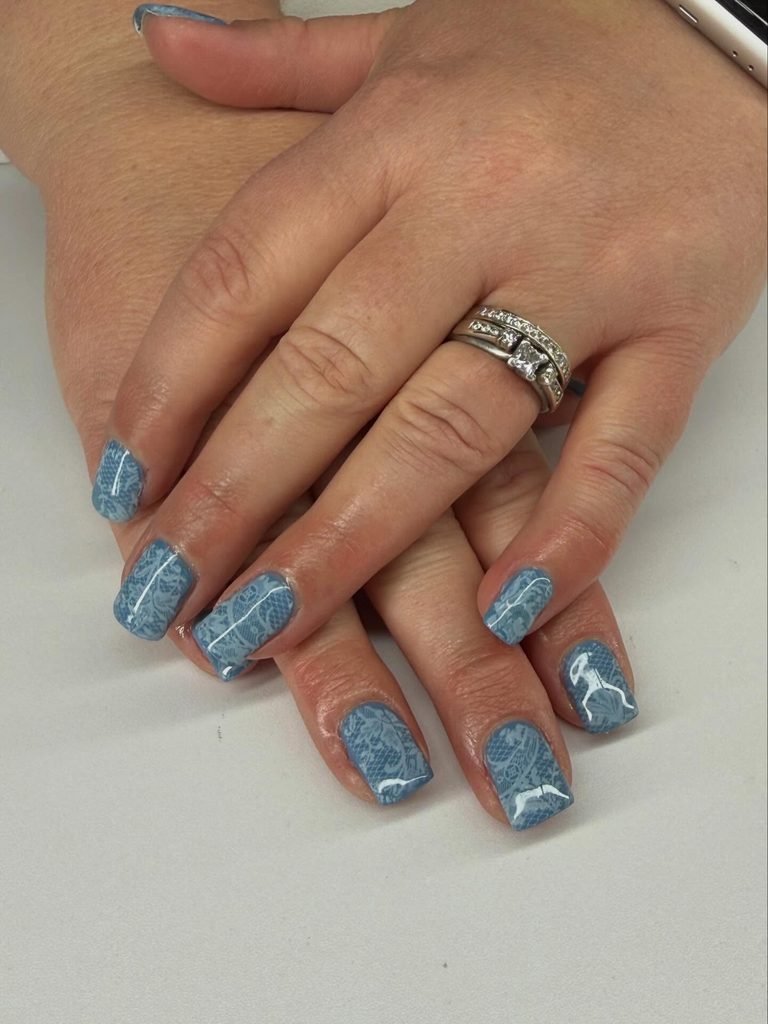
Almond medium nails have a light powder-blue nail base along with ivory lace nail art and one dark blue accent line per hand. Limit the lace art to just the tips and sidewalls so that the cool-colored base can be seen between the nail decorations. The overall finish should be shiny with the darker blue visible only as small dots, bow center, or borders to keep the design delicate and not nautical.
This is a great wedding nail art idea when you want some blue to be part of your wedding but not hidden. This also goes well with spring occasions, blue gowns, and silver accessories. Almond medium nails offer enough space to accommodate the design while still being comfortable to wear. An ivory or white lace transfer will work great here with small blue accent lines easy to hand paint.
How to Apply
- Create almond nails of medium size and apply two layers of pastel powder blue nail polish, curing or allowing to dry after each application.
- Add ivory lace tips or sidewalls using a transfer, stamping technique, or by using a very fine paintbrush while keeping in mind that the blue base color should be visible.
- Add one small dot of dark blue color at the center of the lace designs.
- And let it dry
17. Silver Chrome Lace Accent
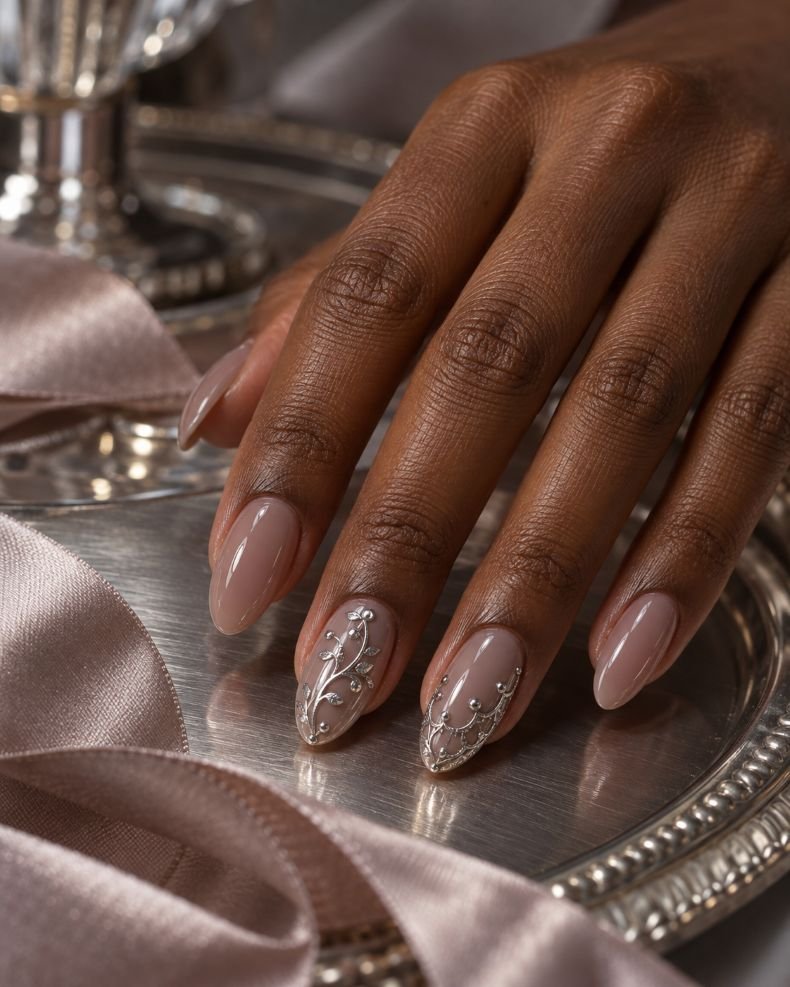
The medium almond nail design has a taupe-pink jelly polish base and silver chrome lace elements on two accent nails. The chrome design needs to be minimal and delicate, including scallops at the free edge, some reflective vines, and some mirror dots but not a whole metal coating. The other nails should remain shiny taupe, so that the lace sparkles only in the right lighting.
This contemporary take on the style is perfect for an evening outing, a winter wedding, or a simple look paired with silver jewelry. This is because the jelly base helps to soften the effect of the chrome, and almond shape works perfectly with the design. Chrome stamping or transferring is better than painting a fine metallic polish with a tiny brush. For those who love reflective nail art, this finish will go well with these cat-eye nail ideas without mimicking their magnetism.
How to Apply
- Create medium almond-shaped nails and use two coats of a taupe-pink jelly polish on them.
- Put no-wipe gel on the two accent nails and cure it according to the instruction.
- Stamp fine silver chrome lace scallops, vines, and dots on the two accent nails and keep other nails as they are (only taupe).
- Protect chrome edges with appropriate top coat and cure.
18. Lace Butterfly Wings
For medium stiletto nails, a sheer nude base is applied to which the black lace butterflies are applied to two accent nails. The butterfly motif is made up of open lace wings, thin antennae, and a small clear center on the nail, with other nails decorated with a single lace butterfly at the end of the nail.
The pointed nail shape provides the butterflies with a more fashion editorial look and makes them great for a concert, evening party, or dark romance look. The nude base helps balance out the black on the hand, and the limited butterflies make the design more wearable. While the lace can be applied through stamping, the butterfly shape should be done by a technician.
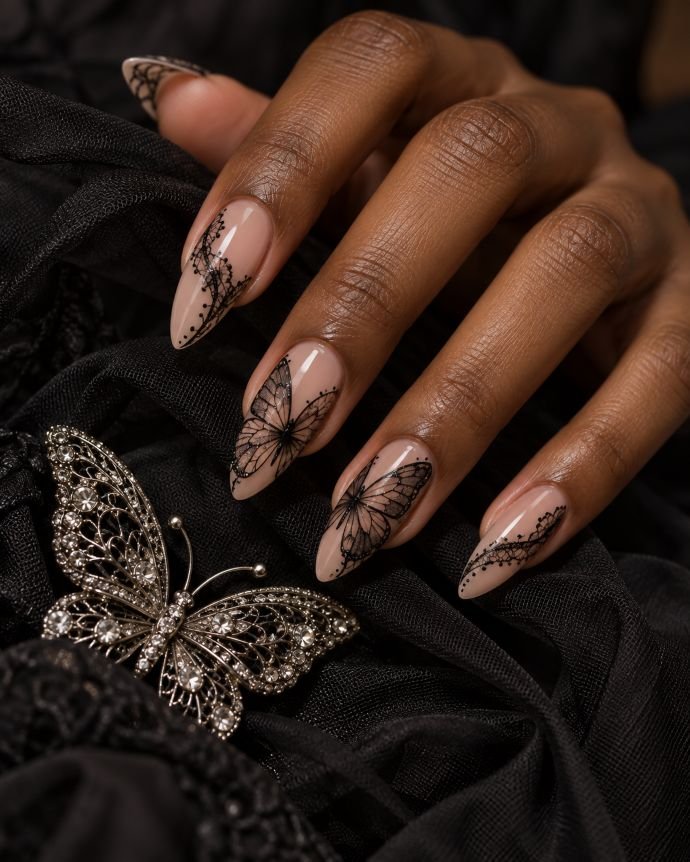
How to Apply
- Nail the medium stiletto shape and cover it with a sheer nude base that you should dry till it becomes perfectly even.
- Paint black lace butterflies’ wings on your two accent nails while making sure the central parts and antenna stay very thin.
- Put one curvy lace border on each of your other nails towards the tips of your nails.
- Finish the design by applying a shiny top coat and keeping wing borders straight and tips pointed.
19. Single-Line Lace Minimalist
Lace nails remain thin due to the square shape of the nails and consist only of a sheer clear pink background, a line close to the tip which is white and curved, and three dots or half-circles attached to this line. The position of these elements varies slightly depending on the finger but there is always one line on the side wall and one on the free edge. The finish should be glossy while leaving as much free nail as possible.
This is the best option for people who want to get lace nails but in a subtle way. This square shape makes the line look tidy while at the same time allowing for very little artwork making it easy to type, work and wash hands. This is an easy design for beginners, it can be done with the help of lace striping brush, lace decal piece, or dotting tool and easily replicated on press-ons.
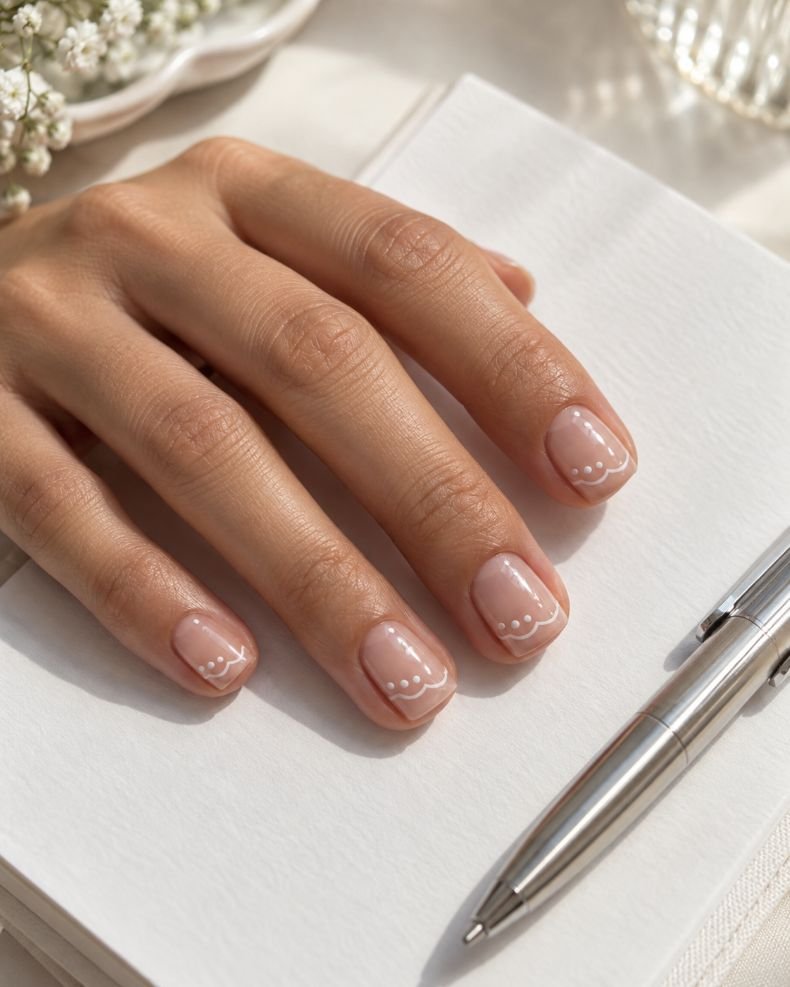
How to Apply
- File short nails into a perfect square shape and put one thin layer of clear pink or nude base color.
- Paint a thin curved line with a white brush for each nail close to its tip or sidewall.
- Put tiny three dots or half circles in selected lines in different positions but not all over the nail.
- Cover with one layer of gloss top coat and let the design dry.
20. Lace Veil Tips
Short ovals have a milky, translucent base with white lace applied to soften them from the tips towards the center. Add scalloping, floral mesh and some transparency in order to make the manicure look like a veil and not French tip. Glossy and satin finish will help to keep the color light and hazy.
Veil look suits very well to the civil weddings, bridal showers or those people who would like to have white lace nails, but without too much contrast. Short oval nails will keep the look soft and allow the fading edge to elongate the look visually. Stamping and transfer foil would provide you with a more even transition of color than painting each motif manually. You may wear pearl earrings, soft gray or ivory dresses; avoid glittering nail polish.
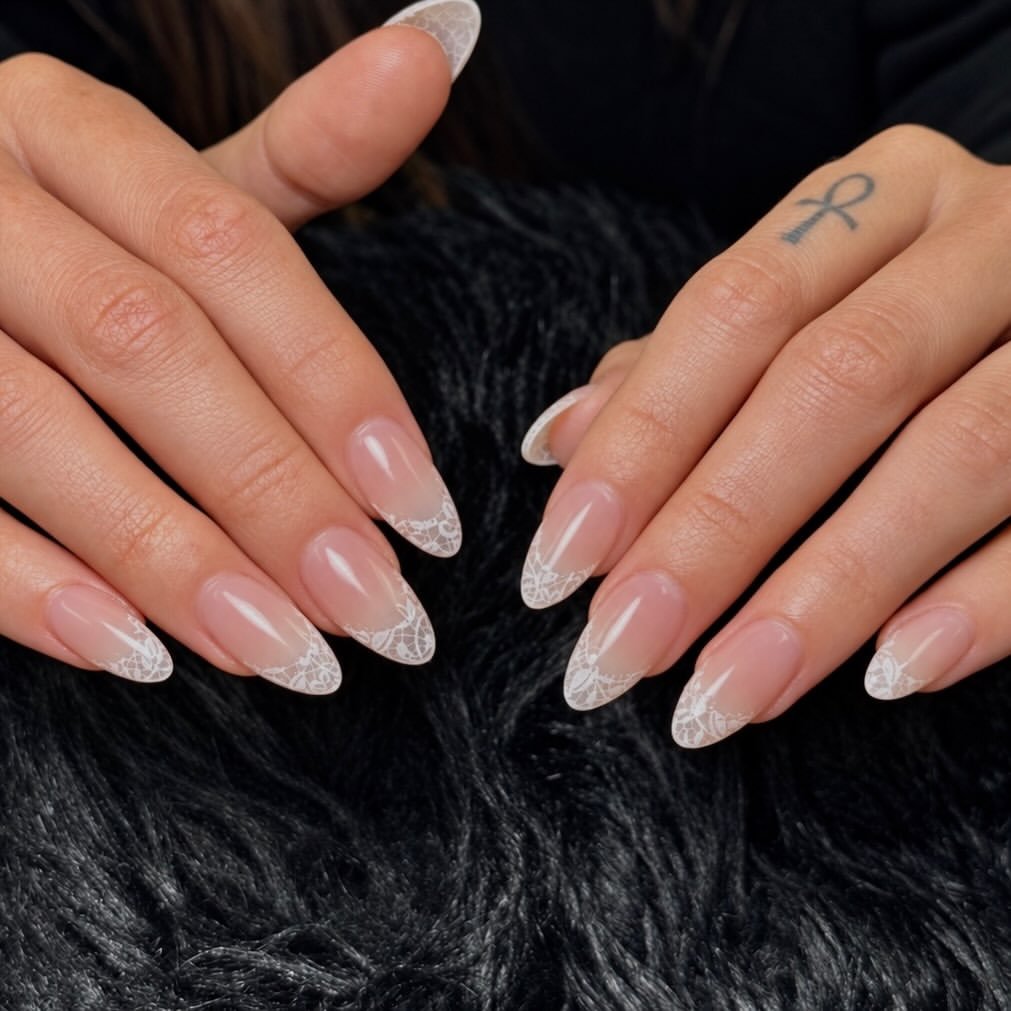
How to Apply
- Apply your nails with an oval shape and paint them with one or two coats of translucent polish.
- Stick white lace decals on the nail or stamp light lace pattern on them. Ensure that the lace pattern is more dense at the tip.
- Fuzz out the top line of the nails by applying milky translucent layer. This will create a soft fade-out effect.
- Finish off by applying satin gloss topcoat.
21. Champagne Lace Glitter
Nails that feature medium oval shape are done using warm beige color with a layer of fine champagne glitter underneath followed by white lace tips alternating on your fingers. Glitter should be minuscule and transparent, whereas lace will be the element of sharpness with scallops, small flowers, and loops positioned at the top third part of nails. Finish must be shiny and smooth rather than coarse with visible chunks.
This look will bring the elements of evening without transforming into a sparkly manicure. This look fits perfectly for anniversary dinner or holiday party or for a champagne colored dress, and the oval nails allow keeping the look gentle. Create a glow using sponge and stamping a lace pattern when the color base has already dried. It is essential to use a very fine top coat as glitter may get stuck into the knit of your clothes.
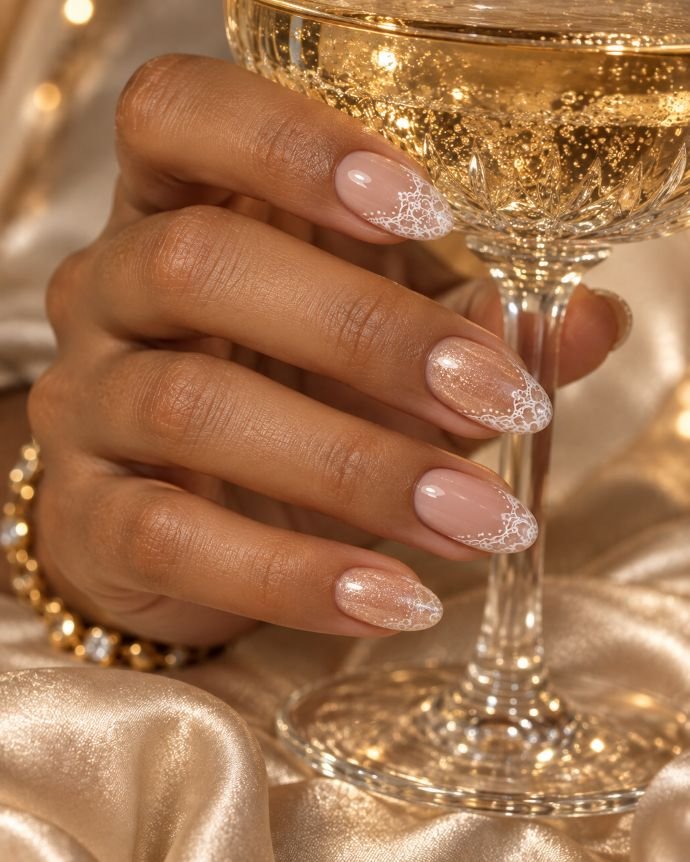
How to Apply
- File and shape your medium oval nails. Start with a warm beige base nail polish with only one thin layer of champagne shimmer.
- Make sure that the shimmer is slightly concentrated on the top third, and then cure the layer.
- Decorate the nail tips alternately with white lace scallops, flowers, and loops.
- The other nails should be left with a soft shimmer finish.
22. Monochrome Lace Panels
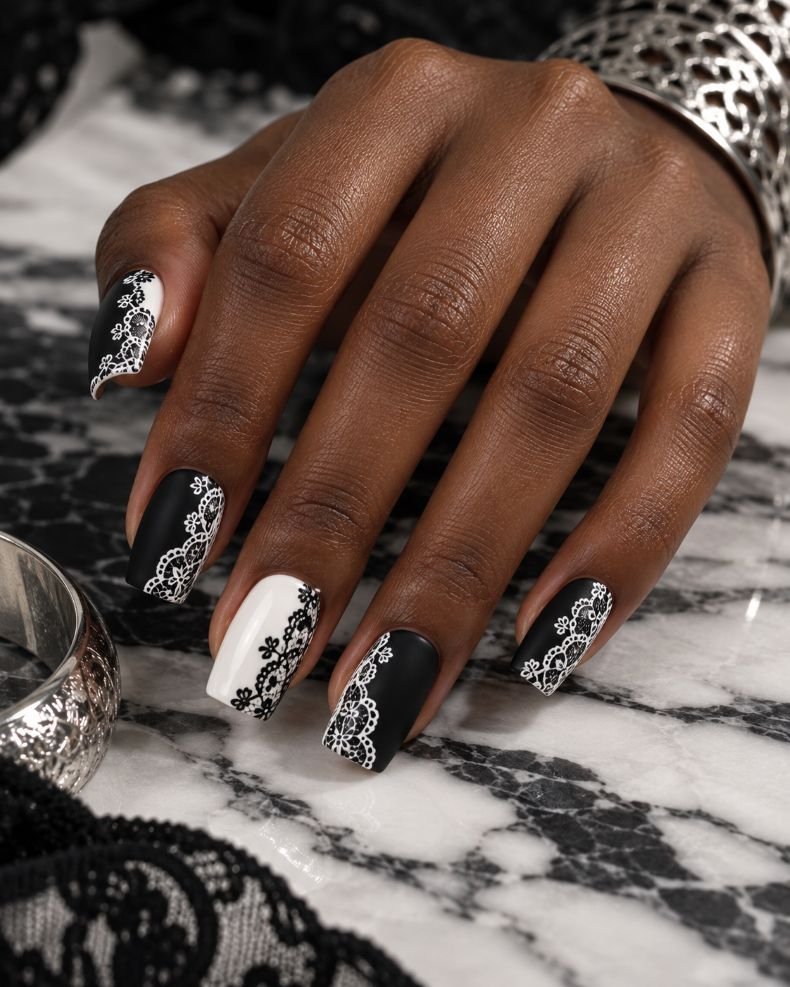
Nails medium square feature matte black and glossy white panels alternated by lace of the opposite color applied to each panel. For black nails apply fine white lace featuring mesh and scallops, for white nails – black lace left open and airy. Panel borders should be clean and even, with an equal number of lace elements, creating a graphically appealing look.
Such design with its black and white color scheme will suit a modern black and white outfit or gallery party. This monochromatic look adds to the overall elegance of your outfit. Medium square nail form provides a perfect frame for the alternating blocks. Glossy finish of one part makes it more visible in photos. Decals and stamping are good ways to repeat lace in this manicure, but the exact duplication may require a professional. Keep your accessories simple.
How to Apply
- Make your square nails medium-sized and section off the hand into areas where you have black and white bases which cure.
- Put a matte top coat to your black areas and keep your white sections glossy before applying any design.
- Stamp lace design in white on your matte black nails and stamp lace design in black on your white nails, making sure that the lace pattern fits within the area.
- Use a compatible top coat to seal your nail art.
23. Burgundy Jelly Gothic Lace
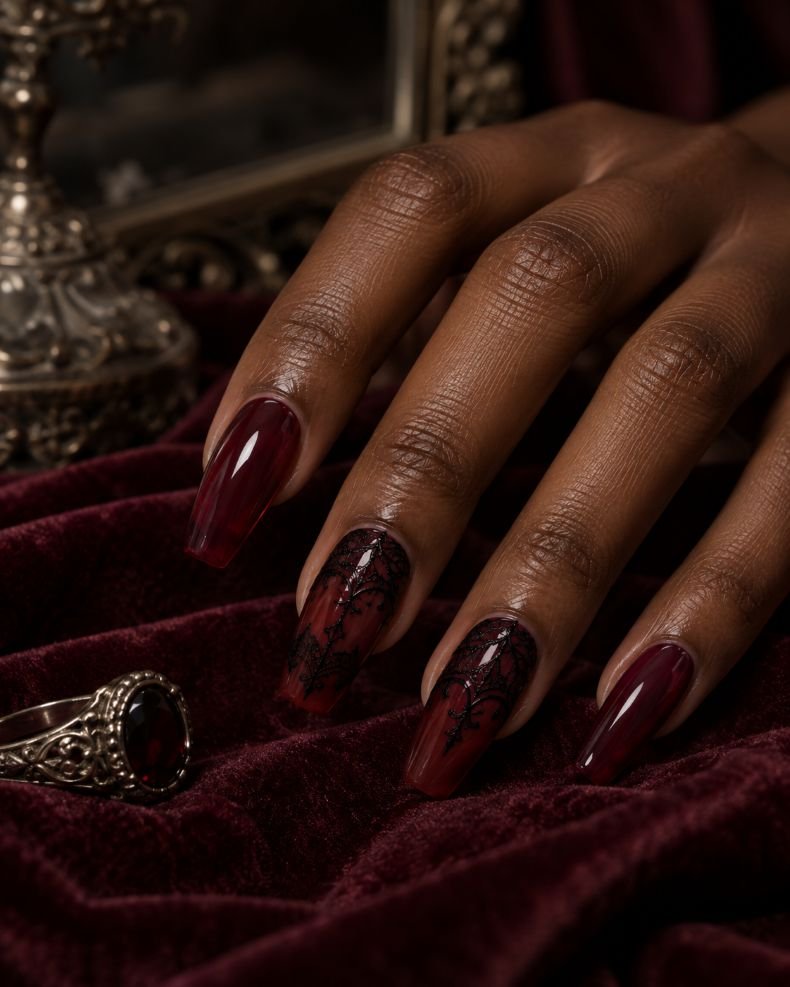
The medium coffin nails involve applying a translucent burgundy jelly base coat with black lace on top of the color on two accent nails. The lace should look as if it was a veil in the red-brown glass, with open arches and pointed flowers instead of a black print design. Make all the other nails remain shiny burgundy to achieve a balance of moody accents.
It is a rich and dark version of black lace on a nude background. This manicure looks good at evening events, concerts and gothic nail ideas styling, in particular when combined with oxblood clothes, silver rings or even velvet. The translucent jelly makes a difference while keeping the nail visible and the coffin nails give the pointed lace motifs form. Use the black stamping polish or transfer foil to make the design neat, the technician will add the black design on top of the translucent burgundy.
How to Apply
- Make sure to shape medium coffin nails and then give them two thin layers of translucent burgundy jelly nails.
- Then leave two accent nails glossy and put black lace design on them after the base has dried.
- The design should be open; the black design should have pointed arches and flowers that will let you see the burgundy color through the holes.
- After that, seal both accent nails and regular nails with a glossy top coat, making sure that the base is still clear around the edge.
24. Lilac Lace With Tiny Bows
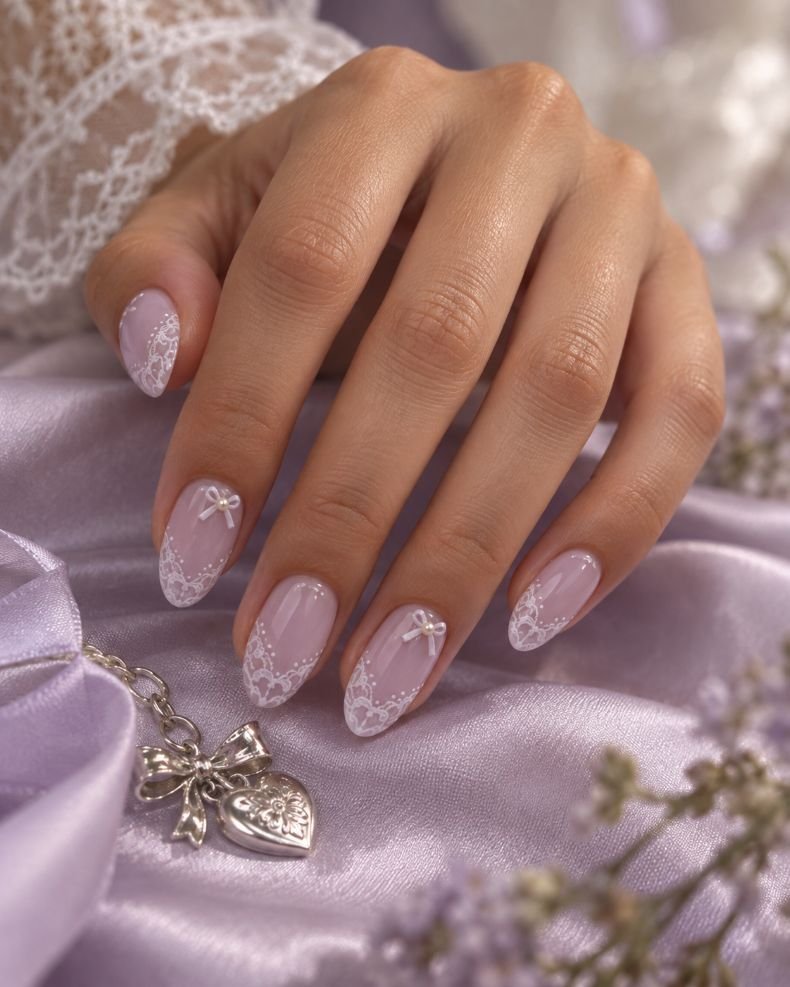
The medium almond nail design combines the sheer base of lavender with lace borders and one satin bow on each accent nail. The lace will be applied along the tips or sidewalls of the nails, and the satin bows will be small and centered closer to the cuticles. Use a pale and translucent color of the base, giving the nails a shiny surface to make the lace look like a decorative ribbon trim.
This design is feminine and subtle enough to use for a bride maid’s manicure or spring party manicure, without applying hearts or other elements. The almond nails will match the curved lace and the bow designs perfectly, while the simplicity of the decorations will add elegance to the design. You may try to sculpt the bows with gel in the salon, but flat bow decals or stickers will be easier to apply at home.
How to Apply
- Shape medium almond nails and apply two thin coats of sheer lavender polish, curing or drying each layer.
- Add fine white lace borders at selected tips and sidewalls using stamping, decals, or a detail brush.
- Place two low-profile white or lavender bows near the accent cuticles with compatible nail adhesive.
- Finish with glossy top coat around the bows and cure or dry the set without covering their center detail.
Can You Do Lace Nail Art on Short Natural Nails?
Yes, lace is one of the easiest intricate nail art designs to miniaturize since it can be done only on the tip of the nail, as well as its side and cuticle edges. Oval-shaped nails with short or squoval tips, as well as soft almonds, help create a neat pattern line, while a sheer nude, blush or creamy nail color allows for avoiding overcrowding the design. A mini-lace French design, a single-line lace, a negative space panel or an accent nail is most likely going to be visible compared to the full coverage version.
In order to create a neat pattern, it is necessary to adapt the size of the detail to the nail bed: smaller scallops, loops and thin lines, instead of imitating a large lace pattern. Stickers and stamps are quite helpful here, since they can be cut accordingly to natural nails. For the sake of creating the illusion of longer fingers, it is possible to make the lace vertical or to confine it to the tip area.
Which Nail Shape and Length Show Lace Details Best?
Ovals and almond shapes are the softest option for lace designs as they mimic the soft curves of scallops, vines, and floral loops. Short ovals will make your cuffs and micro tips neat, whereas medium almond nails will provide sufficient space for a full overlay or botanical panel to look beautiful on them. Squoval nails are perfect for modern geometric lace, negative space stripes, and straight French edges. Look at these ideas for oval nail ideas for shape inspiration. Medium square and coffin shapes work well with monochrome and structured panels as the sidewalls keep the design symmetrical.
Length must be in accordance with the pattern rather than vice versa. Short nails are ideal for crop motifs, one or two accent nails, and lace with a lot of negative spaces in it. Medium length is the most universal option when it comes to French edges, flowers, pearls, and stamping. Almond, coffin, or stiletto nails that are long can support complex lace designs, ombré effects, and big butterflies, but they need more maintenance. In case of doubt, show your nail tech a reference where both design and length are illustrated.
What Is the Easiest Lace Nail Technique for Beginners: Stickers, Stamping, or Hand-Painting?
You should start with decals or stickers to get a flawless outcome with minimal experience. Cut the sticker so that it is a little bit smaller than your nail and attach it from the center to the sides and then apply top coat over the edges. The next method is stamping – it allows you to make repeated patterns very quickly, but requires opaque stamping polish, a clean stamp and a quick transfer time. Unlike the hand-painting technique, all of these ways allow you to use a pattern that is already done in advance; besides, professionals will never confuse press-on and transfer techniques, stamping and hand painting.
Hand painting allows you to create the most personalized outcome but takes much more time, especially if every loop needs to be perfect. First try it on just one or two accent nails instead of creating the entire manicure. You may also use the actual lace fabric and transfer foil for your nails but they require special trimming and sealing. To begin with lace manicure, start with a sheer base, a single lace shade and a narrow placing area.
Which Lace Nail Colors and Finishes Suit Bridal, Everyday, and Gothic Looks?
With bridal lace nails, go for ivory, white, blush, or nude. These color combinations will help you maintain the lace nails’ lightness together with your lace dress, pearls, satin, and soft metallic jewelry. Either a glossy or a satin finish will preserve the delicate design, while small pearls or a crystal will provide some depth without making the nail look too heavy. For daily wear, you can try a cream-on-nude, a soft brown-on-beige, or just a white lace accent.
In order to create the Gothic look, you will need to have a contrasting color base: black over nude, espresso over taupe, or black over burgundy jelly will give you an illusion of veiling. The matte top coat will give your nails a look of real fabric, whereas the gloss finish will be more suitable for the evening nail design. With champagne foil, silver chrome, and wine bases, you will get an option somewhere in between dramatic and black nails.
Final Thoughts
When it comes to lace nail design ideas, those that maintain a good balance between the design and the space around it often look the most elegant. Short nails don’t necessarily require an extensive overlay – often a narrow lace tip, cuticle cuff, or even just an accent nail can be much more elegant than ten dense patterns. Almond-shaped, coffin and stiletto nails allow you to incorporate botanical lace, gradient fades, butterflies, and other overlays while requiring more effort at maintenance.
Firstly, consider what kind of lace nail art style you want to achieve – soft bridal lace, toned everyday design, modern monochrome, or gothic dark design. Then, explain in detail what nail shape, length, lace color, finish, and technique – stamping, transfers, decals, or hand painting – you like to your manicurist. In case of DIY attempts, start with a single accent nail or a lace sticker first, instead of going full hand painted from the very beginning.
Found a lace detail you love? Upload a photo of your hand and a clear lace manicure reference to see how the pattern could look with your preferred shape and length.
Try It On Virtually